Discokids
Well-Known Member
- Posts
- 3,160
- Location
- Derbyshire
Well, after much mental debating I decided against the galv door idea and started painting it. I reckon having them blasted would have cost £120+ and they're still full of ziebart so would have made a right mess when dipped, plus there's loads of weld which the galv sits on, the warping, cost of it etc.
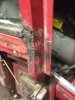
Here's the n/s frame in zinc rich primer, ill chassis black the face before I stick the skin back on.

Here's the n/s frame in zinc rich primer, ill chassis black the face before I stick the skin back on.
")