lighting laws

This site contains affiliate links for which LandyZone may be compensated if you make a purchase.
Front fog lights and driving lights are not part of the mot.

I thought they were, if they are working.
As they were going to be tied into the main headlights, you may get the testers unwanted attention.
Solution - put them on a seperate fuse and remove the fuse for MOT time. ;)
If they don't work, they can't be tested :D

I doubt that plod would even know about the measurements for front lights - as long as they are not blinding others / blue / obviously wrong, I doubt they would even give you a second glance.

Personally, I thought they looked better when all 4 were on the same level.

Are they the brackets from Powerful UK?
If so, just be careful when fitting them that the frontmost edge isn't too far forward.
I followed the instructions and found the front edge fouled the bumper slightly, but nothing a sharp knife couldn't fix :rolleyes:

hiya

many thks for the reply, as i would indeed like to get it right before hand , lol

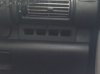
ive got a land rover full wiring loom which i got off ebay which comes with a 4 switch panel, that sits in the right hand side small cubby hold, the spots can go on and off with the main beam or i can turn them completely off.

only the spots would go on and off with the main beam

the fogs i was going to wire on its own switch and not wire it into the rear fog light switch so it wilk be completely independent

we did get the clamps from powerful and taped them onto the bumper first just to make sure

i agree they do look nice all in a row but then saying that wouldnit be better to fix the fogs below the bumper etc

another thought i had was if i fitted the outer brackets only, then put a roof rack cross bar across , could then mount the light onto that and if th bar was longer than the existing bracket could get the fogs closer to the edge ,

going to have another go at it today later and maybe if i put the bar on there to see what u guys think

as i thought i could also put my pmr radio aerial on there

nothing is fixed yet so thought if i messed around with it and asked u guys what u thought so it looks half decent etc

fed up with trying to see when i go down country lanes etc and cant see jack, lolol

another thought was putting the spots up on the roof rack when i fit it but then concerned about glare threw the sunroof etc

so only the main spots would be tied into the main beam and would dip on and off etc

the fogs would be completely on there own switch and not tied into anything else


personally I would like to put the fogs into the lower middle grill but it looks as though its moulded on and cant get it off,

maybe if i put the bar on and then post a pic on then see what u think as i would prefer to mess around before i fit them

any ideas suggestions am happy to listen to, yeh i know dont bother and buy a defender, lololol

just trying to make them look half decent

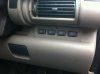
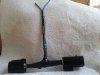
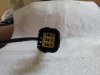
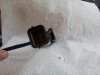
enclosed a pic of the switch panel that im going to install

thks again for all the help and imput

gary
 

Attachments

  • image.jpg
    image.jpg
    203.4 KB · Views: 213
I likes that I does!

Where did you get the faceplate to cover up the cubby hole? Or did you make it yourself?

Ive always wondered what that cubby hole was for, its too small for anything useful! And I was looking for somewhere to put a switchboard when I get some more lights for mine! So Ill be keeping an eye on this thread :) Im planning on fitting front fogs and some big ol' portable suns to the front because Ive found the standard headlights to be a bit crap on mine. Might do a work light on the back too and thinking about getting orange LED strobe lights because they make you look well official when stopping in the middle of the road :D
 
Last edited:
here u go

STC7944 | SWITCH INSERT PANEL F/L | Land Rover | Freelander - 1996 to 2006 | Britcar (UK) Ltd

main panel is stc7944

switches for them are vvn100000

and the electrical connector that goes into the back of the switches are

zzplug02, that a dingocroft part number

hope that helps, but i bought a complete spot and fog light wiring loom of ebay for around 30 quid as it was a lhd model, just got to extend 4 wires to take me from left hand drive to rhd

it didnt come with the lights but came with everything else , ie switch panel relays etc

the one i got was stc53049 excluding the lights and was lhd

the other lhd drive ine was stc53079

the right hand drive one was stc 53068

these are the ones i searched for on ebay and found them without the lights and pods so they may have some on there

is that any good to you

gary
 

Attachments

  • image.jpg
    image.jpg
    46.7 KB · Views: 251
Last edited:
Cheers mate! They look really good but phwoar a bit on the pricey side!

Im not really sure how to go about wiring up extra lamps, people seem to say it varies from "cheers easy" to "if you do it wrong itll catch fire!"

Would it be significantly easier if I put them on their own circuit operated independantly rather than try and get them working off the high beams like youre planning?
 
Does the kit have the fog light switch with it?

yes the kit came with 2 x switches one for the spots and one for the fogs, the spots u can have them coming on and off the high beam or turn them off completely

ref the loom it comes with everything and is all plug in , also has plugs to just gies into the fuse bix etc and is very easy to fit,

i looked on ebay they have them on there excluding the lights and comes with a full install instructions,

they just have the lights missing so they sell them really cheap as i only paid around 30 quid for the hole loom and kt came with the switch panel etc

the switches can be bought at the breakers etc for around a fiver

this is what the panel will look like but mine will be in black

gary
 

Attachments

  • image.jpg
    image.jpg
    53.9 KB · Views: 296
Last edited:
The geuine LR wiring loom simply plugs into the back of the fuse box, switched driving lights come on with main beam, switched front fog lights with side lights.
 
The geuine LR wiring loom simply plugs into the back of the fuse box, switched driving lights come on with main beam, switched front fog lights with side lights.

yep thats it, it all just plugs in and the only thing i have to do it extend 4 x wires as its a lhd

and is a genuine land rover wiring loom

will see if i can find any on ebay but comes with everything u need

plus ive bought an aux fuse box so can run all my extras into it, ie amber beacon etc

this is the fuse box, so I'm going to run a live and neutral wire to it from the battery then connect all mynaux to the fuse box

as i will have 2 spare switches in the panel, will hae one to turn my roof amber beacon on , and maybe the other one for a rear work light

gary
 

Attachments

  • image.jpg
    image.jpg
    28.6 KB · Views: 162
Last edited:
My fogs and driving lights are genuine LR and came with the looms.
I found it easier to run the wiring through a grommet in the bulkhead on the drivers side just above the pedals, rather than through the passenger side.
 
Have this kicking round my shed, can't remember where I got it from.
You just unplug the connector at the back of the headlight unit, and fit this between them to get a feed from the main beam.
 

Attachments

  • bits and bobs 005.jpg
    bits and bobs 005.jpg
    320 KB · Views: 150
  • bits and bobs 006.jpg
    bits and bobs 006.jpg
    225.5 KB · Views: 200
  • bits and bobs 007.jpg
    bits and bobs 007.jpg
    335 KB · Views: 168
Have this kicking round my shed, can't remember where I got it from.
You just unplug the connector at the back of the headlight unit, and fit this between them to get a feed from the main beam.

hiya

not sure if ive got that bit will have to look on the loom

plus may i ask how do u post multiple images please as when i upload them say 3 x of them then press up,oad only one will appair, this is on an ioad so dont know if there is a problem with posting images on an ipad

have never done the rivnuts before, bought the tool so this should be fun lolol

going to mount the two outer brackets first will then see if by fixing a roof rack cross rail will look any good

plus have been looking for roof rack cross rails , looked in halfords and blimey arnt they expensive

may have to try and look onto ebay but there are so many on there dont know what will fit my 3 door roof rack

the pic is the one my son kindly bought for me, just need to but another 2 lockable roof cross rails,

thks again

gary
 

Attachments

  • image.jpg
    image.jpg
    395.3 KB · Views: 244
My fogs and driving lights are genuine LR and came with the looms.
I found it easier to run the wiring through a grommet in the bulkhead on the drivers side just above the pedals, rather than through the passenger side.

hiya, that sounds a good idea, but you know the four way white plug that will be on the passenger side, and it then plugs into another loom that goes ontonthe switches on the drivers side, as ive got to extend mine from the passenger side was going to do it inside so its out of the damo etc, managed to get the the same white connectors and going to use 1 mm 17 amp cable to extend it from that white plug to the switches

thks again

gary
 
i agree they do look nice all in a row but then saying that wouldnit be better to fix the fogs below the bumper etc

another thought i had was if i fitted the outer brackets only, then put a roof rack cross bar across , could then mount the light onto that and if th bar was longer than the existing bracket could get the fogs closer to the edge ,


you could always replace the front number plate with a square one like the back to give you more room at the front :cool:
 
My fogs and driving lights are genuine LR and came with the looms.
I found it easier to run the wiring through a grommet in the bulkhead on the drivers side just above the pedals, rather than through the passenger side.


hiya

may i pick ur brains please, as mine is left hand drive, the only connections ive got to make under the bonnet its the live and neutral to the battery and also the connection to the back of the head light for the main beam section

ive got some soare baterry cabke and a bus bar, if i simply turned the loom the other way round and extended the the battery leads via a bus bar does it matter which headlight ive got to connect the section into please, does it matter if i connect it into the right or left headlight please

as i could then just extend the baterry leads via the bus bar and then run the lead through the drivers side and not have to mess around,

does that make sense please, just trying to think of an easy way to do it , in converting it from a left hand to right hand drive in by simply turning the loom the other way round and extending the leads via a bus bar

thks again so much for the help

plus got all the brackets on today, blimey arnt thkse rivnuts fun to do, had to go and get a 10.5mm drill bit then realised had to leave the bolt in before i hammered them into the bumper, as if i left the bolt out and hammered them in it would make the rivnut loose

got there in the end , but now got to find all the part numbers fornthe front grill and arches as all the screws were knackered

thks

gary
 
Last edited:
hiyab

sorry to be a pain again, ive got a fuse box, where i can run a live and neutral from the battery to then a fuse box , but there is knowhere to put it under neath the bonnet

was thinking what about behind the passenger side dashboard, where u can take out the cubby hole box and also in the glove box u can remove that panel with just four screws and can mount it out of the way of everything onto the bulkhead

was thinking of running two 170 amp cable ive got from the battery to the fuse box can then run all my aux supplies off the fuse box, saving me trying to bunch a load or wires

but thought i wouldnt really need a 170 amp cable, as i would wire into the fuse box

my cb, amber beacon, could run the spots directly off the battery so would have thought the cable size from the battery to the fuse box would only need to be about 50 amp , or do u think that would be too big

thks again guys and really appreciate all the help with this

gary
 
Last edited:
Back
Top