LaSalle head lining series 2a 109 install

This site contains affiliate links for which LandyZone may be compensated if you make a purchase.

PAH

Member
Posts
46
Location
Bognor Regis
Just a thread to give my tips and experiences from my most recent install of a new headlining in my series 2a lwb utility.
There are a few pictures of the finished result but i'm afraid, i was so involved i did not take any photos during.
In all it took about 2 days including the insulation install.
 
Last edited:
First a few pictures before i started.
First tip, install your electrics for lighting first as you will not have access after.
Secondly, ensure your roof is not leaking. I spent a while fixing a creeping leak along my gutter rails which i resolved by using silicone on the outside and captain tolleys creeping crack cure along the seem of the roof and gutter from the inside.
 

Attachments

  • IMG_20160222_101754.jpg
    IMG_20160222_101754.jpg
    237.9 KB · Views: 210
  • IMG_20160222_101839.jpg
    IMG_20160222_101839.jpg
    222.7 KB · Views: 256
The next stage is insulation, LaSalle trim supply foil backed 12mm open cell foam that is very bendy and is self adhesive.
It cost me £120 for enough for my 109 roof, after i called tyem to ask how much i needed and i ended up with about a 1ft square piece left over so very little to spare.
The insulation sticks well and each piece is about the right width to slot between the rails but you will need more than one piece per section to cover the panel down to the gutter.
Another tip is cut the insulation with the backing on, test fit then remove the backing paper at one end as you stick it to the roof starting at one gutter and working across the roof, peeling ofc the backing paper az you go, that way you don't stick it where it should not be as it will not come off in one piece.
The hardest part is over the front as the compound curve over the windscreen means that you will need to cut a tapering section on each side.
Tip: fit a centre piece over the front then line up a piece for each side, cutting the taper using the line of the centre inzulation as a guide with the edge of the insulation pushed in place.
Sorry, i forgot to photograph this.
When installed, i used aluminium tape over all the seems, including the roof cross rails and wiring.
 

Attachments

  • IMG_20160222_101754.jpg
    IMG_20160222_101754.jpg
    237.9 KB · Views: 199
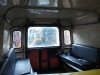
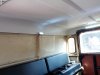
The last stage is installing the head lining itself, which for a 109 came in 3 approximately square parts; front, middle and back.
It also came with plastic rivets but i used self tapping pan head srews in case i needed to remove at a later date as the rivets are a one time only deal.
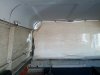
The instructions say install back section first then front and finally middle. (i installed from back to front sequentially and one of the photos shows how i could not get the drivers side of the front section quite in the right position as the middle panel prevented the curve of the corner being pushed into place)

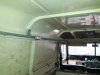
The linings screw into the face of the gutter rail with pre drilled holes in the lining edges that follow the line of the gutter right over the rear door, but you will need to mark through these holes positions on the gutter and drill holes of a suitable diameter for your self tapping screws (4mm in my case but depends on the screws you use)
make sure your screws will not go to far through so they do not put a hole in your roof and that the screw head is wide enough not to pull through the pre drilled hole in the lining which are about 4.5mm dia.
Tip: if you can, get someone to help as holding the lining in place while marking drill holes is a 3 handed job.
The sequence is;
1. lift rear lining into place, mark holes around gutter edge (don't bother with the ones on the cross rail until after fitting middle section)
2. Drop lining and drill holes,
3. Reposition lining and screw in self tapping screws enough to prevent lining falling on head
4. Lift front lining into place and mark holes (felt pen does the trick but punch holes before drilling, gutter steel is not that easy to drill and the bit will slip if you dont)
5. Drop and drill holes around gutter line
6. Lift and screw in self tapping holes, ( loose so when you do the screws over the windscreen it pulls the linibg into place.
7. Position centre lining and mark holes
8. Drop lining and drill gutter holes
9. Reposition lining and srew into place with self tapping screws
10. Locate and drill holes into cross rails through middle and adjacent lining panels, ensuring you are drilling into the cross rail sections and not the insulation or roof skin (ensure screws are not too long to go through rail section into roof skin)
11. Tighten all screws and admire your work.
As i said, i did rear, middle then front panel which is wrong as the front panel needs to go in before the middle to allow the rear edge of the front panel to sit right. The middle panel is also a little oversize and will over lap the front and rear sections a little more that the edge so don't expect the holes of each of the panels to line up so it is crucial you know where the cross rails are before you drill.
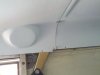
I then installed the light fittings i had wired before installing the lining, srewing into the same gutter rails i fixed the lining to.
I also used the screw points to fix a cotton twill screen over the seat bulkhead to seperate the load space from cab.
 

Attachments

  • IMG_20160325_125614.jpg
    IMG_20160325_125614.jpg
    266.5 KB · Views: 256
  • IMG_20160325_125754.jpg
    IMG_20160325_125754.jpg
    157.8 KB · Views: 264
  • IMG_20160325_125850.jpg
    IMG_20160325_125850.jpg
    105.8 KB · Views: 254
  • IMG_20160325_130541.jpg
    IMG_20160325_130541.jpg
    209.1 KB · Views: 227
This sounds horribly complicated.
Not really, just akward as the hardest part was positioning the lining pannels which while flexible are large and need to be positioned at an angle to get them in the back door then lifted into place.
If you are methodical and take your time, the finished product is well worth the effort.
The three panels need to go in the right way round but it is easy to tell what way round that is as the shapes are obvious and the middle panel can go either way round.
 
Looks good but not a cheap those head linings as I recall. A nice piece of Perspex or similar would look good in place of your large handkerchief! :)
 
Yes, not cheap, around £450 but they are made of a semi-rigid plaster resin compound that is both rot proof and sound adsorbent and should last longer and be more moisture resistant than fabric liners.
I have also noticed the sound reduction and heat retention as well which is surprising as i have not installed any insulation on the side panels yet.
 
It looks good. Are you going to do the side panels? I have a station wagon hard top with original side windows. They are original but are leaky and draughty. Even if I had that lining I'd still have the roof condensation and drips. Good job though.
 
It looks good. Are you going to do the side panels? I have a station wagon hard top with original side windows. They are original but are leaky and draughty. Even if I had that lining I'd still have the roof condensation and drips. Good job though.
Yes in short but LaSalle Trim don't make side panels for my LWB series.
I have been considering what to use instead, both with the insulation (Lasalle trim's insulation is quite expensive for what you get) and finish.
My current thoughts are;
15mm neoprene closed cell foam with foil backing (I have loads of spare aluminium tape and from my construction experience, foil faced insulation performs so much better with condensation)
9mm marine ply, painted white and fixed through the same holes as the head lining (6mm is just too flexible and the ability to screw things to it sounds like a nice idea)
I thought about a coloured PVC or polyeurathane sheet (to be rot proof) but it is significantly more expensive and if I don't like the colour, not as easy to paint as ply.
I even thought about windows as it was quite dark inside before I put the head lining in but concluded that the benefits did not outweigh the costs and the privacy offered by the panel sides is quite useful (I sleep in the back when at events).
 
Last edited:
If your lining with ply 10mm foam would be enough and you can use camping mat. About 4 quid each off eBay.
Mind you I would try and equal the thermo conductivity of the new ceiling what ever you do as the coldest area will be prone to condensation.
 
Good tip about comparative conductivity, as you say, if i want to direct condensation, somewhere low down on the sides give least problems.
I haveseats in the back and only have limited room for insulation behind these, so i was figuring that would be wherecondensation woukd occur but take your point.
 
Back
Top