JC’s Discovery 300TDi Restoration

This site contains affiliate links for which LandyZone may be compensated if you make a purchase.
Difficult one isn't it? Image wheels in Australia do some nice stuff...
Billet Wheels
billet_105.jpg


Billet rostyle with a polished edge.... Trouble is 4 wheels would be somewhere in the region of £1400 plus vat! Ouch.

I wonder if what we've got would look better in a much darker silver grey similar, as you say, to the side decal?

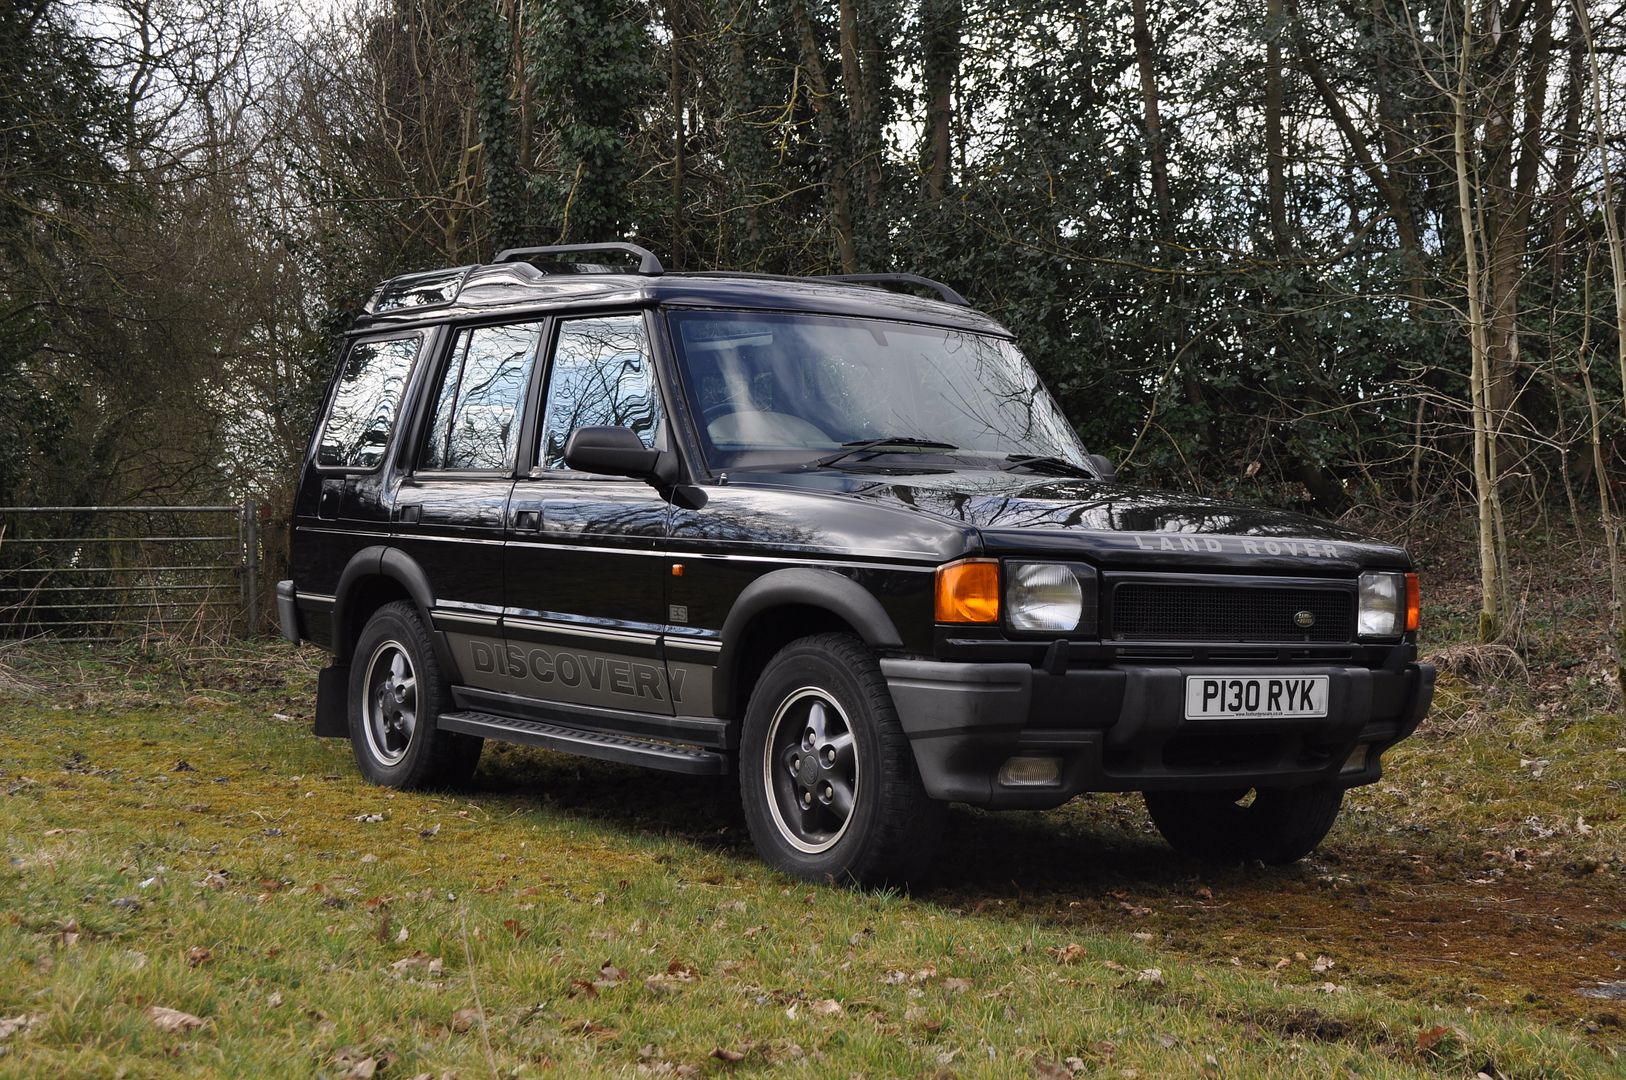
Certainly not interested in going any bigger than 16" as I'm very keen for it to just look like a "nice tidy disco 1" so anything I do has to be subtle. The grille is a prime example of what I'm trying to achieve with the car - you'd have to do a double take and actually know your land rovers to realise it's a none standard feature?
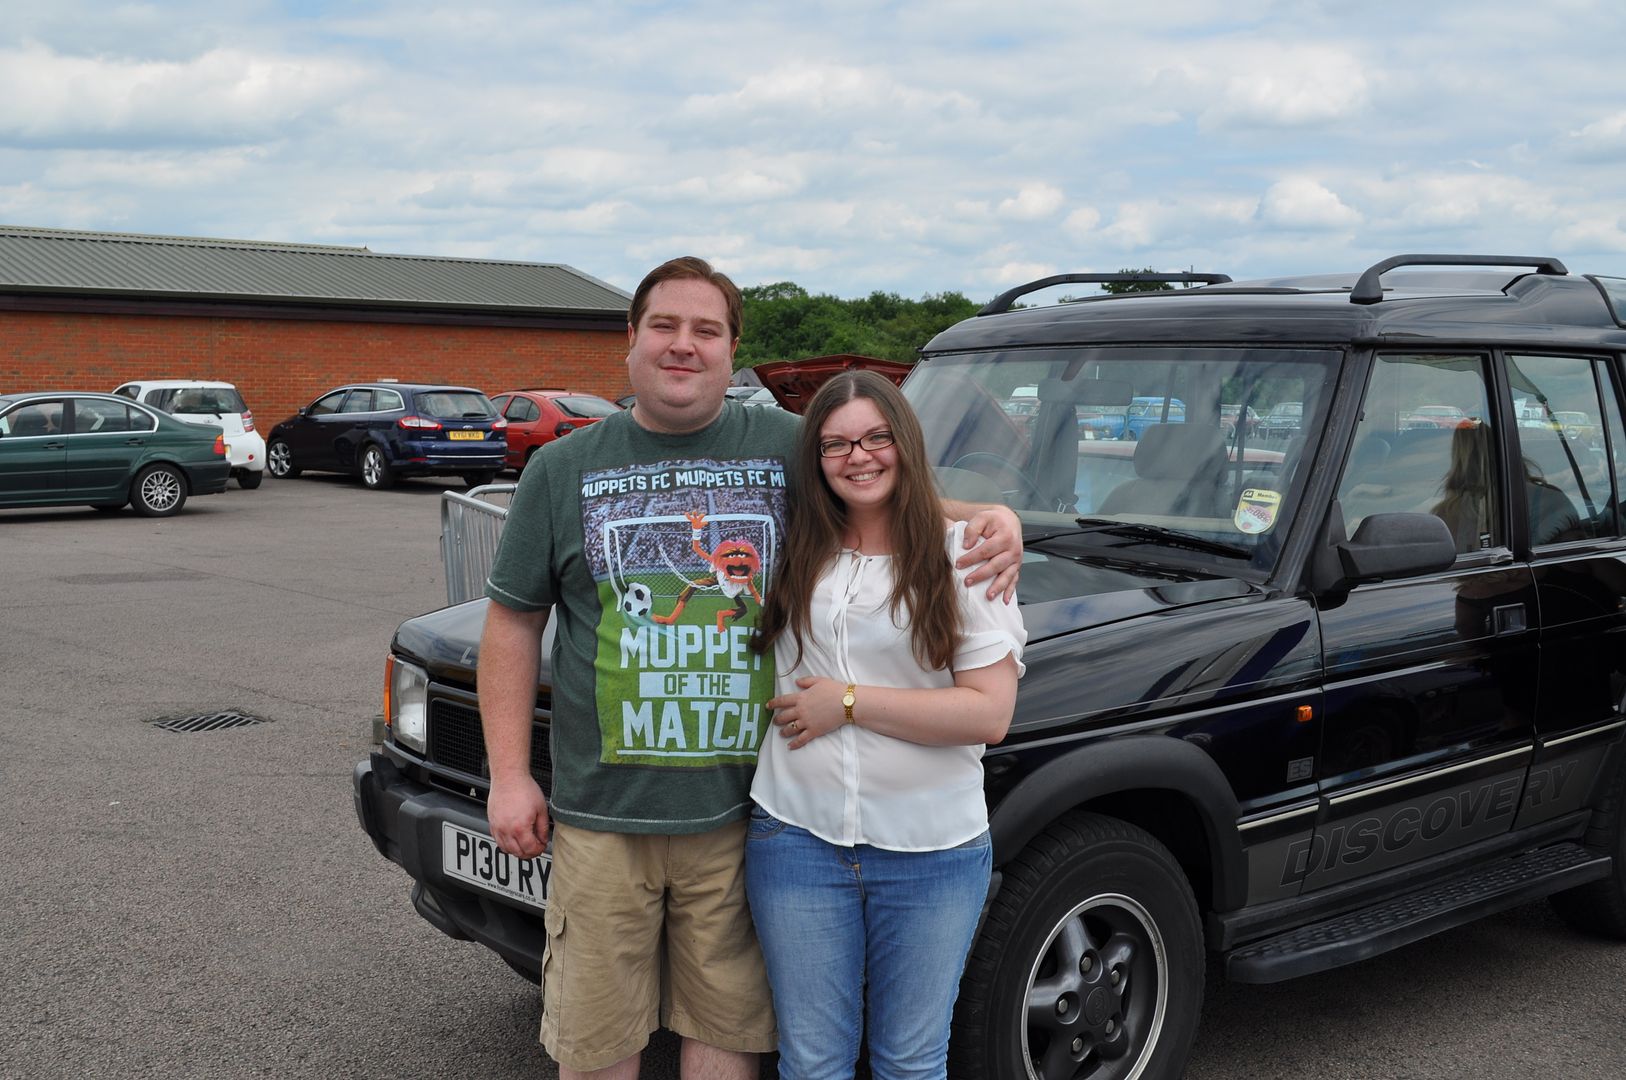
 
Believe it or not, it was pre reg'd by Lancaster Land Rover in London. Date of first registration is 30/08/96 so I guess they were struggling to make targets that month - according to google maps they aren't there any more anyway. Certainly judging by the service record it was a tarmac warrior chugging around London until around 50,000 miles / 2006.

We are the 6th owner including the supplying dealer acquiring it @ 71k miles. Believe it or not, the owner before us was a farmer. I vacuumed no end of sand and straw out of the car when we stripped it down for painting.
When the farmer bought it in 2009 @ 58k, that's unfortunately where the service record stops.
It obviously had a hard life on the welsh farm as it picked up some massive dents - hence the need to replace the back n/s wing. There was also a huge dent in the drivers door and front wing along with the bonnet. It still bears the scar on the slam panel from whatever the farmer did.

The four doors, front wings and bonnet are from M130PAN - the V8 ES model we owned prior to buying this vehicle. There are a few pictures detailing the panel swap in the first couple of pages of the thread.
Unfortunately, the paint on the replacement panels, whilst much straighter are covered in swirl marks and deep scratches which doesn't show up in photo's. That said, it'll get there - a panel at a time if necessary.

It's the interior which has suffered the most at the hands of the farmer. The leather seats were quite dirty, but I've managed to steam clean them up and feed them. Hopefully a tan RRC interior will turn up eventually?

What attracted us to the truck in the first place was the very low mileage and how unmolested it was - the very first thing we did to it, astonishingly, was to have the ORIGINAL cambelt replaced. Only 1000 miles / a decade or so over due! ;) So hopefully we'll own it, restore it and improve it for many years to come. :)

Cheers,

JC.


Thanks for the compliment, Dave!
Unfortunately, I don't think I could part with it. Aside from getting a bit attached to it, it now owes my other half an I quite a lot of cash. In hindsight we could have bought a very tidy, low mileage D2 and had change! ;)

Now I am surprised to hear that, would of put money on it being a import, just wish when I removed my carpet it was as rust free as yours, :mad2: would of saved 7months of work lol.
 
I have seen rostyles painted single colour and look nice, say a gunmetal silver but with a high gloss clear, that could work

Or you simply are going to have to paint the full centres black leaving the rim silver, or perhaps if you could fit a chrome ring.
 
Thanks for your thoughts gents. Nicola seems to like them - she said to me "maybe you're just not used to seeing Disco's with different wheels". Which, in fairness is a valid point. So, for the 30 days it's off the road they'll stay on the car but in truth I'm still a little bit cold on them in all honesty.


discowithrostyles_zpsc457c33a.jpg


Sam! Colour coding the bumpers is already on the to-do list!!! Well... the main steel girder section, certainly. The end caps will be semi gloss. I've got a few tricks up my sleeve from when I used to own rubber bumpered MGB's - getting a good shine from the plastic bits won't be too hard. ;)


Now those wheels look really nice !!!

Dave
 
Had a fairly productive day today.

Got the serp belt and alternator changed. Also fitted an aircon belt - it hadn't got one fitted before.
Started her up and the aircon was ice cold - bonus!
However, it now idles at around 1000rpm instead of the usual 750. Weird.
Perhaps the alternator bearings were keeping the revs artificially low?

Also found the cruise pump wasn't even connected up. Snipped the ends off the tubes and remade the connections so we'll see if we've got cruise next time I take it out!

Oil and filter changed. Someone could have warned me that the oil was going to bounce off something and squirt about a foot further back than I expected!!! ;) Block paved drive looks a bit of a mess now. :(
Bit of a personal milestone for me - never serviced a diesel vehicle before. :)

I then swapped out the fuel filter and filled the filter with that injector cleaner stuff that someone on here recommended. It came free with the oil which was nice.
It's a bit smoky at idle now, but I'm assuming that's the injector cleaner and it'll stop it once it's burned through the fuel that's left in the tank. However, at this point, the idle had dropped back to where it was originally!

Also spent a bit of time farting around inside. Got the arial hooked up and fitted the proper land rover stereo and CD changer from the V8 that we sold last year. Even got the controls around the binnacle working which is nice.

Jobs still left to do:

- Replace head lining.
- Fit new cat and exhaust.
- Underseal whole car and rust treat any surface rust.
- Weld up the holes in the front inner wings left after splash guards removed.
- Fit and wire up Driving lamps.
- Restore rear bumper.
- Restore front bumper.
- Fit rear step.
- Fit windscreen rubber top and side surrounds.
- Investigate why the ABS light never comes on.
- Work out how to adjust the passenger side window frame to sit tighter against rubber seal.
- Source and replace tailgate door card and door pocket.
- Resolve the wheel dilemma.
- Source and fit wind deflectors to door tops.
- Replace rear seat belts.


Not too big a list then - but inevitably it'll grow!
 
Last edited:
Blowtorch or hot air gun.

Melt the surface and it goes back.

Careful, not too much heat, but you need enough for uniform finish, big medium heat flame/heat gun works better than small intense heat.
 
Been a little while since I updated this thread...
In the almost 2 years since we bought the TDi we've clocked up almost 25,000 miles. By and large it has been quite reliable.
The Discovery has become part of the family now. Nicola, my other half and I got engaged last year at santapod dragstrip. Strange place to do that? Maybe, but not for us... it's a special place for us as that is where we met one another 5 years previously and our old friend was there for the occasion!

Retro2014ver2_zps7e013162.jpg


We had a bit of an incident back in April. The old favourite the flex plate finally gave up the ghost. We heard it rattling away when I started the car one Saturday afternoon and came straight home to look up "knocking at idle" and sure enough the forum generated some hits.
I'd not been too well and I wasn't really feeling the energy to pull the engine out so I got in contact with James Martin to see if he would help. He suggested the best way was to remove the centre console and drop the box down to the ground and invited me along to his workshop in Louth.

A look at the map showed that it was going to be an awkward 65 mile cross country journey which wasn't ideal in a sickly Discovery with the imminent risk of the flex plate sheering all together stranding me with no drive.
The rattling was very loud at idle but as soon as a little load was applied the rattle went away. Presumably the pieces of the crumbling flex plate locked together securely under load . I thought I'd be clever and add an extra 25 miles to the journey running the truck along the motorway and major A roads. A longer journey but kinder on the flex plate I thought.
Off we set, AA card on standby... The journey took hours. We got stuck in every roadwork going, behind vehicle fires and smashed caravans. It couldn't have gone worse. We agreed to meet up around 12 noon but it was half 4 by the time we rolled into Louth. Poor James had finished work for the day and gone home for dinner so we ended up dropping the Discovery off outside his house!
We had a couple of other cars at home to use which took the pressure off James a bit so he could attend to the discovery on an "as and when" basis so we arranged to come back 3 weeks later.
Well, goodness knows how we got there. Apparently when James removed the box it turned out that the flex plate had sheared off completely. It was only turning the converter by virtue of the fact that there is a little collar that clamps the flex plate to the back of the crankshaft. The clamping force was just enough to keep the wheels on the wagon turning.
Incredible that it completed the journey at all?
I want to publically say a big big thank you to James Martin - Thank you for all your help and advice mate. You're an absolute star.

This is what was left of the old flex plate:

DSC_0002_zps55ajmiac.jpg


In other news it has become increasingly obvious that this vehicle is starting to feel a little bit tired. The original suspension has completed 95,000 miles and it was starting to feel a bit woolly.
It is my intention over the next few weeks to completely overhaul the suspension and axles.
I ordered a 12 ton workshop press and it has already proved very useful in pressing out the old bushes on the front radius arms. So far all I've managed to do is to is re-bush the front panhard rod and the front radius arms with bearmach polybushes but that was a bit of achievement in itself for me.
The engineering that goes into these old land rovers is incredible. I've never seen fasteners that big before! I need to summon the enthusiasm to do the rear radius arms and overhaul the a frame next before we look at springs and dampers. Nothing particularly special to you experts but we've all got to start somewhere.
DSC_0342_zpssakperxg.jpg


In other news I've finally got around to restoring the rear bumper. I decided to paint it gloss black to match the bodywork in the end. None of the recent pictures I have show the new bumper, but I did manage to take some pictures of the car a few months back when we went to town with the cherry glaze.

DSC_0265_zpsqfd0boae.jpg
 
Finally got around to a job that I've been meaning to do for about a year... Lazy git!
Rear windows haven't worked for ages. The usual suspect is the rear window ECU and this case was no exception. Hardest bit is getting the circuit board out of the case whilst it's still in the vehicle. What the guides don't tell you is that there is no obvious way to get on the rear nut that holds the ECU case to the car. You need to remove the front two bolts, pull the ecu case away from the studs and tilt it upward. With the case in this orientation there is then enough room to draw the board out of the case without dismantling the dashboard further than removing the glove box.
Then you can break out the soldering iron, test and reassemble.

This was the pin circled in red with a dry joint on my ECU board. The only tell was a hairline crack in the solder.

Discovery%20rear%20window%20ECu%20repair._zpsw2mvnmjo.jpg
 
Back
Top