Pluribus
Active Member
- Posts
- 247
- Location
- Sevenoaks, Kent
̶I̶'̶v̶e̶ ̶t̶a̶k̶e̶n̶ ̶i̶t̶ ̶u̶p̶o̶n̶ ̶m̶y̶s̶e̶l̶f̶ ̶t̶o̶ ̶d̶o̶ ̶t̶h̶i̶s̶ ̶j̶o̶b̶,̶ ̶a̶s̶ ̶m̶y̶ ̶o̶l̶d̶ ̶o̶n̶e̶ ̶c̶r̶a̶c̶k̶e̶d̶.̶ ̶ ̶I̶'̶v̶e̶ ̶b̶e̶e̶n̶ ̶t̶a̶k̶i̶n̶g̶ ̶l̶o̶t̶s̶ ̶o̶f̶ ̶p̶i̶c̶t̶u̶r̶e̶s̶ ̶s̶o̶ ̶I̶ ̶c̶a̶n̶ ̶d̶o̶ ̶a̶ ̶p̶r̶o̶p̶e̶r̶ ̶w̶r̶i̶t̶e̶-̶u̶p̶ ̶l̶a̶t̶e̶r̶ ̶t̶h̶i̶s̶ ̶a̶f̶t̶e̶r̶n̶o̶o̶n̶/̶e̶v̶e̶n̶i̶n̶g̶,̶ ̶b̶u̶t̶ ̶I̶'̶m̶ ̶a̶ ̶b̶i̶t̶ ̶s̶t̶u̶c̶k̶.̶.̶.̶
̶
̶H̶o̶w̶ ̶t̶h̶e̶ ̶f̶*̶*̶k̶ ̶d̶o̶ ̶I̶ ̶g̶e̶t̶ ̶t̶h̶e̶ ̶m̶a̶n̶i̶f̶o̶l̶d̶ ̶b̶o̶l̶t̶s̶ ̶o̶f̶f̶?̶ ̶ ̶I̶'̶v̶e̶ ̶b̶e̶e̶n̶ ̶f̶o̶l̶l̶o̶w̶i̶n̶g̶ ̶t̶h̶e̶ ̶H̶a̶y̶n̶e̶s̶ ̶m̶a̶n̶u̶a̶l̶ ̶s̶t̶u̶d̶i̶o̶u̶s̶l̶y̶ ̶(̶a̶n̶d̶ ̶a̶m̶ ̶d̶o̶w̶n̶l̶o̶a̶d̶i̶n̶g̶ ̶R̶A̶V̶E̶ ̶a̶s̶ ̶I̶ ̶t̶y̶p̶e̶ ̶t̶h̶i̶s̶)̶,̶ ̶b̶u̶t̶ ̶f̶o̶r̶ ̶t̶h̶e̶ ̶l̶o̶v̶e̶ ̶o̶f̶ ̶G̶o̶d̶,̶ ̶I̶ ̶c̶a̶n̶t̶ ̶g̶e̶t̶ ̶t̶o̶ ̶s̶o̶m̶e̶ ̶o̶f̶ ̶t̶h̶e̶ ̶b̶o̶l̶t̶s̶.̶.̶.̶
̶
̶I̶s̶ ̶t̶h̶e̶r̶e̶ ̶a̶ ̶t̶r̶i̶c̶k̶ ̶I̶'̶m̶ ̶m̶i̶s̶s̶i̶n̶g̶ ̶s̶o̶m̶e̶w̶h̶e̶r̶e̶?̶
Here is the promised write-up")
You will need:
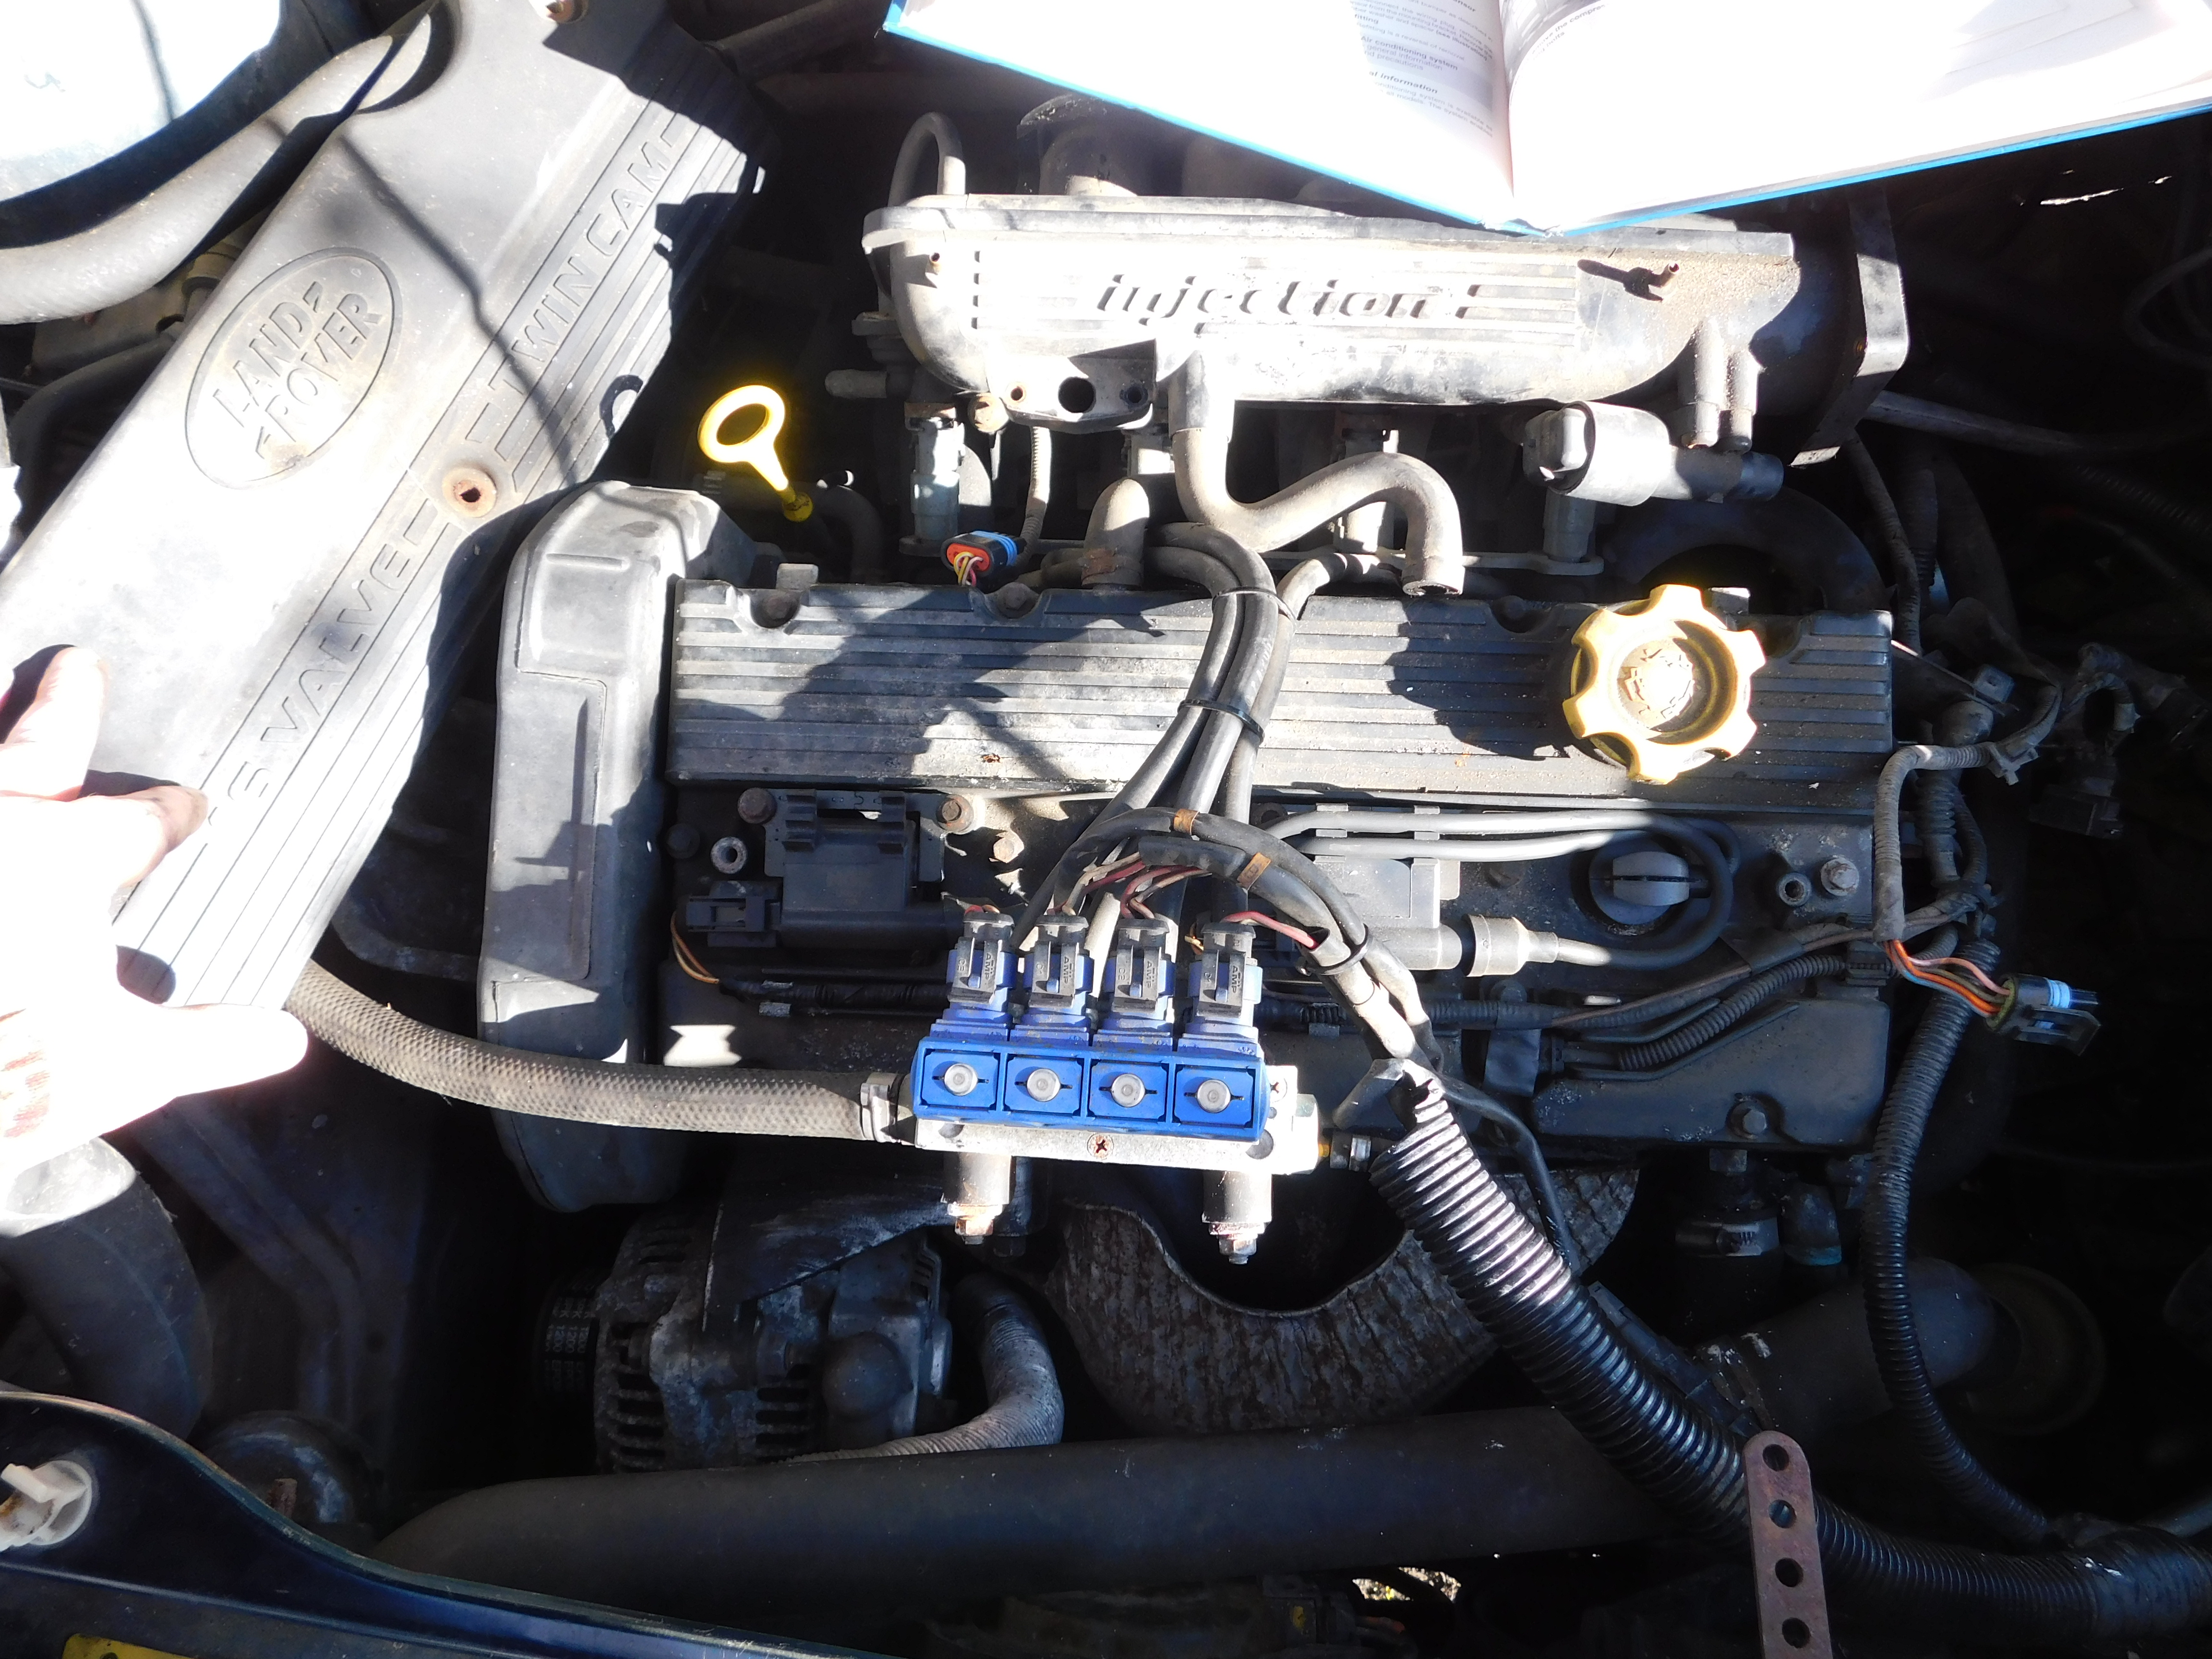
Before:
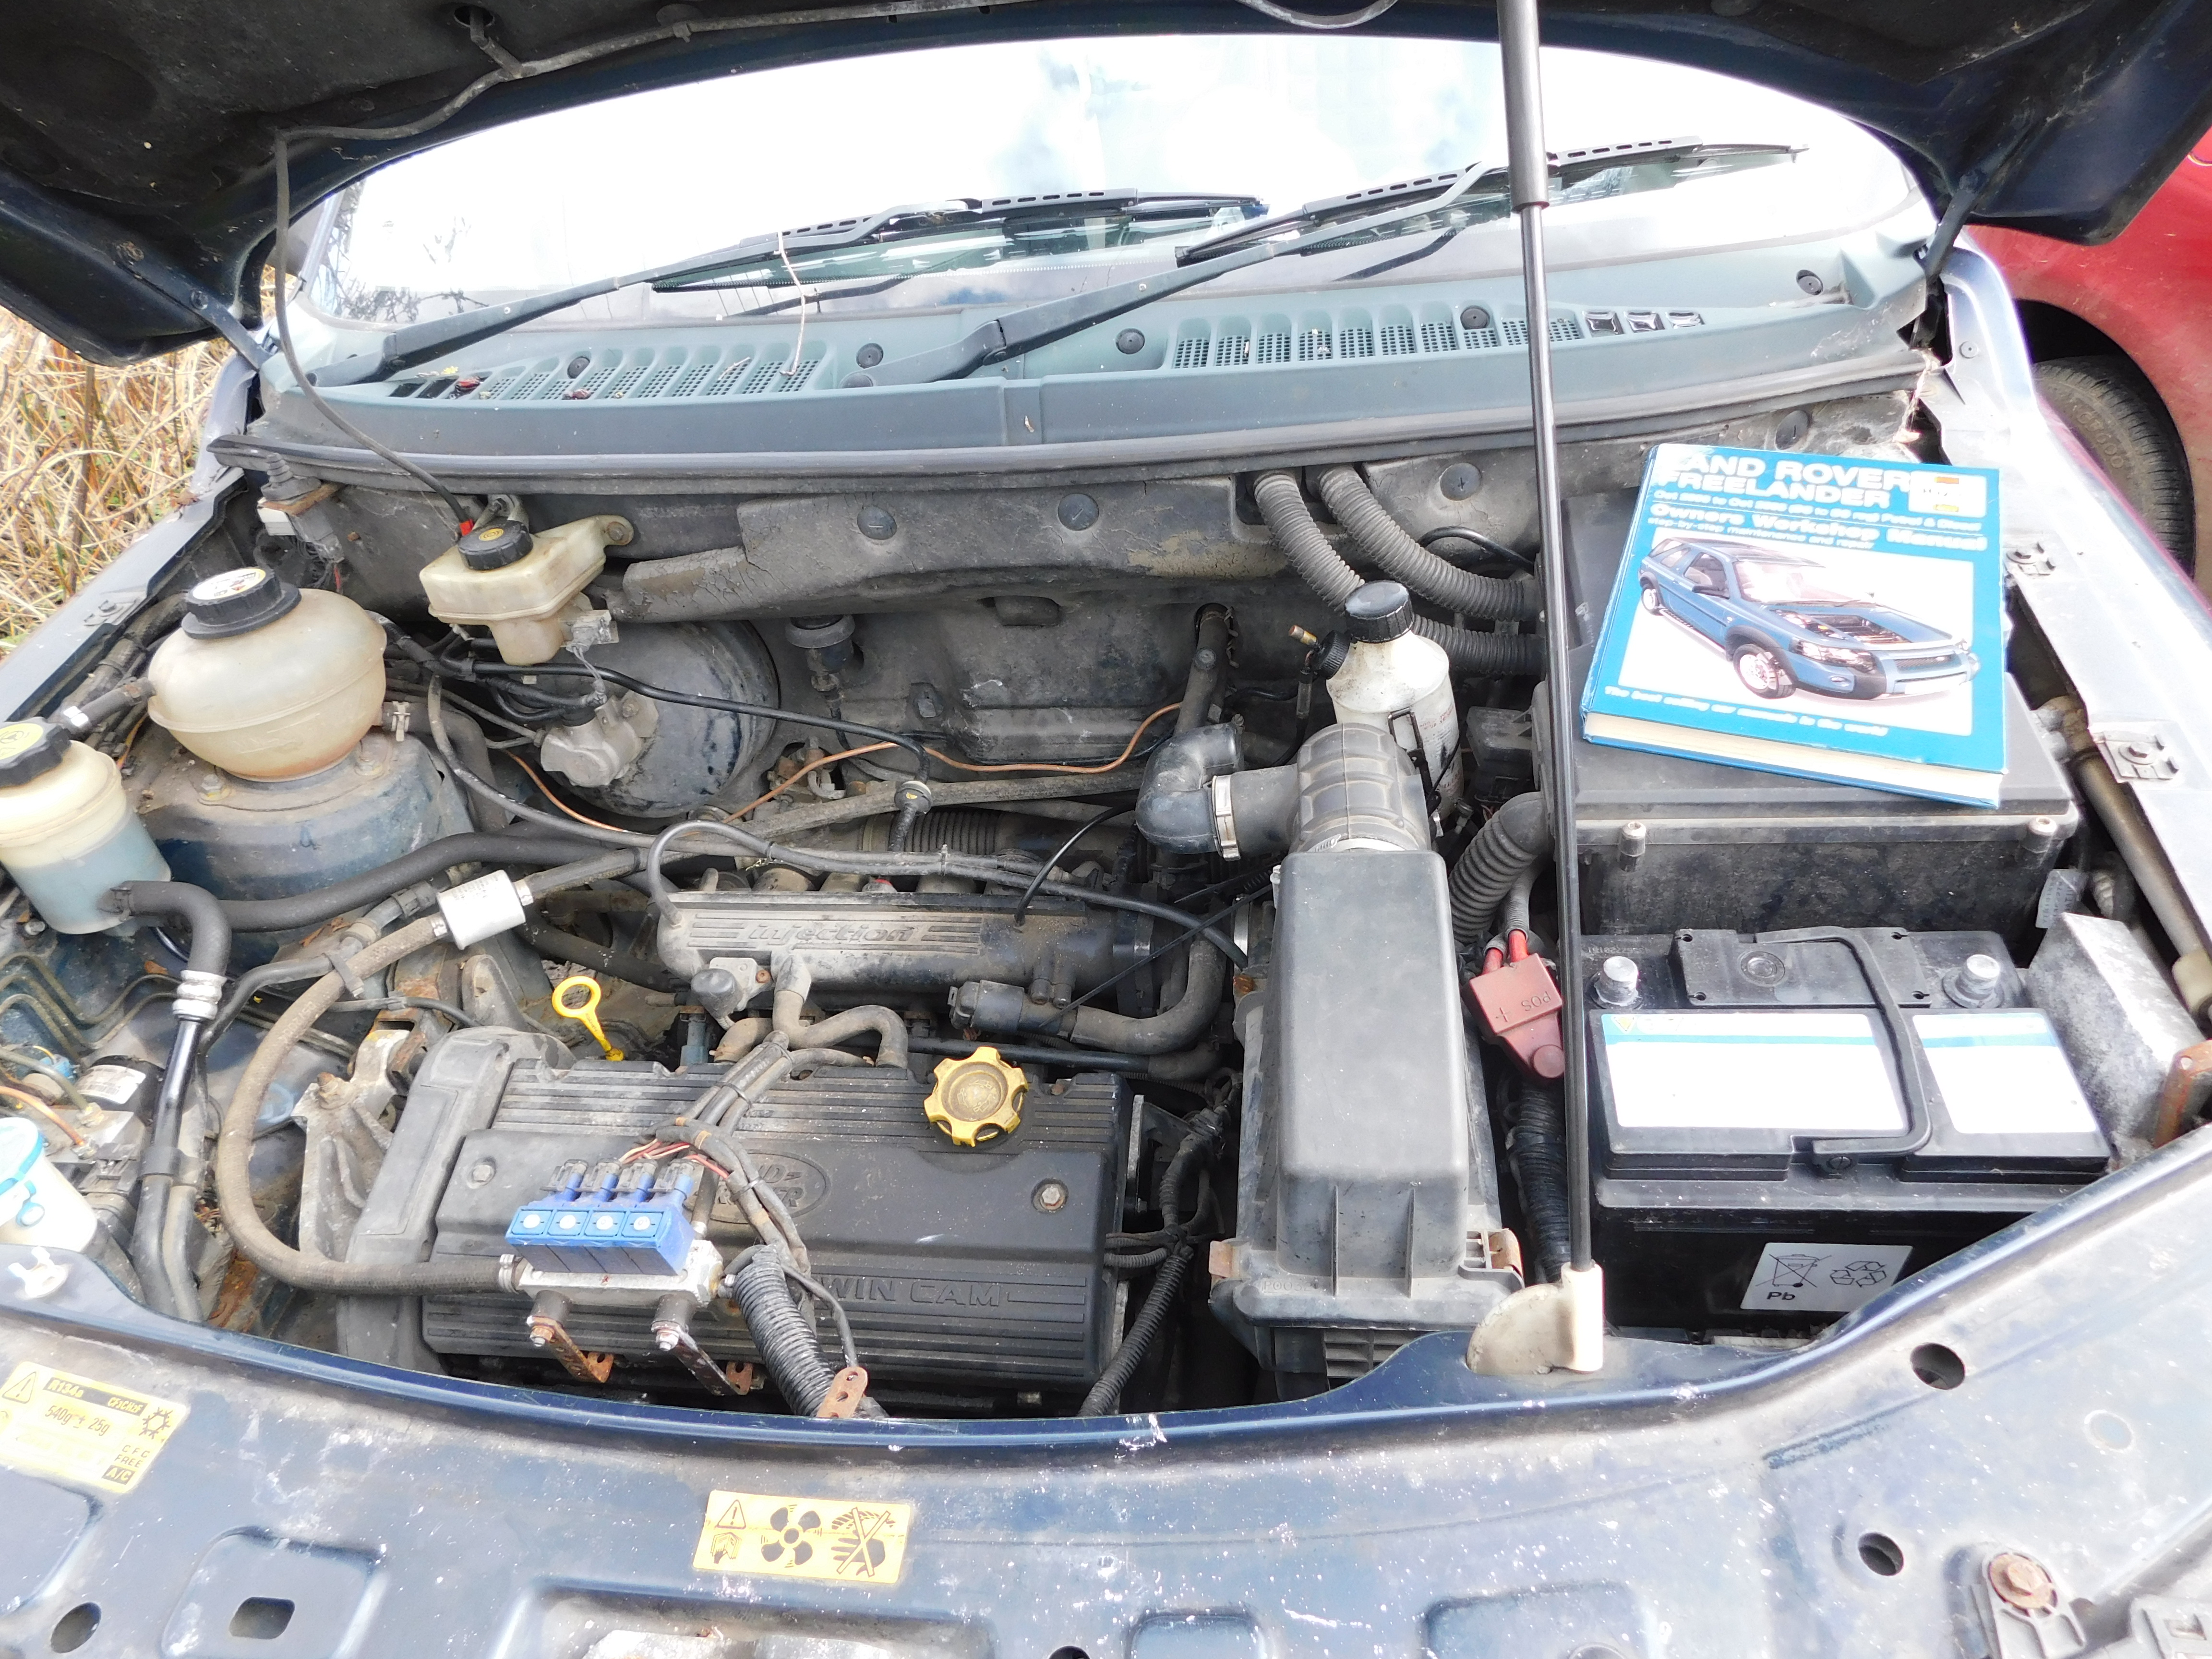
The blue bits at the front, on top of the engine, are part of the LPG system.
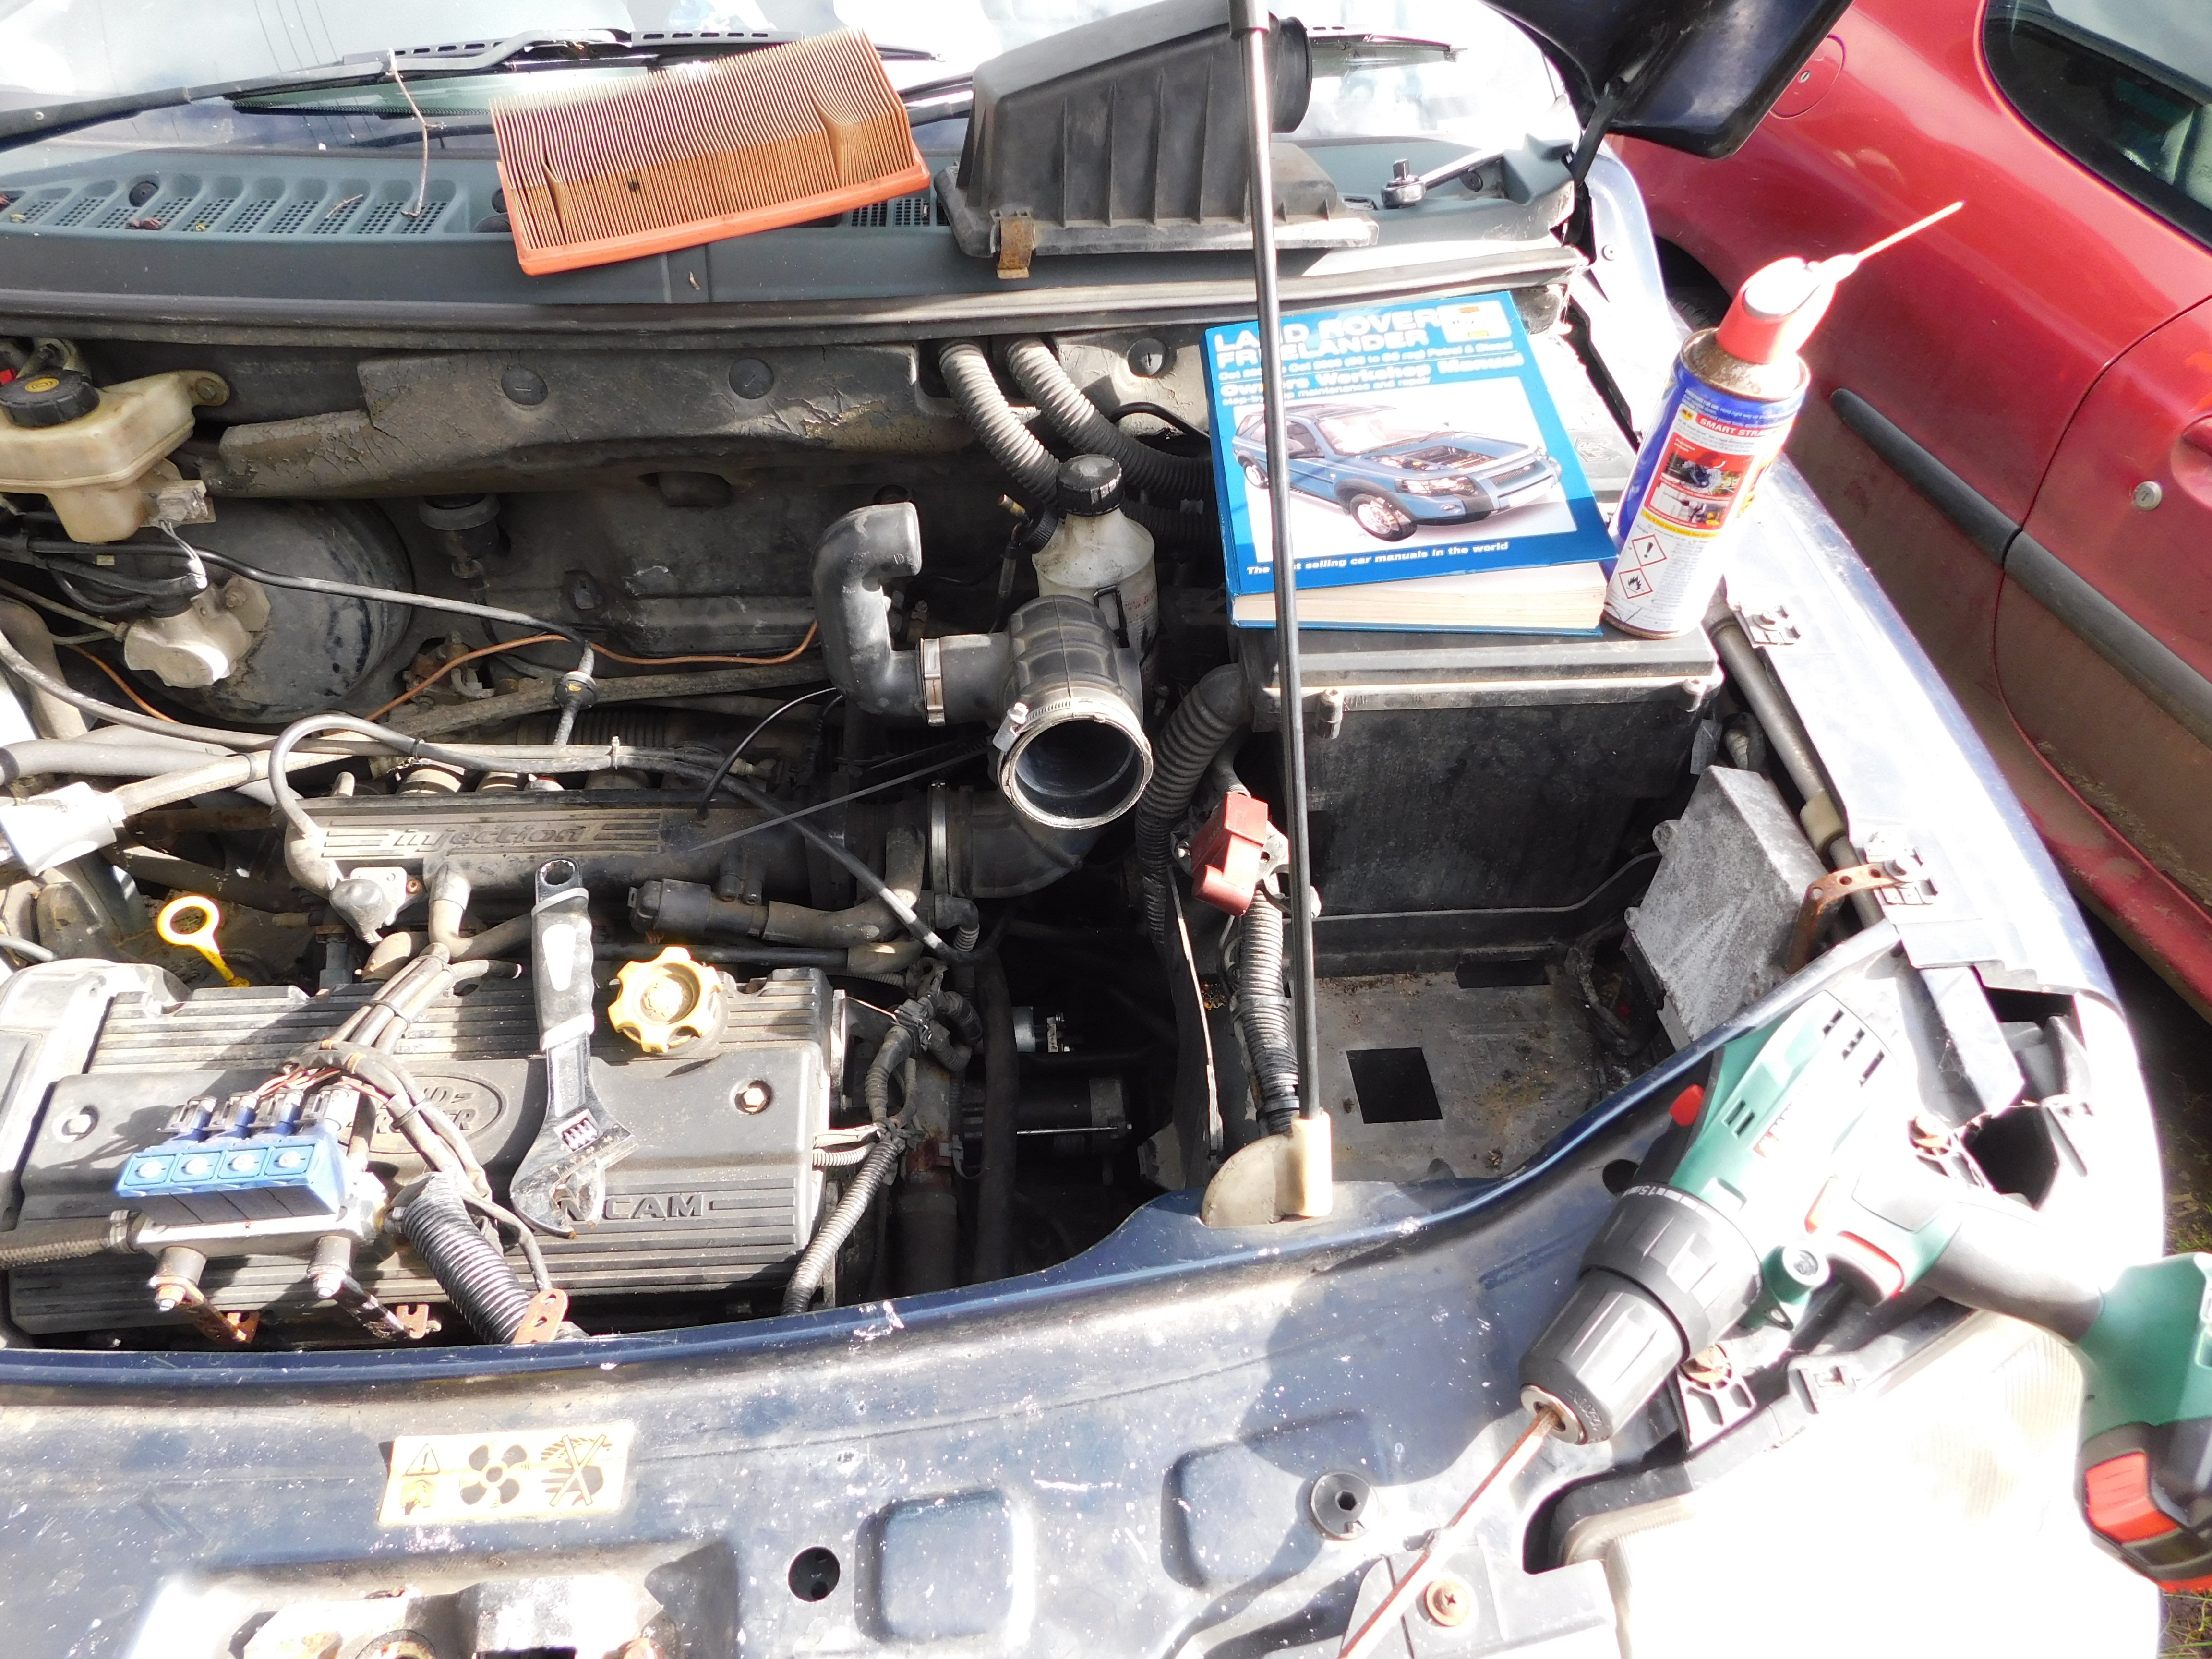
1. Remove the battery and the air filter cover and paper filter inside.
2. Undo the 2 bolts holding the air filter body to the engine bay. You will be left with this:
3. Unclip the rubber hose from the throttle body and remove. You can see a white bottle attached to mine - its valve saver fluid, again, part of the LPG system.
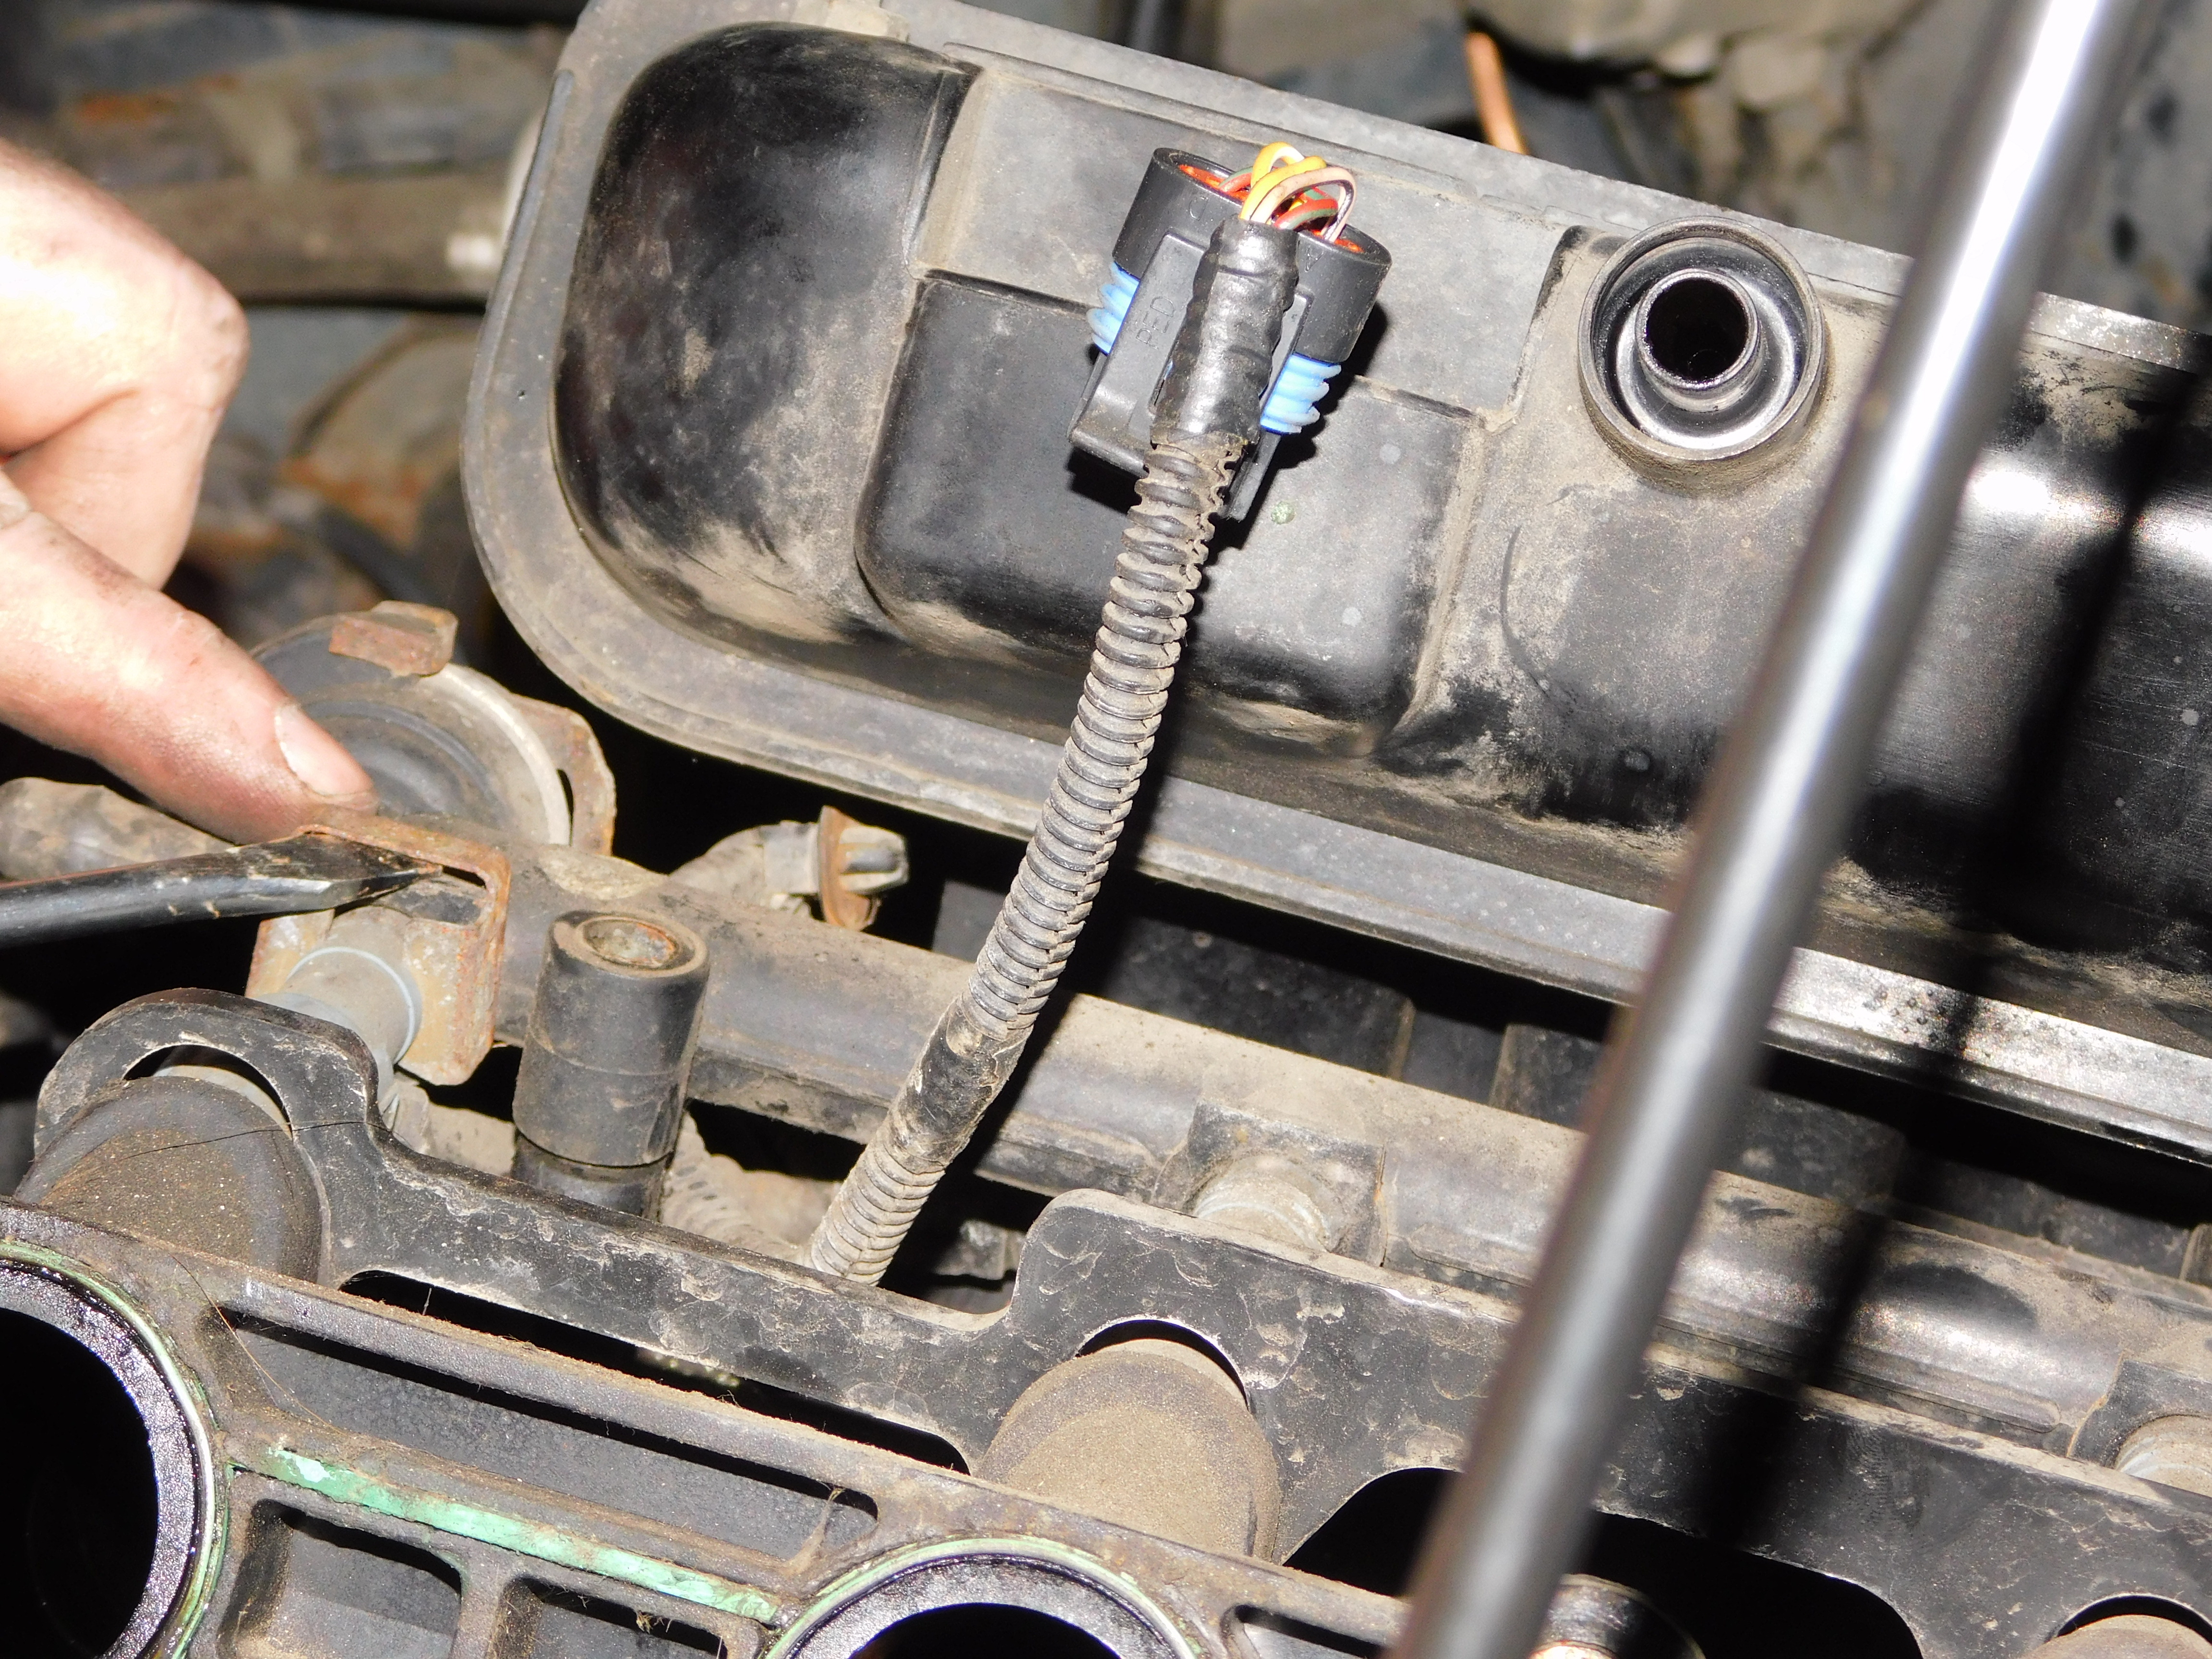
4. Unplug the 3 plugs, as shown below:
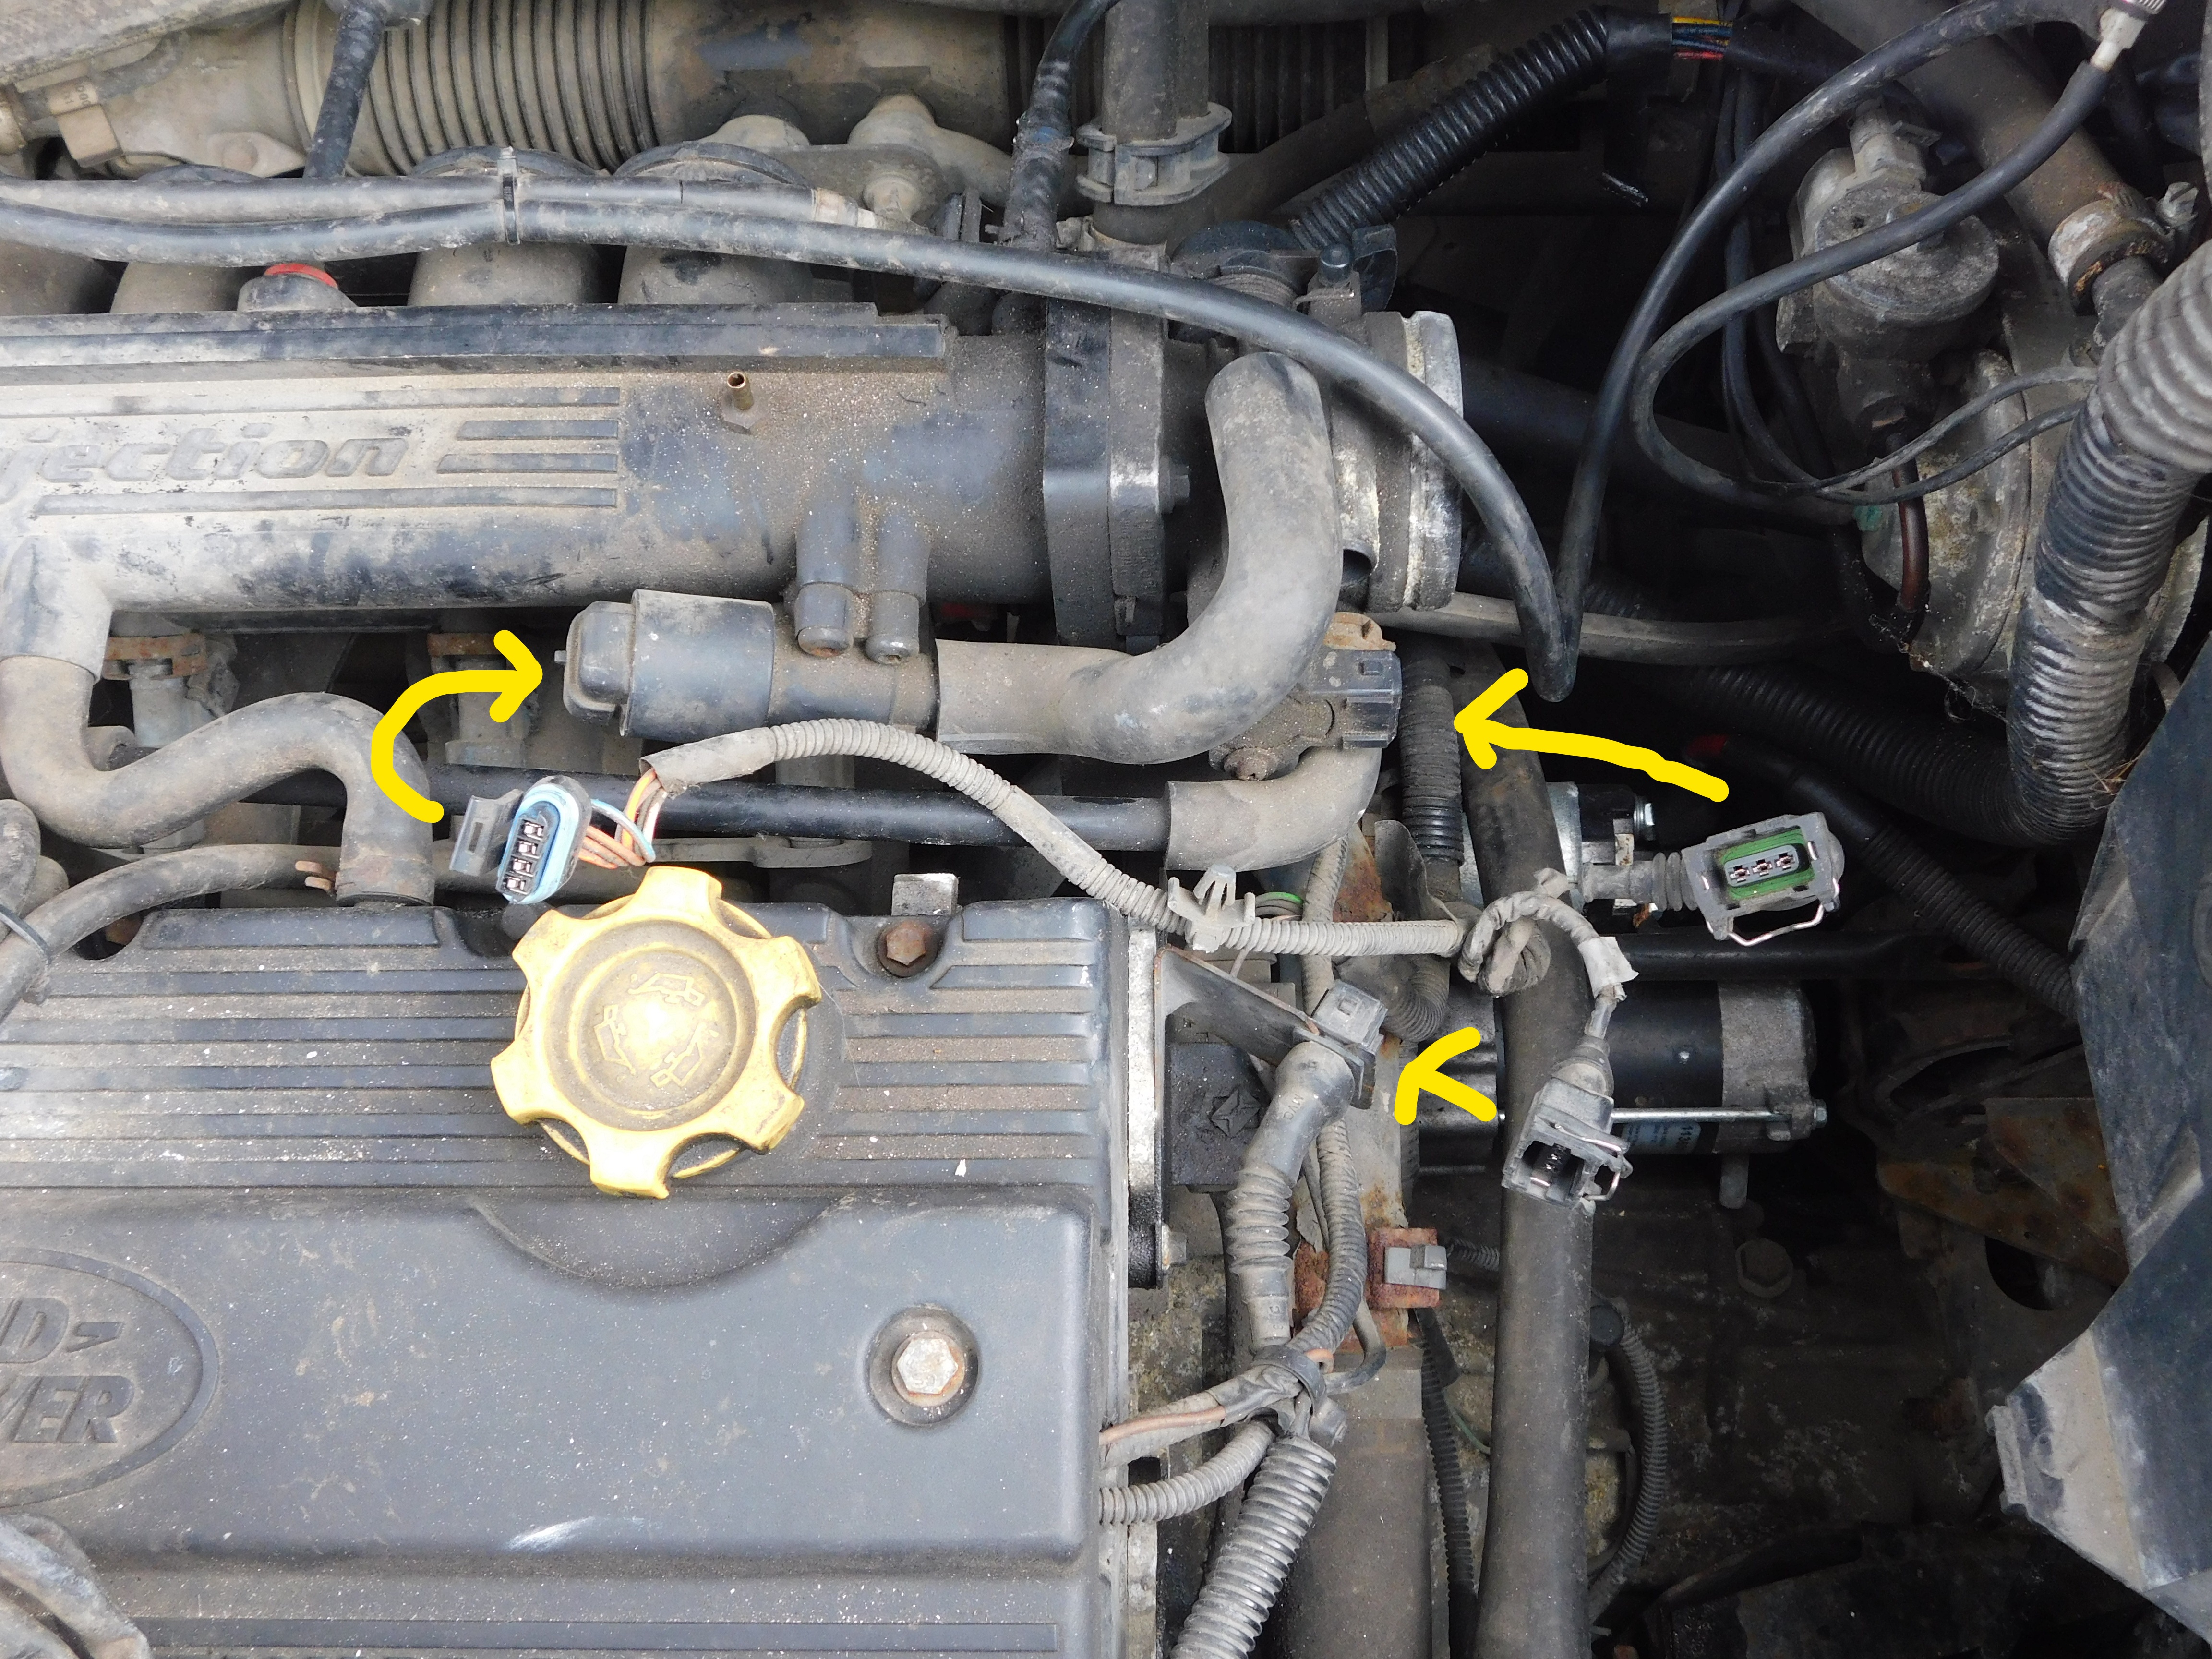
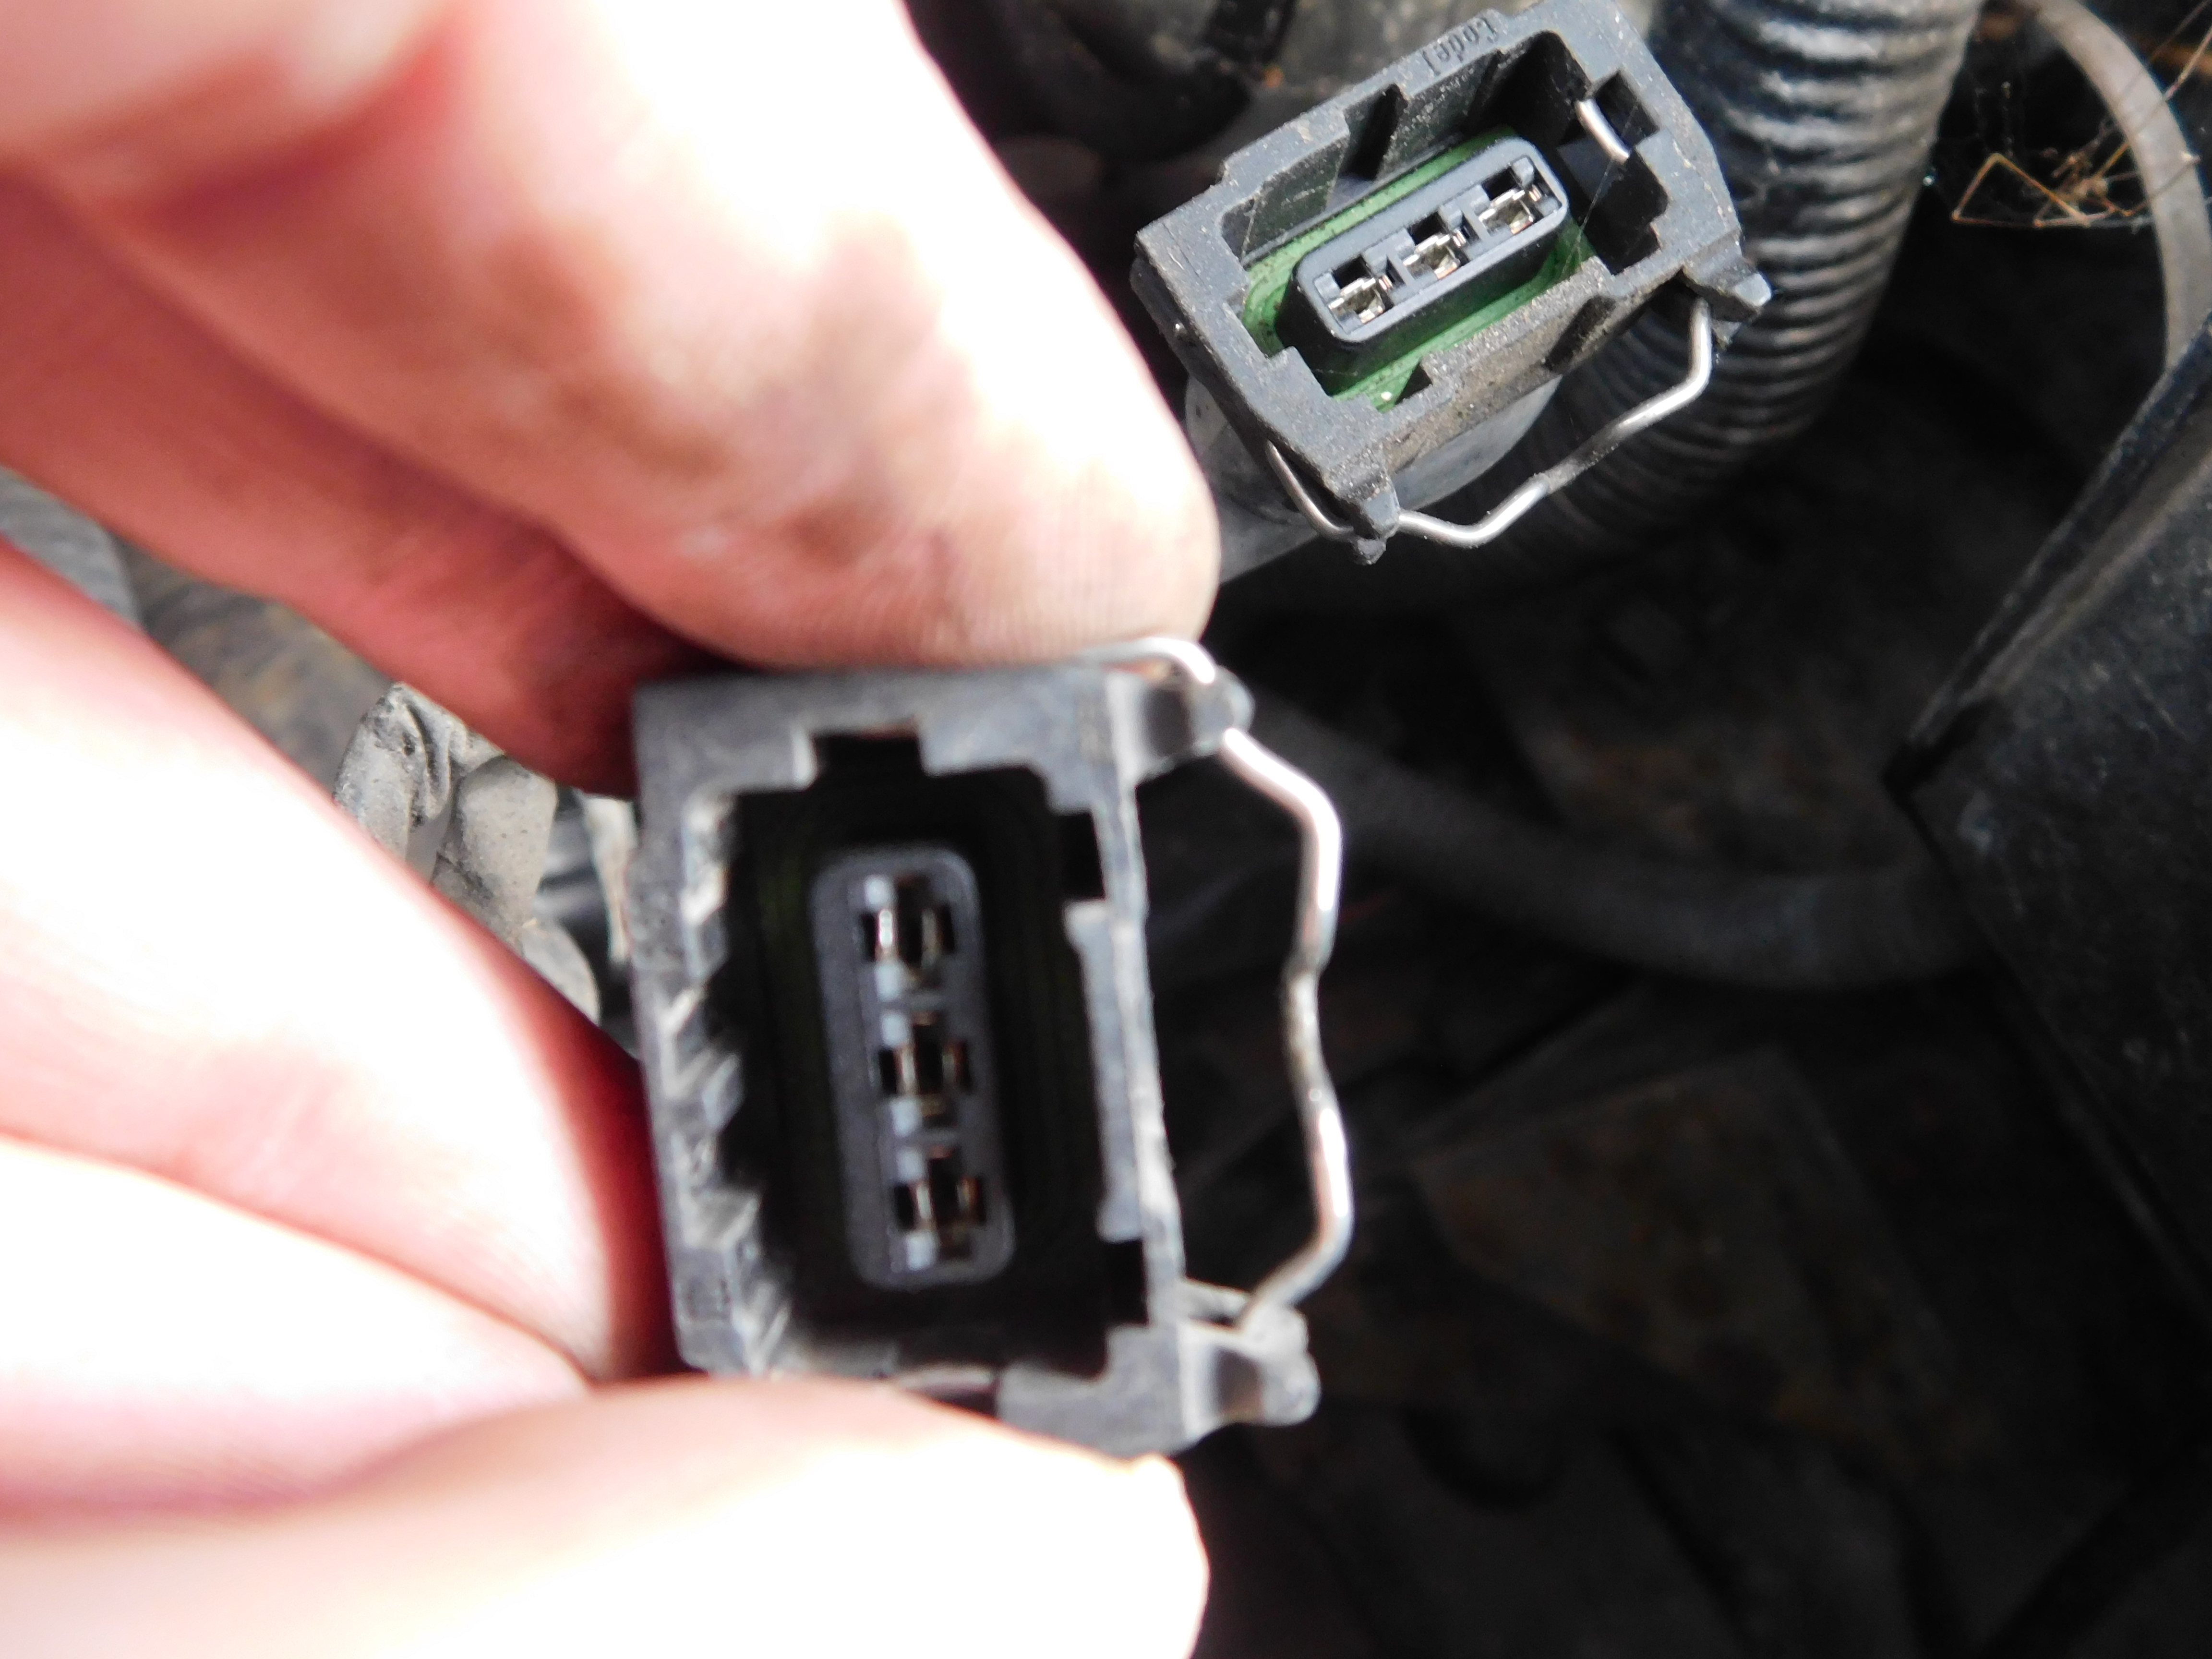
4a. The plug on the far left has a simple push tab to release it. The two on the right have a metal clip. Just insert a small screwdriver and pry the metal clip upwards, away from the plug. You can now easily remove the plug from the socket. Better pic of the metal clips are below:
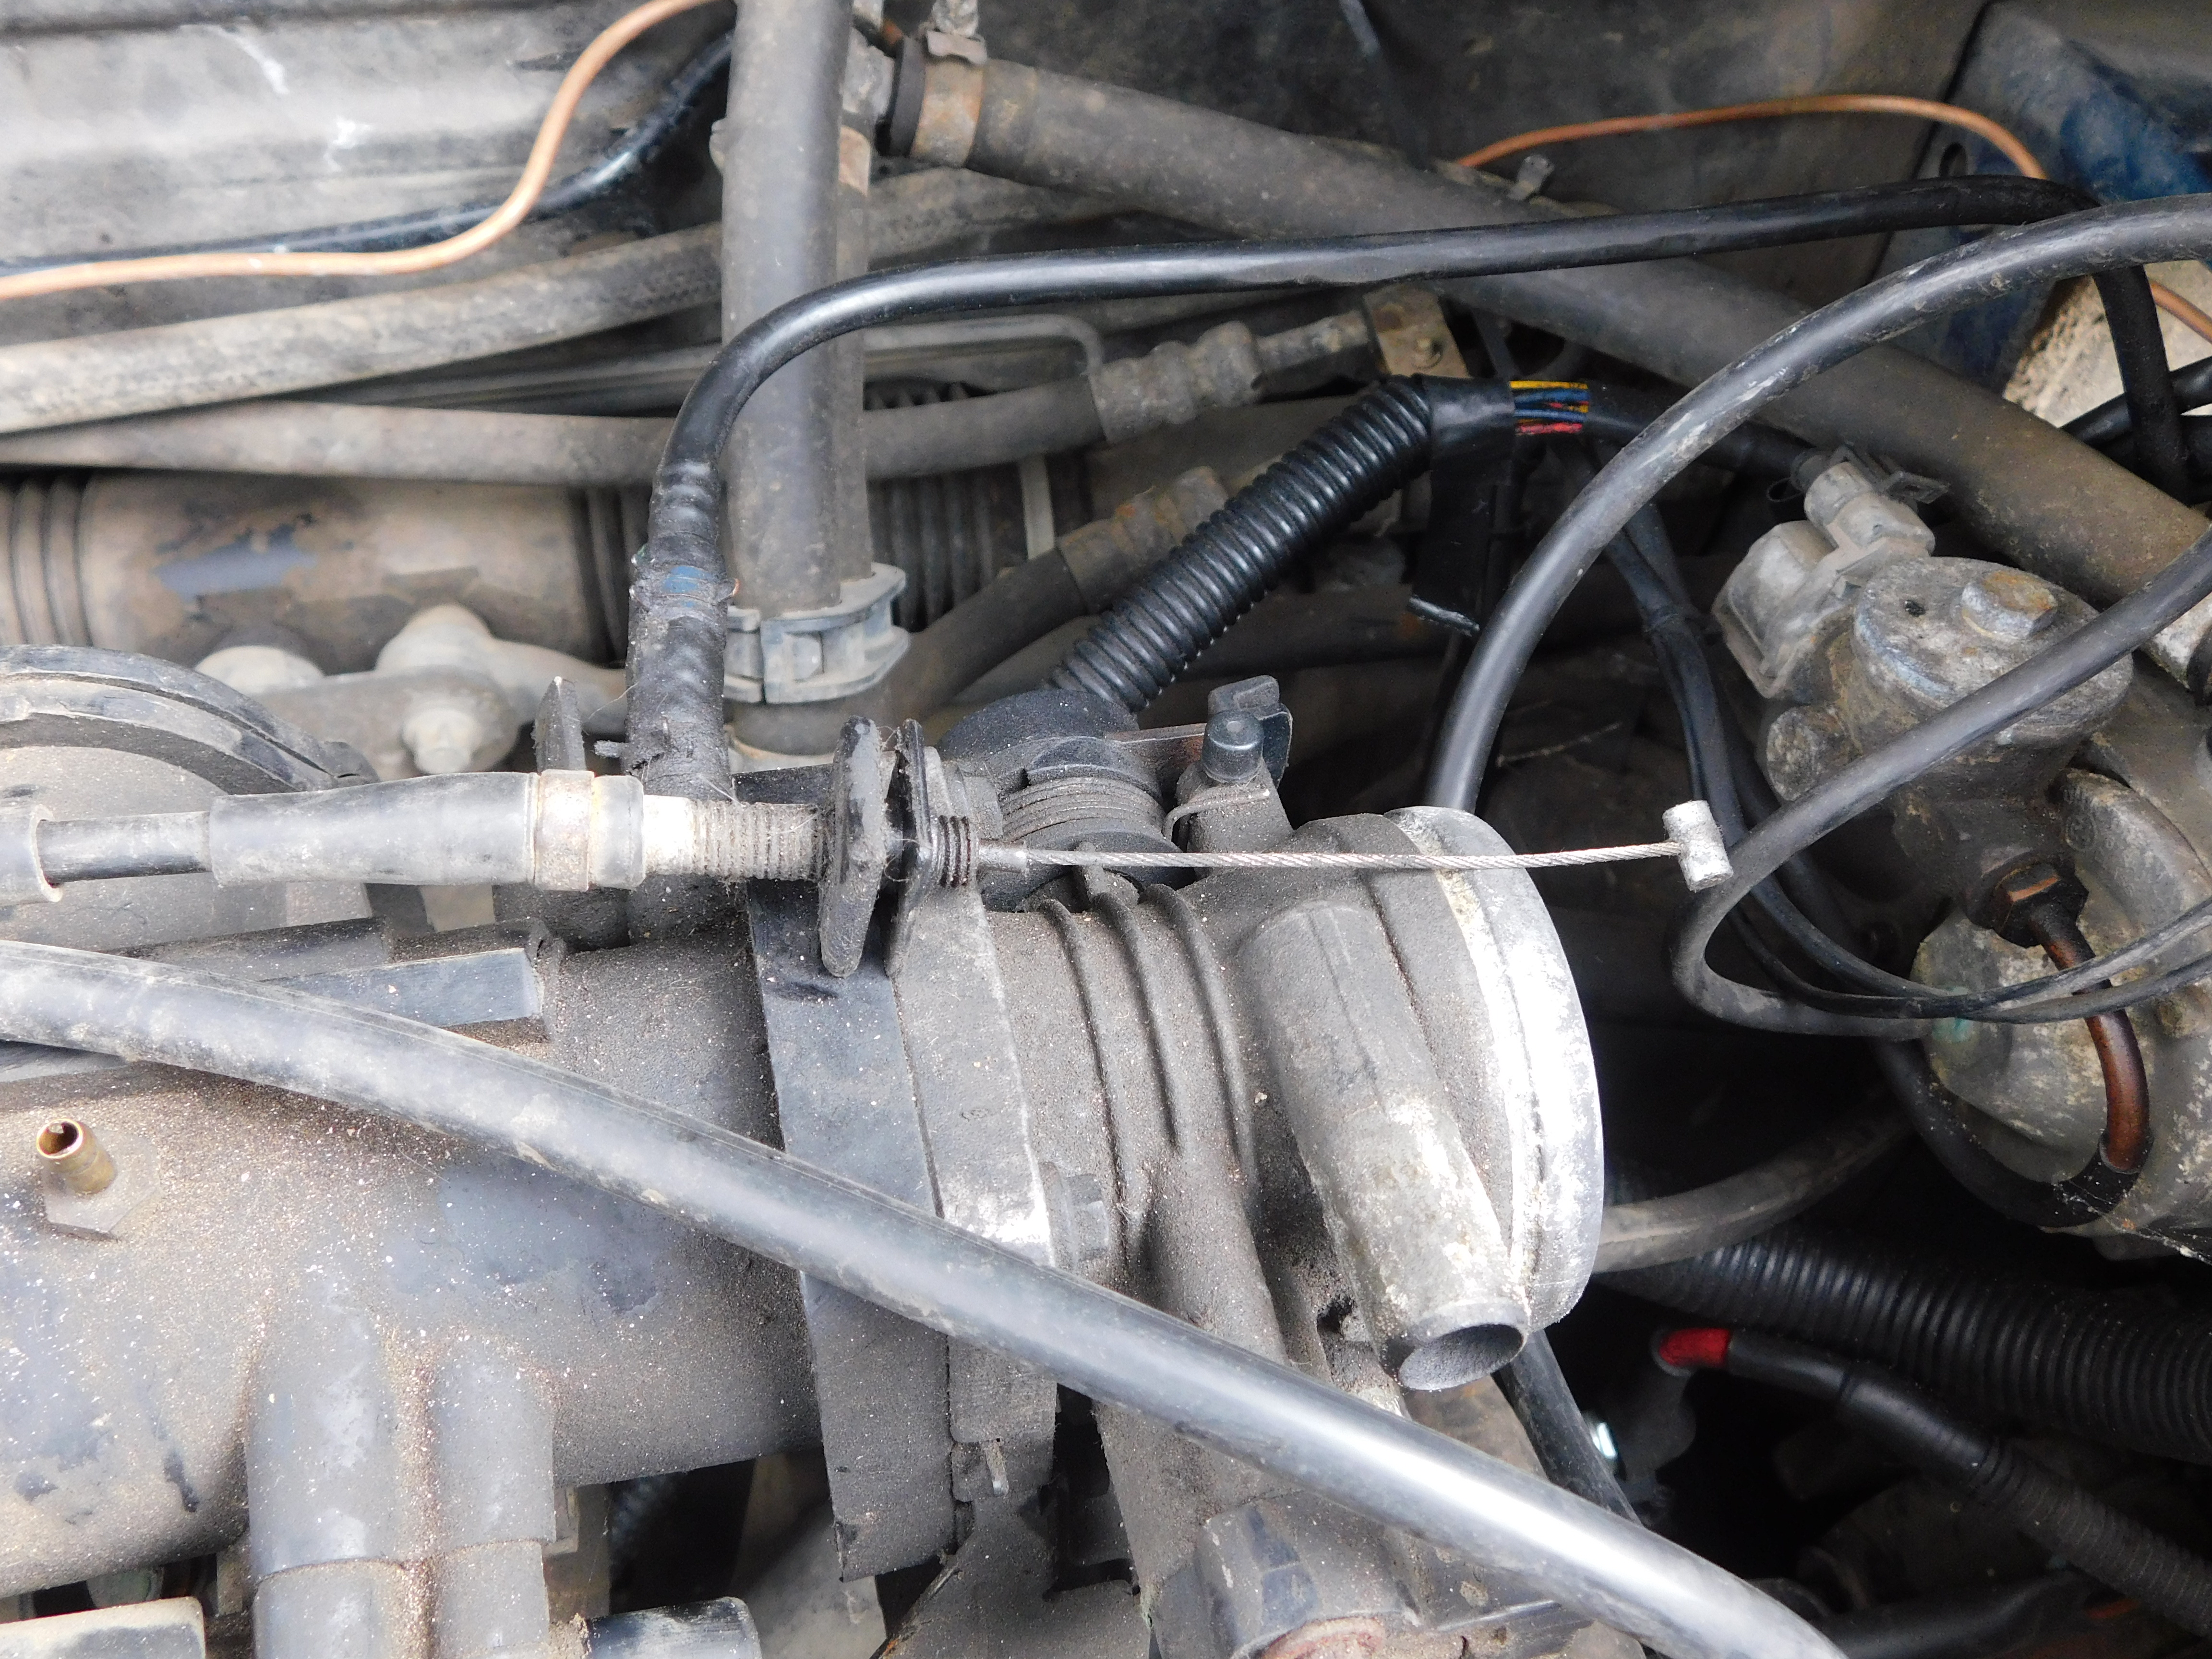
5. Remove the throttle cable from the metal spring thing. Rotate the bit the cable pulls on (the "metal spring thing", and you can remove the cable easily. Slide the cable out of the retaining bracket.
6. Remove the two hoses on the front of the throttle body. The top one will just pull off, the bottom one has a small clip. A pair of pliers pinching together the ends of the clip will allow you to remove it easily. Instead of repeating pics, take a look at the pic in step #4. The hoses are the ones the top arrows are pointing to. The top hose goes to the manifold sensor (I don't know what this sensor is). The bottom hose attaches via a rigid pipe and another small piece of hose to the engine.
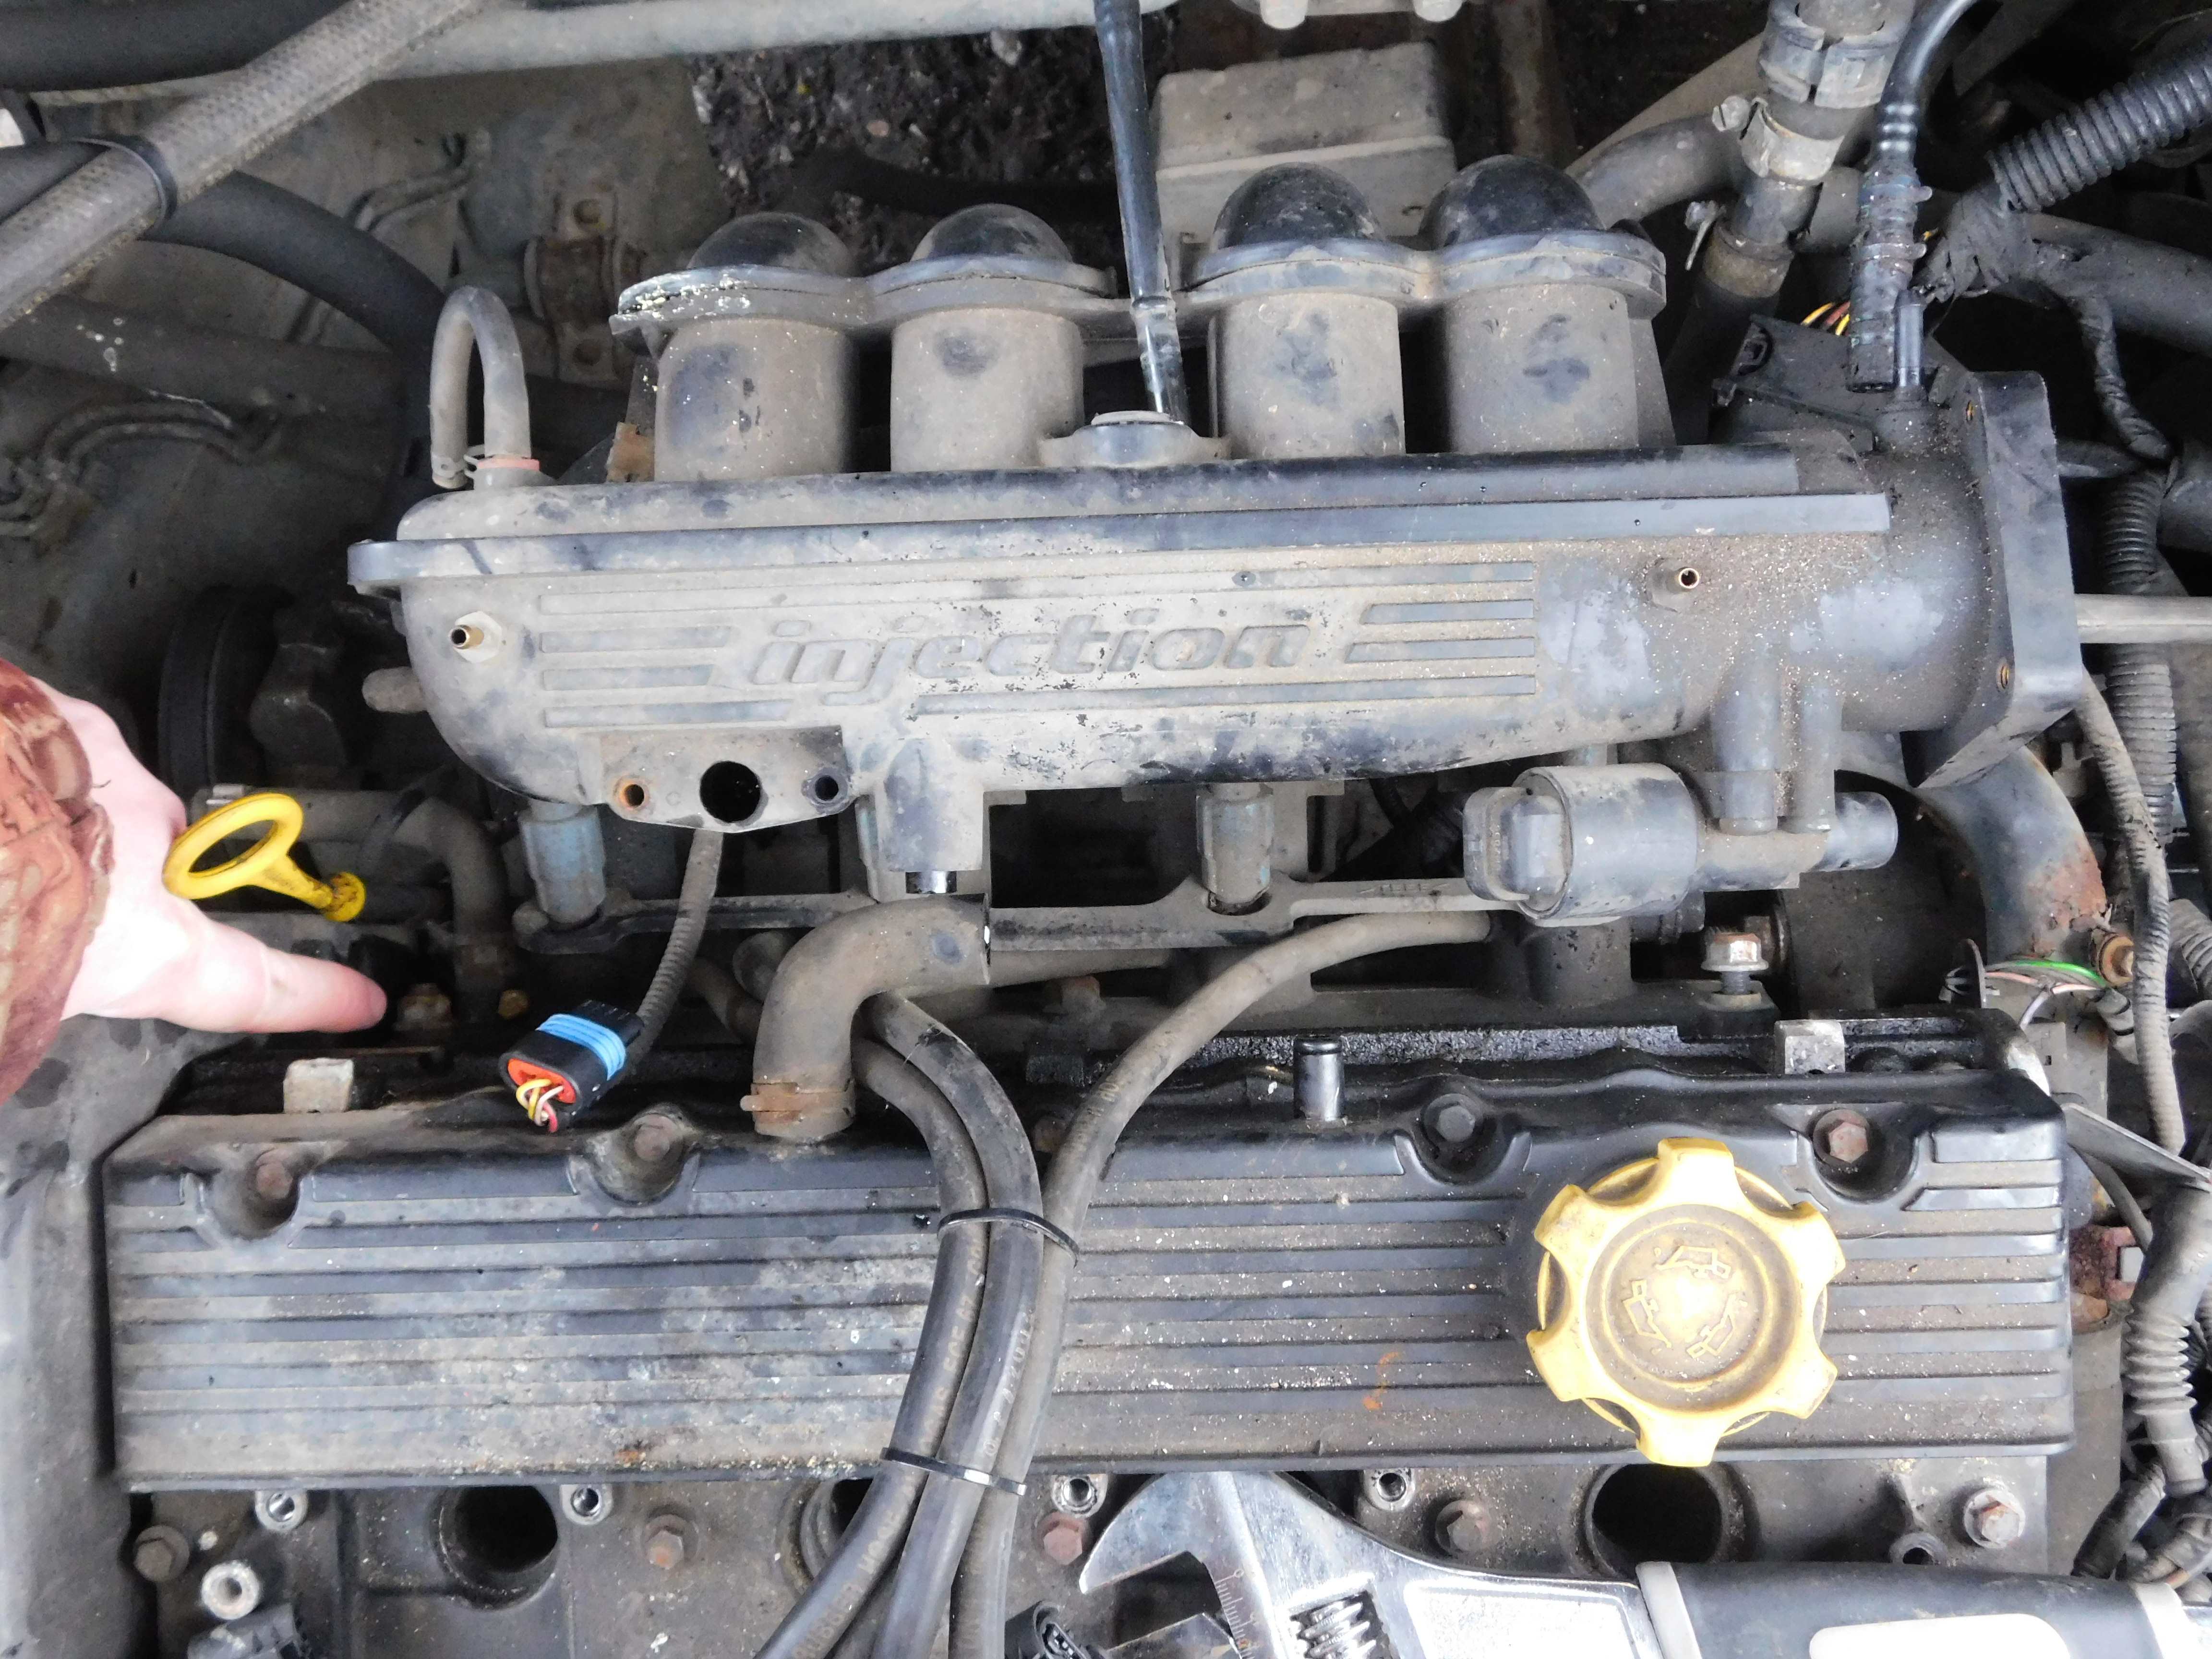
7. Unscrew the MAP sensor from the manifold. You'll need a torx bit for this. Put the screws somewhere safe. Don't do what I did, and drop one into the engine, then spend the next hour trying to fish it out...

8. Remove this hose (its just a pressure fit and comes off without much effort). Retain and fit to the replacement manifold.

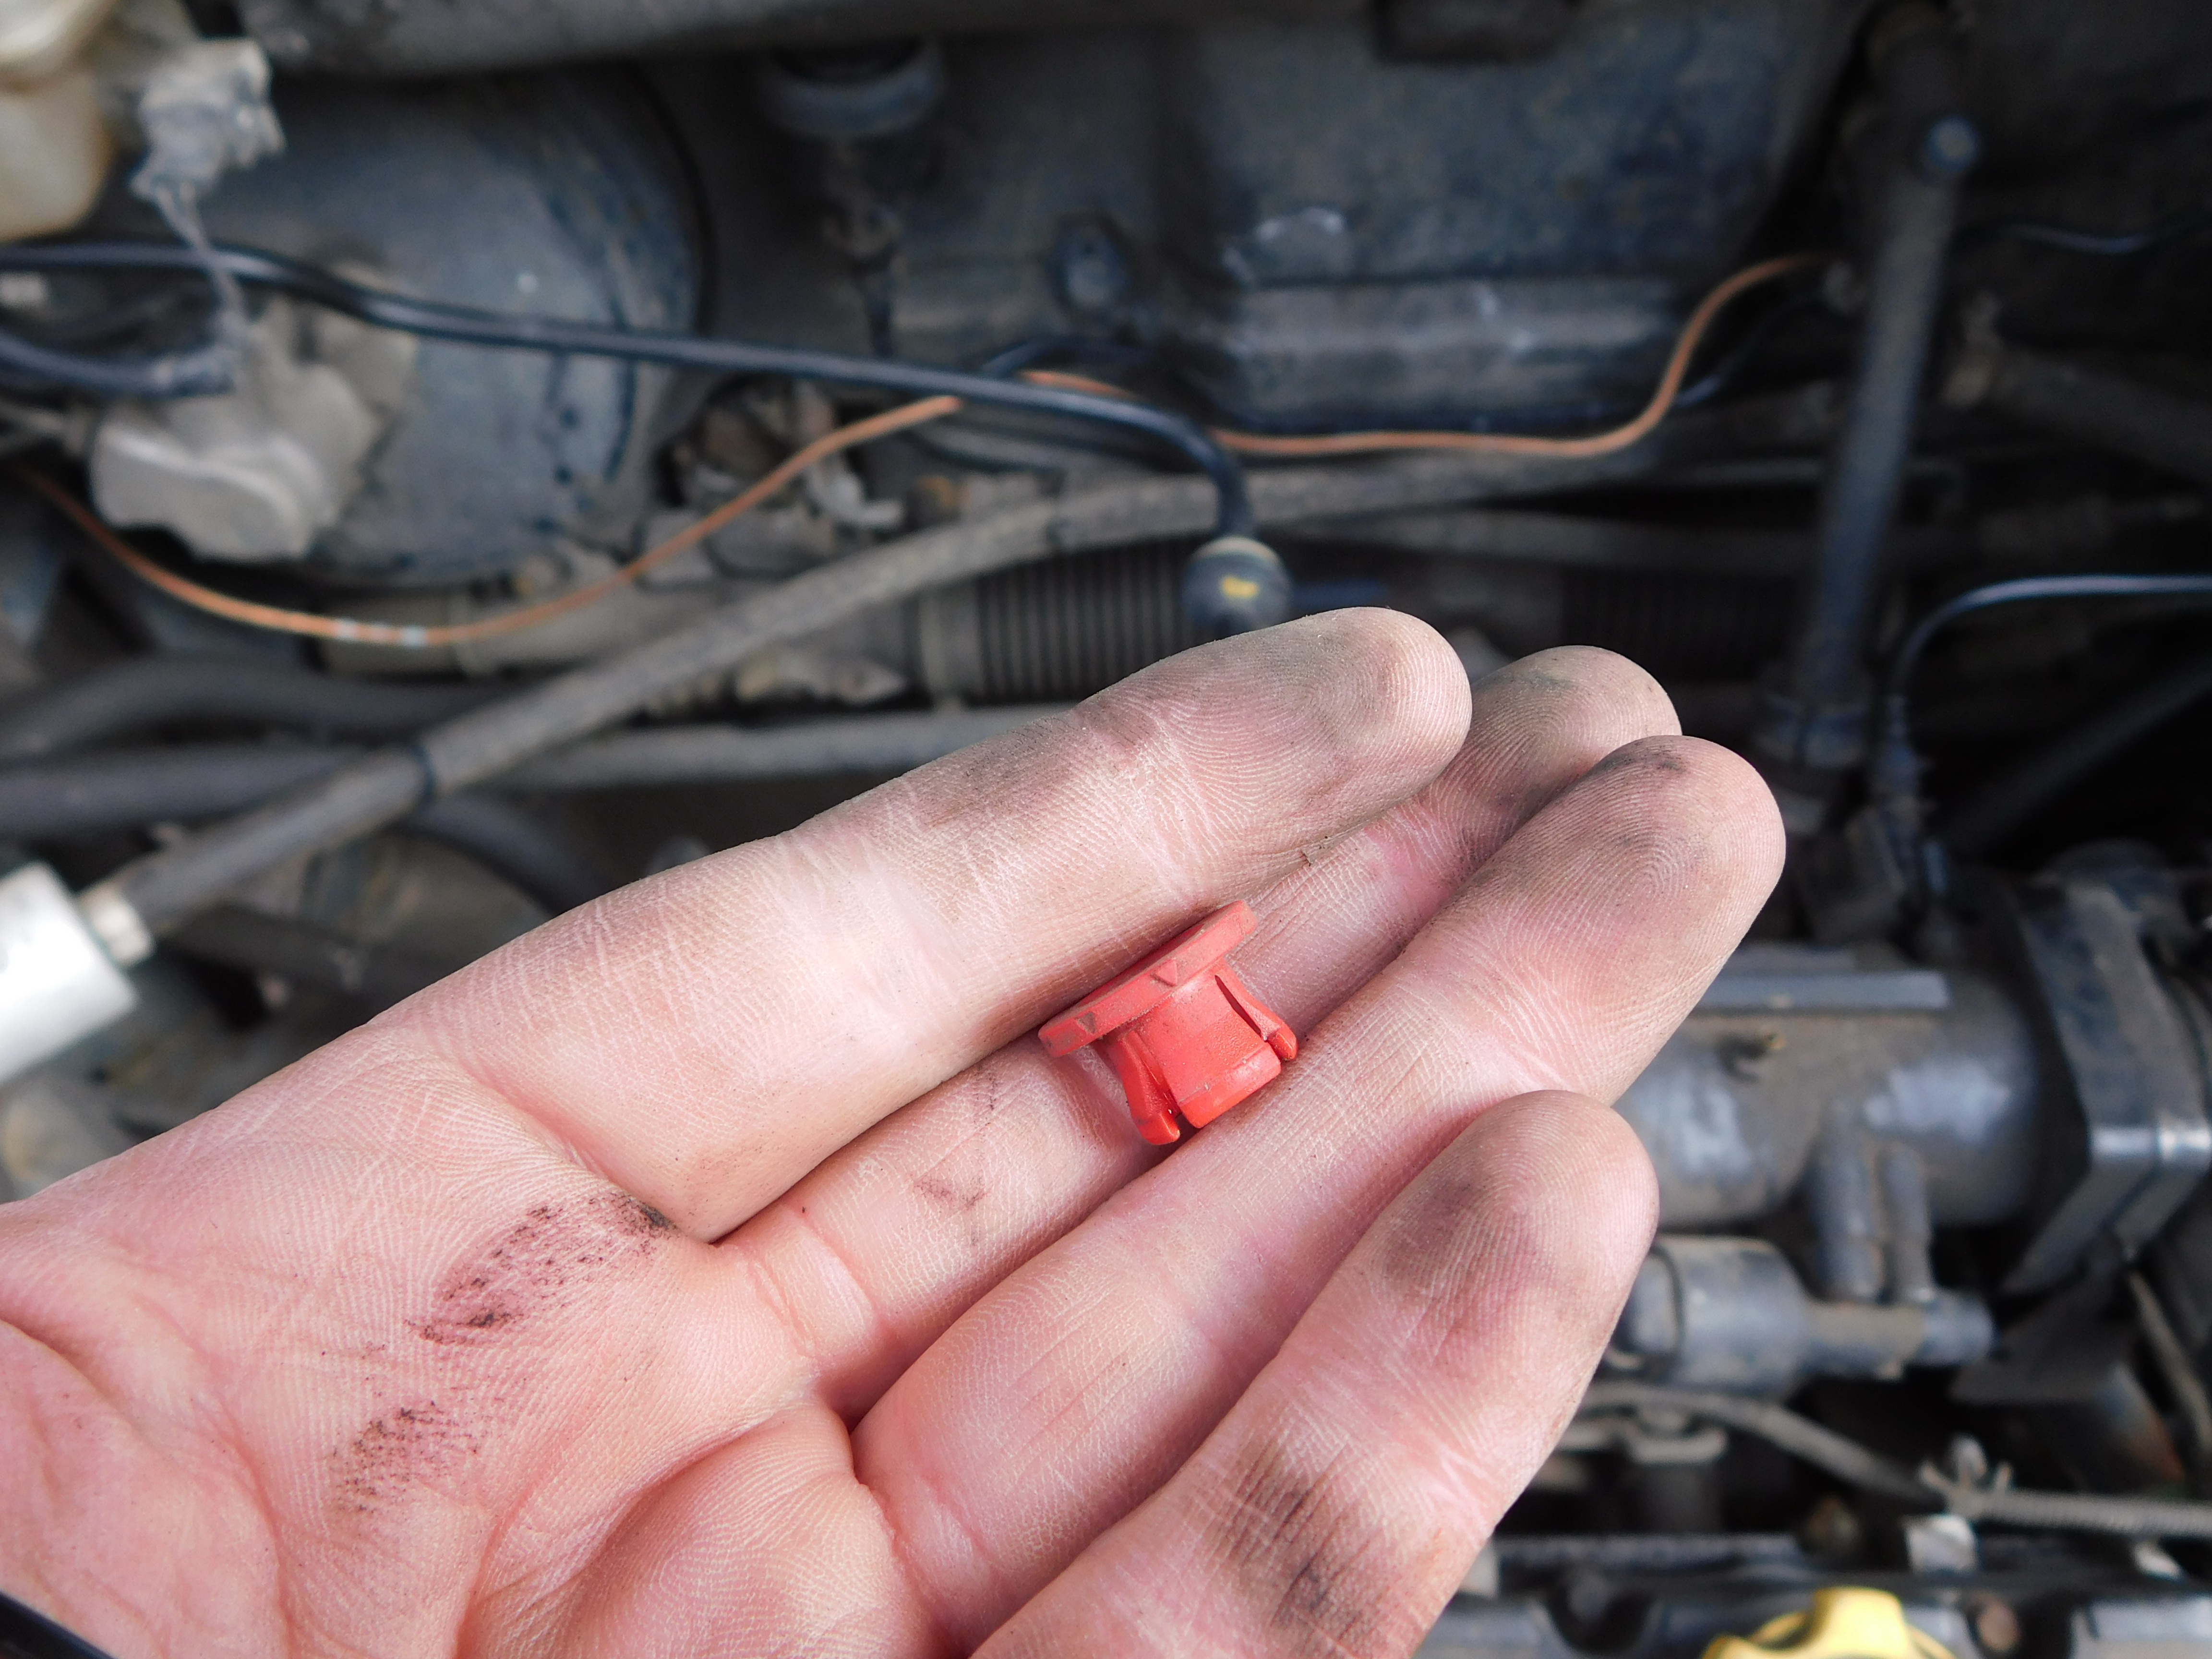
9. Remove this hose from the back of the manifold. It has a small red clip. Push the clip towards the manifold whilst pulling the hose backwards. Now pull the red plastic clip out and fit to the replacement manifold.
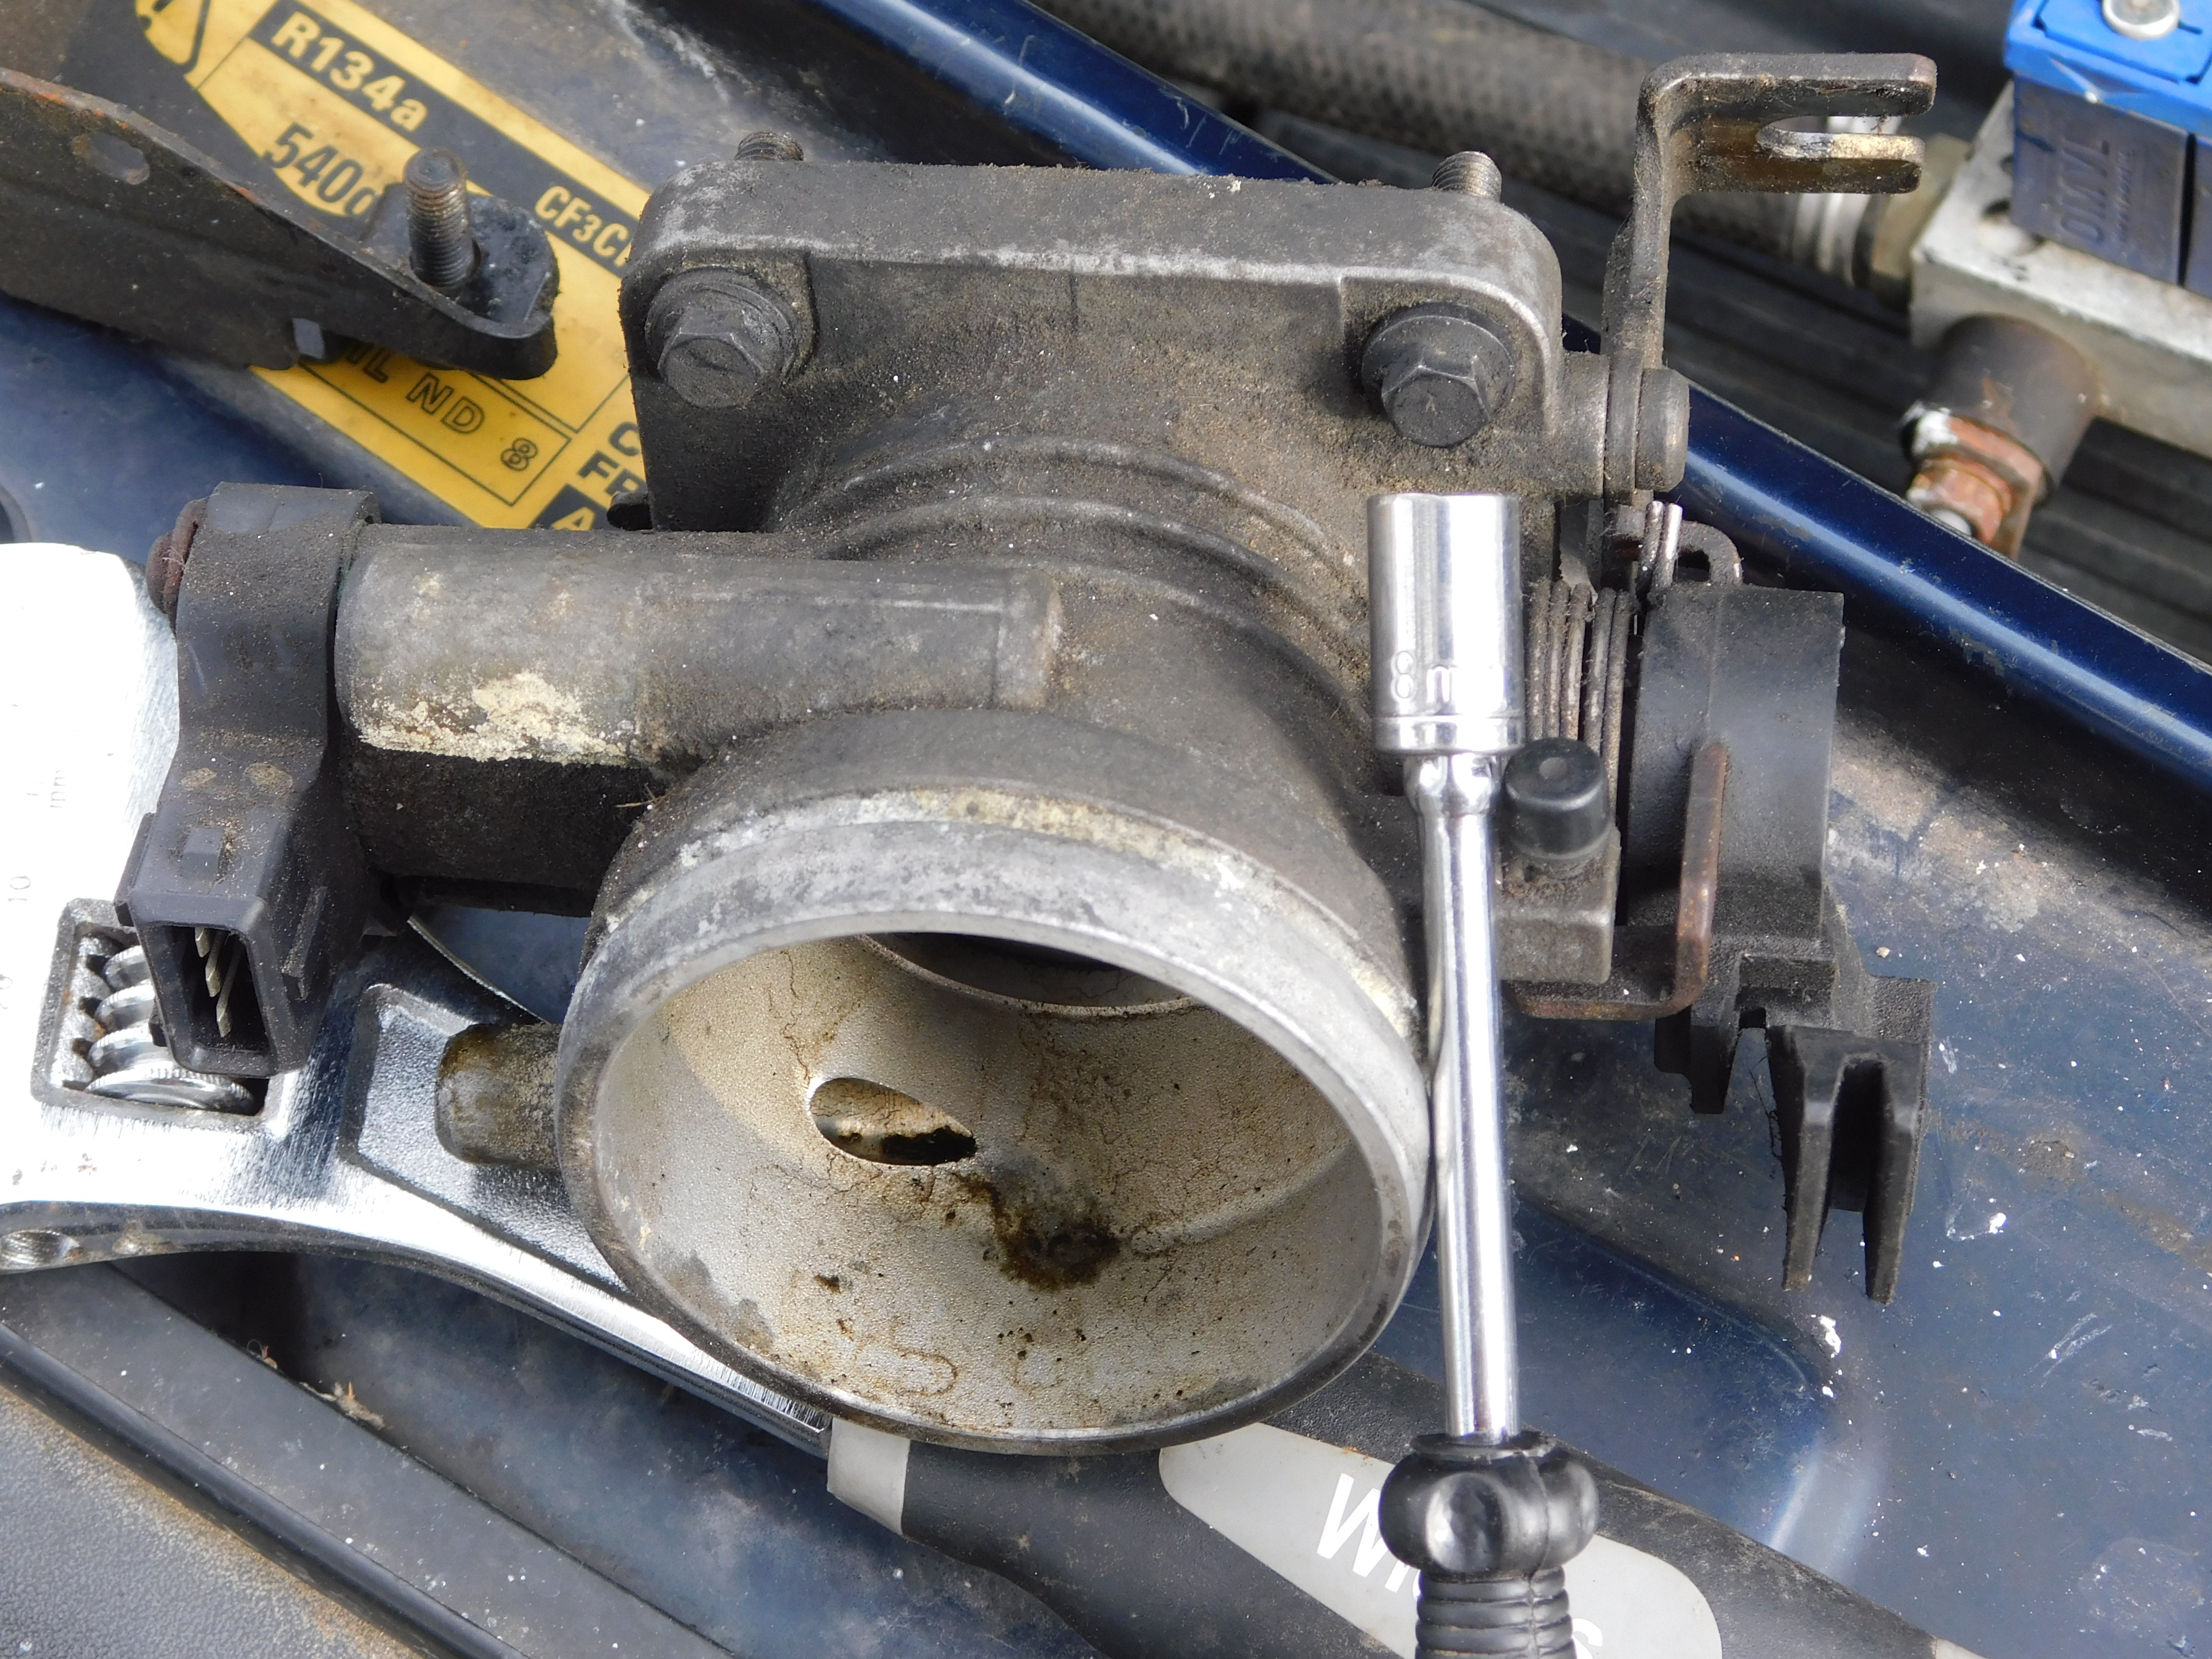
10. Using an 8mm socket, remove the 4 bolts - 1 in each corner - from the throttle body.
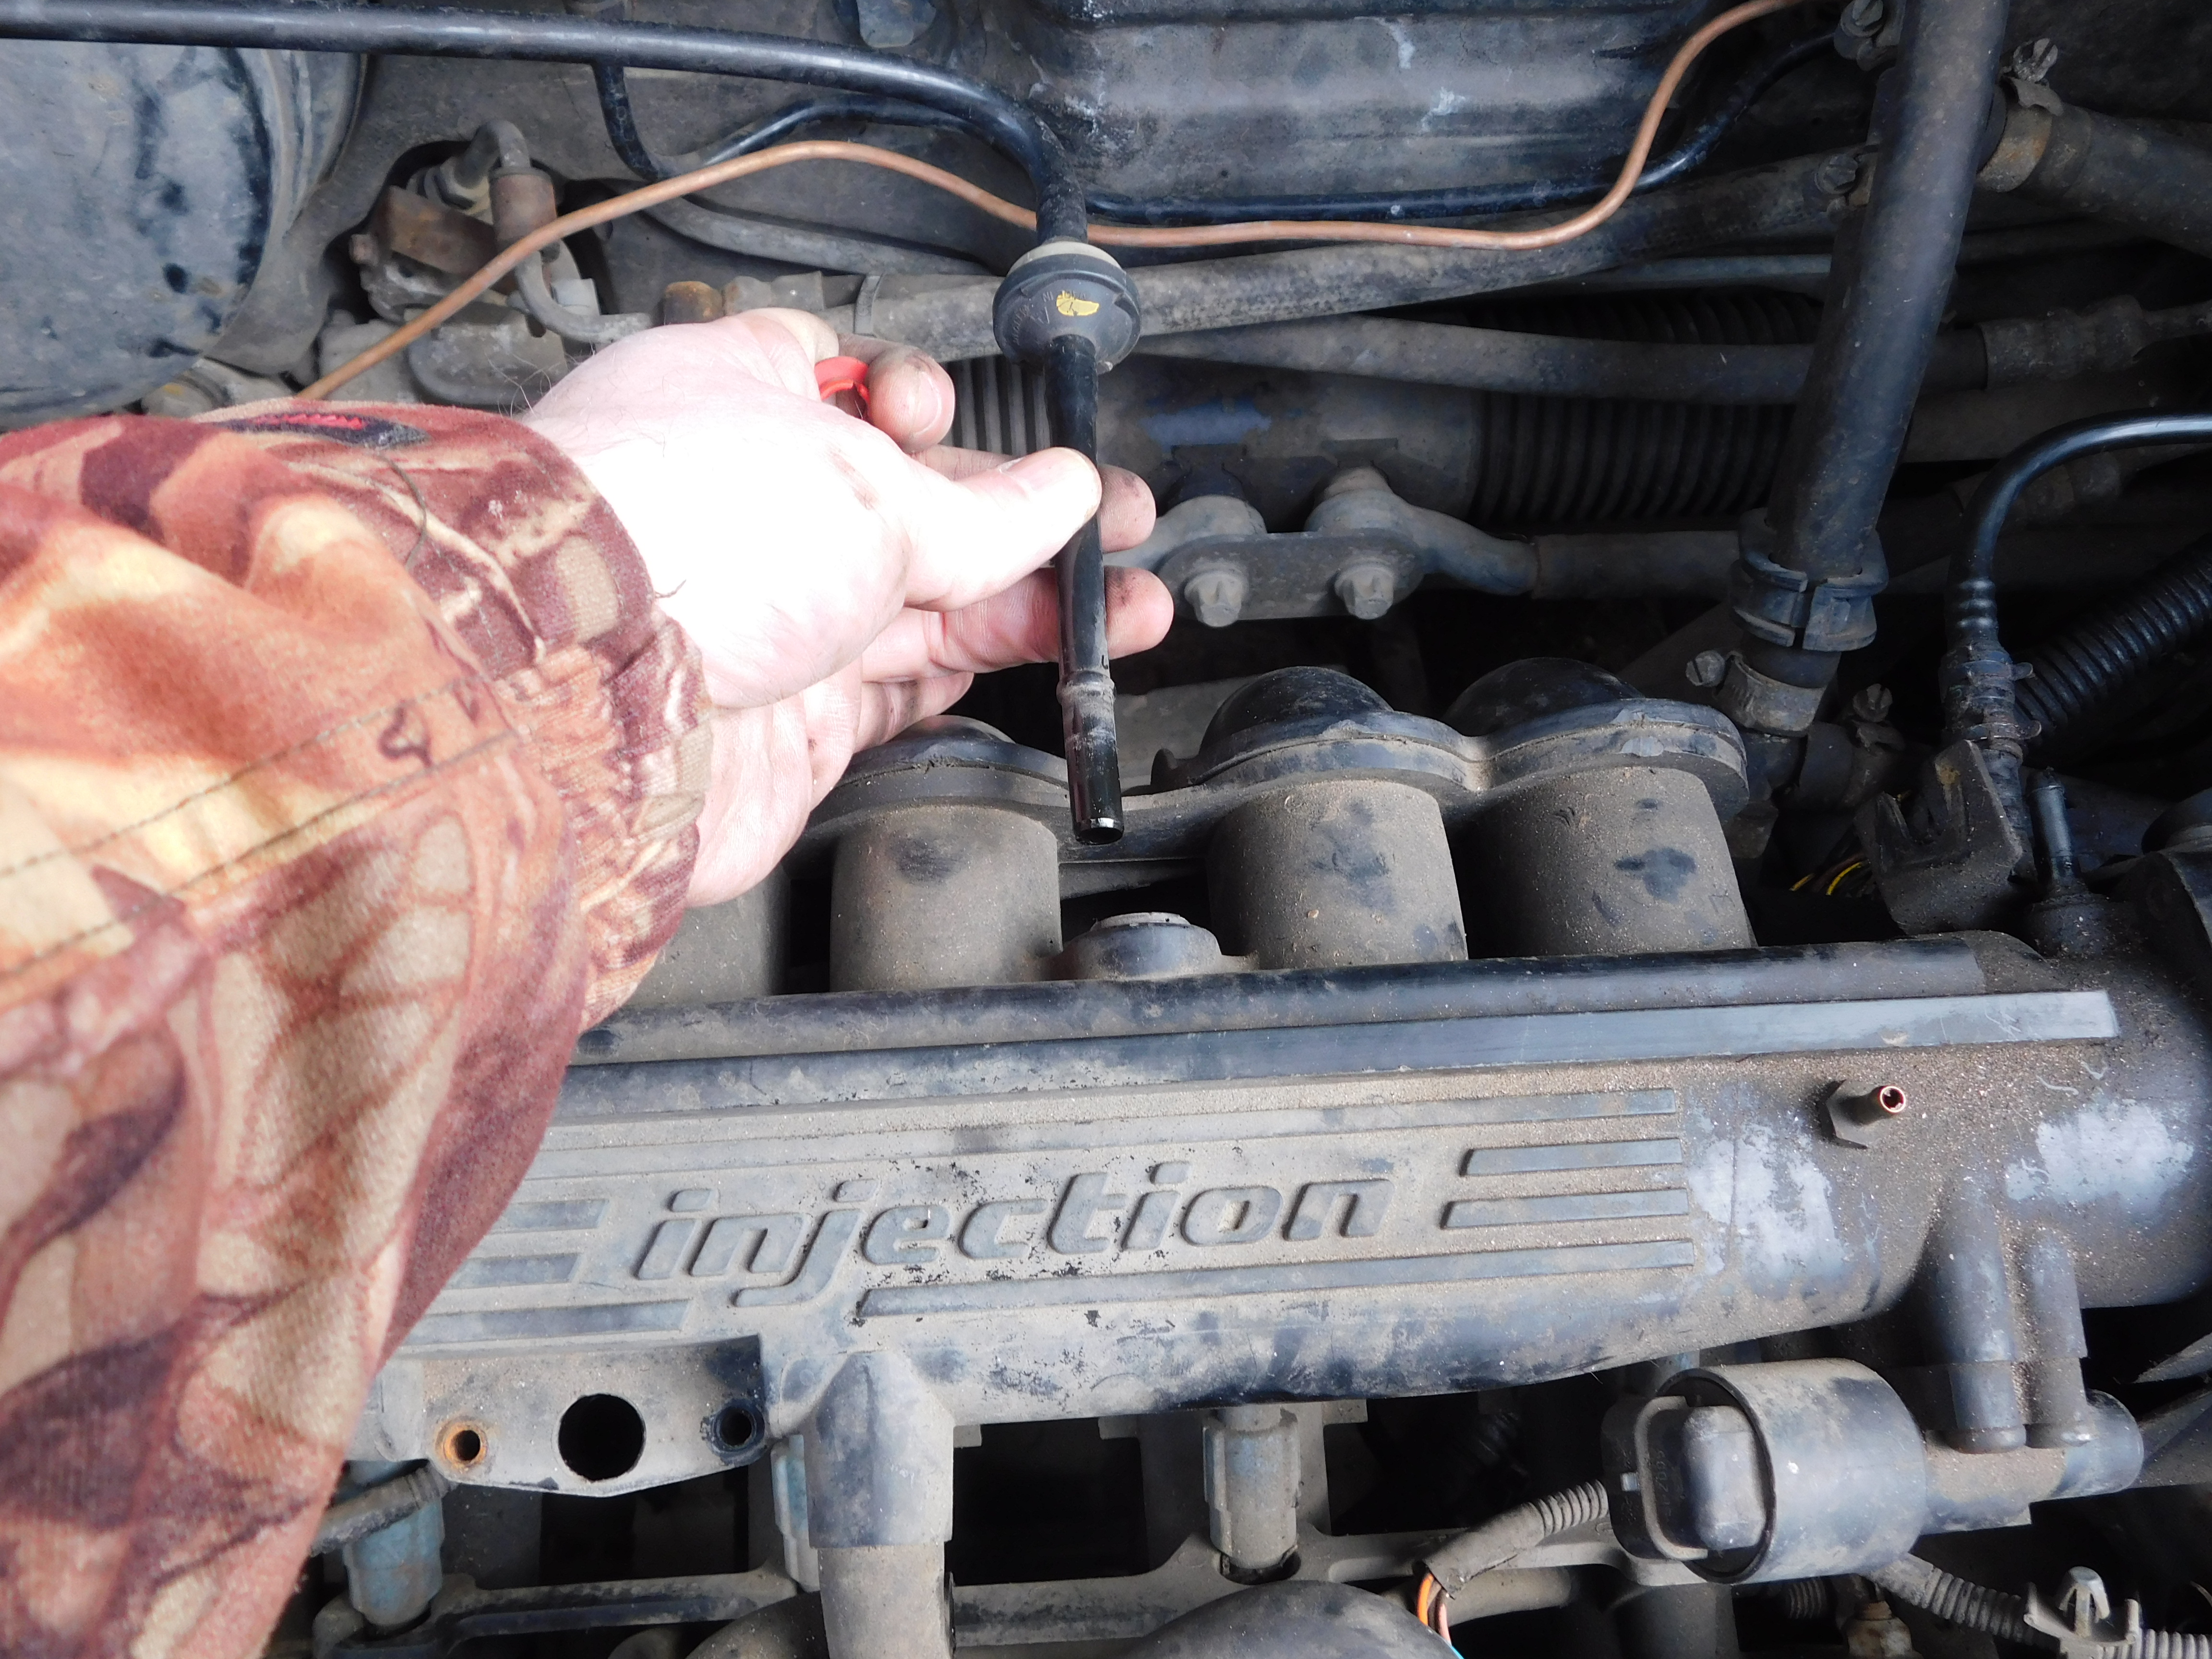
11. This bit is where the Haynes manual says to remove the engine cover and the spark plug leads. They're not in the way, and have nothing to do with the manifold as far as I can see, so I have no idea why you do this. But the mighty Haynes says do it, so I did it. Unbolt the top cover, remove the bolts from sparkplug 1 and 3, then twist and pull the leads out. Remember the order they go back. Unplug the lead from the clip on the far left. Yours will be easy, mine was a pain in the arse because of the LPG bits in the way...
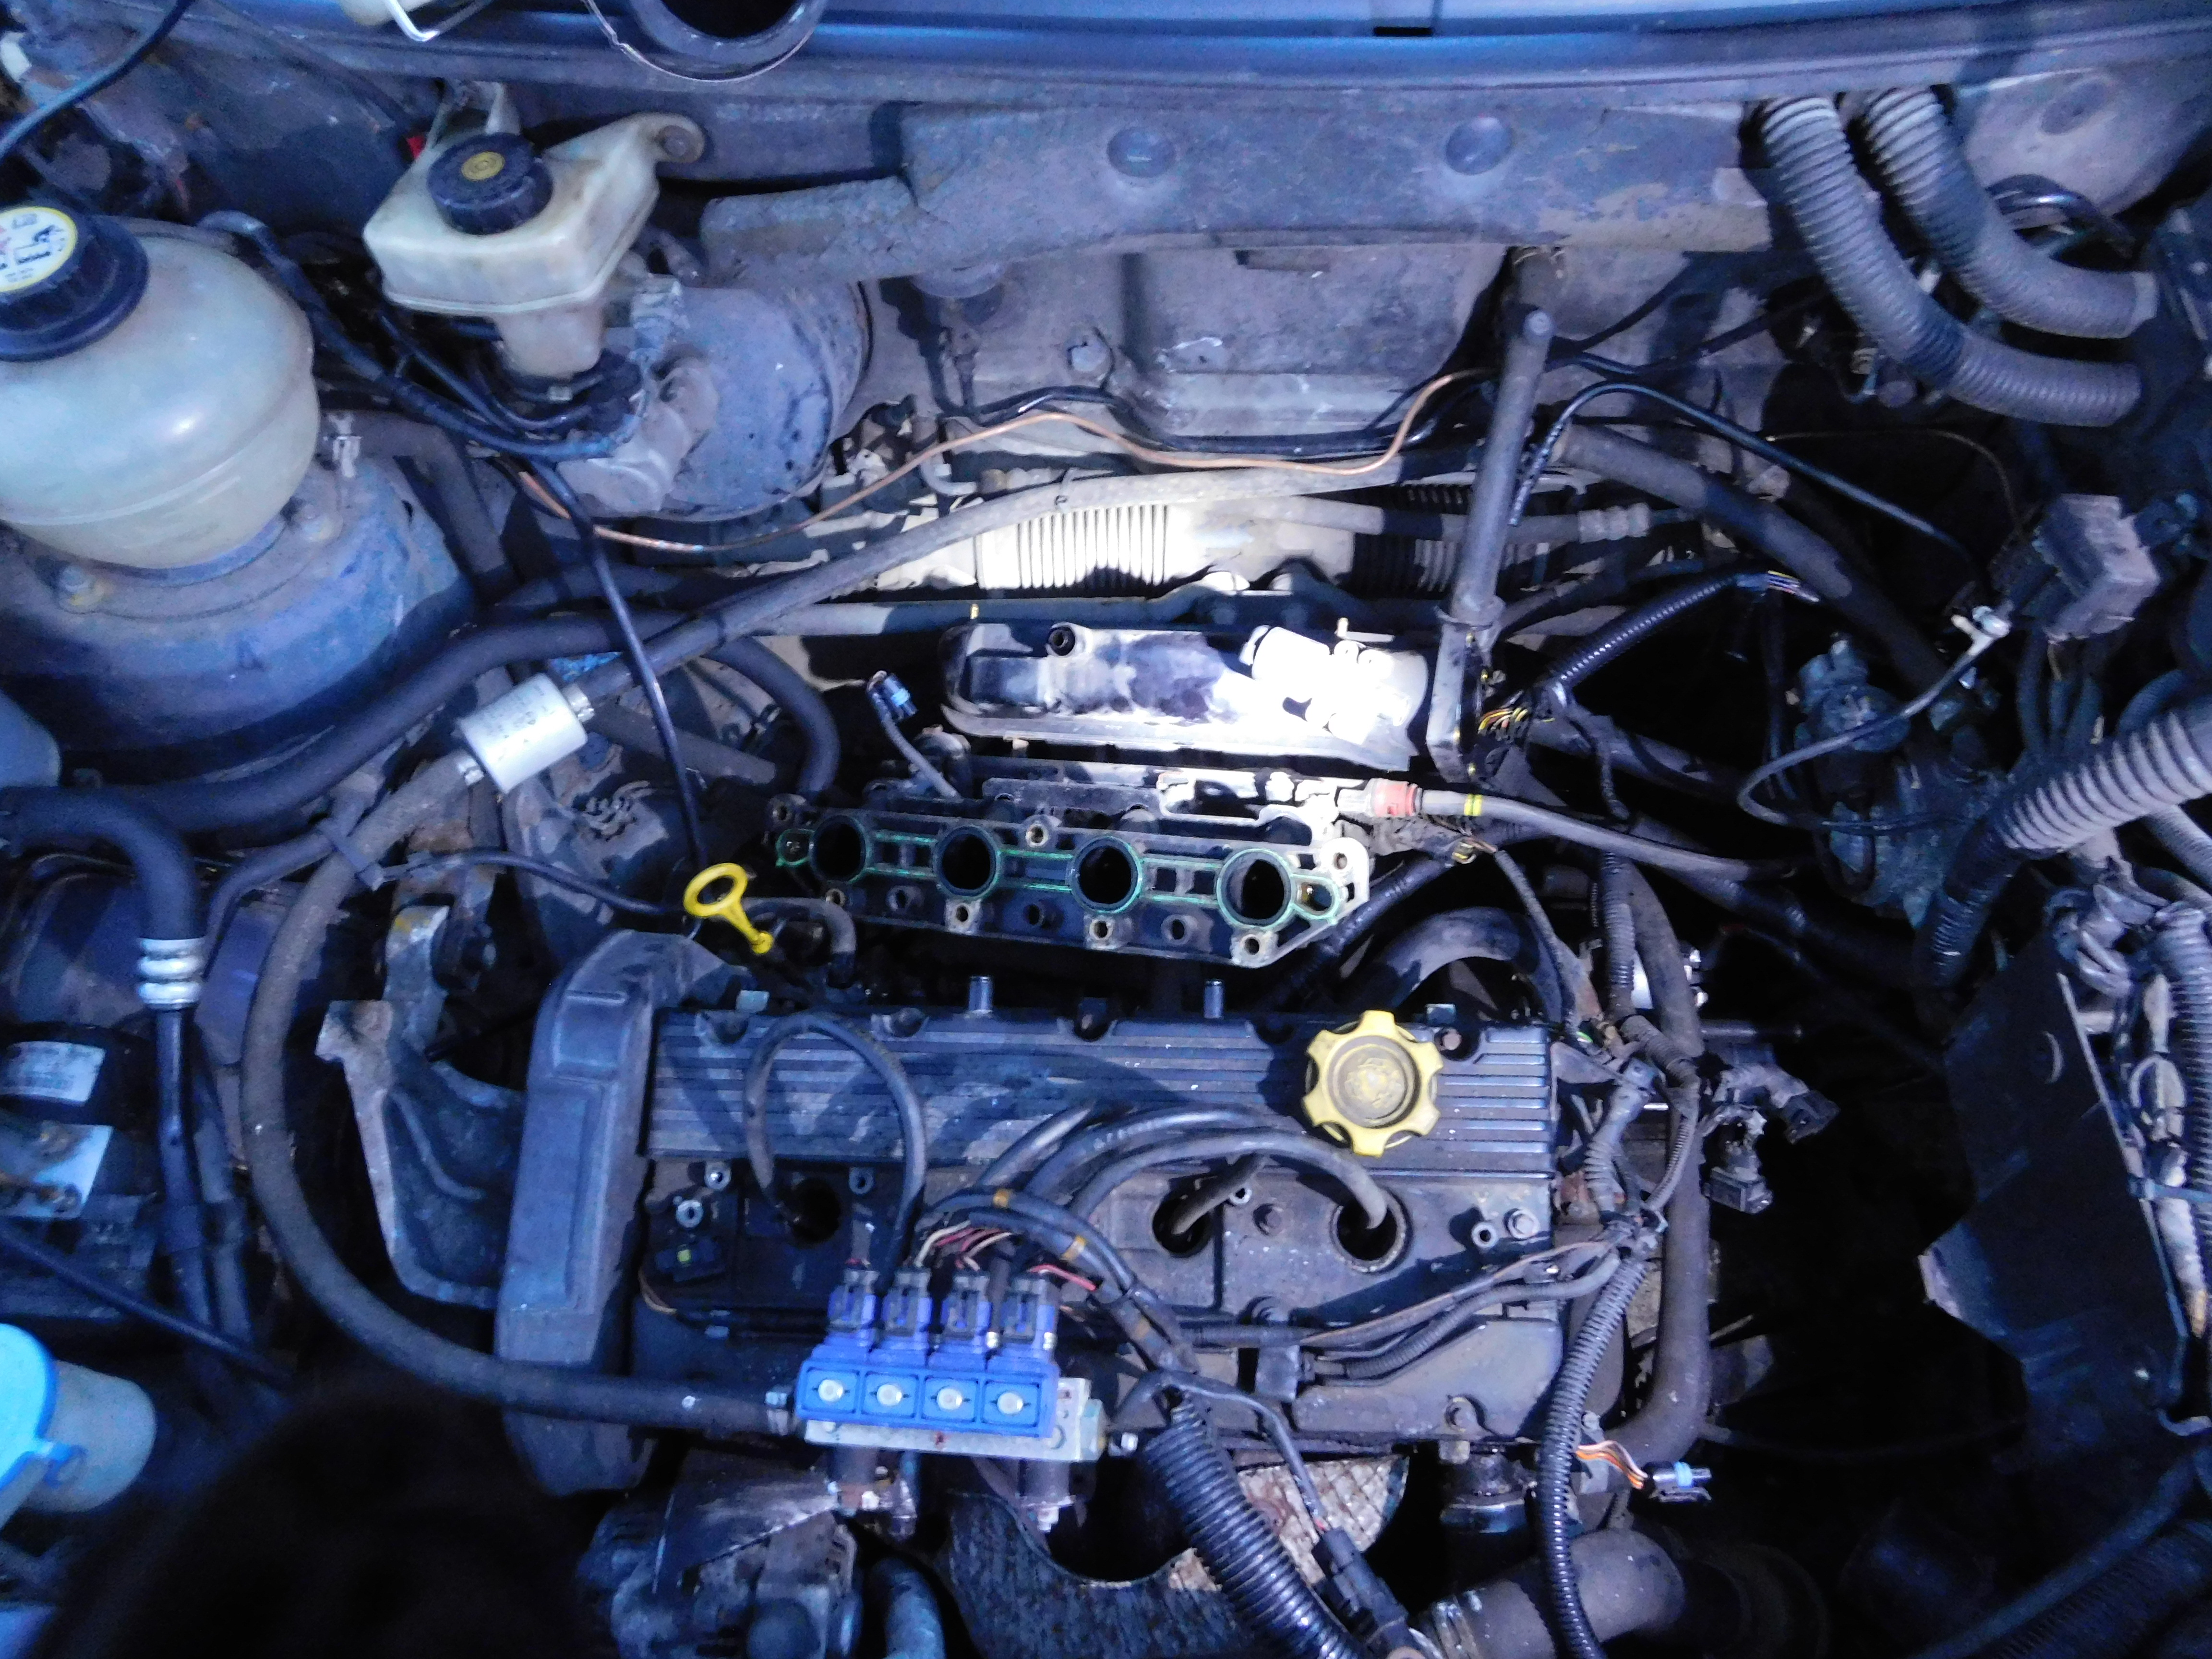
12. Using a 13mm socket, remove the three bolts on the top of the manifold. One on each end, and one in the middle. In the pic below, I'm pointing at the one on the left, the one on the right is partially undone (just above the oil filler cap) and the one in the middle can just be seen in the gap between the three LPG hoses.
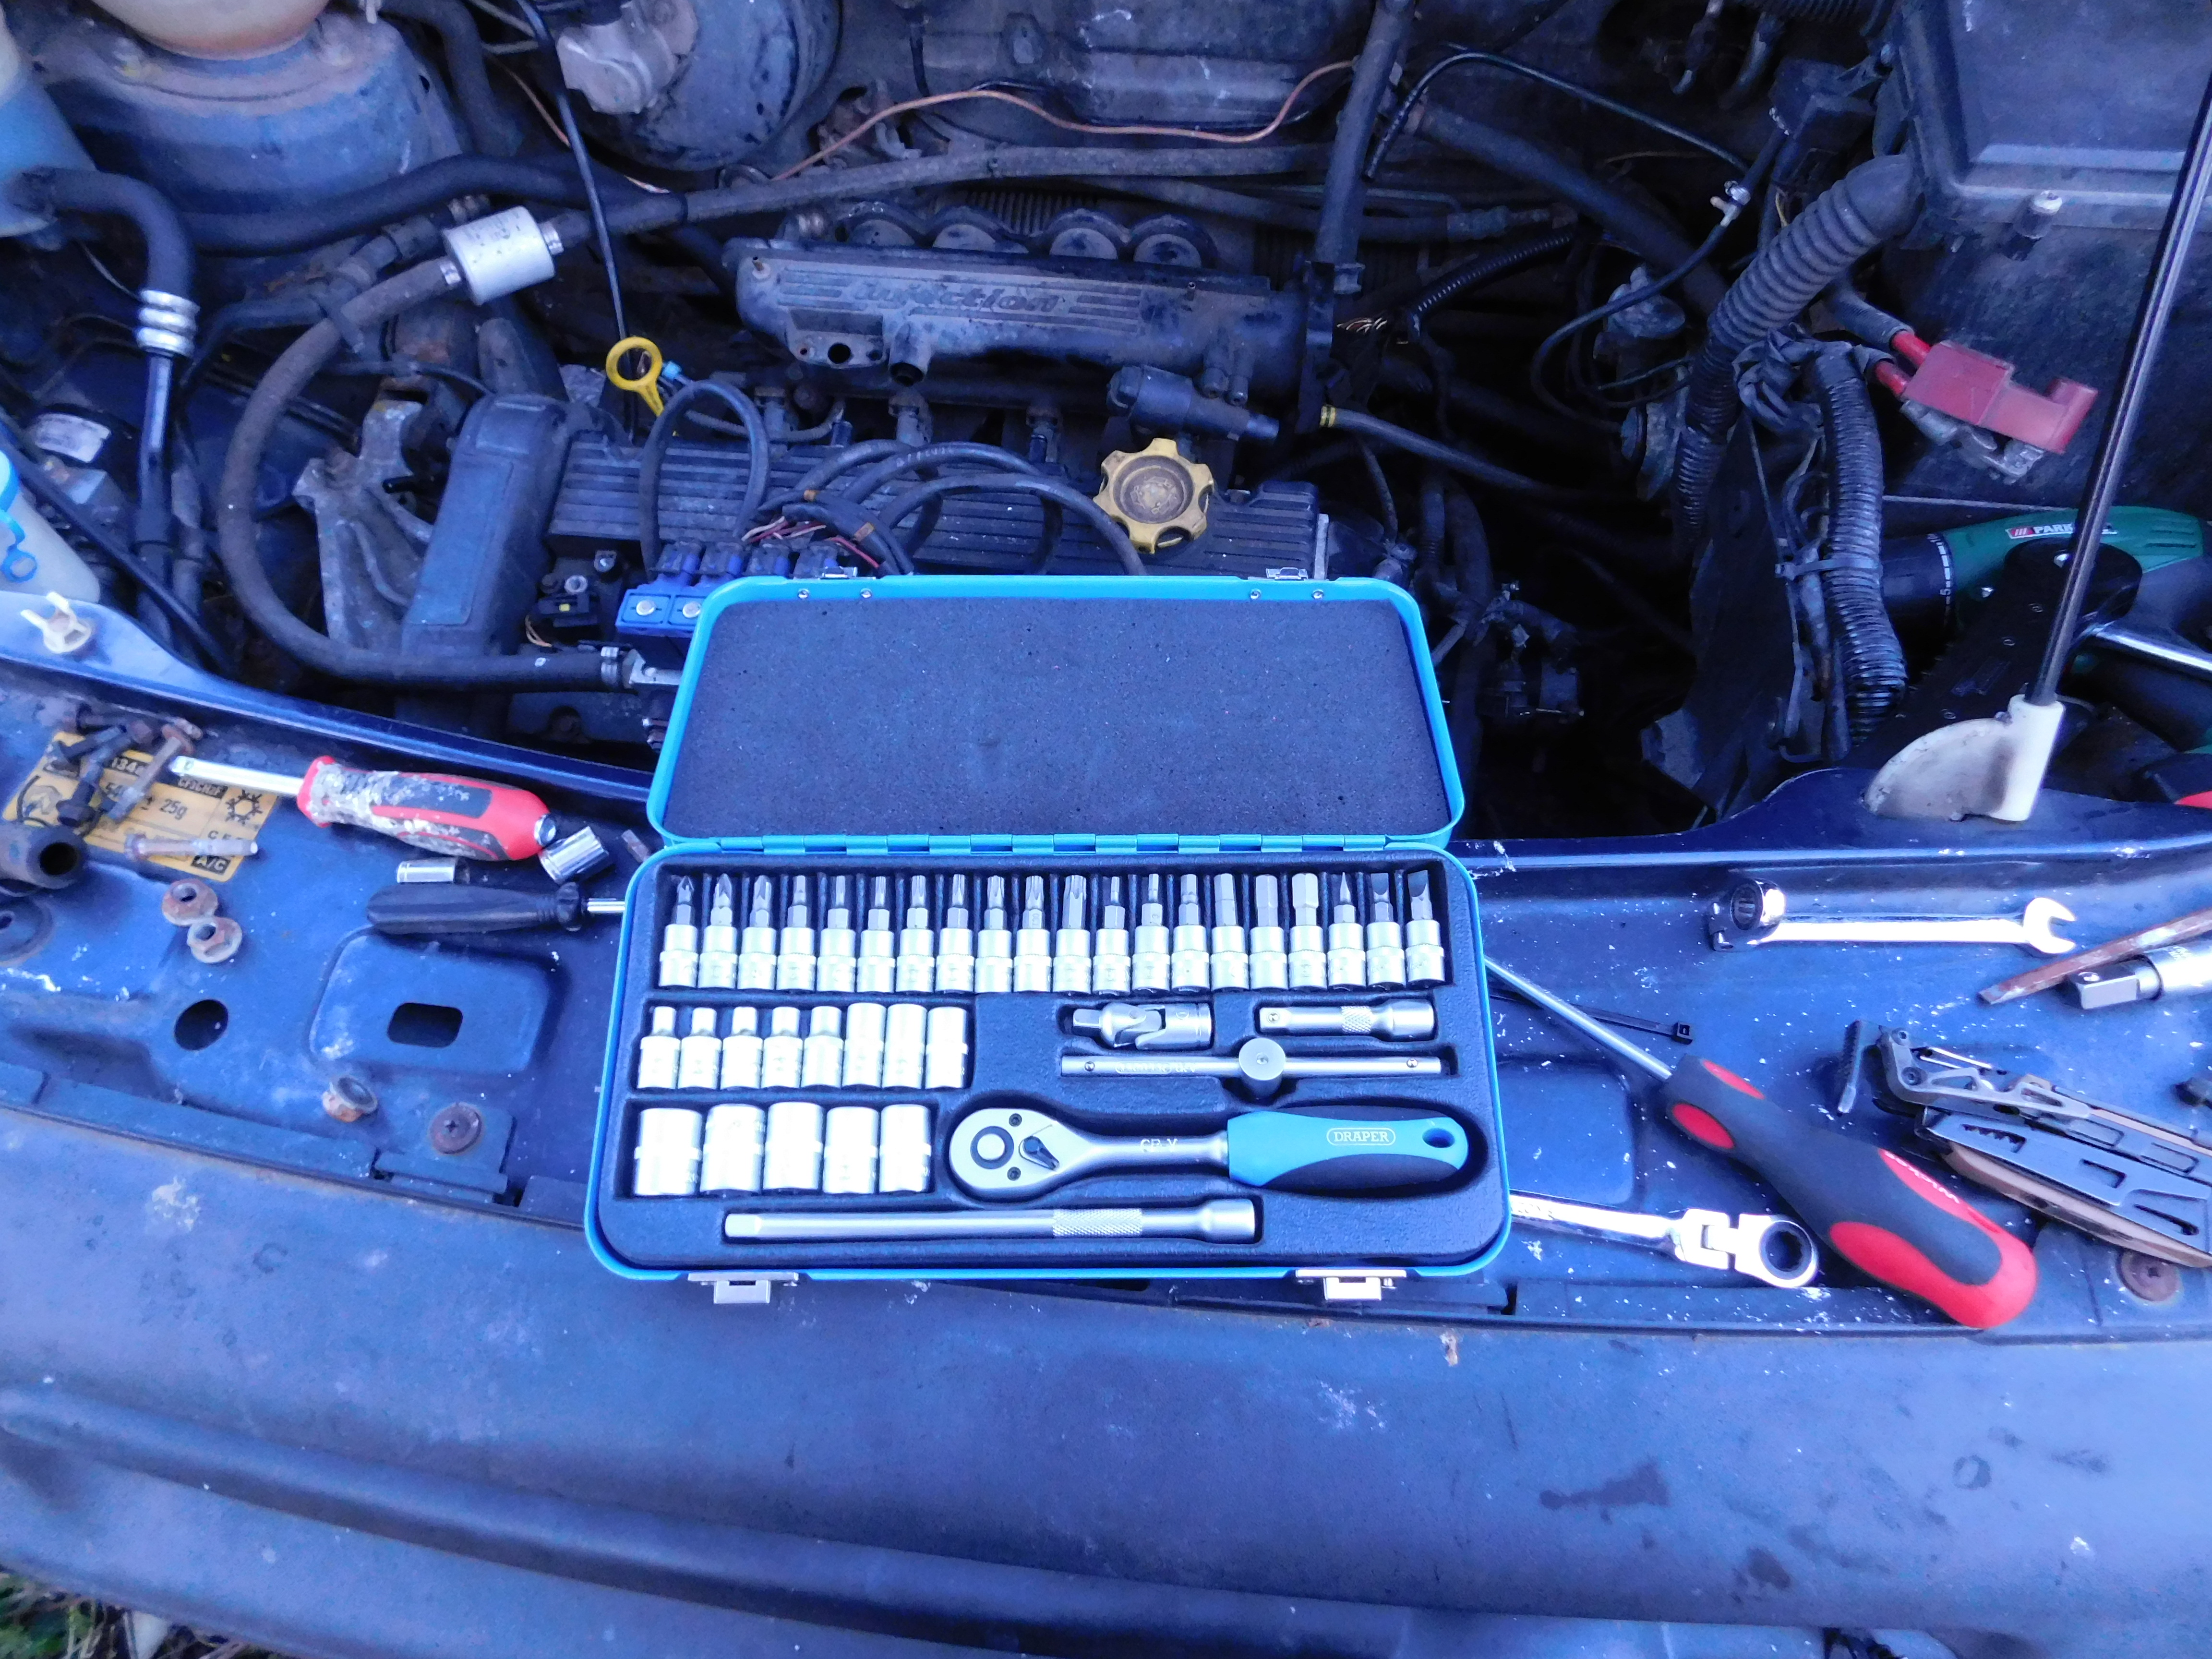
13. When trying to undo the 4 bolts on the bottom of the manifold, it is imperative that you create a long socket extension thing from the 3 or 4 mostly incomplete socket sets you own, then drop the whole thing into the bowels of the engine, where there is no chance of you getting to them while the manifold is still on. No pic of this as I was shouting and throwing a tantrum for a good few minutes.
14. Grab your wifes car keys and drive to the nearest tool shop and buy yourself a nice Draper socket set.
15. Using the two extension pieces and the 13mm socket, remove the 4 remaining bolts holding on the bottom of the manifold. It will now come loose and you can remove the coolant and fuel lines. The coolant line on the left side of the manifold has a spring clip. With a pair of pliers, pull the ends of the clip together and pull the hose off the connector. On the right side of the manifold, the fuel line has a red plastic connector. Depress the tabs on the connector and you can remove the fuel line from the injectors.
16. Remove the two bolts holding the injectors to the manifold - one on each end (already removed in the pic below, on the right of the clip I'm removing). Sorry, cant remember of these were 8 or 10mm. Remove the injectors by first using a flat head screwdriver to pry up the 4 metal retaining clips, one on each injector hose. Retain and keep safe. Now pull the injectors out of the manifold. A tiny amount of fuel will escape - dont worry about it, it will evaporate by the time you're ready to reassemble. This might require a bit of effort to remove.
17. The manifold will now be completely free of ancillary parts, hoses and connectors. Remove from the engine bay and decamp to your kitchen table with the old and new manifolds.
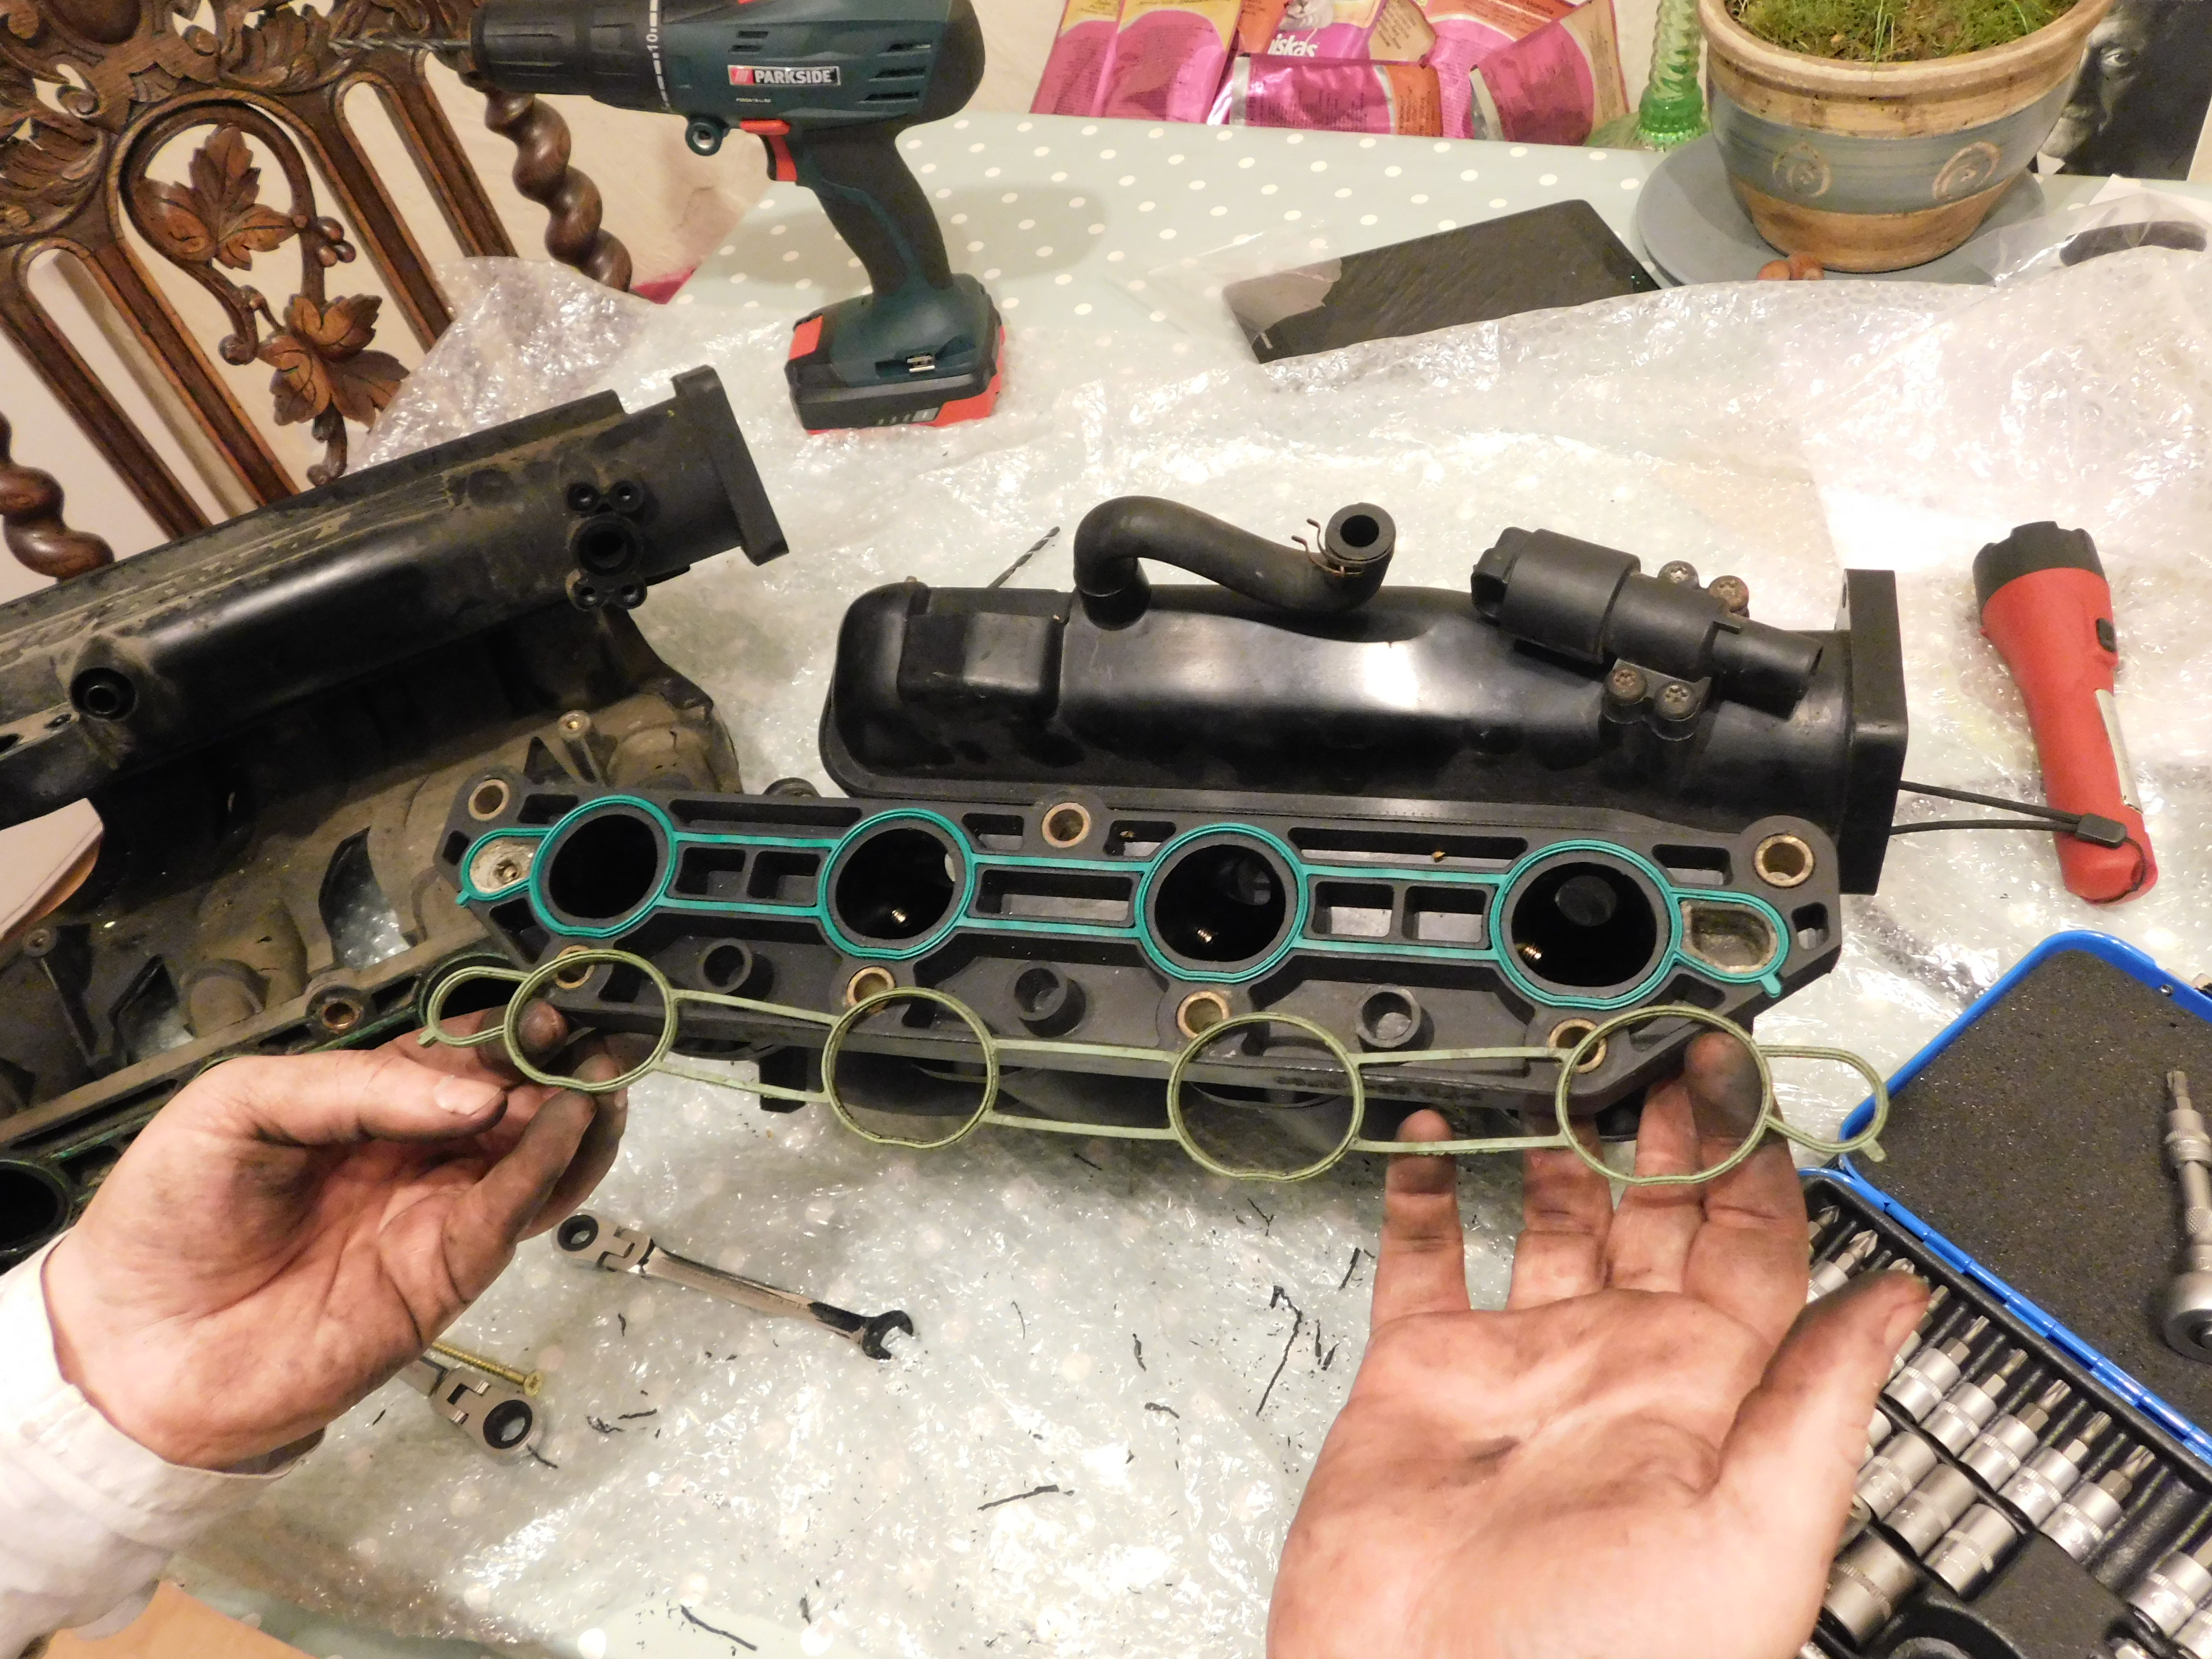
18. In the pic below, the old manifold is on the left, the new on the right. I have already pressed in the hose and moved over the mystery (to me) sensor from the old to the new. This mystery sensor is held in by 4 torx screws. Last job - for you - is remove the old gasket and fit a new one.
19. Refit the manifold by doing everything above in reverse!
I had to drill my manifold to fit various LPG hoses, hence the drill and drill bits in the pic above. You wont have to do that.
For someone whose entire mechanical knowledge amounts to "the engine is at the front", this was a massive job, and gave me nightmares before I did it. It was actually really easy, and has inspired me to complete more jobs on my freebie myself. Also saved me the best part of £300 on the local garage doing it for me, which is nice.
I hope this helps someone
̶
̶H̶o̶w̶ ̶t̶h̶e̶ ̶f̶*̶*̶k̶ ̶d̶o̶ ̶I̶ ̶g̶e̶t̶ ̶t̶h̶e̶ ̶m̶a̶n̶i̶f̶o̶l̶d̶ ̶b̶o̶l̶t̶s̶ ̶o̶f̶f̶?̶ ̶ ̶I̶'̶v̶e̶ ̶b̶e̶e̶n̶ ̶f̶o̶l̶l̶o̶w̶i̶n̶g̶ ̶t̶h̶e̶ ̶H̶a̶y̶n̶e̶s̶ ̶m̶a̶n̶u̶a̶l̶ ̶s̶t̶u̶d̶i̶o̶u̶s̶l̶y̶ ̶(̶a̶n̶d̶ ̶a̶m̶ ̶d̶o̶w̶n̶l̶o̶a̶d̶i̶n̶g̶ ̶R̶A̶V̶E̶ ̶a̶s̶ ̶I̶ ̶t̶y̶p̶e̶ ̶t̶h̶i̶s̶)̶,̶ ̶b̶u̶t̶ ̶f̶o̶r̶ ̶t̶h̶e̶ ̶l̶o̶v̶e̶ ̶o̶f̶ ̶G̶o̶d̶,̶ ̶I̶ ̶c̶a̶n̶t̶ ̶g̶e̶t̶ ̶t̶o̶ ̶s̶o̶m̶e̶ ̶o̶f̶ ̶t̶h̶e̶ ̶b̶o̶l̶t̶s̶.̶.̶.̶
̶
̶I̶s̶ ̶t̶h̶e̶r̶e̶ ̶a̶ ̶t̶r̶i̶c̶k̶ ̶I̶'̶m̶ ̶m̶i̶s̶s̶i̶n̶g̶ ̶s̶o̶m̶e̶w̶h̶e̶r̶e̶?̶
Here is the promised write-up
You will need:
- Haynes manual (so you can read helpful information like "remove the manifold")
- Several socket sets
- Screwdrivers
- Adjustable wrench
- Spanners
- Rags
- Replacement manifold (got mine for £30 delivered)
- Coolant
- Replacement gasket (about £2 from Rimmers I think)
Before:
The blue bits at the front, on top of the engine, are part of the LPG system.
1. Remove the battery and the air filter cover and paper filter inside.
2. Undo the 2 bolts holding the air filter body to the engine bay. You will be left with this:
3. Unclip the rubber hose from the throttle body and remove. You can see a white bottle attached to mine - its valve saver fluid, again, part of the LPG system.
4. Unplug the 3 plugs, as shown below:
4a. The plug on the far left has a simple push tab to release it. The two on the right have a metal clip. Just insert a small screwdriver and pry the metal clip upwards, away from the plug. You can now easily remove the plug from the socket. Better pic of the metal clips are below:
5. Remove the throttle cable from the metal spring thing. Rotate the bit the cable pulls on (the "metal spring thing", and you can remove the cable easily. Slide the cable out of the retaining bracket.
6. Remove the two hoses on the front of the throttle body. The top one will just pull off, the bottom one has a small clip. A pair of pliers pinching together the ends of the clip will allow you to remove it easily. Instead of repeating pics, take a look at the pic in step #4. The hoses are the ones the top arrows are pointing to. The top hose goes to the manifold sensor (I don't know what this sensor is). The bottom hose attaches via a rigid pipe and another small piece of hose to the engine.
7. Unscrew the MAP sensor from the manifold. You'll need a torx bit for this. Put the screws somewhere safe. Don't do what I did, and drop one into the engine, then spend the next hour trying to fish it out...
8. Remove this hose (its just a pressure fit and comes off without much effort). Retain and fit to the replacement manifold.
9. Remove this hose from the back of the manifold. It has a small red clip. Push the clip towards the manifold whilst pulling the hose backwards. Now pull the red plastic clip out and fit to the replacement manifold.
10. Using an 8mm socket, remove the 4 bolts - 1 in each corner - from the throttle body.
11. This bit is where the Haynes manual says to remove the engine cover and the spark plug leads. They're not in the way, and have nothing to do with the manifold as far as I can see, so I have no idea why you do this. But the mighty Haynes says do it, so I did it. Unbolt the top cover, remove the bolts from sparkplug 1 and 3, then twist and pull the leads out. Remember the order they go back. Unplug the lead from the clip on the far left. Yours will be easy, mine was a pain in the arse because of the LPG bits in the way...
12. Using a 13mm socket, remove the three bolts on the top of the manifold. One on each end, and one in the middle. In the pic below, I'm pointing at the one on the left, the one on the right is partially undone (just above the oil filler cap) and the one in the middle can just be seen in the gap between the three LPG hoses.
13. When trying to undo the 4 bolts on the bottom of the manifold, it is imperative that you create a long socket extension thing from the 3 or 4 mostly incomplete socket sets you own, then drop the whole thing into the bowels of the engine, where there is no chance of you getting to them while the manifold is still on. No pic of this as I was shouting and throwing a tantrum for a good few minutes.
14. Grab your wifes car keys and drive to the nearest tool shop and buy yourself a nice Draper socket set.
15. Using the two extension pieces and the 13mm socket, remove the 4 remaining bolts holding on the bottom of the manifold. It will now come loose and you can remove the coolant and fuel lines. The coolant line on the left side of the manifold has a spring clip. With a pair of pliers, pull the ends of the clip together and pull the hose off the connector. On the right side of the manifold, the fuel line has a red plastic connector. Depress the tabs on the connector and you can remove the fuel line from the injectors.
16. Remove the two bolts holding the injectors to the manifold - one on each end (already removed in the pic below, on the right of the clip I'm removing). Sorry, cant remember of these were 8 or 10mm. Remove the injectors by first using a flat head screwdriver to pry up the 4 metal retaining clips, one on each injector hose. Retain and keep safe. Now pull the injectors out of the manifold. A tiny amount of fuel will escape - dont worry about it, it will evaporate by the time you're ready to reassemble. This might require a bit of effort to remove.
17. The manifold will now be completely free of ancillary parts, hoses and connectors. Remove from the engine bay and decamp to your kitchen table with the old and new manifolds.
18. In the pic below, the old manifold is on the left, the new on the right. I have already pressed in the hose and moved over the mystery (to me) sensor from the old to the new. This mystery sensor is held in by 4 torx screws. Last job - for you - is remove the old gasket and fit a new one.
19. Refit the manifold by doing everything above in reverse!
I had to drill my manifold to fit various LPG hoses, hence the drill and drill bits in the pic above. You wont have to do that.
For someone whose entire mechanical knowledge amounts to "the engine is at the front", this was a massive job, and gave me nightmares before I did it. It was actually really easy, and has inspired me to complete more jobs on my freebie myself. Also saved me the best part of £300 on the local garage doing it for me, which is nice.
I hope this helps someone
Last edited: