Disco 1 HELP/ADVICE needed300TDI Disco 1

This site contains affiliate links for which LandyZone may be compensated if you make a purchase.
P gasket. You will unclamp most of the loading force on the P-gasket when you undo the water pump - might pay to have a gasket available just in case.

I'd also have a set of waterpump bolts, especially the long ones in case the buggers prove awkward, and if they stat housing and rad have plastic plugs swap them for brass ones.
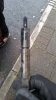
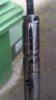
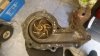
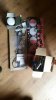
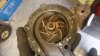
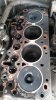
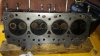
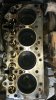
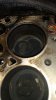
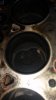
i have all new gaskets and a new water pump. (see pic)
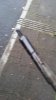
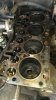
havent got new bolts but they all came out nice and smooth (this time and not long ago when i changed the P-Gasket lol
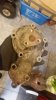
thinking at this point that my rad was BLOCKED and gasket is letting gasses through due to the lack of cooling but i guess at this point its just keep stripping and see what comes of it. back to one of my previous posts is there a way to check the rads integrity while its all in bits.

as always thanks for all the replys good, bad or irreverent they all help me learn lol
 

Attachments

  • 1f7480a4-71e4-4fd2-a1c3-47a7128a9ced.jpg
    1f7480a4-71e4-4fd2-a1c3-47a7128a9ced.jpg
    111.6 KB · Views: 61
IF you don't wont water in oil then take out the stud between the turbo & alternator under the core plug in the block ! BEFORE you take the head off !:rolleyes::rolleyes: Or it's a :oops::oops::oops:
 
Mine overheated a bit eventually swapped the rad. That sorted it. Couldn't tell it was blocked.

Remember the 300TDI rad is "odd" as in the coolant flows across the top half only, down through the tank and then back over the bottom half.

there is also a bypass on the inlet side that goes straight from inlet to return which lets you bypass the rad entirely in case it's frozen solid... so checking a 300 rad for blockages is a bit tricky unless you feel it to check for colder spots...
 
As for the pipe with the valve in that goes to the rad mines never been fastened to the rad as the bit in the rads broke !:eek: So both ends plugged with NO probs !:)
 
ok little update and there will be pics as soon as i get chance (taken them but there on my phone so need to move them to the pc) 2 or 3 of the glow plugs came out oily and also had some WELL lubed injectors lol starting to think i should have let it cook.... but too much time effort and money in it for me to give up now
 
ok first lot of pics glow plugs injectors and the old water pump.
 

Attachments

  • glow plug 1 (1).jpg
    glow plug 1 (1).jpg
    418 KB · Views: 77
  • glow plug 2.jpg
    glow plug 2.jpg
    871.4 KB · Views: 78
  • glow plug 1.jpg
    glow plug 1.jpg
    638.4 KB · Views: 66
  • glow plug 4.jpg
    glow plug 4.jpg
    415.2 KB · Views: 76
  • glow plug3.jpg
    glow plug3.jpg
    697.9 KB · Views: 83
  • injector 1.jpg
    injector 1.jpg
    845.9 KB · Views: 93
  • injector 4.jpg
    injector 4.jpg
    413.8 KB · Views: 102
  • injector 3.jpg
    injector 3.jpg
    527.2 KB · Views: 94
  • injector 2.jpg
    injector 2.jpg
    274.1 KB · Views: 72
  • old water pump 1.jpg
    old water pump 1.jpg
    143.3 KB · Views: 114
  • seals gaskets and water pump.jpg
    seals gaskets and water pump.jpg
    111.6 KB · Views: 102
  • old water pump.jpg
    old water pump.jpg
    137.3 KB · Views: 103
  • old water pump 2.jpg
    old water pump 2.jpg
    604.1 KB · Views: 74
anyone want to run an eyeball over them pics see if you can spot anything :)

edit: if anyone needs a close of of a certain part if you let me know what part i'll get the image taken :)
 

Attachments

  • head removed but gasket still in place.jpg
    head removed but gasket still in place.jpg
    829.1 KB · Views: 144
  • head2.jpg
    head2.jpg
    937 KB · Views: 98
  • head3.jpg
    head3.jpg
    807 KB · Views: 90
  • head1.jpg
    head1.jpg
    730.9 KB · Views: 72
  • head.jpg
    head.jpg
    172.4 KB · Views: 90
  • head4.jpg
    head4.jpg
    605.9 KB · Views: 73
few pics of the cylinders again if someone spots something that needs a better look let me know and i'll get on it and get the more pin pointed picture up on here.
 

Attachments

  • cylinder 2.jpg
    cylinder 2.jpg
    538.4 KB · Views: 116
  • cylinder1.jpg
    cylinder1.jpg
    486.1 KB · Views: 97
  • bottom end gasket removed and wiped.jpg
    bottom end gasket removed and wiped.jpg
    790.3 KB · Views: 113
  • bottom end gasket removed.jpg
    bottom end gasket removed.jpg
    780.3 KB · Views: 102
  • cylinder 4.jpg
    cylinder 4.jpg
    468.8 KB · Views: 69
  • cylinder 3.jpg
    cylinder 3.jpg
    356.9 KB · Views: 73
Only thing that i can see is the amount of oil around No4 pot at the rear left as you look at it !!!! wish you would get a good camera !!!!!!"
 
yeah my camera sucks its hard to get it to focus on there. main thing i been concerned about though is between the valves on cylinder 3 looks like theres a small surface crack going about half way between them. heads not warped at all though so thats something.
 
images a little better and after re-looking the crack i was talking about is on 2 not 3 lol

image numbers are wrong 1 and 2 are 2 and 1 3 and 4 are 3 and 4 though lol
 

Attachments

  • 3.jpg
    3.jpg
    118.3 KB · Views: 134
  • 4.jpg
    4.jpg
    142 KB · Views: 106
  • 1.jpg
    1.jpg
    97.3 KB · Views: 89
  • 2.jpg
    2.jpg
    111.2 KB · Views: 93
Back
Top