Heater Resistor

This site contains affiliate links for which LandyZone may be compensated if you make a purchase.

tinytdi

New Member
Posts
424
Location
North West
Hi Folks.

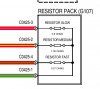
Tiny needs your help again. Her heater blower switch has done next to naff all on number 1 setting for years now, now number 2 has stopped working also. I noticed on a Rover forum this is quite common and eventually all the settings will be dead as the resistors eventually fail. Now then, on the rover they are in the glovebox...anyone got any idea where these mysterious resistors live on the Hippo? :confused:
 
Mine is on the drivers side in the FL

But rover/MG have them behind passenger glovebox.

It was about £14 from LR and repaired one for a rover £24 ????

Only the back board on them differed in shape, couldnt justify the price difference.

You can solder constantan wire with difficulty. Dont have details at hand but if you search the Rover forum. Dr. Dave and few others have done DIY fixes which are probably better than the original.

Resistor wire is from MAPLINS
 
Was banking on a Maplins fix!
So, under the dash it is... Passenger side or Driver side? Final decision? Ask the audience? :confused:
 
Have an assistant stand nearby
Put on knee pads LOL
Open drivers door (assuming your FL is RHD) look up behind centre console to the left of the steering rack.

There should be a green coloured part held in place by two self tappers.

It has 4 wires running into it. Disconnect wiring/connector, unscrew self tappers. remove resistor block.

Shout for help and get assistant to pull you by the ankles from under the dash LOL

It costs pence to do the DIY fix. I had replaced mine a few years back before I noticed the threads about the DIY method.
 
Am I wrong or is my uncle Alzheimer joking with me again when I think to have seen somewhere that also the same thing can be used from Honda (whatever is the cheapest) ??
 
I lied!!!!! It's on the drivers side, saw one today while I was stuck under the dash.......ooooppppsss sorry!!!!
no need ta apologize clutchy,we all make mistakes. . .look at floppy un his slitty motor,but thats er big mistake . . .snigger
 
This might help effect a DIY repair:

With the switch in position 1, current flows through the blower motor to the
resistor pack (C425-4). The current flows through a 2.6 Ohms resistor in the
resistor pack (C425-3) and is connected by a green and black wire to the
blower motor switch (C058-2). The current passes to earth via switch
connection (C058-5). The resistor limits the current flow through the blower
motor which operates in slow speed mode.

With the switch in position 2, current flows through the blower motor to the
resistor pack (C425-4). The current flows through a 1.32 Ohms resistor in the
resistor pack (C425-1) and is connected by a pink and black wire to the blower
motor switch (C058-6). The current passes to earth via switch connection
(C058-5). The resistor limits the current flow through the blower motor which
operates in medium speed mode.

With the switch in position 3, current flows through the blower motor to the
resistor pack (C425-4). The current flows through a 0.27 Ohm resistor in the
resistor pack (C425-2) and is connected by a yellow and black wire to the
blower motor switch (C058-3). The current passes to earth via switch
connection (C058-5). The resistor limits the current flow through the blower
motor which operates in fast speed mode.

With the switch in position 4, current flows through the blower motor and is
connected with the blower motor switch (C058-1) by a slate and black wire.
The current passes to earth via switch connection (C058-5). Because the feed through the motor is direct to the switch, the motor operates at full speed.
 
helfull that james, you would think with modern electrics now that manufacturers would do away with shunt control , so just one pot o- max , be soo much better. . .
 
James - you bloomin star!

Got the resistors out this morning, turns out they are in the heater box under the dash drivers side...just follow the wires. Undid the 2 screws and removed. Was gobsmacked that the resistors make the electrics on a spitfire look advanced. Curly wires???? Mein Gott.
Anyhoo, got the soldering iron out and all is now as it should. In fact its slightly better as I shortened the thinnest wire resistor and now my heater blows well on number 1 setting without the noise you get from number 2 setting. I will be popping off to maplins with my resistor shopping list in hand to replace the crappy curly wire ones next weekend. I am amazed they have lasted as long as they did in the first place!

Many thanks all for your help on this one.

Tiny.:D
 
This might help effect a DIY repair:

Quote:
With the switch in position 1, current flows through the blower motor to the
resistor pack (C425-4). The current flows through a 2.6 Ohms resistor in the
resistor pack (C425-3) and is connected by a green and black wire to the
blower motor switch (C058-2). The current passes to earth via switch
connection (C058-5). The resistor limits the current flow through the blower
motor which operates in slow speed mode.

looking at my Rave disk - this shd be 2.8 Ohms - as per this piccy....
 

Attachments

  • delete.jpg
    delete.jpg
    42.4 KB · Views: 621
looking at my Rave disk - this shd be 2.8 Ohms

That's interesting....so does mine!! "Electrical Library" says 2.6 ohms, "Circuit Diagrams" says 2.8 ohms.... I guess it doesn't matter what you put in as long as you are sensible!!

I may well investigate modifying the switch to a potentiometer, 100% controL! (I've always been a control freak :D ) I'll post up if I do.
 
As you say - it wont make much difference as the values vary between 2.8 and 0 Ohms - it will just alter the fan speed slightly. I am not sure whay current the fan takes - as Watts = Volts*Amps - a high wattage Potentiometer might be necessary.
I should have mentioned - my Rave is a 01/02 NAS disk
 
What have I started?? :D
Well off I go to maplins...I am gonna go for 2.5,1.5 and 0.5 as I hardly ever use anything above setting 2 due to the noise. This should hopefully move settings 1 - 3 further down the range with minimal noise and leave max settings for emergency de-mist hurricaine speed.;)
 
2.5 will make setting 1 slightly higher than it is at the moment - I wud be inclined for 3 Ohms to make the first setting lower than current - just a gentle whisper. Your values of 1.5 and 0.5 seem good. Particularly as setting 4 is always 0 anyway.
 
Back
Top