Head Gasket Replacement?

This site contains affiliate links for which LandyZone may be compensated if you make a purchase.

Anaconda

Well-Known Member
Posts
1,983
Location
Thames Valley
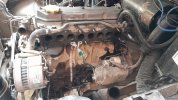
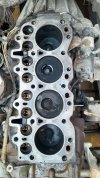
Been reading up a little on head gaskets and am thinking it might need replacing on the son's Ninety.
Although there is no power issues or overheating or fluid contamination it is oily towards the back of the head and down the bell housing.
It does use a small amount of oil and smells a bit of you are following it.
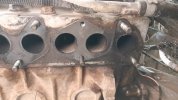
While I'm not over confident about doing it I have done a head gasket on the 2a when we had that. I am a bit concerned on the chances of the injectors being a struggle to get out, can I leave them in?
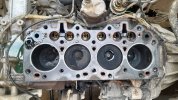
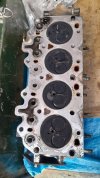
While I am there I guess I should change the valve stem seals, anything else?
Mileage unknown.
Any checks I should undertake or should I just crack on with it?
All advice and tips are welcome.
 
Leave injectors in.

Iv never removed these unless fitting a new head.
Would say takes a day to complete(this allows for plenty of tea breaks)

Oil leak could be the rocker gasket or half moon insert weeping. Clean off & check.
 
What Phil said but if it is the head gasket get an elring one. Tie the bonnet up against the windscreen for good access. Drain the coolent from the block near the turbo drain pipe if you can otherwise you'll get coolent filling the head bolt holes when the had is lifted, not the end of the world just more to clean up.
Stem seals are easy with a valve spring compressor, back off all the valve adjusters before removing the rocker shaft and hold it all together when lifting it off. Watch out for and keep safe the valve stem caps.
 
And, because I've got the devil in me this morning...
Screenshot_20240118_092923_Facebook.jpg
 
Leave injectors in.

Iv never removed these unless fitting a new head.
Would say takes a day to complete(this allows for plenty of tea breaks)

Oil leak could be the rocker gasket or half moon insert weeping. Clean off & check.
I replaced the rocker seals and used sealer on them aswell.
Ignoring the drivers side to discount any possible diesel leaks the joint between head and block gives the impression its leaking oil on rear two cylinders (exhaust side). Of course it could be tracking round from the other side.
Going to have to clean it all up anyway so may aswell do that first.
Seem like a hard engine to keep clean.
 
That's where they commonly go, exhaust side around 3 and 4.
I could feel the air escaping when mine went.
 
Choose wisely , just checked mine it’s a Sykes pikavant but just realised the reason I have trouble getting the collets Back in is for OHC not OHV 🥸
 
Worked for me, mine is similar to top one with the fixed bit that goes on valve , yours has several fittings
You can use, I found on mine working around the little openings getting collets in was a bit awkward , once in releasing handle sometimes put them on the kink and they popped out, I might have had a bit more success releasing pressure slowly using the T. Handle. But note the bottom version which has an open plate to compress valve without anything getting in way , so your chosen one will work better than mine hav8ng the choice of bigger fittings
IMG_3181.png
 
It's off, had to be a little careful with one glow plug which was a little stiff apart from that it went OK.
Got carried away and took the injectors out which came out easy.
Although, to me, it looks as if the gasket was OK.
Should I lap the valves and is it as easy to do as it looks, what's the scope for messing it up?
The dowels have stayed in the head, will they just twist out?
 

Attachments

  • 20240120_120221.jpg
    20240120_120221.jpg
    335.6 KB · Views: 36
  • 20240120_120302.jpg
    20240120_120302.jpg
    265.9 KB · Views: 35
  • 20240120_120313.jpg
    20240120_120313.jpg
    300.9 KB · Views: 35
  • 20240120_142538.jpg
    20240120_142538.jpg
    345.7 KB · Views: 38
  • 20240120_142546.jpg
    20240120_142546.jpg
    395.3 KB · Views: 48
  • 20240120_142557.jpg
    20240120_142557.jpg
    277.4 KB · Views: 38
  • 20240120_143350.jpg
    20240120_143350.jpg
    328.3 KB · Views: 42
  • 20240120_152647.jpg
    20240120_152647.jpg
    316.5 KB · Views: 38
If you keep all the valves in order, then closely inspect the seating on valves and head and you might see nice clean area all the way round.
halfords do the rubber sucker thing on stick and the valve paste. My 2286 valves were well worn with a concave shape all round most valves , I changed the lot. Easy to lap them in coarse then fine paste
I cleaned valve heads and stems with mini grinder and cup brush which removes all the carbon
how are bores looking no ridge at top
There is a slight ridge at the top, what's the plan of action with that? Carbon deposits?
 
carbon deposits on valve head and lower part of stem, these valves and seats were fine but cleaned up nicely, the 2286 was worse, the ridge shows how much the valve has worn, you could price up new valves and make a decision, how did it run , how good is seats apart from ridge , will lapping give you a smooth unbroken seat area all way round , have a look at Turner engineering for parts and prices


IMG_6459.JPG
 
Back
Top