Gearbox removal rear main replacement

This site contains affiliate links for which LandyZone may be compensated if you make a purchase.
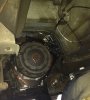
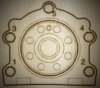
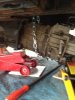
lowering box right down as far as possible makes removing cover easy

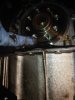
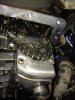
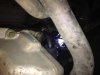
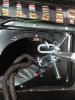
I couldn't get the cover off in this position, it was pretty much glued on, so I left it on to come out, wasn't sure if it had melted on or was actually glued on, but managed to get it out the way enough.
 
After some lowering, pulling and a bit of pry-baring the gearbox came out and eventually I got it on the floor.

It would be interesting to know how much it actually weighs.
If anyone knows?
 
Forgot to say, when I took out the bottom 4 bolts I had a lot of water, oil and general soot from the clutch that poured out the bottom. The gearbox had pretty much sealed this into the bell housing and for some reason hadn't drained out through any of the drain holes.
 
With the gearbox out, the clutch cover is exposed.
 

Attachments

  • image.jpg
    image.jpg
    321.3 KB · Views: 194
After removing the nuts on the clutch cover, support the cover and clutch disk and remove it off the lugs that support it, I had to lever this off a bit as it was stuck on.
With the cover and dick removed this exposes the flywheel, and the 8 bolts.
These bolts are 'plastic region tightening bolts' and shouldn't be reused, but the torque is only 40nm then 90 degrees, so probably could.
I bought these from Land Rover and they only cost £9.00 for the set, so I was happy to replace them.

I had bought a new clutch and cover and release bearing.
I got genuine parts as I figured that I wouldn't be doing this again so wanted to buy genuine bits.
I'm sure that there are much cheaper and equally as good parts but there are some things that I would always buy genuine.
The one thing that I should have bought extra was the plastic clip that holds the clutch release bearing on to the fork. This is a tiny plastic clip and was bent a little, and probably could have been replaced.
 

Attachments

  • image.jpg
    image.jpg
    268.2 KB · Views: 167
With everything off you can see the rear main and sump seal clearly.
The rear main was leaking round the inner rubber seal. And there was a crack on the metal to the bottom right.
You can just about see the rear main seal is wet with oil, I can't remember if I wiped it before I took the picture or not.
You'll see in the next picture the main reason it was leaking.
 

Attachments

  • image.jpg
    image.jpg
    384.9 KB · Views: 175
The sump seal was spit by the bottom of the rear main.
There is a large split that runs between both the lugs on the sump seal.
 

Attachments

  • image.jpg
    image.jpg
    451.1 KB · Views: 190
It looked to me that the rear main had been put in without the sump being removed and this has caused the sump seal to split.
I'm guessing the seal was put in on the bottom first and then levered up and this has caused the lugs to move and the seal to split.
 

Attachments

  • image.jpg
    image.jpg
    347.5 KB · Views: 156
As the seal was split, this needed the oil sump to be removed.
To remove the sump the chassis needs to be lifted and the axle supported to enable the gap to be big enough to get the oil sump out.

It is just a case of removing the bolts, making sure they are removed in the correct way, as there is a sequence. Also a few of the bolts at the rear are longer than the others, but it's pretty obvious which ones are.

Also support the sump as it's aluminium and can crack if dropped.

I hope that he doesn't mind me putting a link to this website, but it is an excellent site and has a few bits on there about replacing the sump and the oil pump bolt, which apparently is common, so I replaced it too.

www.discovery2.co.uk / TD5 "Famous" Oil Pump Bolt
 
I cleaned the sump up and basically followed the instruction on the website above.
I cleaned and replaced the rear main oil seal, and I used the plastic seal protector ( part number LRT-12-061 ) that was supplied with the rear main, so that the seal slips over the Crankshaft end easily.
You need to put it on at an angle it to get it on, I couldn't get it to go over it by pushing it on straight.
Also there is a tightening sequence for this, and they are tightened to 9 nm
 

Attachments

  • image.jpg
    image.jpg
    275.1 KB · Views: 148
After the sump was cleaned and dried and the gasket added to the areas shown I put the seal back on the block side rather than the sump side, I'm sure you can do it either way, but this seemed the logical thing to do as you can see the securing lugs are fitted to the sump when it's fitted, but you can't see them in the block if you do it the other way.
With the sump back up I tightened the bolts in the order shown on the website.
 
I had the same problem with the oil pipe too, the pipe was starting to wear through rubbing against the sump, so I cable tied it out the way as a temporary measure. I'll do something more permenant at some stage.
But just for now wrapped some hard plastic round it and cable tied it in position too.
 

Attachments

  • image.jpg
    image.jpg
    135 KB · Views: 131
The engine support was money well spent as I said earlier on. It made life so much easier. I cut 2 pieces of wood to fit in the seats, wrapped them in card to protect the seats and put the support across the two seats.
 

Attachments

  • image.jpg
    image.jpg
    258.5 KB · Views: 148
Before the gearbox goes back in make sure the spiggot bush is ok, clean and not cracked, it's only a few £ to replace it if you want.
 
Back
Top