Jrdinger
New Member
- Posts
- 44
- Location
- N 36.062 W 96.023
Gaylander How To Clean Up your Fuel Pump
.
So I did the simplest thing I could think of. I yanked out the Fuel Pump and cleaned it up.
Here's how:
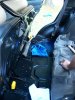
I flipped up the seats and pulled back the floor cover by unscrewing the little plastic clips a quarter turn, until they released. The fuel pump is directly under the metal cover on the passenger side. The screws are a #3 Phillips.
Putting the screws and cover aside, I popped the hood and removed the fuel pump relay ( its pretty clearly marked ) under the fuse cover on the ( US models ) drivers side. I fired it up until it stalled, telling me that the fuel system was depressurized completely. I then removed th battery "hot" cable from the post, wrapping it in a shop cloth as I did so. DO NOT PROCEED UNTIL YOU HAVE DONE THIS.
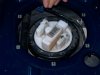
I then used a screwdriver to pop the clips on the electric motor feed, on the top of the fuel pump, followed by the fuel line itself. If you have one, use a yellow chalk stick or white-out to mark the original position of the collar. Now it was time to remove the locking collar that holds the pump in place. I hear that Land Rover has a tool for this, but I figured that a #4 flat blade screwdriver and a ball peen hammer would do the trick. I was right. The pump is spring loaded, and this provides some resistance against the collar when removing it.
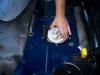
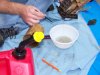
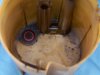
Put the collar to the side, and the pump pulls out of the tank. You will have to rock it to get the float to clear without bending it. This is a good time to dip a small jar into your tank and check your fuel quality, and any sediment build up in the tank.
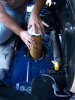
I pulled the pump body out and placed it in a glass bowl I had brought along to catch any fuel that might leak out. I had also put down a blue tarp on my driveway, and had plenty of rags handy as well. An old toothbrush is nice to have around to clean away any old grime that your rags wont get. I also placed a clean rag over the hole left by the pump, to keep anything from dropping into the tank.
Placing the pump on my tarp, I removed the outer sleeve by popping the tabs on the side and pulling it down, being careful not to damage the rubber seal at the top of the body.
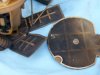
The screen condition will be immediately obvious. Mine was jet black and completely clogged, causing the pump to overheat as it worked too hard to supply the necessary fuel. This also explained why the engine ran so much better without stalling on cool days.
I removed the screen by opening the side panels of the screen gently outward, then prying the bottom collar away with my screwdriver. The picture shows it better than I can explain it. The screen is a snap fit, and it doesn't require a lot of pressure to get it off.
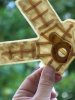
At this point, I placed the screen in a bowl of clean fuel and brushed it with a toothbrush to get the loose stuff. Then I put it on the driveway, and at max pressure, I flushed it out with my garden hoses' pistol grip sprayer. To dry it off, I used a hair dryer set to "low heat", as the plastic mesh is quite delicate, and I didn't want to melt it.
I then flushed the pump with clean fuel, and brushed all of its surfaces clean, then reassembled the pump.
Putting the pump back in can be a bit tricky, ( mind the float! ) as putting the necessary pressure on the pump to get it down into the tank while trying to lock the collar on isn't easy for one person to do. Have someone lock the collar on while you stand on the pump.
Reattach your fuel line, electrical feed, fuel pump relay, and battery. She should fire right up for you after the line pressurizes. You may have to try it twice.
I did this about six thousand miles ago and the difference has been amazing, and I am going to add this as standard procedure with my Freelander tuneups. This may be just the fix for quite a few Freelanders out there with the performance and stalling issues that have plagued these machines.
.
So I did the simplest thing I could think of. I yanked out the Fuel Pump and cleaned it up.
Here's how:
I flipped up the seats and pulled back the floor cover by unscrewing the little plastic clips a quarter turn, until they released. The fuel pump is directly under the metal cover on the passenger side. The screws are a #3 Phillips.
Putting the screws and cover aside, I popped the hood and removed the fuel pump relay ( its pretty clearly marked ) under the fuse cover on the ( US models ) drivers side. I fired it up until it stalled, telling me that the fuel system was depressurized completely. I then removed th battery "hot" cable from the post, wrapping it in a shop cloth as I did so. DO NOT PROCEED UNTIL YOU HAVE DONE THIS.
I then used a screwdriver to pop the clips on the electric motor feed, on the top of the fuel pump, followed by the fuel line itself. If you have one, use a yellow chalk stick or white-out to mark the original position of the collar. Now it was time to remove the locking collar that holds the pump in place. I hear that Land Rover has a tool for this, but I figured that a #4 flat blade screwdriver and a ball peen hammer would do the trick. I was right. The pump is spring loaded, and this provides some resistance against the collar when removing it.
Put the collar to the side, and the pump pulls out of the tank. You will have to rock it to get the float to clear without bending it. This is a good time to dip a small jar into your tank and check your fuel quality, and any sediment build up in the tank.
I pulled the pump body out and placed it in a glass bowl I had brought along to catch any fuel that might leak out. I had also put down a blue tarp on my driveway, and had plenty of rags handy as well. An old toothbrush is nice to have around to clean away any old grime that your rags wont get. I also placed a clean rag over the hole left by the pump, to keep anything from dropping into the tank.
Placing the pump on my tarp, I removed the outer sleeve by popping the tabs on the side and pulling it down, being careful not to damage the rubber seal at the top of the body.
The screen condition will be immediately obvious. Mine was jet black and completely clogged, causing the pump to overheat as it worked too hard to supply the necessary fuel. This also explained why the engine ran so much better without stalling on cool days.
I removed the screen by opening the side panels of the screen gently outward, then prying the bottom collar away with my screwdriver. The picture shows it better than I can explain it. The screen is a snap fit, and it doesn't require a lot of pressure to get it off.
At this point, I placed the screen in a bowl of clean fuel and brushed it with a toothbrush to get the loose stuff. Then I put it on the driveway, and at max pressure, I flushed it out with my garden hoses' pistol grip sprayer. To dry it off, I used a hair dryer set to "low heat", as the plastic mesh is quite delicate, and I didn't want to melt it.
I then flushed the pump with clean fuel, and brushed all of its surfaces clean, then reassembled the pump.
Putting the pump back in can be a bit tricky, ( mind the float! ) as putting the necessary pressure on the pump to get it down into the tank while trying to lock the collar on isn't easy for one person to do. Have someone lock the collar on while you stand on the pump.
Reattach your fuel line, electrical feed, fuel pump relay, and battery. She should fire right up for you after the line pressurizes. You may have to try it twice.
I did this about six thousand miles ago and the difference has been amazing, and I am going to add this as standard procedure with my Freelander tuneups. This may be just the fix for quite a few Freelanders out there with the performance and stalling issues that have plagued these machines.
Attachments
-
 remove_collar.jpg8.8 KB · Views: 7,766
 -
 remove_pump1.jpg9.2 KB · Views: 6,510
 -
 remove_pump2.jpg12.7 KB · Views: 7,051
 -
 pump_removed.jpg17.1 KB · Views: 7,167
 -
 Flushing_pump.jpg10.9 KB · Views: 5,994
 -
 dirty_pump_case.jpg7.5 KB · Views: 5,723
 -
 dirty_screen.jpg9.6 KB · Views: 5,523
 -
 clean_screen.jpg11.5 KB · Views: 5,179