Discovery Rust - Boot, Sills and Wings

This site contains affiliate links for which LandyZone may be compensated if you make a purchase.
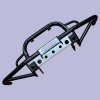
There's no real way of redesigning it. I mean, it works the way it works, but it also has side effects. An HD bumper for instance doesn't have many serious drawbacks in the off road world, so we're all happy to use them. A snorkel aswell, etc etc.

A steering guard of course isn't as set in stone as that.

Some of the challenge guys are using guards made up of 30mm bar, so it does the same job but with less of a scoop. Arguably stronger made out of bar aswell.

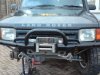
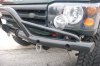
The track rod protector works well. The QT front guard of course does that job on a lesser scale. Does take a lot of the weight off the bar.

HD bars are a must. I would recommend the Terrafirma bars, supplied with greaser joints for about £100.

You can easily weld some box onto the QT guard and make up the same principle. You can't directly fit the Glyn Lewis guard to the axle with the QT guard anyway so there's still mods to be done.

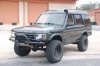
All that said, I've had HD bars, QT guard and no steering guard for the best part of 18 months, I've been over, under or through the worst that northern England and Wales could throw at it (albeit with an element of care but often a battering of v8 power) and its all supa dupa.

Cheers :)
 
Thanks for your input Sam. I am now lost lol. I must admit I have never had a steering guard on any of the off roaders I have owned and never had any issues. In fact the only problem I ever had was ripping a bull bar off which had a built in protector bar.

I do believe the HD bars are a must too.
 
Green hornet im loving your disco youve done a brillant job, im liking the smooth look without the bumpers and like to go that route atleast for now but is it road legal and mot standard, have you had any problems ie police lol, thanks :)
 
Green hornet im loving your disco youve done a brillant job, im liking the smooth look without the bumpers and like to go that route atleast for now but is it road legal and mot standard, have you had any problems ie police lol, thanks :)

Thanks for the complements. I like the look too but prefer a more menacing view at the front.

Bumpers aren't needed for the mot and no I haven't had any problems from the police and yes I do get noticed by them as I'm hard to miss lol
 
wicked thanks gez, im starting now with a blue 3 door pretty much the same as you started with, really like the work uve done, plus this page is a really good post with alot of help needed, im new to disco scene but not new to cars, modification etc, cant wait
 
hi enjoyed the advice and encouragement you gave to green hornet, yours must have been some project [time&money] but looks great. just bought my first disco pick it up tomorrow [94 300 tdi] have owned 90 &110 safari in the past ,18 years ago; now looking forward to the rebuild ps hope this is not boring first time on forum.
 
It's nice to see that I have helped encourage and inspire. Don't forget piccies. The more the merrier lol

Good luck with the projects and I look forward to reading the posts.
 
Ok so day one after getting paid and the disco wins again.

One set of nice new sumo bars and track rod ends. I have thought about the steering guard and as it has been pointed out to me, they can cause more hassle than they are worth so thought that I would go with the bars first and then fit some pretty guard later if I feel like it.

So the Hornet will be off the road for a few days as I fit these and paint the axle as well as changing the oil and timing belt.

Guess I will be cycling to work for this week lol. No rush you see
 
Pics will follow when I fit them. I am currently making up the relocation brackets for the damper as I want to move that too. However holiday, computers etc all take my money :-(

Can't wait to get it on.
 
Hi Ian :)

Damper needs to be mounted as far forward as possible, basically so that with the wheels straight ahead to damper is perpendicular to the chassis legs.

Also, fit a defender damper, it is longer so you can mount it closer to the drop arm which means it operates at more suitable angles, and the ring type fitting is far less stressed than the pin type on a disco damper.

The length is the main improvement though.

Cheers :)
 
Well I have been absent for a while as I have been enjoying the Hornet and messing around with a few things too, one of which is the steering damper relocation.

Now I know that I need to have a defender item but as I want to have the RTC one, I thought I would use the standard Discovery item for now.

But first - I made myself look a right knob yesterday as I decided to clean and polish, yes polish the GreenHornet! Now I know that this is sacralidge but hey,my here are too many dirty discos out there and I want to be different. So why looking like a knob I hear you say, well I was buffing the roof and to be honest,mthe only way I could do it was to climb on the roof and kneel whilst buffing the roof. But look at how shiny she is.

a09d1bcf.jpg


37e92541.jpg


So how about the steering damper and the new steering bars?

Well I needed to replace some track rod ends so as I was at the shop, I was talked into buying the heavy duty steering bars. Well I y talked, it was really my heart ruling the head. Here they are all ready for fitting.

53f76a1d.jpg


So to start of with this is what the old girl looked like at the front.

d39c065c.jpg


Pretty crap really so off came the old bars and on went a lick of paint and the new bars. These were really easy to fit and then it was time to make the damper relocation bracket.

First off I used a piece of 50x50x3.2mm steel SHS. I then marked out the outline of the bracket.

f4eb4d5e.jpg


Once cut out I then cleaned it up with a flap disc on a grinder and gave it a paint.

01d35b6e.jpg


f8c433dd.jpg


Next I had to think about the connection to the arm. For this I used some off cut of angle. I again marked the outline of the piece I wanted and then drilled the holes required. Now as I will be changing the damper to the defender unit, I need to be able to accommodate the defenders pin to eye mount configuration. So when marking out the holes for the 29mm clamps I used to secu the bracket to the arm, I made sure that I could rotate the bracket 90 degrees so the eye mount of the defender bracket can be accommodated.

Anyhow that's enough of words, here are some pics.

d455a356.jpg


25dcbc86.jpg


Looks nice dunnit

cdc626c8.jpg


842e83dd.jpg


I have a few modifications to make to the MK II version which I am making for my mate. I will make the chassis mounting a longer bracket to lower the end a little more and I will angle the arm mount to ensure that there is less stress on the damper.

Finally I made a nifty little bracket for my iPhone. I can now take videos which don't shake like a vicar having a **** lol.

6ad8c55b.jpg


Next we have the front bumper to think about.
 
Now the front bumper is something that I want to do soon but I just can't decide the best way to do it. Here are some ideas

We have big and ugly but it fits an 8274
eaf4bd4a.jpg


bae52092.jpg


We have something which is just a winch tray and tube which is more dainty

8af0575f.jpg


And we have a tubular type which I quite like

61fbb773.jpg


So I'm just not too sure and I can't seem to find a bumper that is made to accommodate a lifted body.

Now othat note, now that the suspension has settled in, I am really bugged by the fact that the rear end is so low. It makes the vehicle look like its having a **** like a dog!

So what's the best way to raise the rear? Buy new 4 or 5" springs or use a lift block under the springs which is cheaper but I can make sure it is level. Answers or suggestions please.
 
Now the front bumper is something that I want to do soon but I just can't decide the best way to do it. Here are some ideas

We have big and ugly but it fits an 8274

And we have a tubular type which I quite like .........

View these and.
........ and its "steal" mode.;)

....nice green seat belts :D will match suit GreenHornet.

404299_10150658025869122_199893579121_11009775_149242110_n.jpg
 

Attachments

  • DA5606.jpg
    DA5606.jpg
    25.9 KB · Views: 1,208
  • DSC00038.jpg
    DSC00038.jpg
    53.5 KB · Views: 4,071
  • DSC_5278.JPG
    DSC_5278.JPG
    248.1 KB · Views: 15,268
  • DSC_5313.JPG
    DSC_5313.JPG
    200.6 KB · Views: 508
  • Pismo2010067.jpg
    Pismo2010067.jpg
    39.4 KB · Views: 414
Back
Top