Discovery Boot Floor Rebuild

This site contains affiliate links for which LandyZone may be compensated if you make a purchase.

puppysandwich

New Member
Posts
333
Location
Swansea
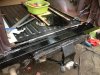
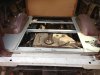
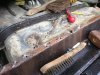
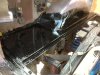
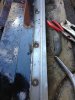
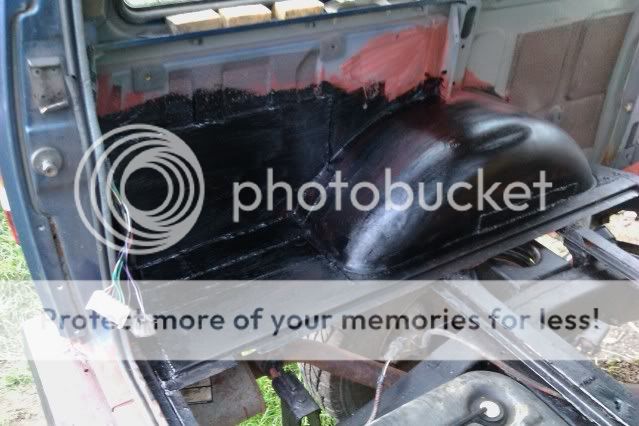
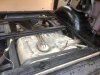
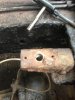
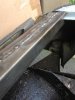
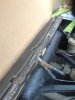
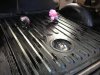
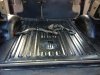
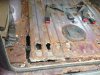
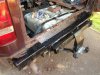
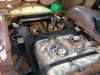
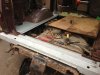
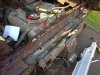
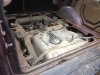
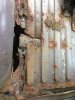
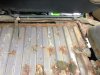
I've been putting this off for about 12 months, but decided to eventually get it sorted, I knew it was going to be a bigger job than simply replacing the floor, so I got a bit of overtime in at work to cover the costs. The original floor was completely shot as was much of the surrounding metal including the top of the rear crossmember. So a few days ago I got to work with the angle grinder and removed the bilk of the rust! :)

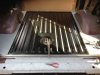
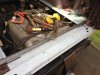
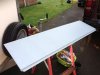
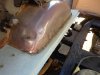
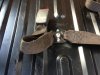
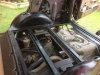
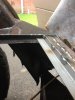
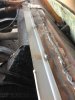
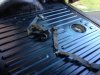
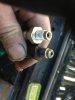
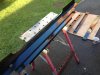
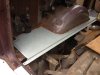
I ordered the side skirt panels and the Crossmember repair section from YRM and spent a day cutting them to shape, I also bought the floor support sections, all of which I've just finished painting with Hammerite, including giving the chassis a good brush and lick of paint. I'm still waiting for the rest of the panels to arrive so I'll update when they're ready to go in.
 

Attachments

  • IMG_0048 (Medium).jpg
    IMG_0048 (Medium).jpg
    97.9 KB · Views: 1,991
  • IMG_0071 (Medium).jpg
    IMG_0071 (Medium).jpg
    94.6 KB · Views: 1,292
  • IMG_0070 (Medium).jpg
    IMG_0070 (Medium).jpg
    86.2 KB · Views: 1,527
  • IMG_0069 (Medium).jpg
    IMG_0069 (Medium).jpg
    86.5 KB · Views: 1,320
  • IMG_0066 (Medium).jpg
    IMG_0066 (Medium).jpg
    56 KB · Views: 2,628
  • IMG_0064 (Medium).jpg
    IMG_0064 (Medium).jpg
    70.9 KB · Views: 1,494
  • IMG_0062 (Medium).jpg
    IMG_0062 (Medium).jpg
    90.5 KB · Views: 3,061
  • IMG_0056 (Medium).jpg
    IMG_0056 (Medium).jpg
    76.1 KB · Views: 1,632
  • IMG_0052 (Medium).jpg
    IMG_0052 (Medium).jpg
    96.7 KB · Views: 1,316
  • IMG_0050 (Medium).jpg
    IMG_0050 (Medium).jpg
    75.8 KB · Views: 1,603
Its been about 10 years since I've done any welding so I dug out the old Sip Migmate 150 and ended up spending 70 odd quid in Machine mart on all the various bits I needed to get it up and running again, including wire and gas and a facemask etc, as well as a new Swan neck and liner, shroud and tips. I've spent a couple of hours getting back into the swing of welding but still need a bit more practice before I let myself loose on the new panels. I'll have to get it done soon because I'm having to use the V8 for running around in now and its costing me a fookin packet! :)
 
nice work

Cheers, the original plan involved a large sheet of chequer plate and a few pop rivets. :D But I decided the old girl deserved to be treated right, so I'm about £400 out of pocket so far and still have a bit more to spend, and thats before I start on the sills! I've been driving around for the past year with a sheet of MDF over the floor to keep the rain out! :D
 
you cant pop rivet it as it will fail the mot has to be welded

I've spoken to my very friendly MOT tester who told me that as long as the surrounding panels are seam welded, the main floor section can be pop riveted as its not structural, and is only spot welded in originally. The plan is bed into a mastic sealer then plug weld the main section every few inches.

I've painted all the panels with Hamerite but I'm going to give them a good coat of underseal as well just to keep water out.

Also does anyone know what size Torx bit is needed to get the seatbelts out? You can see in the pic that I cut around them, but have to get them out to fit the new floor.
 
Last edited:
your better off drilling the bolts out as they are very stubborn to undo

Thats an option, I only managed to get 3 of the rear seat bolts out, the other 5 sheared off and had to be drilled out so I've still got to tackle that little problem. I also snapped the rear flexible brake pipe at the mounting point on the floor panel, it must have been rotten because it just came away as I lifted the floor. You might be able to see the temporary copper brake pipe I've replaced it with until the new one arrives. I still had to use the car for a few days with no boot floor, was a bit loud! :D
 
Well the rest of the panels arrived today, so I decided to get stuck in, I cut off the bolts that hold the seatbelts in so will have to deal with them later. I drilled out the spot welds of the door trim edge and cut the right hand skirt to the right shape, then welded in the new crossmember repair section and gave it a lick of Hammerite, The pics with the floor in place are just checking everything for size and fit. :)
 

Attachments

  • IMG_0091 (Medium).jpg
    IMG_0091 (Medium).jpg
    97.8 KB · Views: 1,115
  • IMG_0090 (Medium).jpg
    IMG_0090 (Medium).jpg
    60.8 KB · Views: 1,119
  • IMG_0087 (Medium).jpg
    IMG_0087 (Medium).jpg
    62.2 KB · Views: 1,132
  • IMG_0086 (Medium).jpg
    IMG_0086 (Medium).jpg
    81.9 KB · Views: 1,107
  • IMG_0085 (Medium).jpg
    IMG_0085 (Medium).jpg
    104.9 KB · Views: 1,047
  • IMG_0084 (Medium).jpg
    IMG_0084 (Medium).jpg
    59.8 KB · Views: 1,115
Progress today, but I've now been beaten by the rain. :(

Anyway, I've plug welded the lower door Chanel onto the rear Crossmember as can be seen in the pic. I've also welded in the nearside skirt panel, not the neatest welding ever but its in and it ain't going anywhere, the pic shows the progress. The final pic shows the panel painted up with Hamerite and the underside is also painted with Car Plan Tettraseal, I'll give the underside another coat before finishing. I've also coated the underside of the Boot Floor panel ready. When its all in I'll paint the entire inside area with it just to be sure to keep any future rot away. :)
 

Attachments

  • IMG_0096 (Medium).jpg
    IMG_0096 (Medium).jpg
    83.4 KB · Views: 1,061
  • IMG_0095 (Medium).jpg
    IMG_0095 (Medium).jpg
    59.1 KB · Views: 1,239
  • IMG_0094 (Medium).jpg
    IMG_0094 (Medium).jpg
    92.1 KB · Views: 953
well done!
may be worth checking the back door lines up ok before yer fully weld everything!
whats the rear body mounts like?

Cheers, I'm quite please with it so far. The rear body mounts are fine, but I need to do both sills and sill ends, but they'll have to wait until next month as I'm under strict instructions not to dip into the savings! :rolleyes: I'll do the sills and fit a set of Rock Sliders, then I'll decide what I'm going to do about this damn clutch.
 
Looking good there chap :0)
It would be a good idea to paint a bit higher up while you have the brush out as the rust will creep up.
I had to cut n patch the sides on mine. They were paper thin.
014.jpg


Also clean out the sedimenter while you have good access to it :)
 
Looking good there chap :0)
It would be a good idea to paint a bit higher up while you have the brush out as the rust will creep up.
I had to cut n patch the sides on mine. They were paper thin.
014.jpg


Also clean out the sedimenter while you have good access to it :)

Nice job, I can see a lot of welding there! I ran out of paint yesterday hence why it stops where it does. :D

wassup with the clutch?

http://www.landyzone.co.uk/lz/f8/clutch-slippage-201218.html

Have a look here, the decision I have to make is do I pull it out myself or part with £240 for my local mechanic to do it, my drive isn't really suitable as its on a gradient. last time I dropped the gearbox on a mates drive but he's since moved. :(
 
Quick update, I've welded in the off side skirt panel, but haven't taken any pics yet. I called into a local Engineering shop to see if they could bend a piece of sheet metal into a dog leg for me to use along the frount edge of the boot where the rear seats bolt in. Needless to say they were less than helpful and claimed they didn't have the ability to put a simple bend in a bit sheet, so a trip to B&Q turned up 2 lengths of Angle iron 20mm x 20mm & 20mm x 15mm. I'll weld them together to give me the lip I need to fit the floor panel on. Pics tomorrow.
 
Finally finished the boot floor! :D

Pics show the angle iron welded in to form the lip for the floor panel along the line of the rear seats. You remember I had to drill out all the seat bolts, well I found a very simple method of solving this little problem, instead of either drilling and re-tapping or fiddling about with nuts I decided to use 7mm self drilling bolts, I drilled them straight through the existing nuts, with the top bots going through the 3mm angle iron and the existing welded in nut, the job took about 5 mins to drill in the 8 seat bolts, the factory fitted bolts were standard 6mm so these are effectively stronger.

You can also see that its not too difficult a job to drill out the seatbelt bolts, started off with a 3mm drill bit then worked up to a 10mm and then managed to pull out the existing metal with a pliers, I re-tapped them to 12 x 1.75 thread and used 2 10.8 tensile bolts that cost me about 50p each from a local supplier.

After giving it some thought I spoke to my local MOT garage about fitting the floor panel and he told me that the main panel is not a structural part of the vehicle so as long as it was fitted securely it doesn't have to be welded in. So I decided to use 5mm self drilling bolts spaced about every 6" much easier and stronger than pop rivets and less hassle than plug welds, it also gives me the ability to remove the panel should I ever need to gain access. I covered everything with loads of Underseal to protect all the new metal, so hopefully it should last another 18 years!

The only other problem I had was the flexible brake pipe that connects between the bracket on the floor support bar and the rear "splitter block" was the wrong fitting as can be seen in the pic, so for now I've left the copper brake line inplace, theres plenty of slack in it to allow for movement, so it might even stay there.

All in all I'm happy with the end result and look forward to starting on the Sills. :rolleyes:
 

Attachments

  • IMG_0106 (Medium).jpg
    IMG_0106 (Medium).jpg
    66.5 KB · Views: 864
  • IMG_0105 (Medium).jpg
    IMG_0105 (Medium).jpg
    85.7 KB · Views: 1,107
  • IMG_0104 (Medium).jpg
    IMG_0104 (Medium).jpg
    79.2 KB · Views: 914
  • IMG_0103 (Medium).jpg
    IMG_0103 (Medium).jpg
    75.5 KB · Views: 973
  • IMG_0102 (Medium).jpg
    IMG_0102 (Medium).jpg
    64.5 KB · Views: 886
  • IMG_0101 (Medium).jpg
    IMG_0101 (Medium).jpg
    61.1 KB · Views: 895
  • IMG_0100 (Medium).jpg
    IMG_0100 (Medium).jpg
    65.9 KB · Views: 920
  • IMG_0099 (Medium).jpg
    IMG_0099 (Medium).jpg
    73.6 KB · Views: 899
  • IMG_0098 (Medium).jpg
    IMG_0098 (Medium).jpg
    65.2 KB · Views: 911
  • IMG_0097 (Medium).jpg
    IMG_0097 (Medium).jpg
    61.5 KB · Views: 883
Last edited:
Last of the pics.
 

Attachments

  • IMG_0112 (Medium).jpg
    IMG_0112 (Medium).jpg
    83.8 KB · Views: 837
  • IMG_0111 (Medium).jpg
    IMG_0111 (Medium).jpg
    79.2 KB · Views: 776
  • IMG_0110 (Medium).jpg
    IMG_0110 (Medium).jpg
    76 KB · Views: 835
  • IMG_0107 (Medium).jpg
    IMG_0107 (Medium).jpg
    46.2 KB · Views: 785
  • IMG_0113 (Medium).jpg
    IMG_0113 (Medium).jpg
    79.8 KB · Views: 752
Back
Top