wiltshireflyer
New Member
- Posts
- 27
- Location
- Wiltshire
HI everyone,
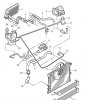
Im hoping someone on here has a good knowledge of my problem and fix. Today whilst out in the Disco (2001 Y - 3.9 V8) the hose between the top of the radiator and the thermostat housing burst away from the thermostat housing itself. On inspection of the thermostat housing after removal it seems that is was pretty knackered. The spring from the stat was loose inside. I am thinking this could have been the cause of poor warm up times after initial starting and a problem with overheating when idling for any length of time. Judging by the general condition of the housing and what remains of the stat I think it was definitely faulty!
To cut a long story short, the hoses seem in good condition but part of the housing came off with so much force that it has pierced the radiator. Can anyone here give me clear and concise instructions on rad removal/reinstallation on this model and how to replenish the system with coolant and how to bleed the air from the system CORRECTLY - or point me to an appropriate thread.
Thanks in advance.:doh: