Defender nut and bolt rebuild

This site contains affiliate links for which LandyZone may be compensated if you make a purchase.
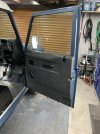
Doors nearing completion, glass is back in with new regulators, new runners, locks and handles.
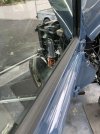
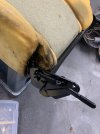
There does seem to be a gap in the outer waist window seal though ?? Wonder if the cheaper ones aren’t as good as genuine LR? If I left them water would just run into the door again
 

Attachments

  • IMG_6348.jpeg
    IMG_6348.jpeg
    254.9 KB · Views: 87
  • IMG_6339.jpeg
    IMG_6339.jpeg
    250.5 KB · Views: 78
battery isolator concealed into the seat box, will save me having to disconnect the battery terminal when the landy is in storage.
 

Attachments

  • IMG_6346.jpeg
    IMG_6346.jpeg
    261.8 KB · Views: 68
  • IMG_6345.jpeg
    IMG_6345.jpeg
    295.4 KB · Views: 68
Where did you find all these perfect condition body panels?!
those are not any kind of panels, these are mostly genuine panels with hours of bashing, fetteling and heating up and shrinking.
The only new sections were the rear lamp panels and the front wing outers oh and new door skins. Most panels are readily available to buy, but I do have a budget to try and stick too
 
Last edited:
had the steering box back from Coventry power steering as I couldnt for the life of me get the input shaft to seal. Now fitted I can crack on… left wing now bolted on with re galv inner wheel arch.
 

Attachments

  • IMG_6381.jpeg
    IMG_6381.jpeg
    307.3 KB · Views: 73
  • IMG_6380.jpeg
    IMG_6380.jpeg
    293 KB · Views: 76
  • IMG_6382.jpeg
    IMG_6382.jpeg
    332.8 KB · Views: 78
What with my north wales accent, I’d expect not ! 😂
I recon all my videos would be classed as adult content and age restricted, not because of my builders bum showing in most clips but of the constant cursing and swearing, although I could possibly get some sponsorship deals … forget snap on Im thinking more kronenburg or San Miguel
 
Some small wins this evening, decided to order a genuine window outer waist seal as the reproduction one didnt even touch the glass. And guess what neither did the genuine one … hmmm right then I decided the only thing to do was to bend the steel section that the seal attaches to inward. A small 6” adjustable did the job and hey presto seal re fitted and tight up against the glass. New wing vent grill screwed in place with some stainless screws.
 

Attachments

  • IMG_6393.jpeg
    IMG_6393.jpeg
    212.8 KB · Views: 64
  • IMG_6394.jpeg
    IMG_6394.jpeg
    266.5 KB · Views: 67
  • IMG_6392.jpeg
    IMG_6392.jpeg
    254.3 KB · Views: 75
Tomorrow evenings fettle… start the old girl up and get her up to a decent temperature, dump the water as there is currently no antifreeze in the system. Which should be easy as the right hand side wing isnt attached.
Do some more turning of the steering wheel to test the recon power steer box as I’m not convinced yet that the inlut seal is doing its job … jury is still out on this one.
If successful then I can crack on with fitting the air in pipe work, aerial and wing.
 
Weekend Landy repairs report, drivers seat base repaired, well it was heated up sprayed with wd40 and wiggled free! Cleaned up and painted. Centre seat stripped cleaned painted. Centre seat covers cleaned with warm water and carpet cleaner and hey presto its techno cloth!
 

Attachments

  • IMG_6416.jpeg
    IMG_6416.jpeg
    383.3 KB · Views: 67
  • IMG_6419.jpeg
    IMG_6419.jpeg
    209.6 KB · Views: 67
  • IMG_6418.jpeg
    IMG_6418.jpeg
    255.3 KB · Views: 66
  • IMG_6417.jpeg
    IMG_6417.jpeg
    381 KB · Views: 55
Right wing fitted for the third time as I wasn’t happy with the alignment. All air ducting fitted with new vent covers and genuine aerial. Bonnet stay fitted along with the bonnet opener cable and catch
 

Attachments

  • IMG_6413.jpeg
    IMG_6413.jpeg
    261.7 KB · Views: 56
  • IMG_6415.jpeg
    IMG_6415.jpeg
    277.5 KB · Views: 59
  • IMG_6407.jpeg
    IMG_6407.jpeg
    281 KB · Views: 63
Drivers wing off once again! 😖 
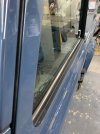
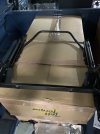
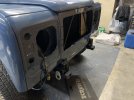
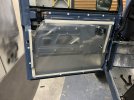
I wasn’t happy with the gap at the bottom where it meets the sill. 3hrs later and I’m a happy man once again.
 

Attachments

  • IMG_6487.jpeg
    IMG_6487.jpeg
    308.1 KB · Views: 50
  • IMG_6488.jpeg
    IMG_6488.jpeg
    268.3 KB · Views: 49
Door gaps adjusted one final time before fitting the door cards, these are the original cards, steamed all the dents out with a kettle, cleaned then polished. Very please with how they have turned out, wish I’d taken a before photo
 

Attachments

  • IMG_6499.jpeg
    IMG_6499.jpeg
    293.6 KB · Views: 58
  • IMG_6491.jpeg
    IMG_6491.jpeg
    273.5 KB · Views: 63
Rear door fitted yesterday thinking of not fitting the rear wiper as I’m going to fit a rear wheel carrier (SP4x4) galv one but going to paint it black and the plate that fits to the door painting that blue to blend in with the door.
 

Attachments

  • IMG_6492.jpeg
    IMG_6492.jpeg
    249.7 KB · Views: 52
  • IMG_6484.jpeg
    IMG_6484.jpeg
    286.8 KB · Views: 68
  • IMG_6501.jpeg
    IMG_6501.jpeg
    516.6 KB · Views: 53
  • IMG_6502.jpeg
    IMG_6502.jpeg
    489.6 KB · Views: 50
Rear door fitted yesterday thinking of not fitting the rear wiper as I’m going to fit a rear wheel carrier (SP4x4) galv one but going to paint it black and the plate that fits to the door painting that blue to blend in with the door.
I guess you can still install it just so it’s there and not just the water jet 😂
 
Back
Top