Defender bodywork rebuild...

This site contains affiliate links for which LandyZone may be compensated if you make a purchase.
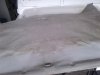
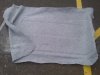
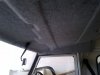
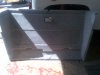
Read on another thread about an excellent headlining restoration, bought the same stuff from eBay and did mine yesterday evening, fitted it to the Landy this evening.

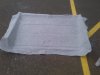
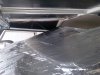
I also covered the rear of the headlining with foil stuff to reflect warmth back in and also reduce heat into the cab in the summer. It will also mean any condensation will not soak into the headlining but at least run off to the sides where it can escape!

I fitted self adhesive 12 mm foam to the sides of the roof and glued 3mm neoprene onto the two big panels in the centre, the difference in resonance is very significant.
 

Attachments

  • IMG-20130703-02109.jpg
    IMG-20130703-02109.jpg
    319.1 KB · Views: 445
  • IMG-20130703-02110.jpg
    IMG-20130703-02110.jpg
    418.8 KB · Views: 540
  • IMG-20130703-02111.jpg
    IMG-20130703-02111.jpg
    394.9 KB · Views: 433
  • IMG-20130703-02112.jpg
    IMG-20130703-02112.jpg
    363.3 KB · Views: 443
  • IMG-20130704-02125.jpg
    IMG-20130704-02125.jpg
    339.6 KB · Views: 515
  • IMG-20130704-02124.jpg
    IMG-20130704-02124.jpg
    354.3 KB · Views: 455
  • IMG-20130704-02122.jpg
    IMG-20130704-02122.jpg
    296.8 KB · Views: 427
  • IMG-20130704-02121.jpg
    IMG-20130704-02121.jpg
    334.5 KB · Views: 472
Yeah I got the stuff from: 1m camper van lining carpet super stretch for caravan boat | eBay

Someone else posted a headlining revamp thread and that's were I got it from.

I bought 2 meters so I can make and cover a rear headlining section. Although, I don't think that the stuff left will be enough to cover a whole panel. I have had a plan to have an infill panel in the middle with speakers and a light, really I am just doing that so I don't need to buy another 2 meters of the stuff. I see, I don't want to botch it up.
 
Passed it's MOT today with no advisories.

It is not finished, there is no carpet or anything, the front bumper was sort of roughly built and given a mist of paint to make it do, but at least I can use her again.

I am going to fabricate up new pipework for the turbo and intake side of things and I need to look into a possible over-boost issue.
 
Been a while, I've not done much to her aesthetically but fitted a new rear exhaust and some other bits and pieces.

About to ramp up works again and do the interior and front bumper.

I got rid of the small tyres she was on and bought some new bigger AT tyres which I am hoping to get fitted tomorrow once my wheels are fully dry.

Gave them a rubdown and coat of etch primer and 2 pack last night, I did 5 but 4 are shown here, it will look great to have nice white wheels. I need to get some white silicon today to run round the seam in the middle that always rusts.

IMG-20140410-03213.jpg
 
Gave them a rubdown and coat of etch primer and 2 pack last night, I did 5 but 4 are shown here, it will look great to have nice white wheels. I need to get some white silicon today to run round the seam in the middle that always rusts.

World class finish by the look of it! :)

I filled that seam with epoxy putty when I did mine.
 
The stuff I use is called Milliput.Google them, think they have a website. Its two part,different coloured sticks, mix equally. Comes in a few different grades, standard one is yellow, fine is white.
Its great stuff, sets like concrete, pretty good heat and vibration resistance. Bit like the old chemical metal. You can thin it with water if you want to use it as an adhesive etc.
 
Been a bit quiet on this thread here but I am going to start back on it as I intend on doing the interior now.

I fitted a new front axle on the front a couple of weeks ago, pleased with that (other thread).

I've now finished my front bumper, I actually started on this originally when the build began and I sort of gave up on it. There was some bursts of activity on it then nothing for a while but I finally got round to taking it to the galvanizing yard. Here it is before it went.

20150416_212026.jpg

It's all custom cut steel, 3mm with 5mm bracing and strengtheners for the jacking points etc.

Looking forward to getting it back, I'll paint it satin black.
 
Last edited:
... and it's back.

Pleased with it, one of my drain holes needs de-zinced and then just drill out all the mounting and fixing holes and then I will give it a quick sand with the DA and prep it for paint.

20150424_115331.jpg
 
Back
Top