D2 chassis replacement

This site contains affiliate links for which LandyZone may be compensated if you make a purchase.
Eureka! I actually managed three hours of ramp time today!!! Brakes are bled, joints tightened, re-bled....working!!
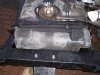
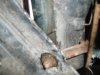
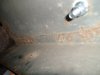
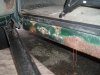
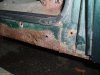
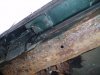
All fourteen body mounts are now in place!!!! :D:D:D:D:D I had serious doubts at times that 14 were actually possible. Only downside is that the towbar bolts through the rear crossmember were fouling the body/chassis mount area - and they had to go. I put it down to Sheilder! Not out by much...but 2-3 mm too far forward - and as they are reinforced with interior tubes, they cannot just be re-drilled. Either no towbar, a seriously adapted towbar....or very thin nuts! :confused:
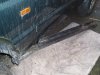
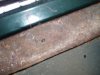
Will hopefully refit the bumpers tomorrow, and then need to have a discussion about the sills :eek:
With luck, Santa might bring me an MOT certificate!!!! :):):)
 

Attachments

  • Tank mounting 2.JPG
    Tank mounting 2.JPG
    413.8 KB · Views: 215
OK, so rain has stopped play for the moment, but I did have the chance to investigate the nearside sill this morning. Verdict.....could be worse. (offside probably will be....)
Anyway....I removed the 10 plastic rivetty things that mainly hold the plastic sill cover in place - and then found that by some miracle the 10mm flanged nut at the front end actually undid without any trouble! Shock> Horror!
Onto the sills themselves. The inner sills don't look too bad - to my untrained eye.
The outer sill - now that might need a little work...maybe....
In my reading and research I had concluded that 100 x 60 x 3mm box section would be the way to go...but now I reckon I might get away with doing just the outer sill? Unfortunately, a lot of the articles on here and elsewhere about re-doing the D2 sills have suffered from the changes to photobucket a couple of years back and are no longer as clear as they might be.
Anyone got any recommendations - easy-on-panels, YRM, other?
 

Attachments

  • Plastic sill cover.JPG
    Plastic sill cover.JPG
    391 KB · Views: 264
  • Plastic sill retaining nut.JPG
    Plastic sill retaining nut.JPG
    171.4 KB · Views: 281
  • ns inner sill front.JPG
    ns inner sill front.JPG
    144.5 KB · Views: 246
  • ns inner sill rear.JPG
    ns inner sill rear.JPG
    159 KB · Views: 282
  • Near side front sill outer.JPG
    Near side front sill outer.JPG
    405.6 KB · Views: 258
  • near side rear sill outer.JPG
    near side rear sill outer.JPG
    384.7 KB · Views: 260
  • ns under 1.JPG
    ns under 1.JPG
    250.7 KB · Views: 303
  • ns under 3.JPG
    ns under 3.JPG
    201 KB · Views: 277
  • ns under 4.JPG
    ns under 4.JPG
    199.6 KB · Views: 254
  • ns under 5.JPG
    ns under 5.JPG
    349.2 KB · Views: 312
OK, easy-on panels were ordered, and duly arrived. Inner sills are good on both sides, so plenty of metal to work with in due course.
Front bumper re-attached. What a ballache that was! But it is done, the corner panels too, only thing not working is the headlight washers - a bit brittle due to age, and I am not convinced of the need to replace them. Not relevant to the mot anyway, so on the backest of back burners.
SOOOOOOO>>>>>>>>>
I took advantage of work being quiet at the weekend and asked one of our Testers to do a pre-mot in order to check that I hadn't missed anything, left something half-tight, got anything back to front.
He kinda expected to find something that I hadn't done....but couldn't! As he told the boss....he couldn't fail it if he wanted to.
So all I need it to get the sills repaired, and MOT_R_US! :D:D:D:D:D:D:D:D:D:D:D:D:D:D:D:D:D:D:D:D

I may just be a little elated at this news!!!
:D:D:D:D:D:D:D:D:D:D:D:D:D:D
Happy days!!!:):):):):):):):):)
 
And as the finishing line draws ever nearer, a few words if I may on the subject of Shielder chassis's
The chassis I bought has not been without its problems.
One or two holes needed rebored. Now that is not uncommon - drill any hole to the correct size and then galvanise and paint it, the bore will narrow and re-drilling will be required so I have no real complaint with this aspect.
Three of the holes I used were slightly out of alignment, and somewhat eliptical drilling was called on to get the bolts through. No big deal.
The 2 holes relating to the towbar were a couple of mm out, and unfortunately they are now inaccessible. As they are also reinforced with internal tubing, there is nothing much I can do about this.
One hole was blatantly in the wrong place. A reasonably easy fix.
The exhaust hangers being on the wrong sides - well.....anyone can make a mistake, and that is one they would not be likely to repeat in a hurry.

So on the whole the actual chassis was not too much of a problem. Weld quality seems pretty good. Metal is equally good quality. Dimensions are pretty much spot-on with the exceptions listed. At the end of the day - it fits!

At just over 2 grand originally ( I got a fair whack back because of the hangers) it represents pretty good value for money in my book. Yes I spent another £800 or so on bushes, replacement parts, paint, fluids etc, so the whole thing is coming in at under £3k. That to me was doable - and enables me to keep the old girl on the road for a few years more. To have gone down the route of the "better" suppliers would have pushed the budget up closer to £5k and I for 1 could not justify spending that much on a 15 year old vehicle (as she was then).

I would have loved to have entered into feedback conversation with Shielder, but quite frankly their customer service / PR issues mean that I really want nothing more to do with them. I have got what I wanted - at an affordable price. I am a happy bunny!
:)
 
Excellent work :) Great to see some more progress - PITA about the tow bar though :rolleyes: :mad:

For some reason I've only just seen the question re Easy on / YRM - I like the Easy On stuff - always does what it says IME .... I reckon you made a good call there :)

MOT for christmas sounds pretty likely :):)
 
Back
Top