Bulkhead TLC Thread

This site contains affiliate links for which LandyZone may be compensated if you make a purchase.
Hello All,

my first two posts on this website were both questions - hopefully my third will be more contributory than the previous, although there will definitely be questions along the way!

We've recently purchased a 2A, and what started life as a 'rolling resto' has inevitably turned into something more. I have shipwrights disease and inevitably there's loads of stuff I didn't spot when I bought it due to being a first time buyer of landies, so likely to be a fairly thorough rebuild of the top half before it next gets an MOT. First place to start is bulkhead...

I've discovered that the bottom of the pillars/feet on the bulkhead are a combination of both completely shot and truly bodged by the PO. Frankly I'm embarrassed to have bought it without noticing this - so I'm going to make amends by attempting to repair it. And I'll put the progress reports in this thread :)

If it all goes horribly wrong I'll end up buying a new bulkhead but I'm going to give repairing it a good bash before I accept defeat. I've welded before but definitely an amateur, so will likely be doing lots of 'test' pieces before I dive in.

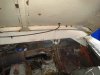
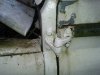
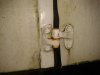
As I say, the bottom 1/3 of the pillar downwards is definitely shot and so we will be getting replacement sections for both pillars and feet. What I wasn't sure about was how far up the damage went - I had a horrible feeling there was a lot of filler up there, and when I removed the bolts holding the hinges on the retainer nuts were rusty as it gets - so I didn't hold out much hope.

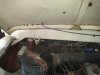
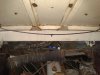
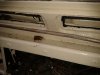
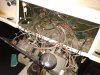
Last weekend I took a grinder and flapper disc to the sides of the bulkhead, and was pleasantly surprised by what I found at the top of it - shiny metal (underneath a reasonable amount of filler)! The passenger side pillar appears to have had an argument with a tree at some point, so although not as rusty as feared the metal bit isn't the right shape and so filler has been used to make it look right... So the current plan (up for discussion here - suggestions please!) is as follows:

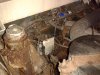
#1 New driver footwell - passenger footwell has been done by PO and isn't dreadful, some small patches top/bottom required. Driver footwell is a patchwork quilt so will drop in a new one.

#2 Likely next job is to repair the upper sections of the bulkhead using sheet and fabrication; from my initial inspection whole repair panels up here are probably not necessary (but advice welcome!) - does depend a bit of what I find underneath the outer skin. If all is not too bad, I think it should just be flat sheet so hopefully not too painful(!) In attached photos I've outlined the areas in red that I'm likely to replace. I'll also fit new captive nuts for the wing mountings at the same time and do as much as I can to protect the internal faces from future rust.

#3 Remove old pillars and replace on both sides - I've seen some previous posts including nice techniques including nuts/bolts to make sure everything aligns, but I'm sure this will require lots of thought before going near a grinder.

#4 Replace pillar feet - scariest bit for me! Haven't thought this through much yet - at this point hoping it will be clearer once I've got new pillars in! Dreading getting it wrong and the whole thing being wonky.

Does this sound like a sensible order to do things? I think I'm right in saying it's best to do these with the bulkhead on the vehicle so that everything lines up and fits properly? Once I'm done I'm thinking I'll remove the bulkhead from the chassis and then do a full clean up and repair other sections that look dodgy. Has anyone ever dipped their bulkhead to strip it? On the one hand it's the only way I can think of to ensure all the cavities are cleaned out, but also aware it might cause other issues I haven't thought of?


Having stripped the bits of interest off last weekend, I then covered them back up with some galvanising primer I've bought to protect it against the weather in the mean time. Next step is to order repair sections (and a welder, likely to keep it simple and go gas MIG) and find the next free weekend - so likely to be a few weeks before the next update.

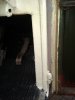
Wow - wall of text. I've hopefully attached some photos so you can see more clearly what I'm on about - including one of what it looked like just before I took the grinder to it.

View attachment 129445 View attachment 129446 View attachment 129447 View attachment 129448 View attachment 129449 View attachment 129450 View attachment 129452 View attachment 129455 View attachment 129456

I don't know what you was embarrassed about here's mine when I bought 2a all done by the p.o.
 

Attachments

  • 2015-12-17 09.23.38.jpg
    2015-12-17 09.23.38.jpg
    153.5 KB · Views: 165
  • 2015-12-17 09.23.43.jpg
    2015-12-17 09.23.43.jpg
    155 KB · Views: 204
  • 2015-12-17 09.23.49.jpg
    2015-12-17 09.23.49.jpg
    147.3 KB · Views: 202
  • 2015-12-17 09.24.02.jpg
    2015-12-17 09.24.02.jpg
    174.9 KB · Views: 187
  • 2015-12-17 09.24.12.jpg
    2015-12-17 09.24.12.jpg
    139.8 KB · Views: 173
  • 2015-12-17 09.24.29.jpg
    2015-12-17 09.24.29.jpg
    182.3 KB · Views: 182
  • 2015-12-17 09.24.42.jpg
    2015-12-17 09.24.42.jpg
    152.9 KB · Views: 161
  • 2015-12-17 09.24.51.jpg
    2015-12-17 09.24.51.jpg
    152.5 KB · Views: 194
  • 2015-12-17 09.25.04.jpg
    2015-12-17 09.25.04.jpg
    133 KB · Views: 173
  • 2015-12-17 09.25.10.jpg
    2015-12-17 09.25.10.jpg
    187.3 KB · Views: 184
Righto - bit of an update; some sunshine gave me an opportunity to compare the new bulkhead bits to those already on the car.

Firstly - what are these for? They arrive with the new bulkhead feet.
View attachment 132409
Next up - driver side. I held the new feet up against the long eye bolt through the current feet and outrigger. At the bottom - a smidge high but within LR tolerances I think, given the new A pillar is held on with masking tape.
View attachment 132410

At the top it's a different story - although the 'shoulder' lines up reasonably well, the holes for the door hinges are too high. What I'm not sure is whether this is due to a previous bodge making my current bulkhead wrong, or the new parts being off - I suspect a bit of both. Head scratch...
View attachment 132411

Allowing for perspective, I would say the wing mounting points are not a million miles off.
View attachment 132412 View attachment 132413


Passenger side - this time doing the same thing at the bottom, the holes for the door hinge are miles out. But I have got the world's most bodged lower A pillar and foot so I have no faith in my reference here.
View attachment 132414

At the top, shoulder is close but again the door hinge holes are a bit high - suggests it's definitely the new part, and I need to have a think about the best course of action here.
View attachment 132415

Finally - again, the wing mounts look in about the right place.
View attachment 132416
View attachment 132417

So although it's only a very rough first pass and I'm a long way off cutting metal, I have some things to answer:

- What am I going to do at the top of the pillars? This may depend on what I find when I remove some of the thinner metal at the top of the bulkead, but I suspect there will be some minor mods to the pillar tops.

- How do I know I've got it in the right place given the state of my current lower pillars? Can I trust the eye bolt location - i.e. outrigger?

I've taken some measurements of my bulkhead as it currently sits - I'll post them up soon; I'd be interested to compare notes with anyone else who's taken similar measurements.
The bulge / shoulder is the point from which you need to align everything.

If you get this bit wrong then the lines of the vehicle will look a right mess.

Check the holes for the wings by mounting the new A post on the wings - see how far the holes are out. I reckon now is the time to make changes / hack them about before you paint.

As for the hinge holes compare the holes on each of the A posts - they should align (if Mungo in the factory has his machine set up properly) - I have to "adjust" the lower holes for my new A posts. The point here is that ideally when you've got the "shoulders" aligned nicely and the wings are at the right height (when you look at the vehicle head on) the sticking out door hinges should also be at the same height on either side of the vehicle.

####

So advice for these choices is - stand back - think ahead - look at the relative heights of the main shapes and make sure it doesn't look like a 6 year old put your Land Rover back together again

####

Import thing to remember when making your plan.

Inside the A pillar several pieces were joined together at the factory

1) The outer front piece of the bulkhead - the bit that goes right across that holds the vents in place
2) An inner piece that also runs the width - the inner side of the "vent panel" see (1)
3) An upper A post piece
4) The lower A post (the bit you've bought)
5) A strengthener (sits behind the upper A post at the top (3))
6) A strengthener (sits behind upper hinge holes)
7) An inside strengthening piece (complicated to make) that sits between (4), (3), (2) and (1)

On the outer surface the new part you've bought (4) is meant to go under / inside (1) and butt up against (3) - with part (6) in there too

Rather difficult to get these replacement parts fitted "as factory" in my opinion if you're not going to pick the parts to bits.

Remember the upper hinges should ideally have the thickness of 3 pieces (not 2!) - but I don't see how you can achieve that with out stripping all the bits to component parts...
 
Looking back at some of the photos posted in this thread - I like the idea of re-mounting the doors as a way of checking whether I've got enough adjustment (or if the pillar is within tolerance). That will require me to get the tub back in one piece and mounted properly though... more thinking required.
 
How are you getting on? Any progress to report with photos?
Fingers crossed I might hopefully start mine to in the next couple of weeks.
 
Hello All - sorry for the lack of replies. Spent the past 2 months trying to get our house move over the line, so was hoping to do this in a nice new garage. House move doesn't look like it's happening, so now back to thinking it'll get done under a temporary marquee on the drive! Welder has been ordered, and in the mean time I've been stripping bits from the landy that will get in the way - wiring has come off (complete death trap - new one will be ordered).

Photos to come ASAP - got a few days off in December so hopefully some progress before Christmas!
 
Back
Top