Afternoon All - been a while since I was on here...not having the Landy as my daily driver any more has reduced the constant need for fettling to a far more relaxing and enjoyable occasional tinker ")
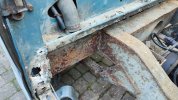
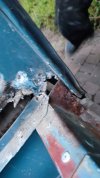
I feel that now might be the time to bite the bullet and really get to grips with the rot on the chassis. In the decade or so I've owned it I've had to replace an outrigger and patch in various places, but I've never really properly managed to get it sorted - mainly through lack of space, time and energy..
So I'm thinking I really need to take the body off and see what's what underneath, allow me to access it properly to clean / weld / replace as needed... I have what I think is a pretty standard 109 hardtop as seen here:

Tho the observant of you will notice I do only appear to have rear windows on one side...I'm guessing a PO panelled over the other side many a moon ago, but who knows... (and yes, I know the paintwork is shocking...again, not my doing!)
I've never removed the body and the Green Book offers very little by way of help in the matter. SO my question is...how easy is it to get the body off? It is possible to remove in one piece or do I need to break a load of spot welds and rivets? Can I just unbolt / unscrew it from (no doubt) a million places and lift it off to expose the chassis underneath?
If anyone who's done this can offer any words of advice on how best to go about this it would be appreciated - I thought I'd ask before tackling the job rather than wait til I got ½ way through and bolloxed it up and resorted to getting help!
I have to work on the drive and have no lifting gear and am normally on my own too if that is a factor..
Thanks for any advice!
Oh and also, while I'm here, what do you call the type of cable that's got the inner core and the flexi outer - the one that is used to operate the heater control leaver? I need to replace mine and I'm sure I can buy a length of cable cheaper than LR parts places sell the 'right' one if i could only remember the name of the cable type...but I can't. I'm sure it's got a fancy name not just 'inner core cable'...anyone?
I feel that now might be the time to bite the bullet and really get to grips with the rot on the chassis. In the decade or so I've owned it I've had to replace an outrigger and patch in various places, but I've never really properly managed to get it sorted - mainly through lack of space, time and energy..
So I'm thinking I really need to take the body off and see what's what underneath, allow me to access it properly to clean / weld / replace as needed... I have what I think is a pretty standard 109 hardtop as seen here:
Tho the observant of you will notice I do only appear to have rear windows on one side...I'm guessing a PO panelled over the other side many a moon ago, but who knows... (and yes, I know the paintwork is shocking...again, not my doing!)
I've never removed the body and the Green Book offers very little by way of help in the matter. SO my question is...how easy is it to get the body off? It is possible to remove in one piece or do I need to break a load of spot welds and rivets? Can I just unbolt / unscrew it from (no doubt) a million places and lift it off to expose the chassis underneath?
If anyone who's done this can offer any words of advice on how best to go about this it would be appreciated - I thought I'd ask before tackling the job rather than wait til I got ½ way through and bolloxed it up and resorted to getting help!
I have to work on the drive and have no lifting gear and am normally on my own too if that is a factor..
Thanks for any advice!
Oh and also, while I'm here, what do you call the type of cable that's got the inner core and the flexi outer - the one that is used to operate the heater control leaver? I need to replace mine and I'm sure I can buy a length of cable cheaper than LR parts places sell the 'right' one if i could only remember the name of the cable type...but I can't. I'm sure it's got a fancy name not just 'inner core cable'...anyone?