Another 90 Rebuild

This site contains affiliate links for which LandyZone may be compensated if you make a purchase.
Done very little on Landy this weekend. Been building a bar for a beer festival :D in between the heavy showers that is.
Got a new gear box cross member, rubbed it down and painted it with rustoleum. Engine clean next weekend, weather permitting :)
 
Got the bar finished. See picture - spent all day yesterday from 9am until 7pm knackered.

Got around to sticking some bits back on the Landy today. No washers for the anti-roll bar joints. I'm sure it had some when I took them off. Typically the pictures I took don't quite show clearly and the picture in the manual is too small. The joint didn't come with a washer, just a castellated nut and a split pin. Should there be washers where I've put arrows.

Offered up the gear box cross member and it seems way wide. The local Landy specialist, where I bought it, did say you often had to hammer them in. :eek:
What about the galv on the chassis? Is this usual? It's a Richards chassis.
 

Attachments

  • IMG_5114.JPG
    IMG_5114.JPG
    227.5 KB · Views: 441
  • IMG_5117 arrows.jpg
    IMG_5117 arrows.jpg
    204 KB · Views: 410
  • IMG_5121.JPG
    IMG_5121.JPG
    300.2 KB · Views: 393
Do the chassis rails flex easily? Can't imagine it.

I've got a big trolley jack, will that do? I presume you used wood packing to avoid damaging the rails?
 
Do the chassis rails flex easily? Can't imagine it.

I've got a big trolley jack, will that do? I presume you used wood packing to avoid damaging the rails?

I used a bottle jack and packed out with wood yes.
A trolley jack may be rather difficult to hold in position while you start jacking.
My opinion, Buy a bottle jack for £10. That's what I did and is much more manageable :)
 
Son is home from uni so he can hold the jack in place while I operate it. Even cheaper than £10 :D

:p Fair play, You'll probably manage, But I can't see it being easy trying to hold this big jack up with bits of wood wedged in whilst trying to move the jack handle :D
 
Ha ha, that's true, but he's a big bugger. Rugby player and much bigger than me. Plus! I've got two more sons if more hands are needed! :D

Did the rails push outwards ok? Or take a hell of a lot of pressure?
 
they push out easily ,but i usually just manage with a large copper hammer

I'm sure they must all be the same, but doing this for the first time the cross member seems silly wide. The welds on the corners of the rails make it worse.
Do you put yours in at an angle and them hammer them in to a straight position?
 
Mine was the same as yours, Was no where near. Don't think you would have ever got it in with a hammer

Thanks for the jacking tip, then. I wouldn't have thought of that. a - because I wouldn't have thought the rails would jack out easily and b - because I would be worried about damaging my new chassis :D
 
Mine was the same as yours, Was no where near. Don't think you would have ever got it in with a hammer.

i have a hydraulic body repair kit ,put rarely use it for cross members,simply because it takes time to get and set up ,but you do find the odd chassis that needs it not many though
 
i have a hydraulic body repair kit ,put rarely use it for cross members,simply because it takes time to get and set up ,but you do find the odd chassis that needs it not many though

I've not had a problem getting them in/out of an old chassis.
But when I rebuild mine. So new galv chassis and crossmember it wouldn't go.

Now it's been in their a couple of months it might go in and out as it should. But I'm not about to go and try it :eek:
 
Last edited:
I'll have to get a bottle jack, cos my trolley jack won't pump up when it's standing on it's nose or side :(

Couldn't quite remember which way the front anti roll bar joints went. With them hanging down the anti roll bar touches the steering bar when I pull the rubber mount up to the chassis.

IMG_5124_zpsd756c267.jpg


I think the joints go up over and I have fitted it this way, but the joint actually touches the diff casing. It may move off it when everything is tightened up. Is this the correct way, with joints going up over. Pictures in manual not clear and I took a lot of pictures of the dismantling, but obviously not enough! :eek:

This shows the joint touching the diff.
IMG_5126_zps3c752b1e.jpg


This is the set up so far. Panhard rod bush won't fit in to axle, but I presume it will when the weight of the engine compresses everything.

IMG_5125_zps58553388.jpg


I've put the pictures as attachments. Photobucket ones not working.
 

Attachments

  • IMG_5124.JPG
    IMG_5124.JPG
    211.7 KB · Views: 209
  • IMG_5126.JPG
    IMG_5126.JPG
    192.6 KB · Views: 193
  • IMG_5125.JPG
    IMG_5125.JPG
    271.7 KB · Views: 210
Last edited:
Got in after 6 tonight, but it was still sunny and the bottle jack had arrived. So, I thought I'd have a go at getting the gearbox cross member in.

Unlike the trolley jack, the bottle jack worked on it's side no bother.

IMG_5128_zps856f99e4.jpg


It doesn't look it, but it was still hellish tight. I didn't want to force the chassis rails too much. I could hear them making 'tinking' and 'dinking' noises as I jacked them apart.

When I got two bolts in as shown in the above pic I couldn't rotate it up and so used the trolley jack. It actually jacked up the whole chassis and I had to stand with one foot on each rail and bounce up and down to get it to rotate up in to position.

IMG_5131_zpsff285c7f.jpg


One of the holes in the two lugs on the chassis doesn't quite line up
 
Unlike Aaron, I seem to have spent a lot of time this weekend and not achieved a great deal.
Spent most of Saturday cleaning down the engine with Gunk. Cleaned up well, with the block starting to show signs of rust by the end of the afternoon. :eek:

Had some family commitments today and so just got the engine mounts rubbed down and painted up,
IMG_5134_zps331775b9.jpg

They cleaned up well and I sprayed them matt black, cos it was all I had.

Hope to drop the engine on this week, if weather stays fine.
 
Last post was two weeks ago and was hoping to get the engine in that weekend. :(
Problems with engine mounts, work most evenings and crane issues has meant taking until now to get it in. I got a lot of help with the lifting problems on a separate thread.
IMG_5153_zps6af60748.jpg


Stripping the bulkhead tomorrow. Then going camping for two weeks with the new one arriving a few days after we get back. Not looking forward to putting everything back on - loads more photos to take!
 
Bulkhead stripped.

IMG_5212_zps9e898de6.jpg


Fortunately the shear bolts holding the steering lock on are made of very soft metal. I started drilling a hole with the view to putting something in it to tap it around. Realised I could push the drill to form a slot. Then put a big flat blade screw driver, came away easily.

IMG_5223_zps62f66632.jpg


Thought the front shocks would go in easily once the engine was in. Wrong! :mad:
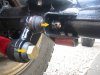
LR specialist I bought them from said it was a tricky job as next to no thread shows. Using the braided straps that held the shocks together I improvised this system and it worked a treat.

Put the nut over the flat blade end of the shocker stud then put a cupped washer over it (cup up over)
IMG_5221_zps6fe8daf5.jpg


Some timber under the chassis with the straps around it and timber in the top to compress the washer. The screwdriver stopped the two bits of wood closing in on each other preventing access to the nut.
IMG_5220_zpse00bd15b.jpg


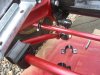
I haven't tried to take this apart yet, but Is this breather serviceable or is it easier just to change it?
IMG_5222_zps6a220e1a.jpg


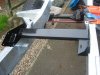
Started cleaning up the fuel tank thinking the seam would probably just fall apart. Didn't get that far cos it was perforated above the seam. Don't know how it wasn't leaking :confused:
IMG_5150_zpsffa0096c.jpg


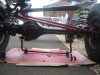
This is it so far, although all the shocks are on since this picture.
IMG_5216_zpsfbe2d717.jpg


Next job is to paint the new bulkhead when it arrives. Once I've learned to paint that is :eek:
 
Waiting for the bulkhead to arrive and so started work on the doors again today. Having spoken to Ashtree Landrover today, I've given up the idea of getting the door frames galvanised. Going for plastic coating instead. Successfully got the rear door skin off, with no creases, and taking the frame to a plastic coaters tomorrow to get a firm quote for all three.
IMG_5226_zpsd09aebb3.jpg
 
Back
Top