Aaron's 90 rebuild (round 3)

This site contains affiliate links for which LandyZone may be compensated if you make a purchase.
It's not a fault, Aaron. Some of us might be great on the phone, but little idea how to re-cut he threads on a radius arm. We're all just more or less comfortable at doing different things. I just popped that in there to maybe give you a starting point for the phone call. Up to you what you want to do :)
How did you prime the calipers before you painted them? Did you use T wash on them?

Yep, I know, you're trying to help mate :) People aren't really my strong point, I will ring them, it's just when.
Calipers I just de-greased, gave a light sanding and painted with the rustoleum stuff.

Copper washers might be in case you decide to use banjo fittings for the brake pipe connection?

Ah, good thinking! I had offered the washer into the recess yesterday and it didn't even twig despite if fitting perfect.

Great to see so much progress in a short space of time. Hope it all goes together smoothly. The rear radius arms seem to have different fittings on the ends. Were they like this when they came off the car?

It's just nice to have plenty to go at, if theirs one thing I hate it is mincing about with little bits.
And yes, it is annoying me slightly so I may change them.

Tell her to move to the top of the street.

Haha, she has plenty of problems to complain about but no solutions.

Re your neighbour/s: you simply can't please all of the people all of the time; I don't even try any more. There is nowt as queer as folk mate. A world without people would be great in my book...as long as I got my parts delivered :)

Yep, I agree mate, I have tried with these people, but I have given up too, their is no point when she is complaining about stupid stuff like a watering can of water on her drive.
And a world without people, well yes, that would be nice at times.
 
A little bit more today.
Mainly building the rear axle up.
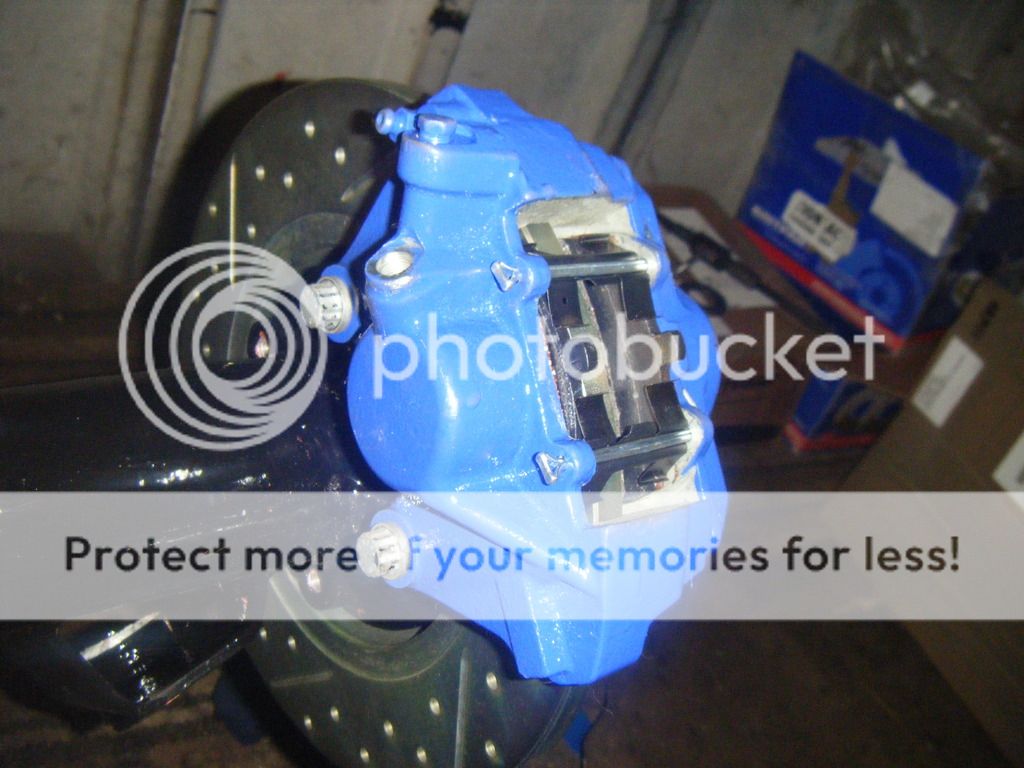
Forgot to take too many pictures to start with, but stub axles on, new bearings and seal in hubs, new discs (I fitted drilled and grooved, I don't know why, just saw them and thought, ah I'll buy some of them) calipers fitted and new pads.


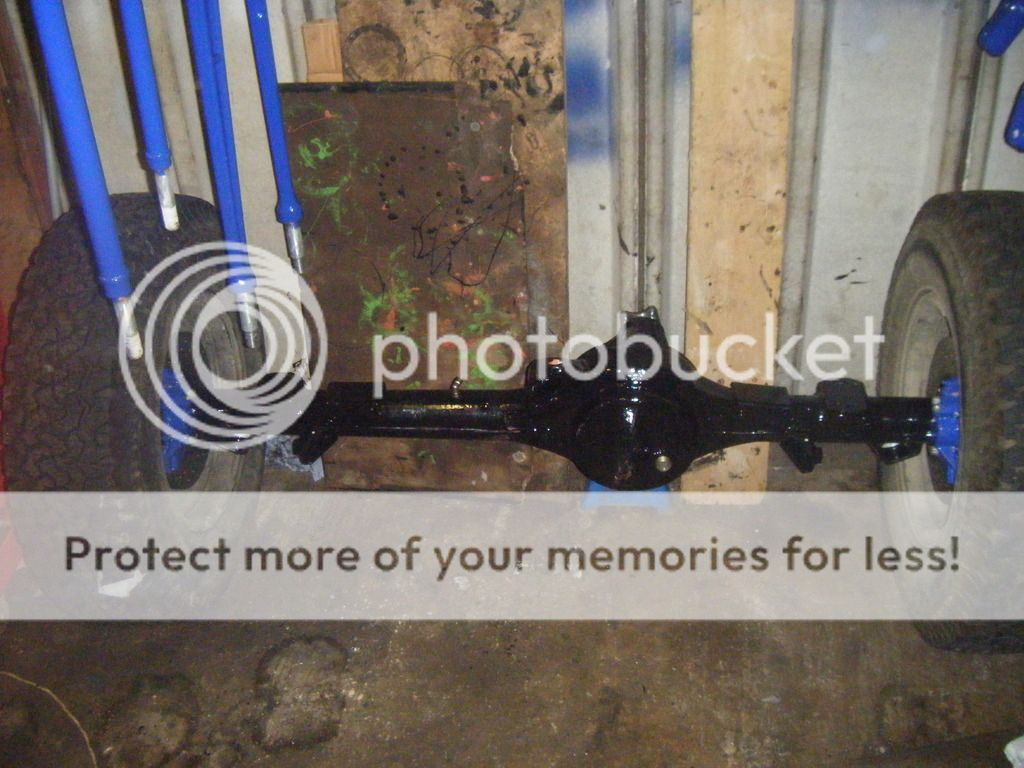
Put new studs in the casing and fitted the diff, and half shafts.


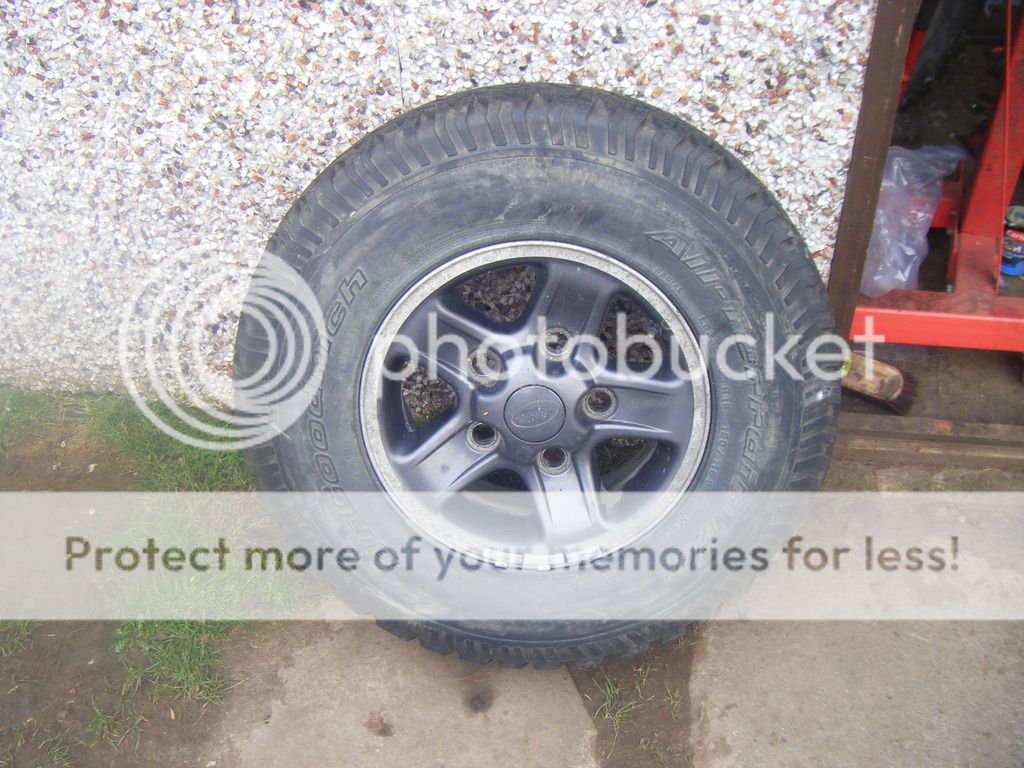
I then had to get some wheels out the shed to get it rolling, these have probably been in their for the last 6 years or so, not constantly, they have been on a few vehicles over the years, but I think I will use them on this build, seen as the ones that came with it where ****'e, or use the tyres at least, I wouldn't mind a set of mach 5's or sawtooths, but we'll see later in the build.


I was going to leave it like above for the time-being and start the front, but thought I might as well just finish it properly. One job at a time and all that.
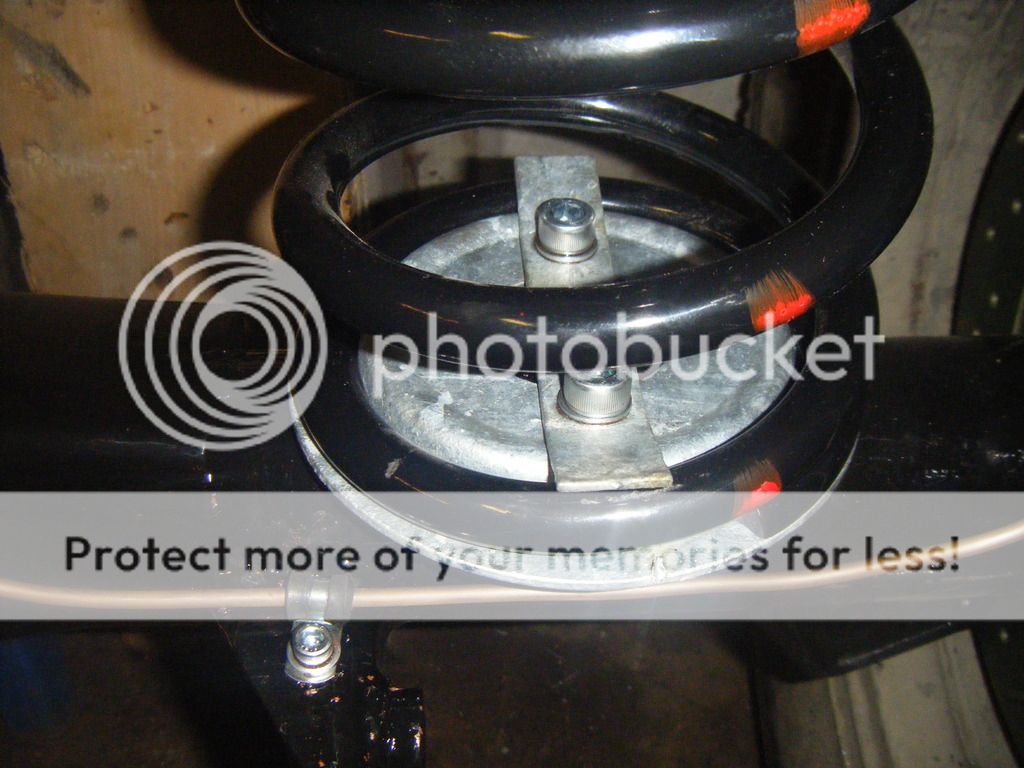
So I fitted the galv spring seats and retainers, plus new springs, and made a couple of brake pipes.
Can't say brake pipes are my favourite job, can just never seem to get them perfectly how I want them, but they're acceptable.


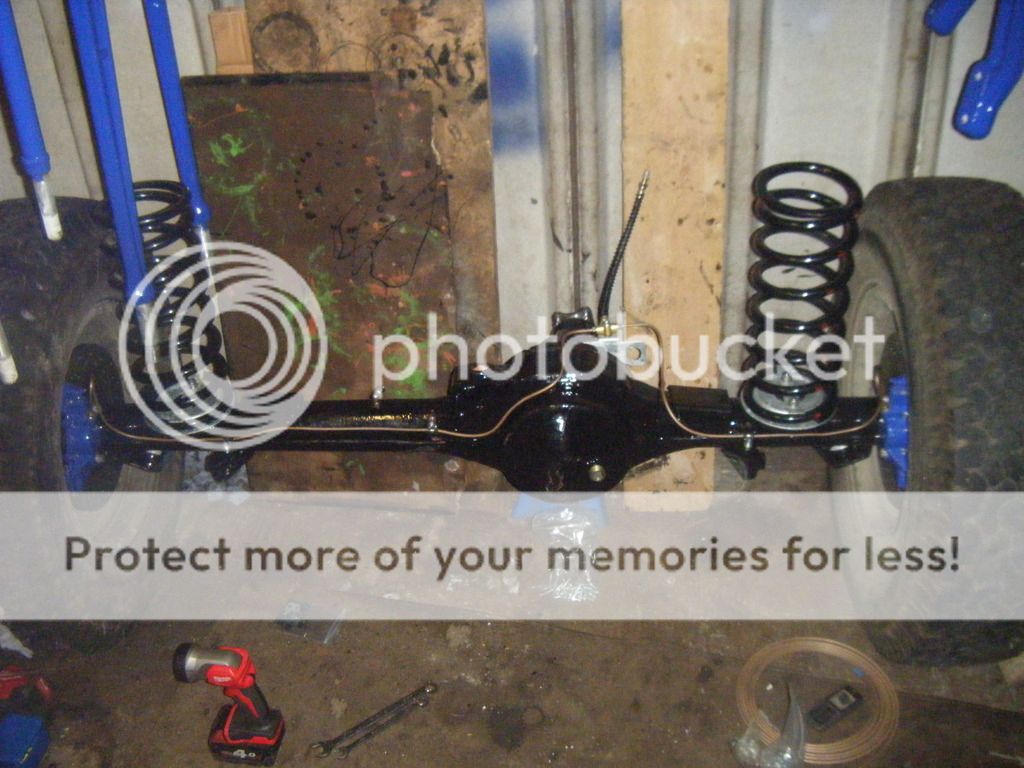
Rubber lined p-clips, much better than plastic crap they fit at factory.


And I found some all metal push fit 90's for the breathers.


Paint was still softer than I thought, so I've got some touching up to do though..
Need to have a tidy in the garage first thing tomorrow and will then start on the front axle.
And you know I said I need to ring Richards' chassis this week to try and get an update, well I went on my emails earlier and I had an email from them on Wednesday saying that my chassis is ready and to contact them to arrange collection, they also say they have been trying to contact me since before Christmas numerous times by phone and no answer :confused:
Well I've had no missed calls :confused: and had I known I would have collected it asap, as I'd rather have it and not need it than not have it and need it.
Anyway, I gave them a call as soon as I saw it and have organised collection for next Saturday. Can't wait :D Maybe things will start falling into place now.
 
Those socket cap screws, are you sure they are a good idea? I don't think I would chance those.
 
Those socket cap screws, are you sure they are a good idea? I don't think I would chance those.

Why not? 12.9 bzp isn't likely to break anytime soon, I'd think stronger than the originals if anything.
If it had a standard hex head people wouldn't bat an eyelid, yet most I've bought/seen are only 8.8 rated.
 
;):):)
Wait til both neighbours pop off shopping and go and get it back., cant report you for stealing, its your property. only offence is trespass which is a civil offence, means that they have to sue you. Which they wont as they can only get damages for any damage you cause.

( trust me bane of the farm i live on, people wandering off the footpath)

Or if necky enough go and get in when they are in.

Good luck with that, felt guilty and did 30 mins in workshop this eve. achieved nowt but broken drill.

Haha, I would never do such a thing o_O:p Not sure how I will retrieve it yet.
I would say I'd love to live on a farm so no one is bothering me, but maybe not so.. Put up with what I've got for the time being, at least I've got a dry place to do little stuff if need be, some people haven't even got that.

All that looks amazing it's how land rover should of done it but then we wouldn't love them as much. Can I be the first to put my name down to buy this haha. This will be the ultimate defender mate with your skills good luck and keep up the good work.

Cheers bud :)
It is and no we wouldn't, but what the chuff would I do with myself if they had :eek:
 
Why not? 12.9 bzp isn't likely to break anytime soon, I'd think stronger than the originals if anything.
If it had a standard hex head people wouldn't bat an eyelid, yet most I've bought/seen are only 8.8 rated.

Ah, thought they were stainless. My worry would be 10 years from now trying to remove them, I've stripped quite a few in my time leaving the socket free to turn in the cap.
 
Why not? 12.9 bzp isn't likely to break anytime soon, I'd think stronger than the originals if anything.
If it had a standard hex head people wouldn't bat an eyelid, yet most I've bought/seen are only 8.8 rated.
personally id only buy the proper part number bolts for axle and suspension components as grade is important plus shank length and fit
 
Ah, thought they were stainless. My worry would be 10 years from now trying to remove them, I've stripped quite a few in my time leaving the socket free to turn in the cap.

Yes you're probably right, but used plenty of copper grease so hopefully that will help a little.
And nope, wouldn't use stainless for anything like that :)

personally id only buy the proper part number bolts for axle and suspension components as grade is important plus shank length and fit

For the most part I have, I wouldn't use something like that for say caliper bolts, or trailing arm to axle bolts etc.. all things like that have been ordered by part number.
 
Not so much progress today, had a tidy and made a start on the front axle.
So new studs in, and diff in and started building n/s swivel assembly up. (forgot to take any pictures before now)


New bearings and hub seal.


Hubs on, bearings adjusted, and calipers fitted.


And that was about it for today, will do a little more tomorrow but I wont be able to finish it as I've ordered the wrong brake pads, and I forgot to order some brake pipe unions last week to be able to make the caliper to flexi pipes, and I've only got one left after making the rears yesterday. :confused:
So I have just ordered some new bushes for radius arms etc and said brake pad, hopefully the right ones this time.
 
Looking excellent of course Aaron!

Quick q... Did you have drain plugs in your swivel housings? Mine are all rebuilt, but haven't seen any trace of a drain plug, only a fill plug. Did they change at some point? I'm sure busters "how to" talks about a drain plug.

I don't want to get started with the one shot till I'm sure.

Thanks :)
Mine have drain, fill and what I assume is a level plug. But they may of done away with them at some point so yours may not.
If you look at this picture, follow around from the fill plug, to probably the 5 o'clock position, their is a flat bit that returns down, that is where my drain plug is, you can just see the corner of it next to one of the swivel seal retainer bolts.

Level plug is obscured by the lock stop bolt, both only small, 11mm headed bolt (or imperial equivalent) so could easily missed.

Thanks chap. I deffo don't have one then. I wire brushed the crap out of then before painting... I'd have noticed actual bolt heads.
 
Good job Aaron. Your photos and description of work done makes it seem so simple.

Cheers Mick :) If I remembered to take more pictures I could write more in-depth/detailed posts, but I don't, so it's simple like me.

Thanks chap. I deffo don't have one then. I wire brushed the crap out of then before painting... I'd have noticed actual bolt heads.

No worries, me too, bloody long winded, I think I need to invest in a shot blaster..

ay up cocker, nice to see you got your stuff galved, who did you use?

Now then, I ended up using Worksop galv, I rang your place and asked for Phill (at least that's who I thought to ask for) and could I chuff get hold of him, now I hate speaking to people of the phone as it is, so when I couldn't get hold of I got the hump and gave up.. took me long enough to pick the phone up to be cut short. Hay ho, 'tis done now..
 
Very little done today, as I said I can't finish the front axle as I've got the wrong brake pads amongst other things.
So I finished off what I could, fitted the drive flanges, fill and drain plugs, spring seats and new lock stop bolts.


The rest of the day was spent sorting and organising stuff in preparation for when other parts/the chassis turns up.
New a-frame ball joint pressed in.


New track rod ends, clamps, nuts and bolts fitted.


And new bushes pressed into the panhard rod (because I already had some in the shed :))


Few other bits like t-washing and painting a panhard rod mount, shock mounts.
And sorted though the big box of bolts that have all been ordered by part number, all put in their places and the spares bunged in the shed, of which their are many.
Just saves time come assembly, and I didn't have a great deal to do today anyway.
Hoping the parts I've ordered turn up early this week so I can have an hour or so on a night after work this week so that the axles are done and ready to go under the chassis once I've picked it up on Saturday.
We'll see, it might not happen yet, but it would be nice to have a rolling chassis by the end of next weekend.
 
Thanks chap. I deffo don't have one then. I wire brushed the crap out of then before painting... I'd have noticed actual bolt heads.
I've got the later ones (2006 model) and they just have a single plug about 3/4 of the way up, to put one shot grease in. So I think that's pretty usual on late model axles.
 
That's coming along very nicely. Looking great, Aaron. That chassis should be up on wheels soon after it arrives. :) I'm away next weekend, so I'll probably not see it until I get home from work on Monday night :( Did the bushes push in ok with the holes being galved?
 
Back
Top