P38A A series of faults

This site contains affiliate links for which LandyZone may be compensated if you make a purchase.
You really have been busy:)

Yes...but haven't had anything like the time to work on it as I needed to as I really wanted it running by now to help me move all my other projects back to Kent from North Hampshire...

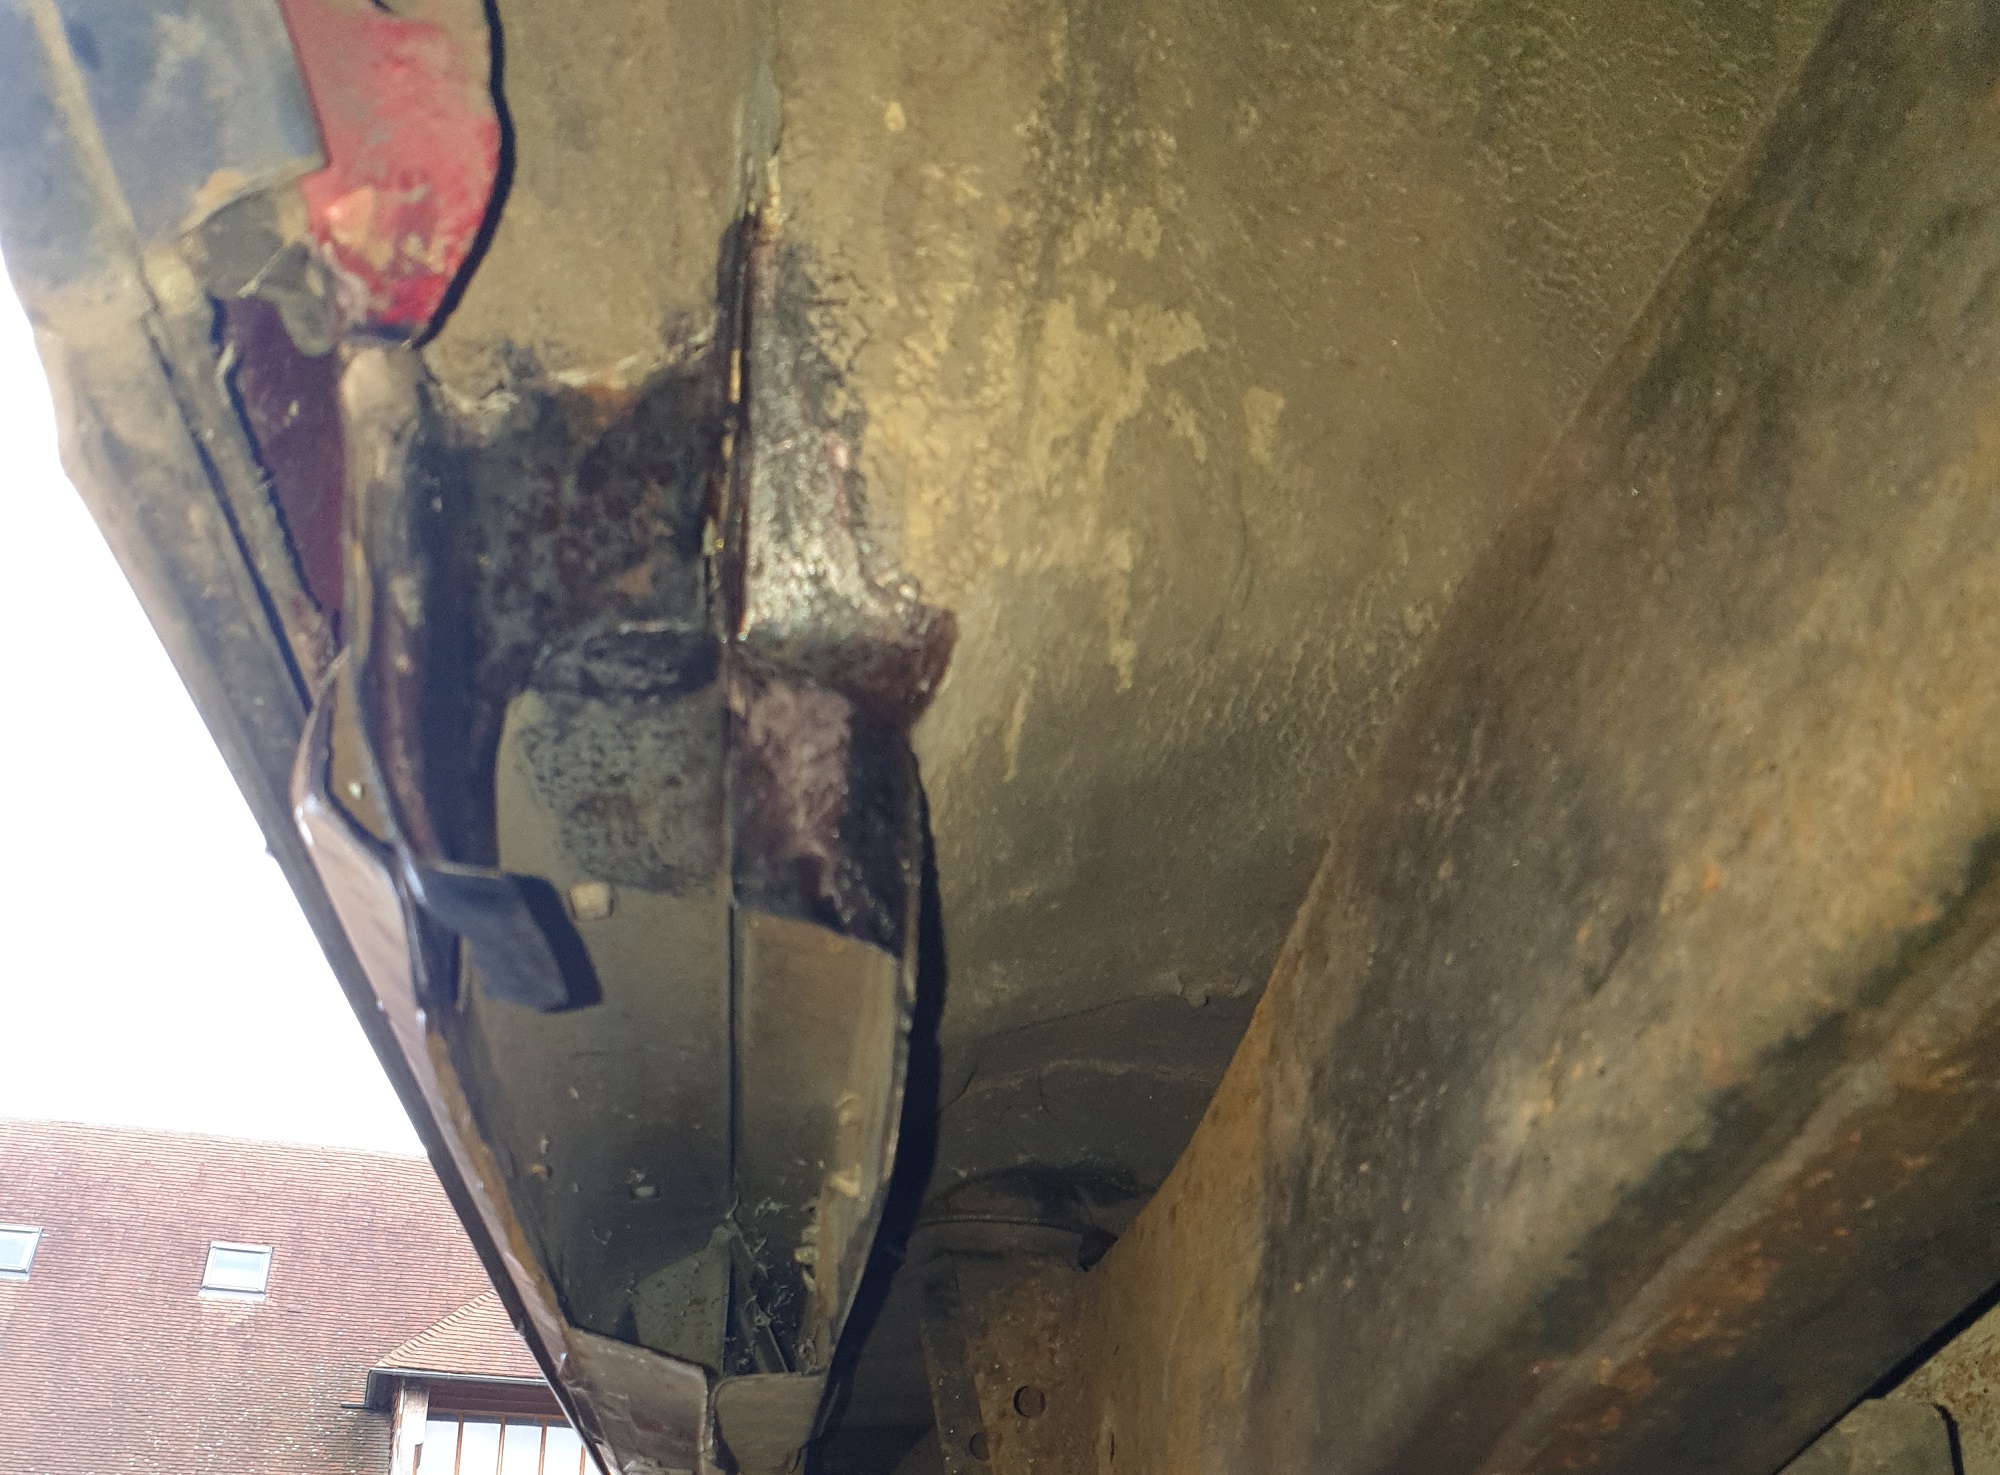
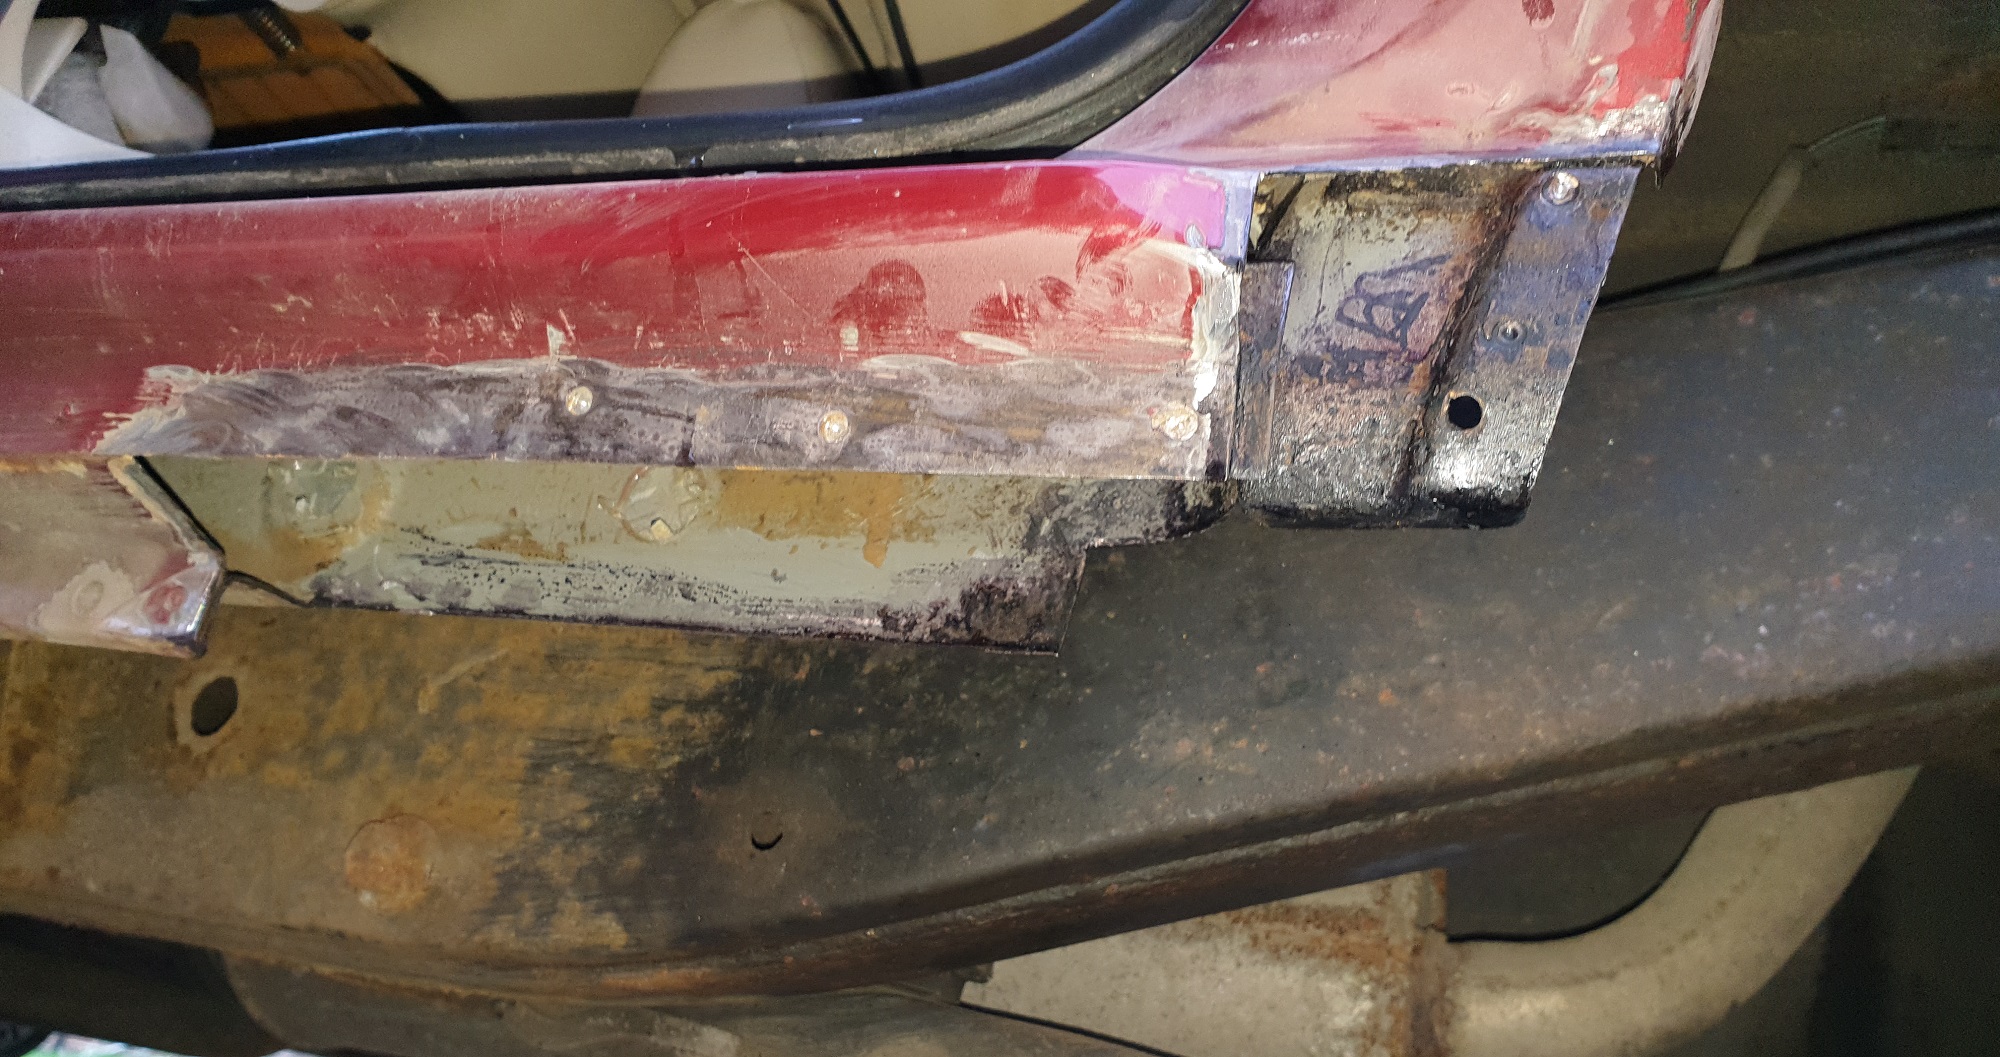
Never seen one that rusty, looks like it was used as a launch vehicle in salt water:eek: I admire your metal working skills.:)

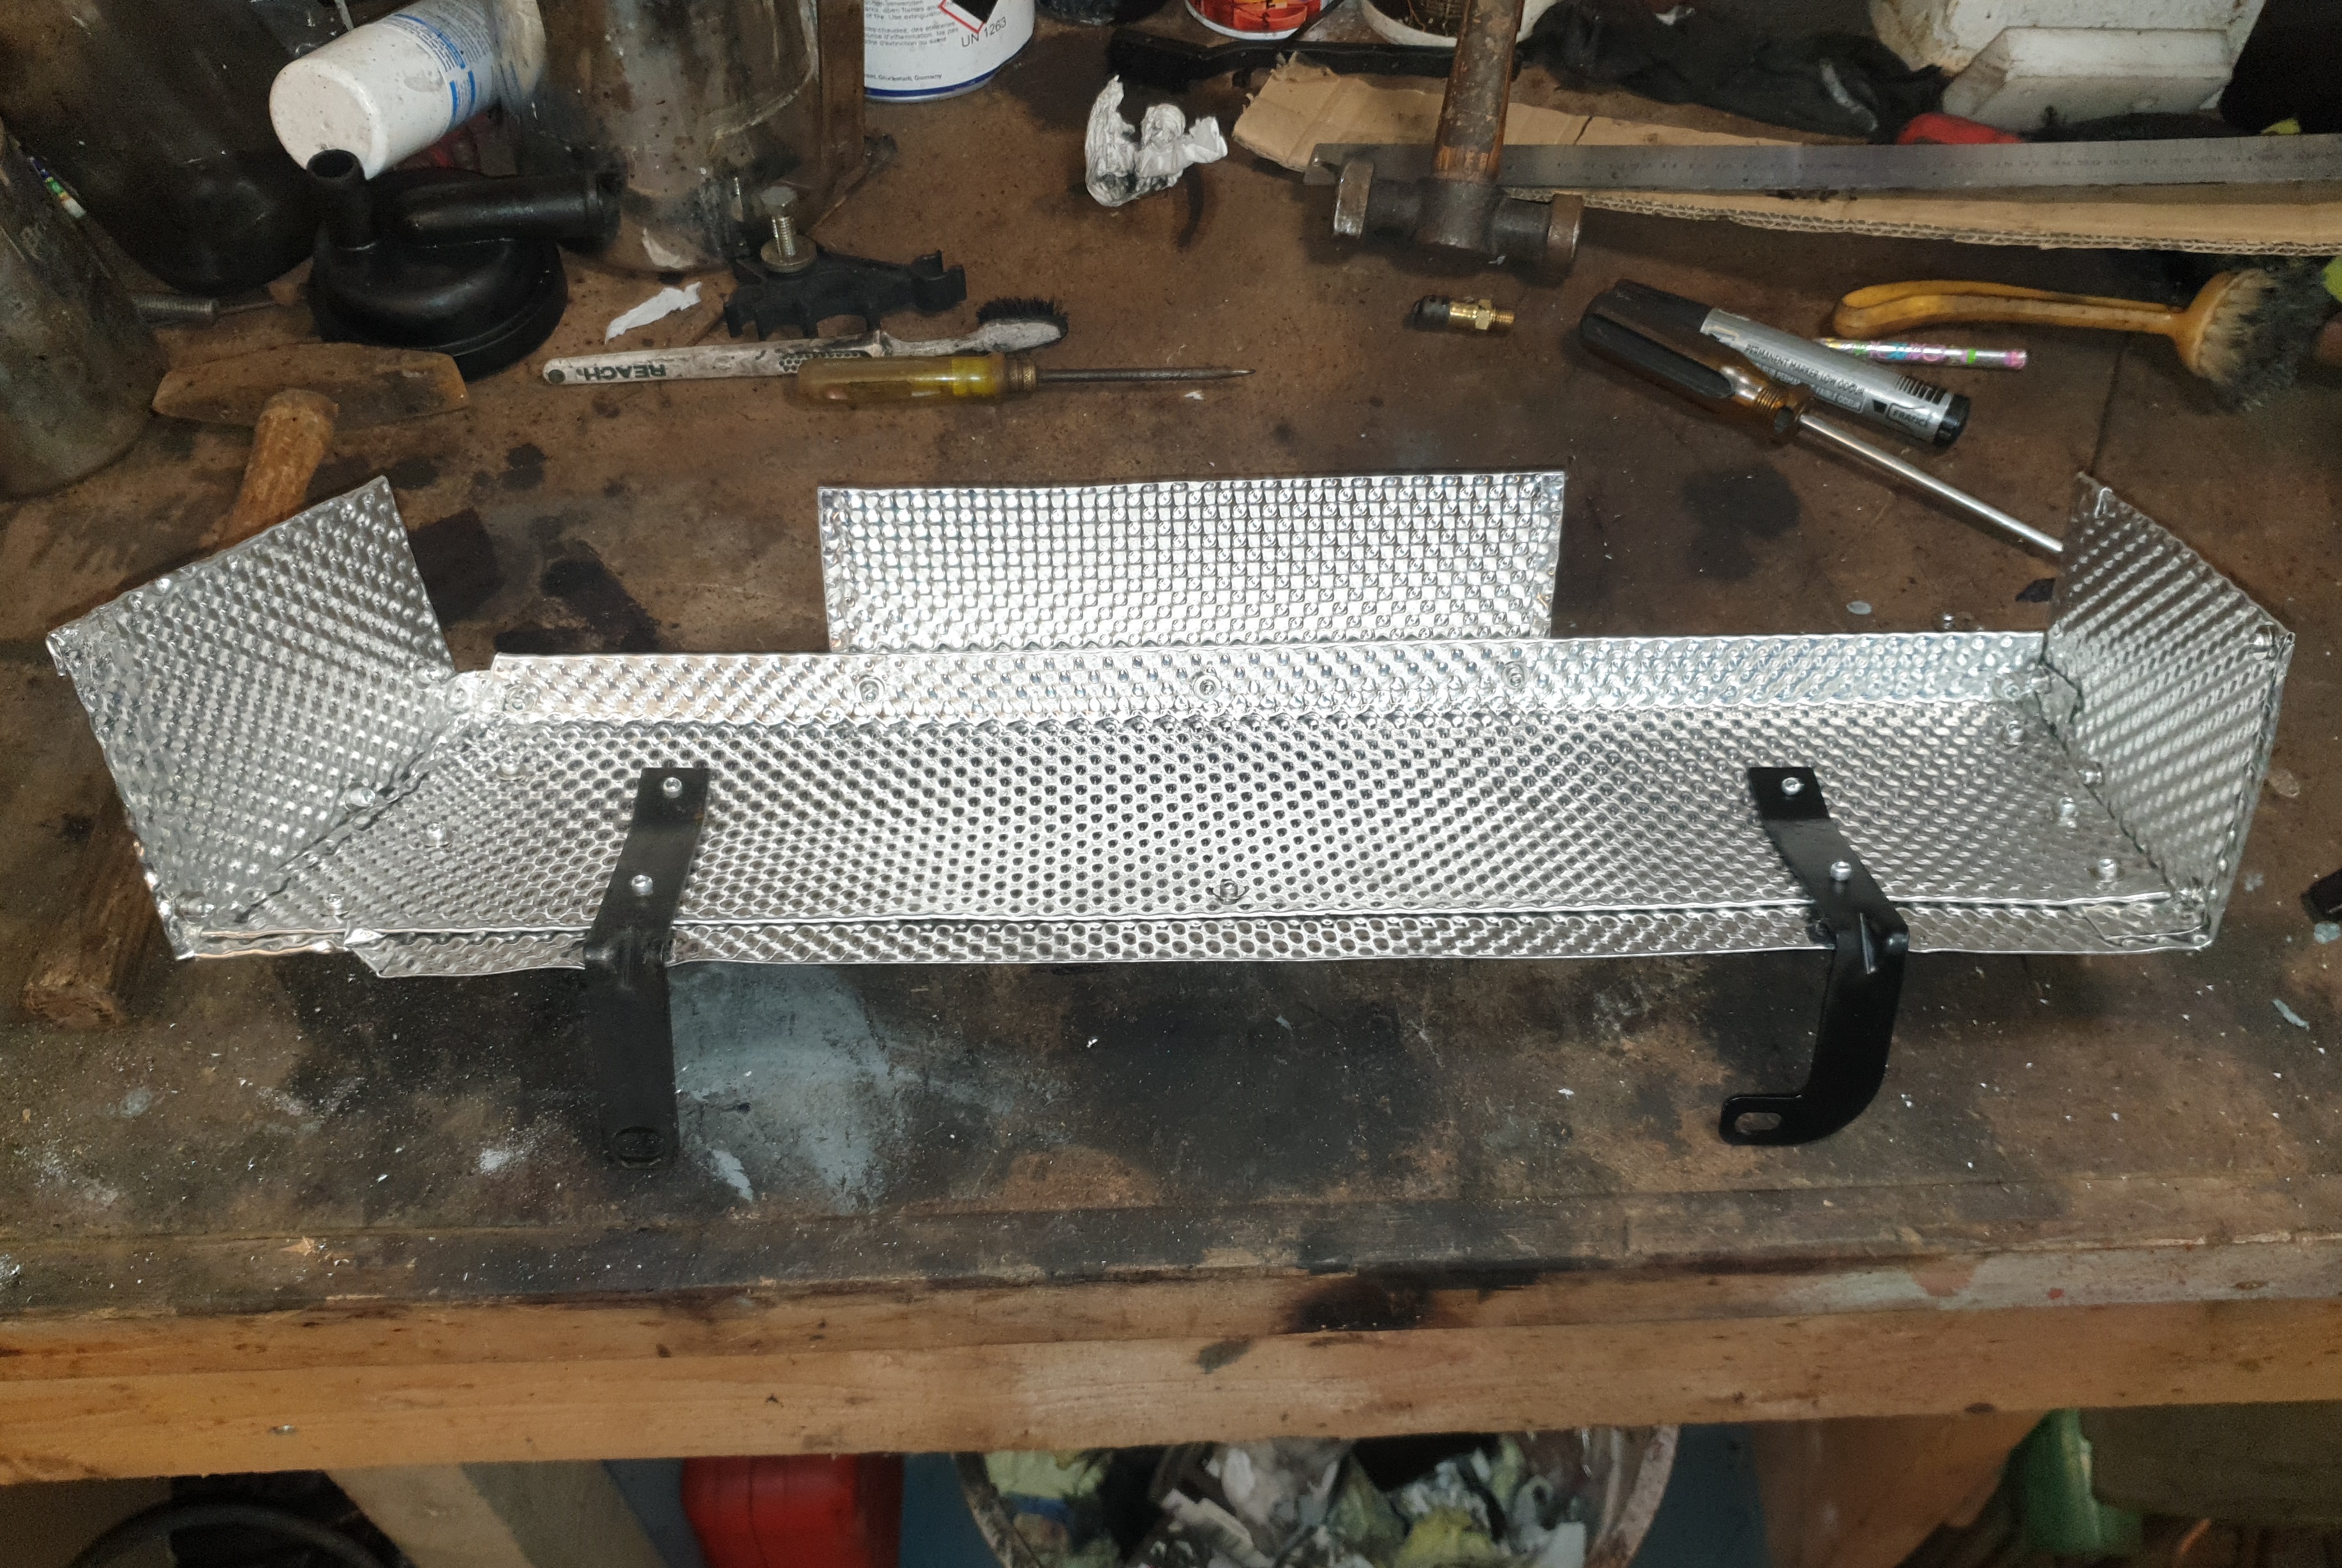
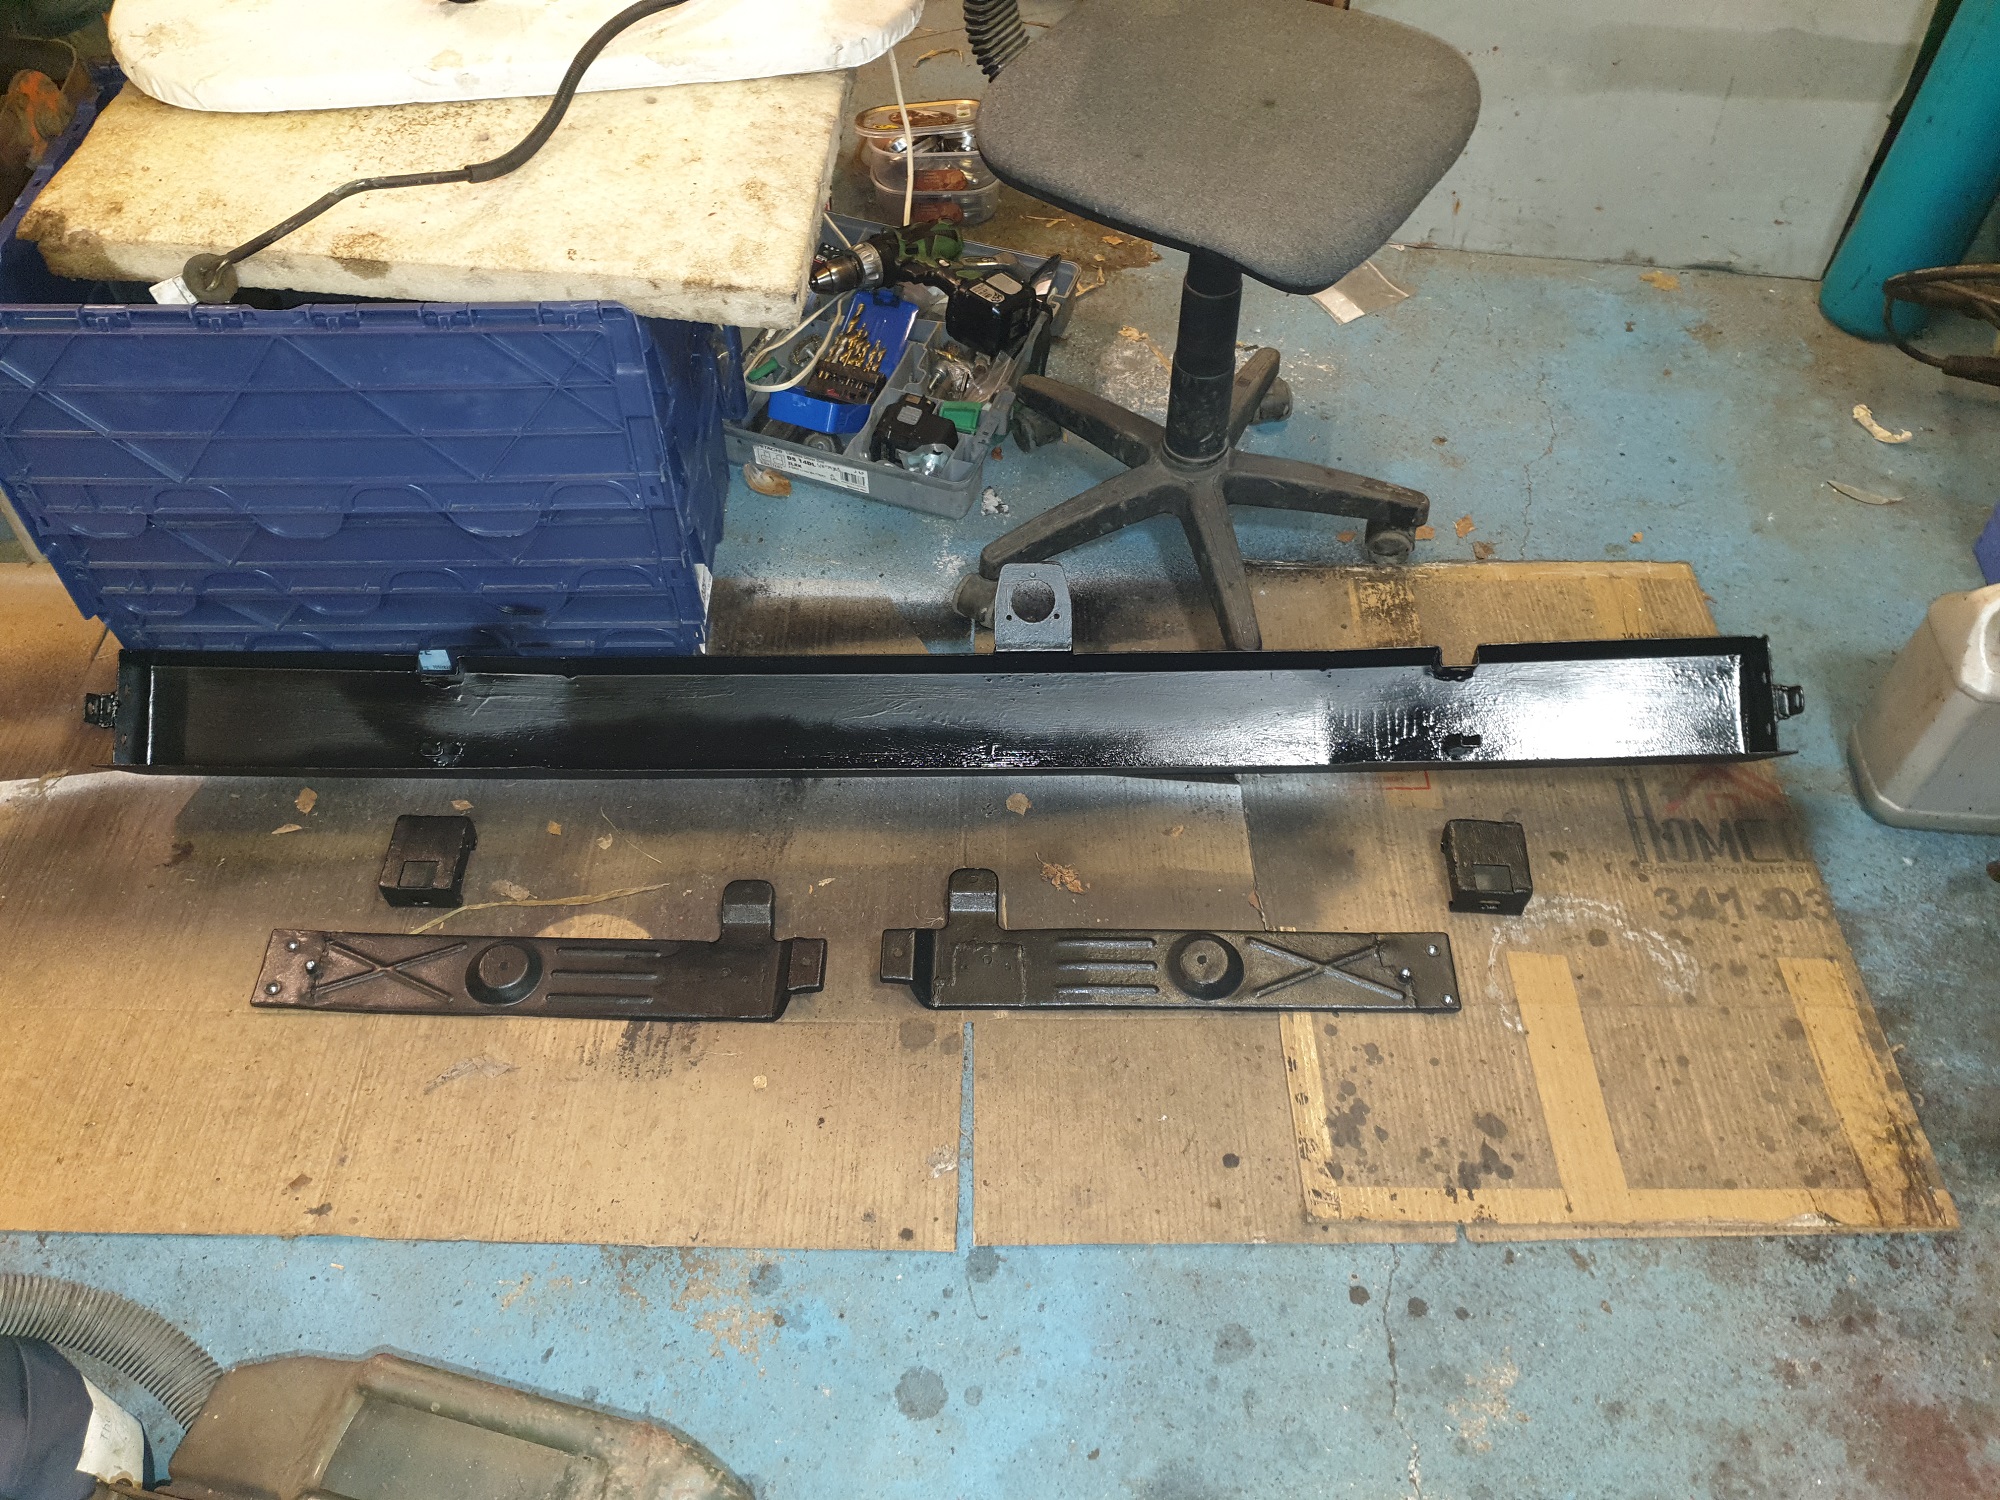
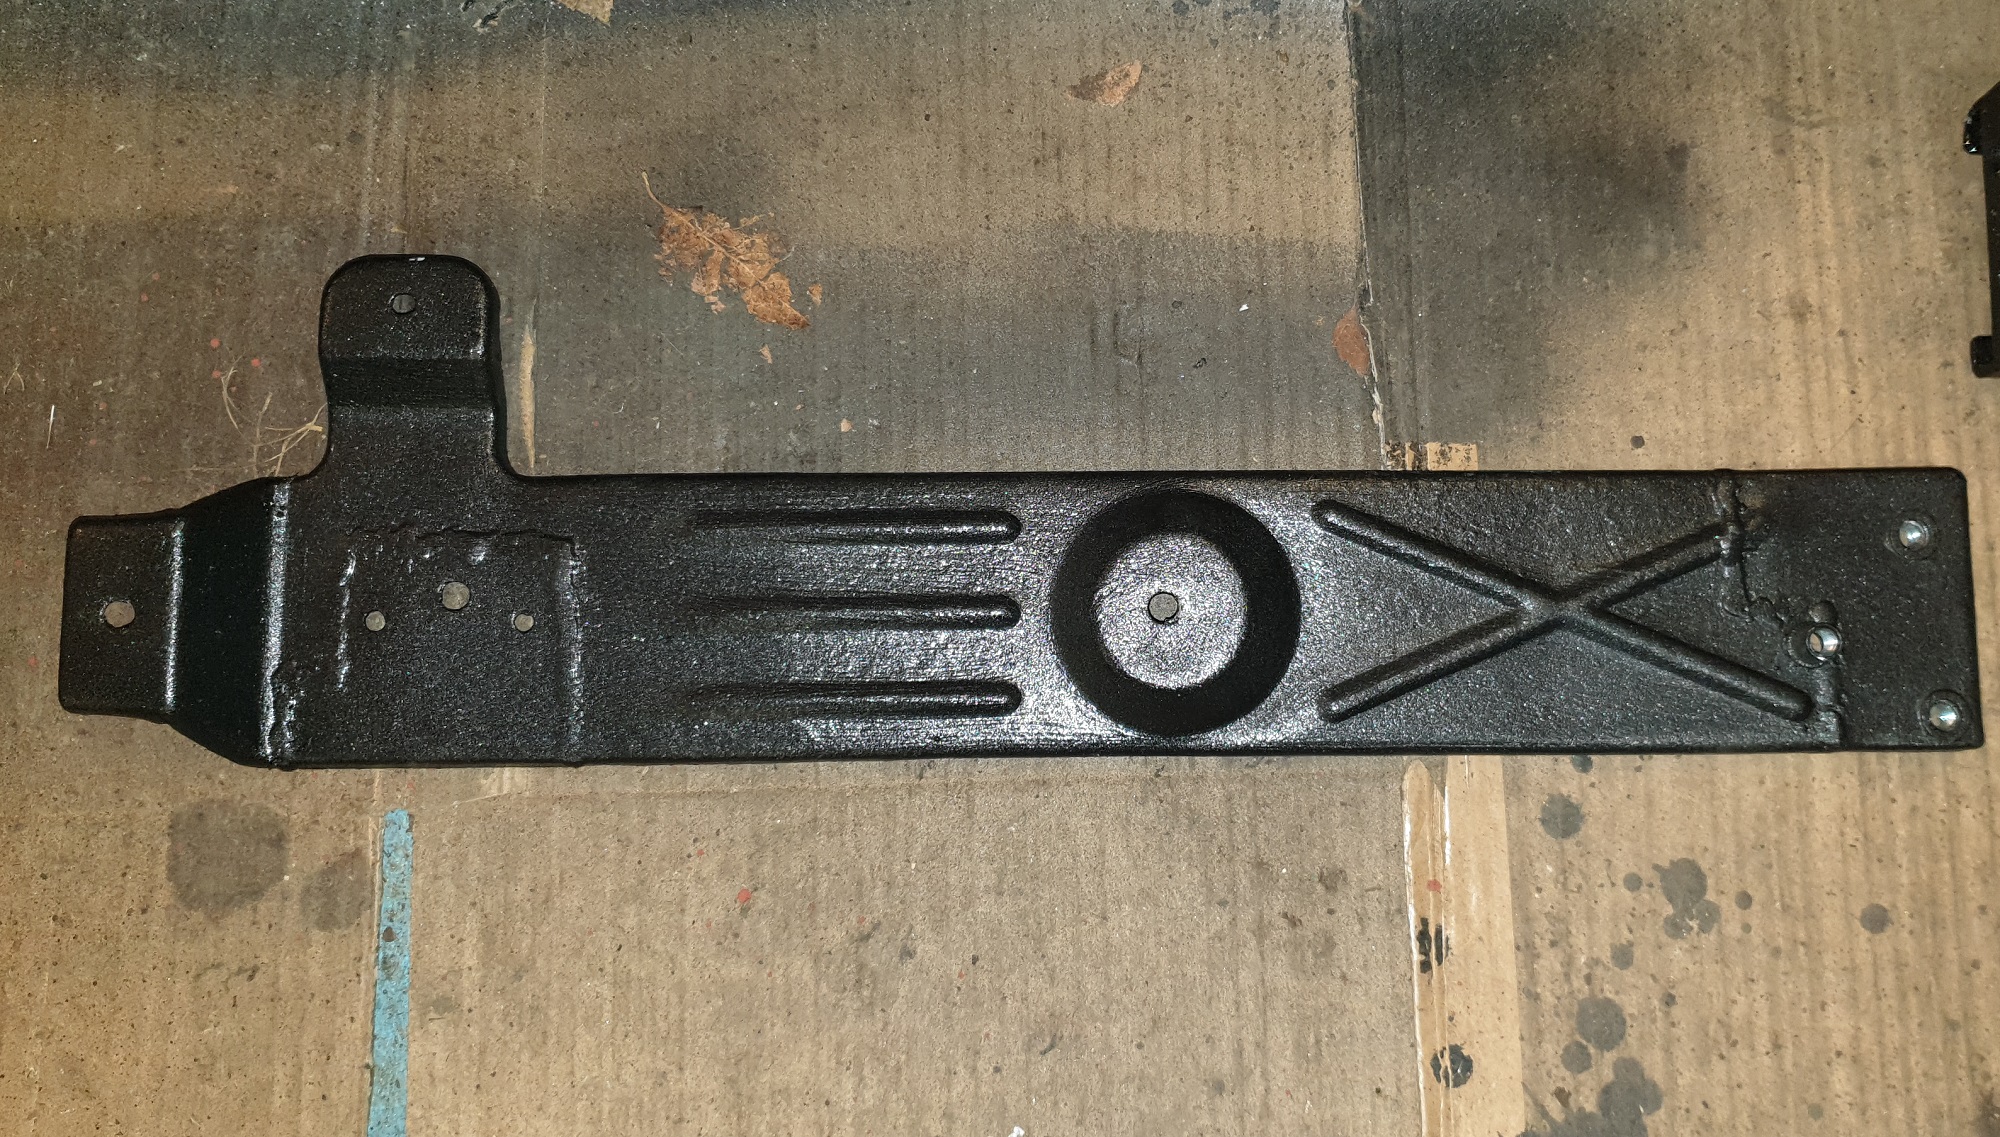
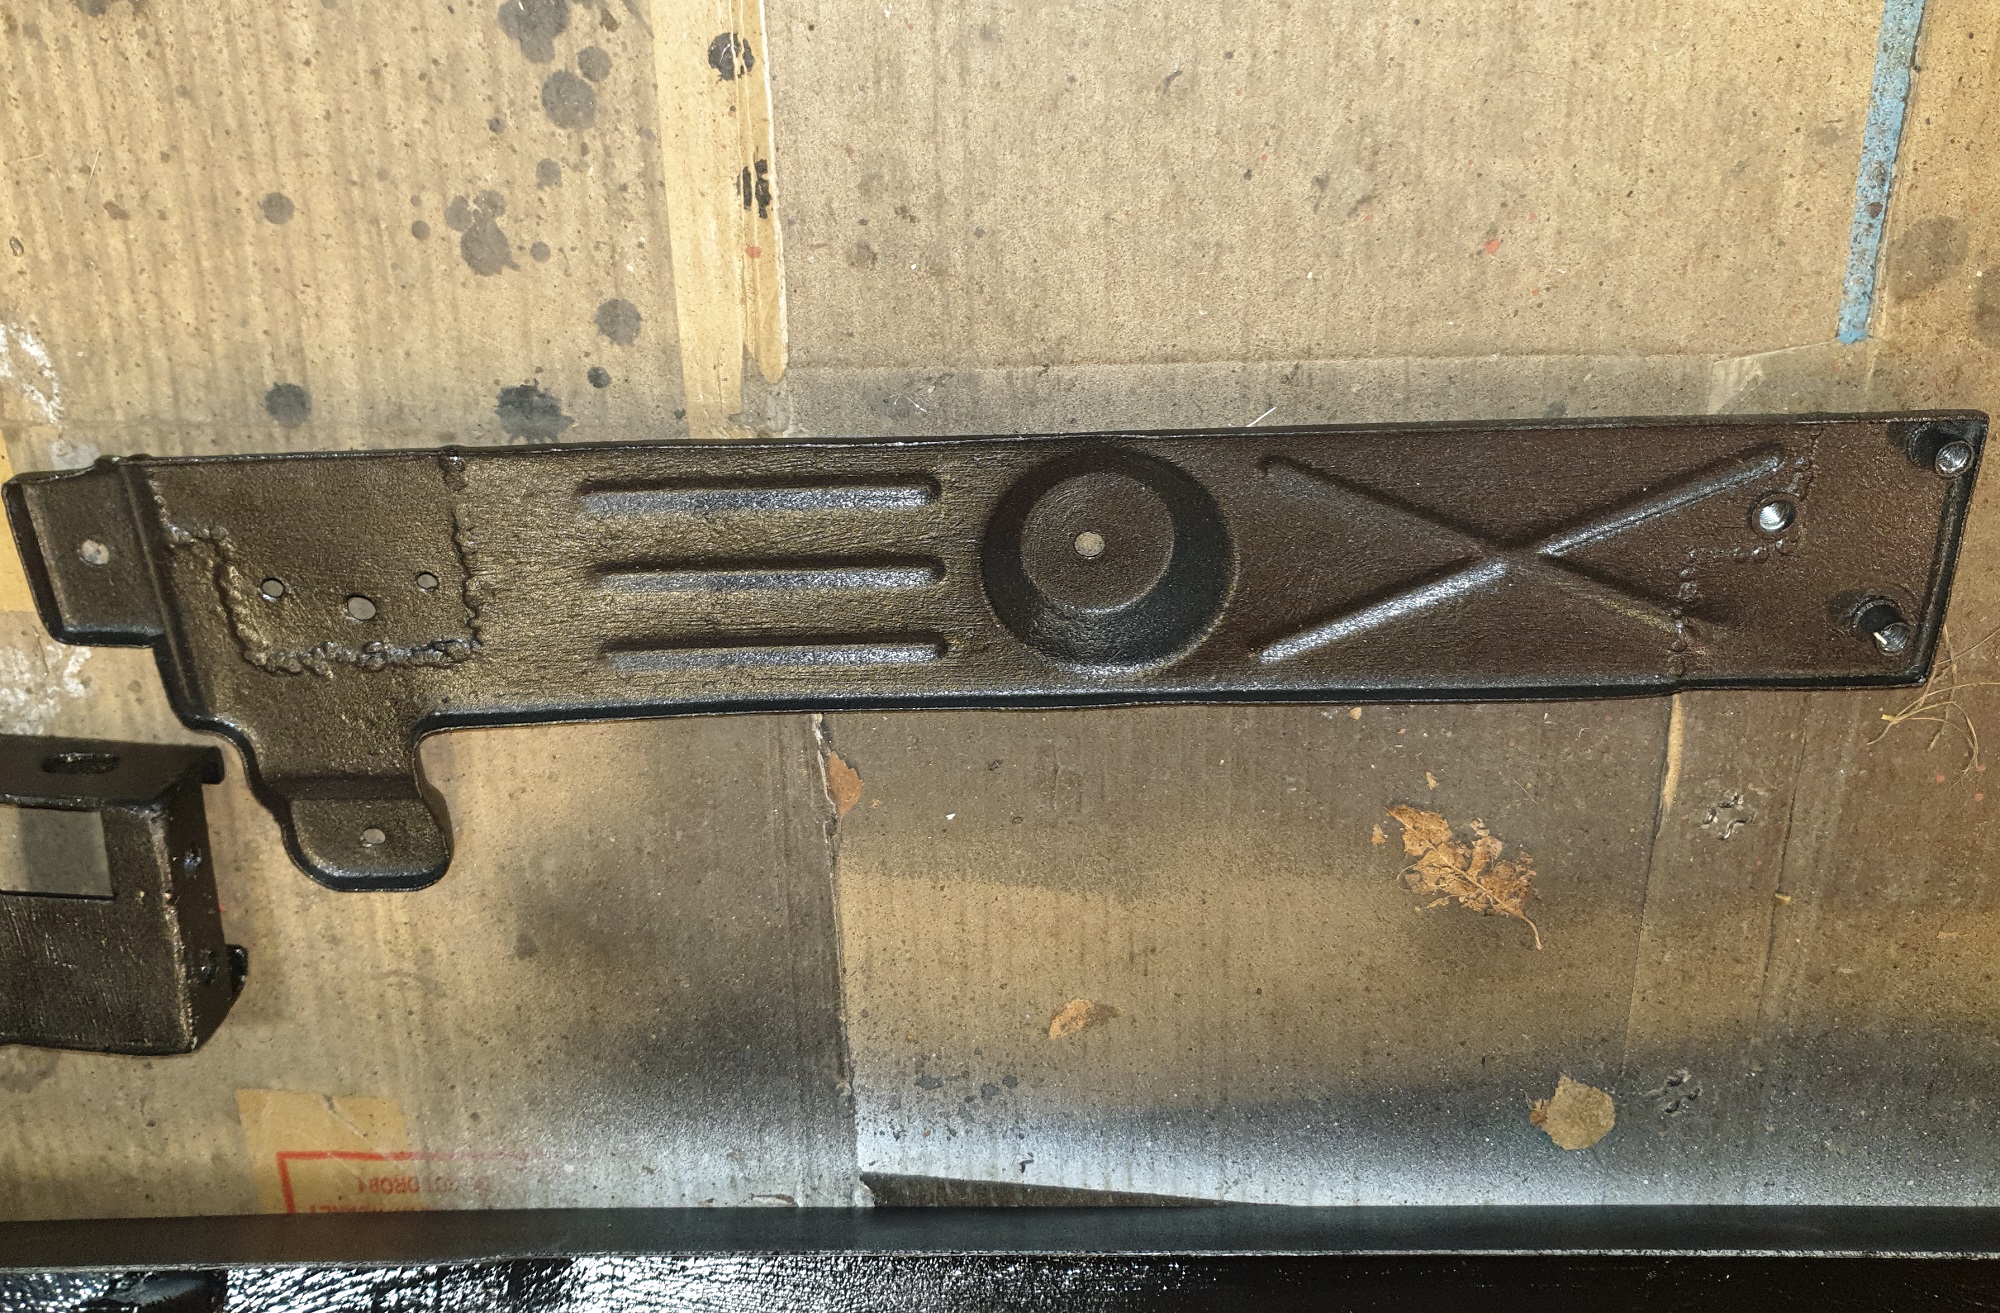
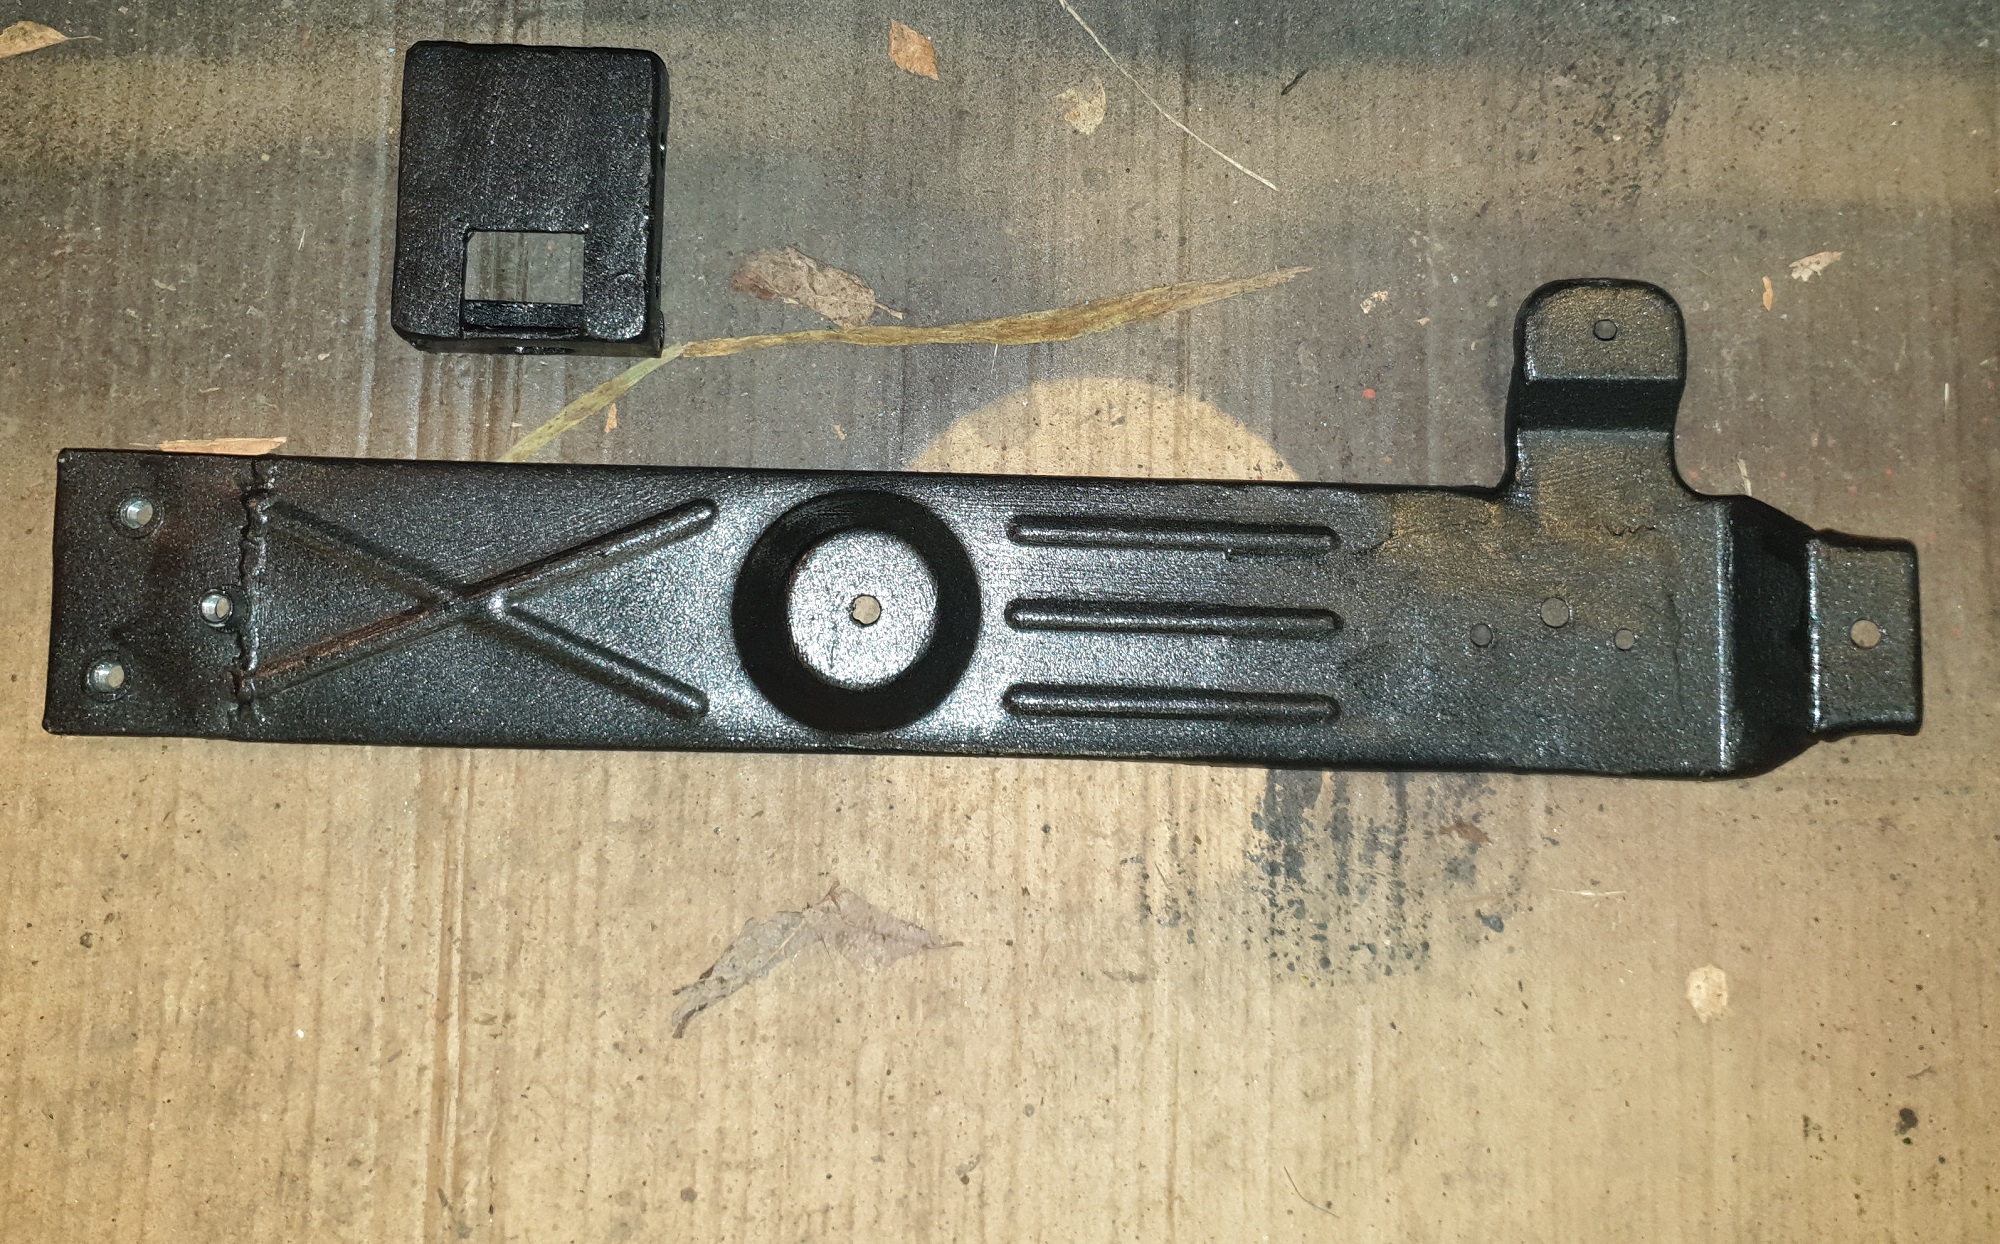
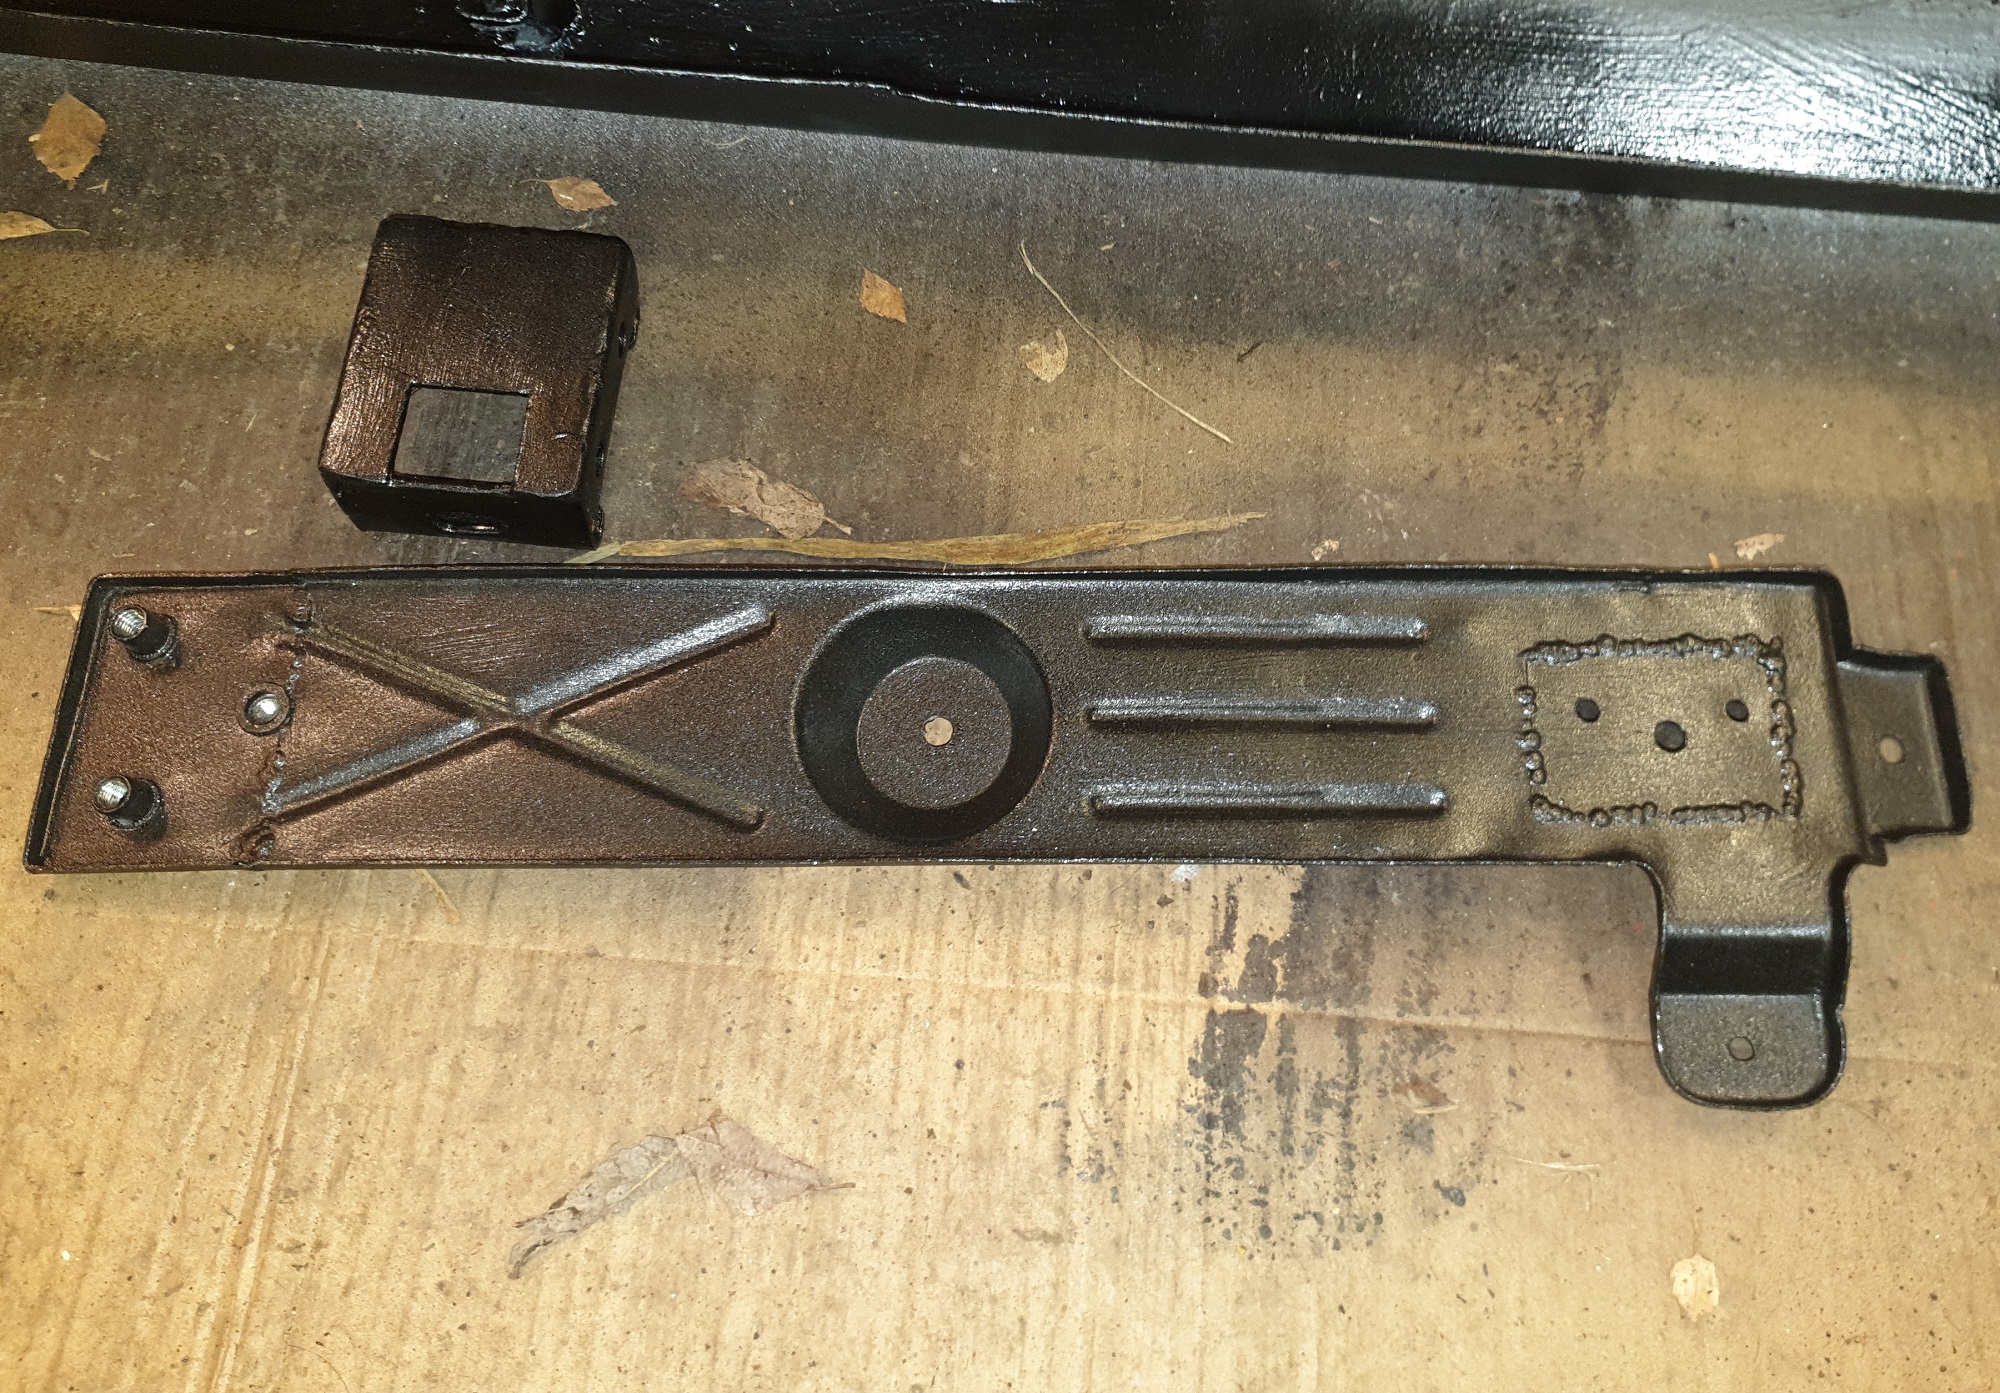
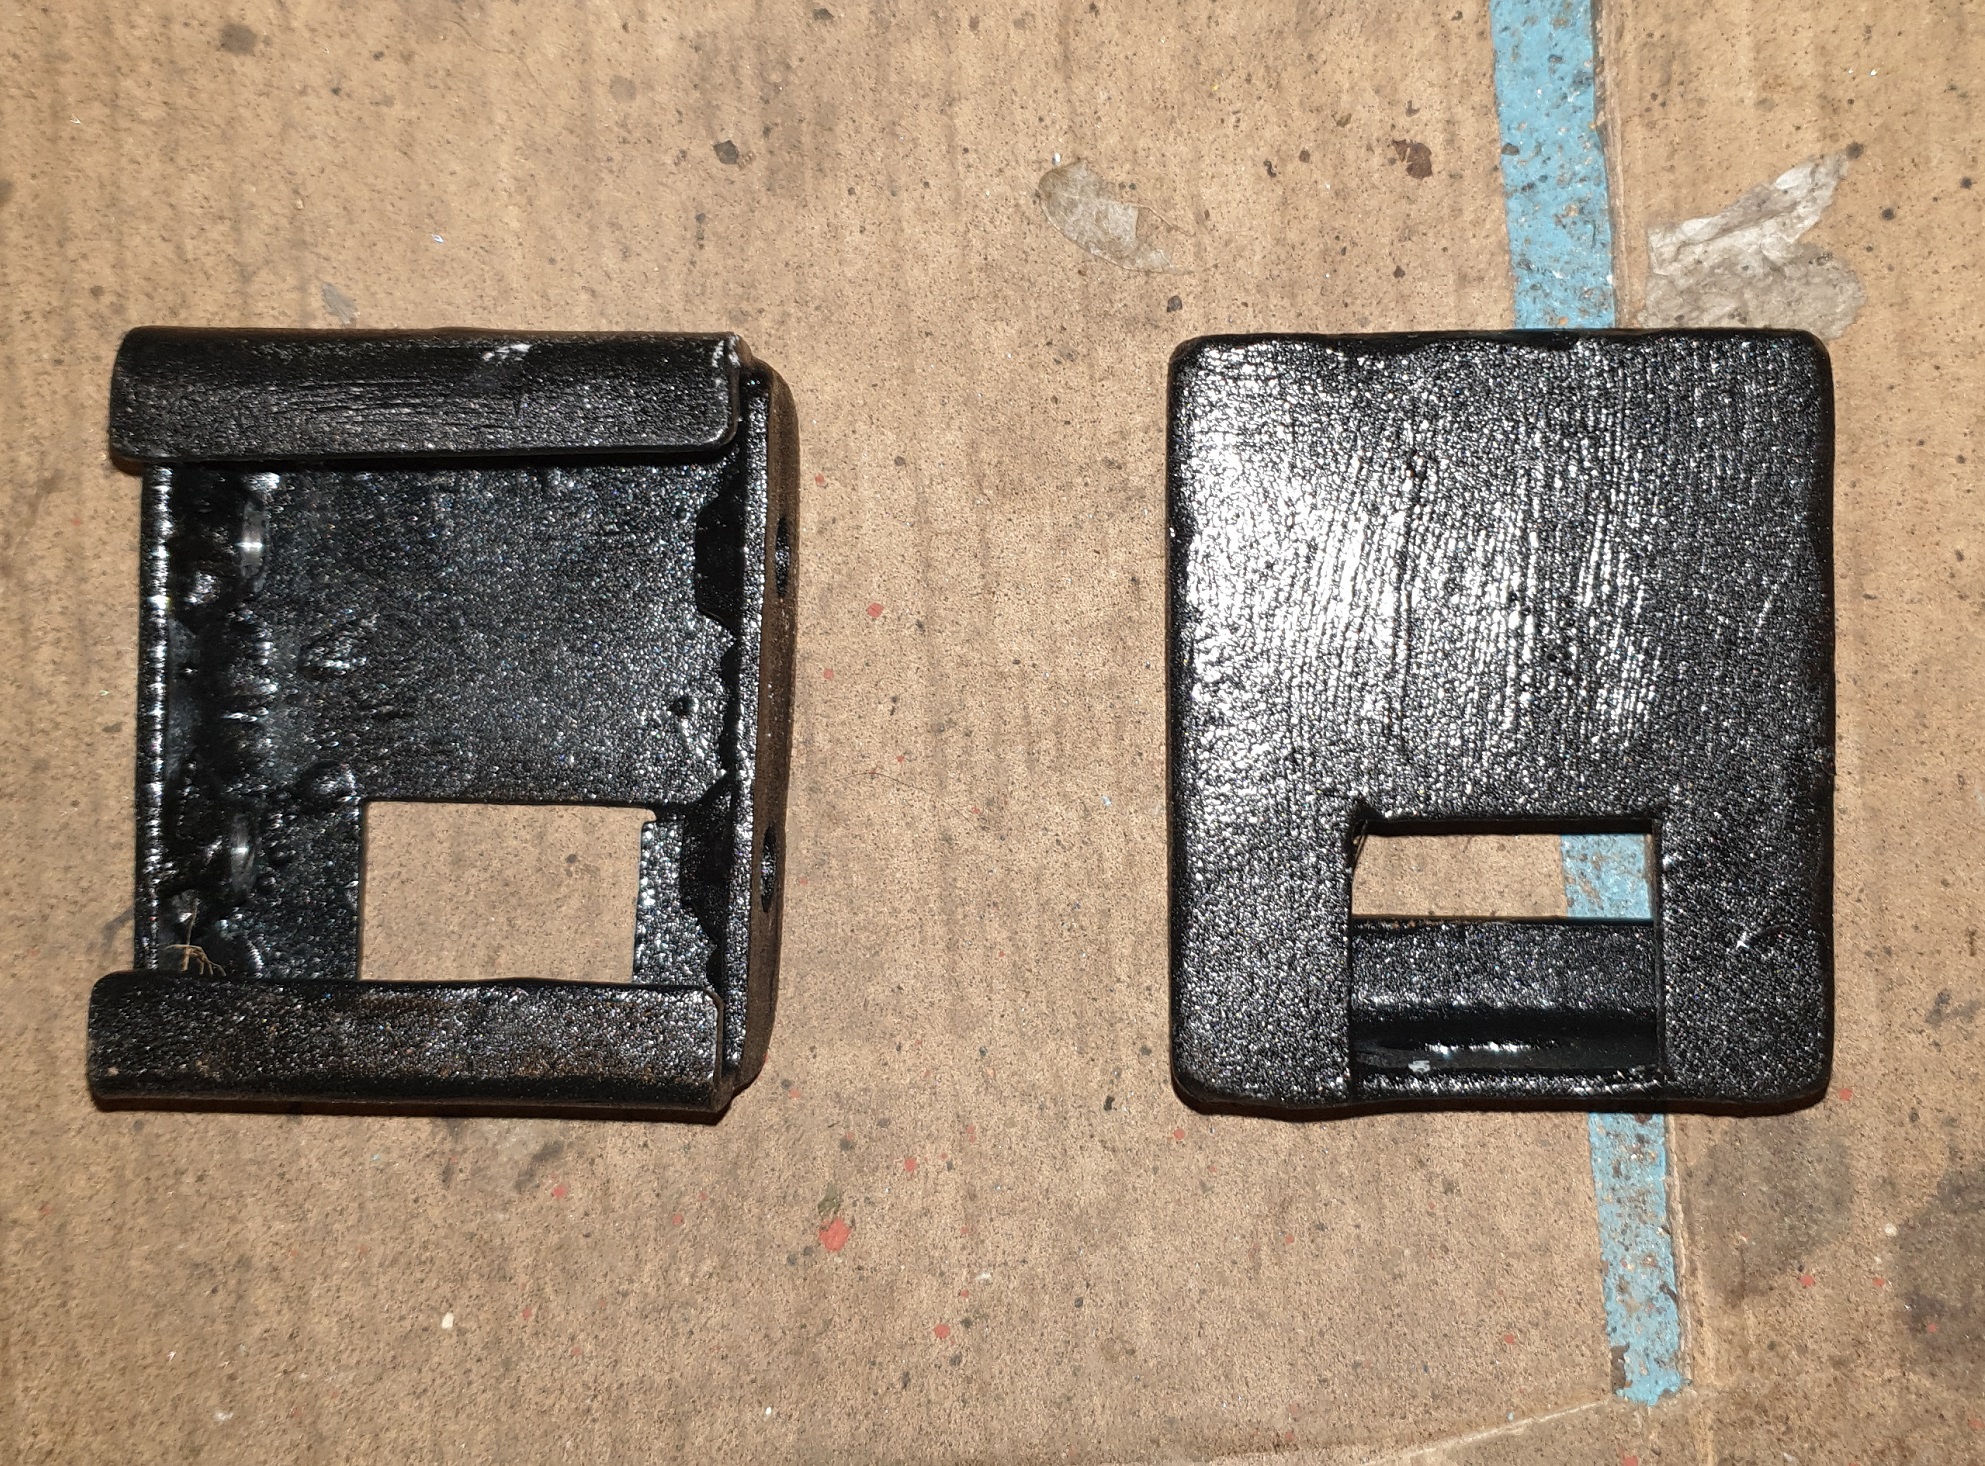
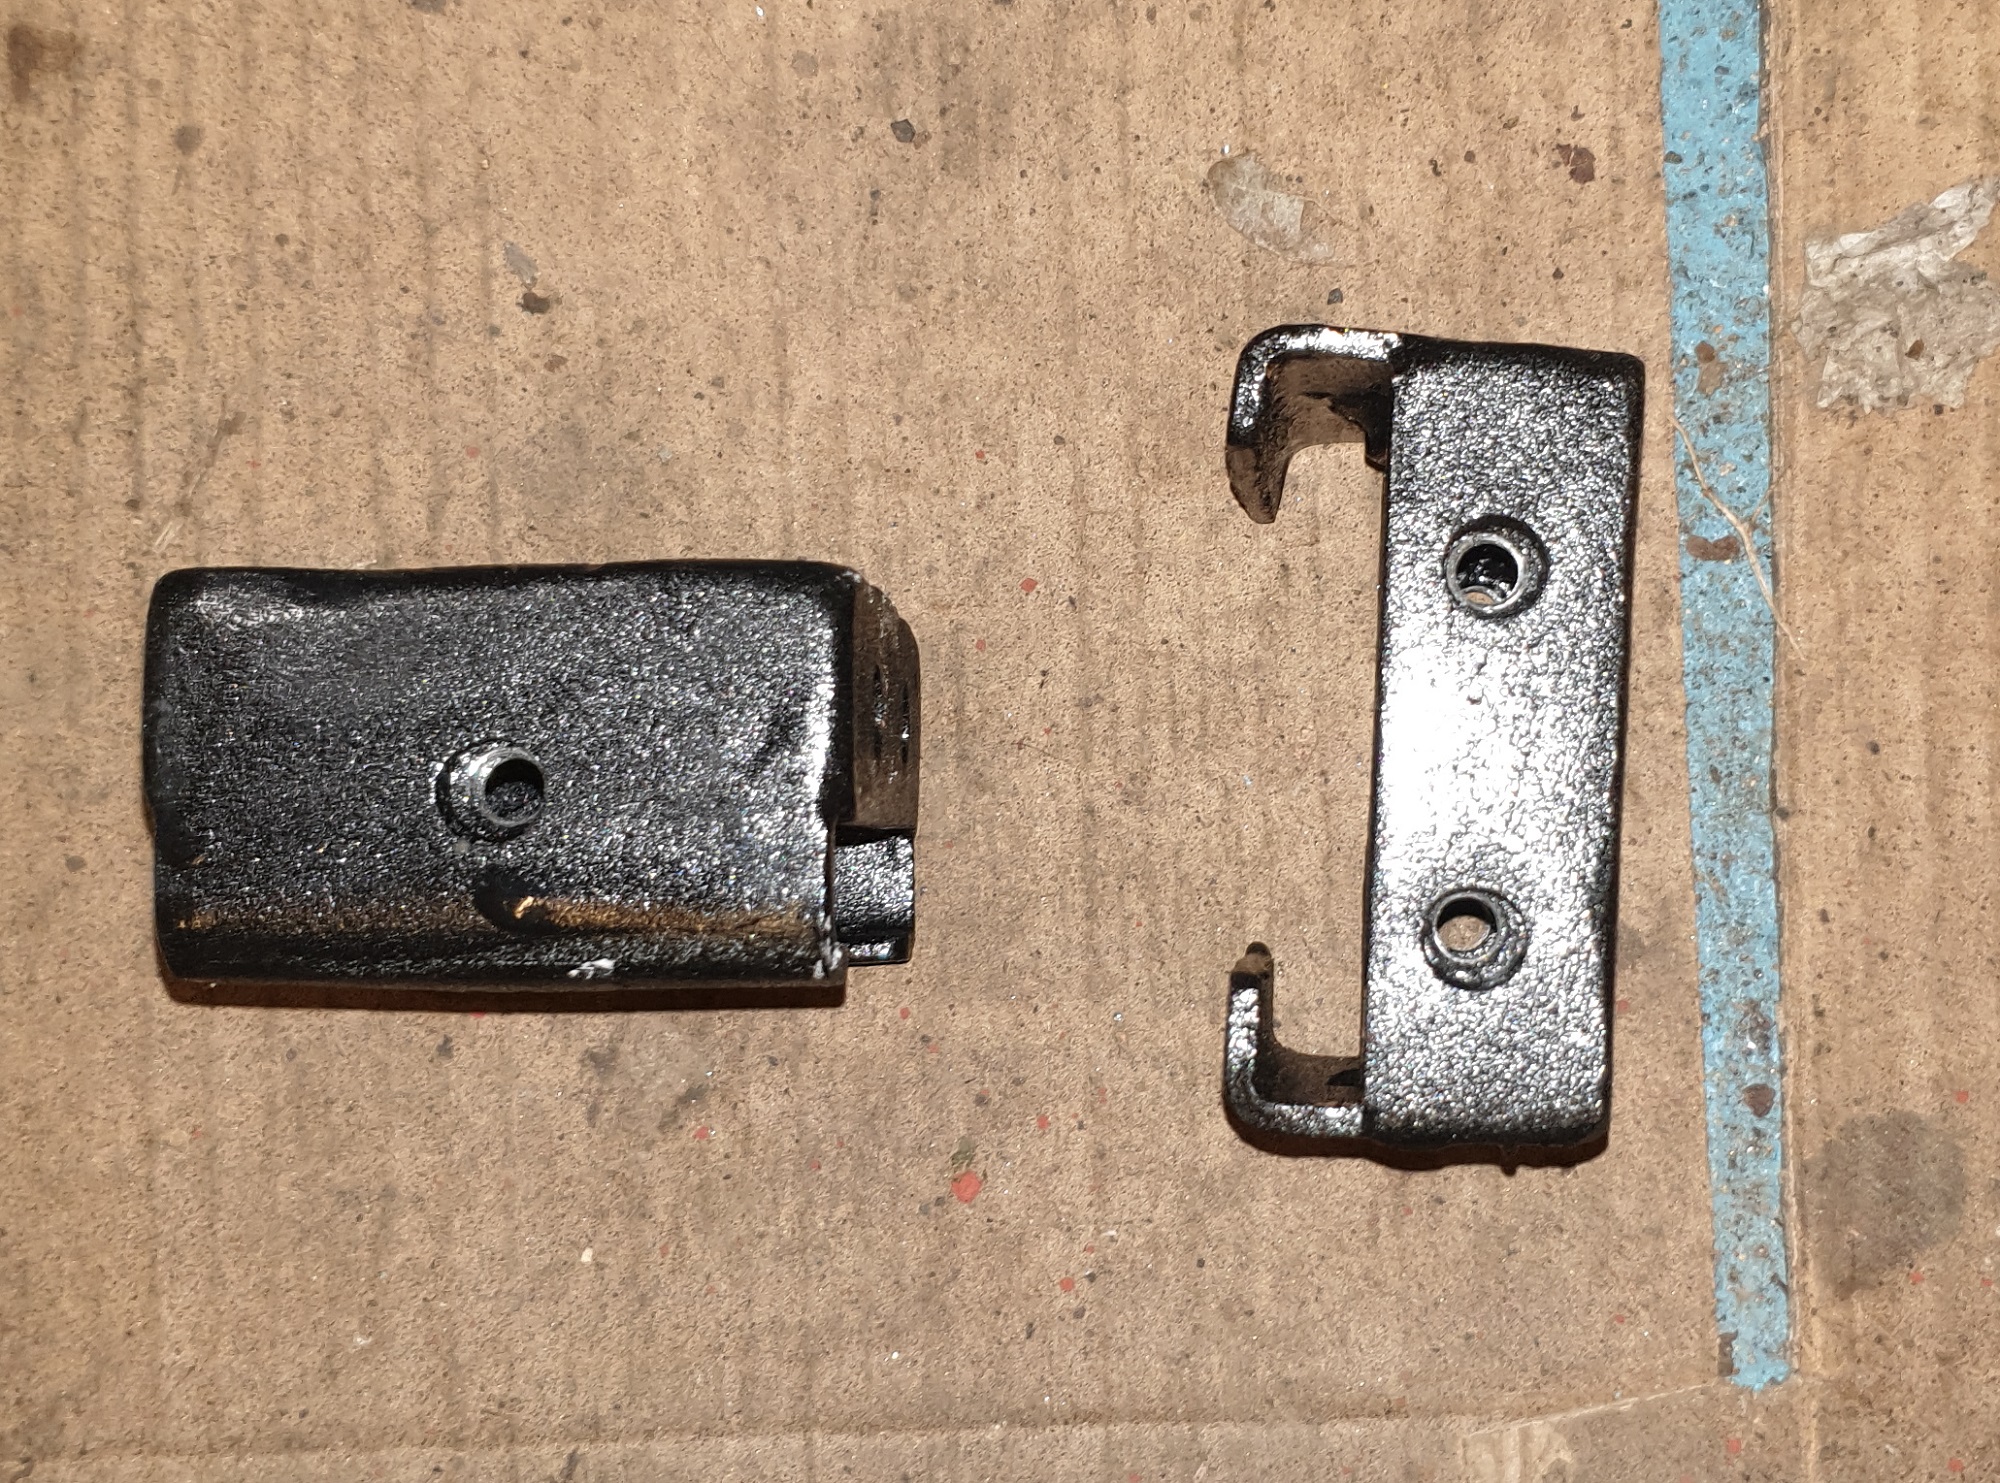
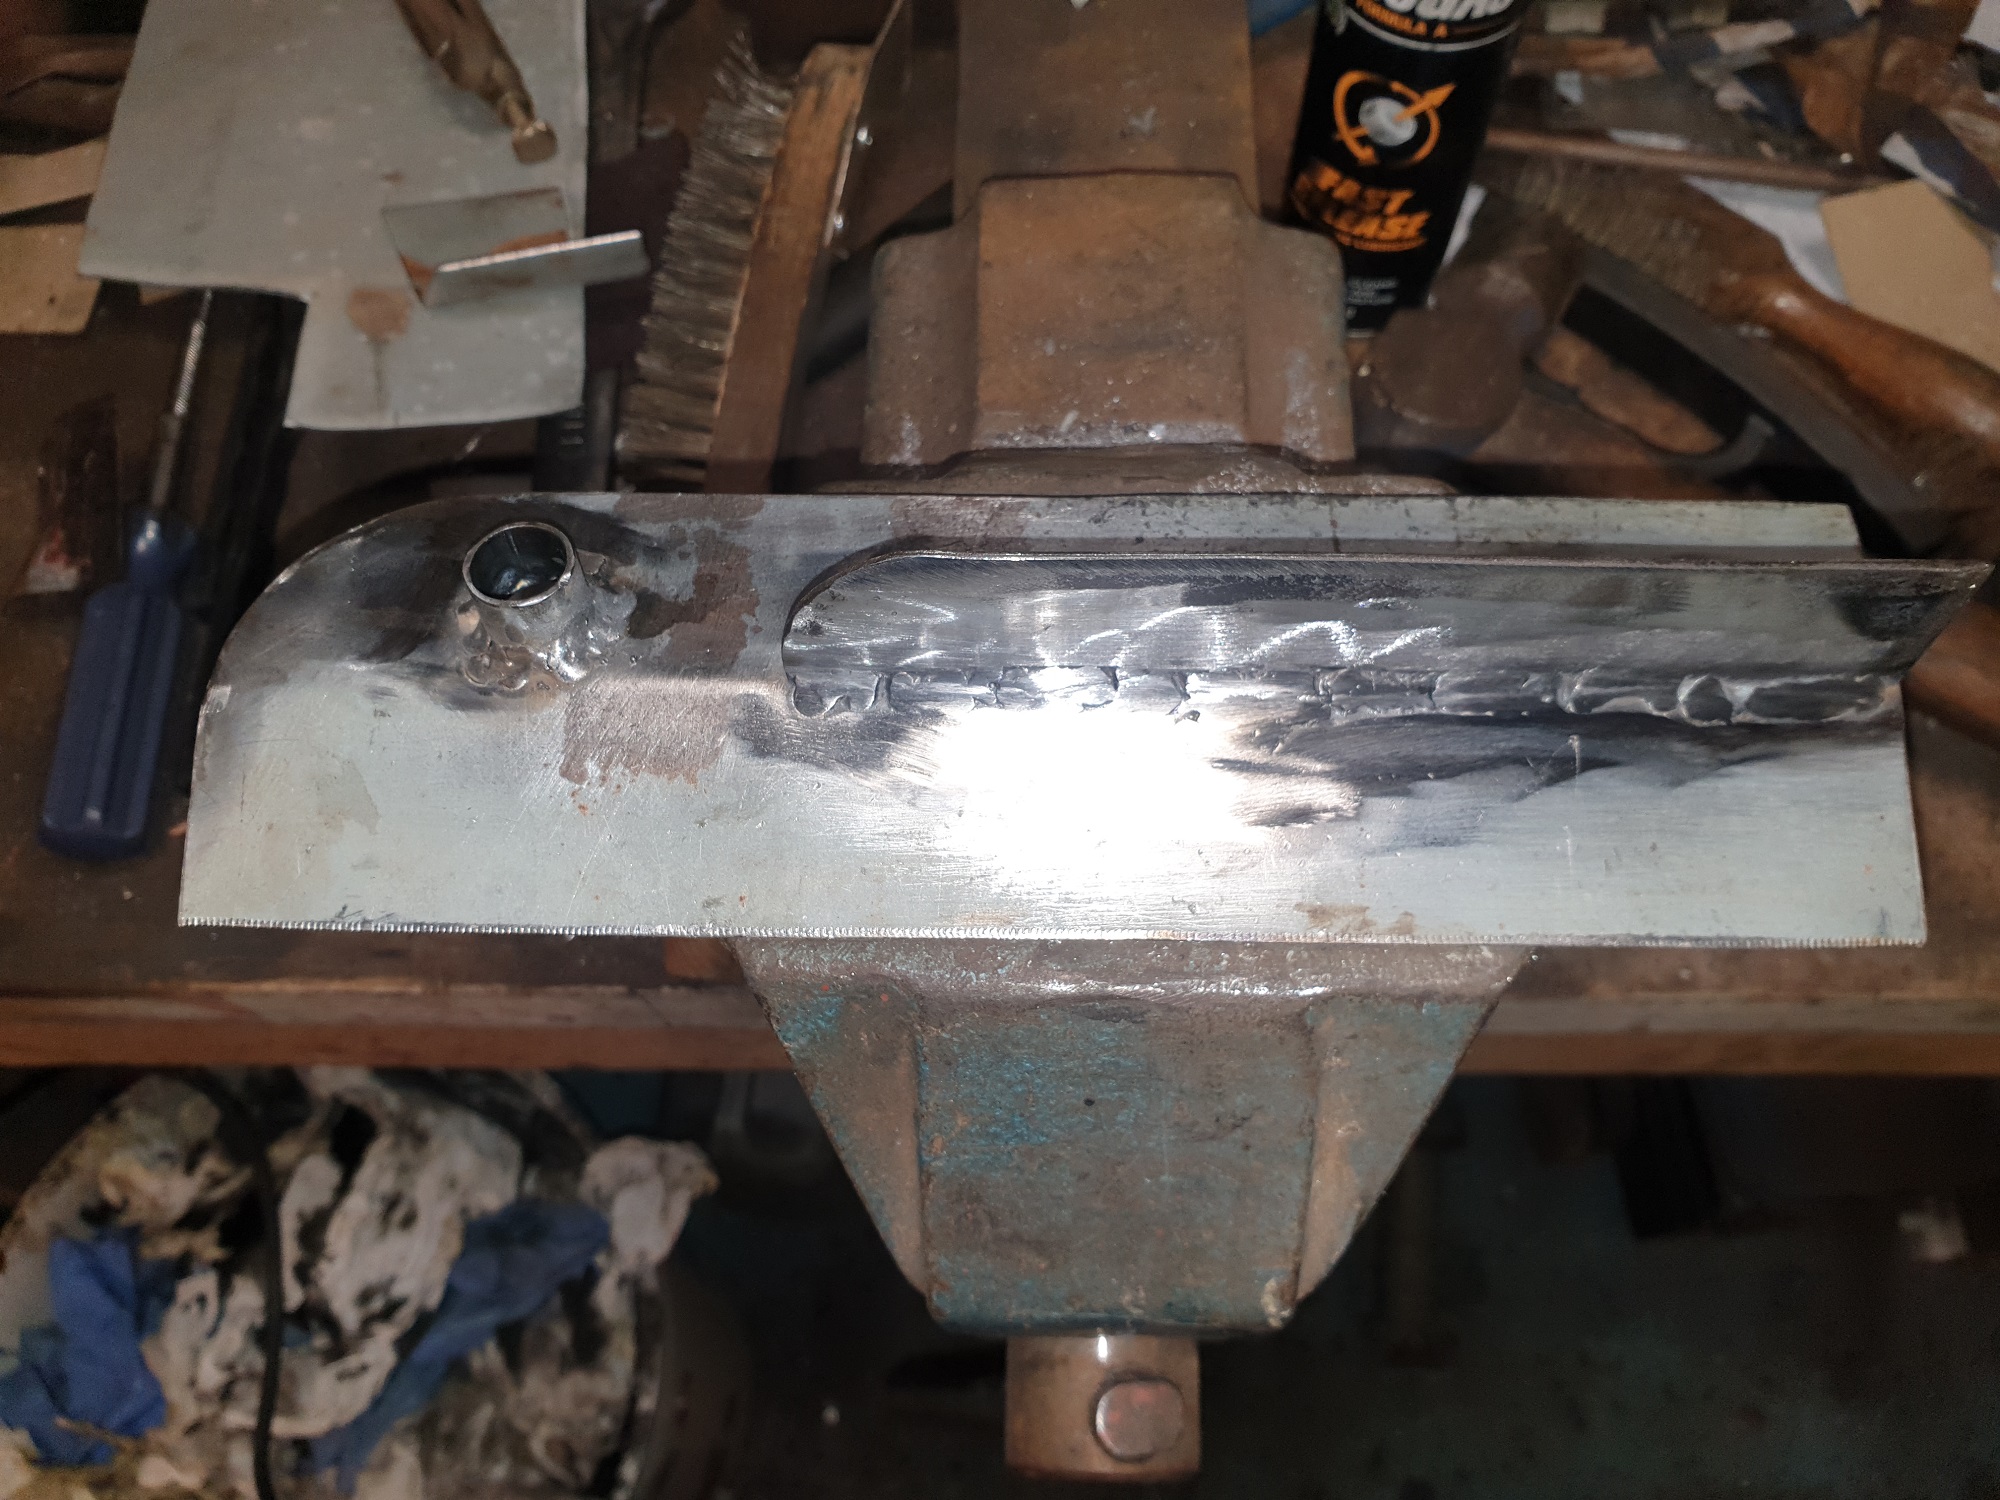
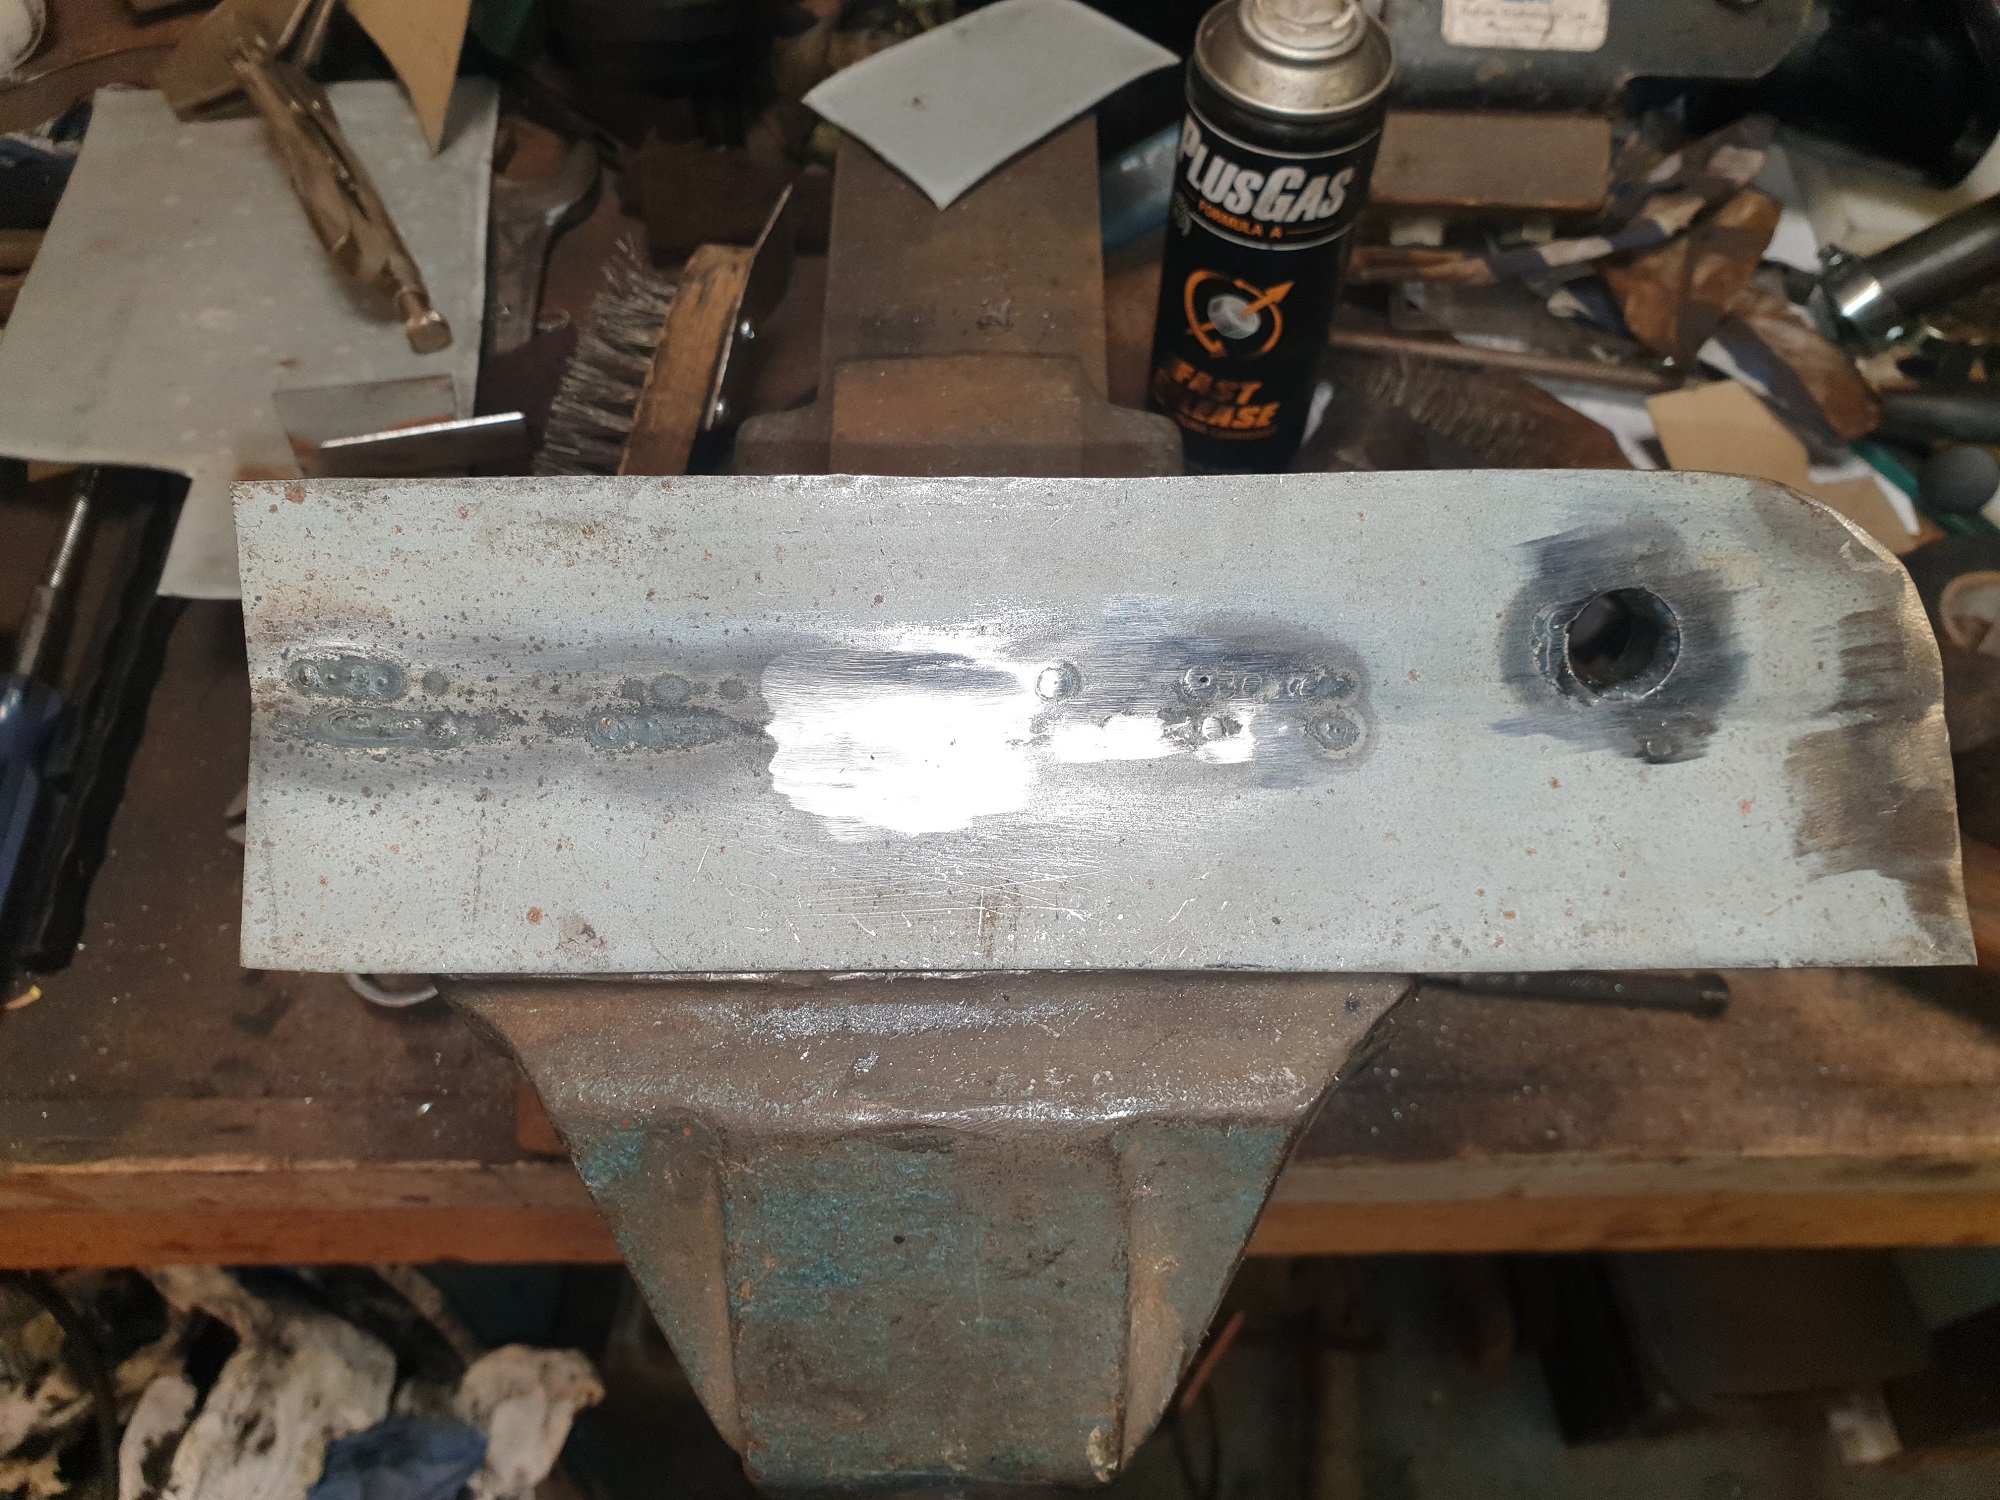
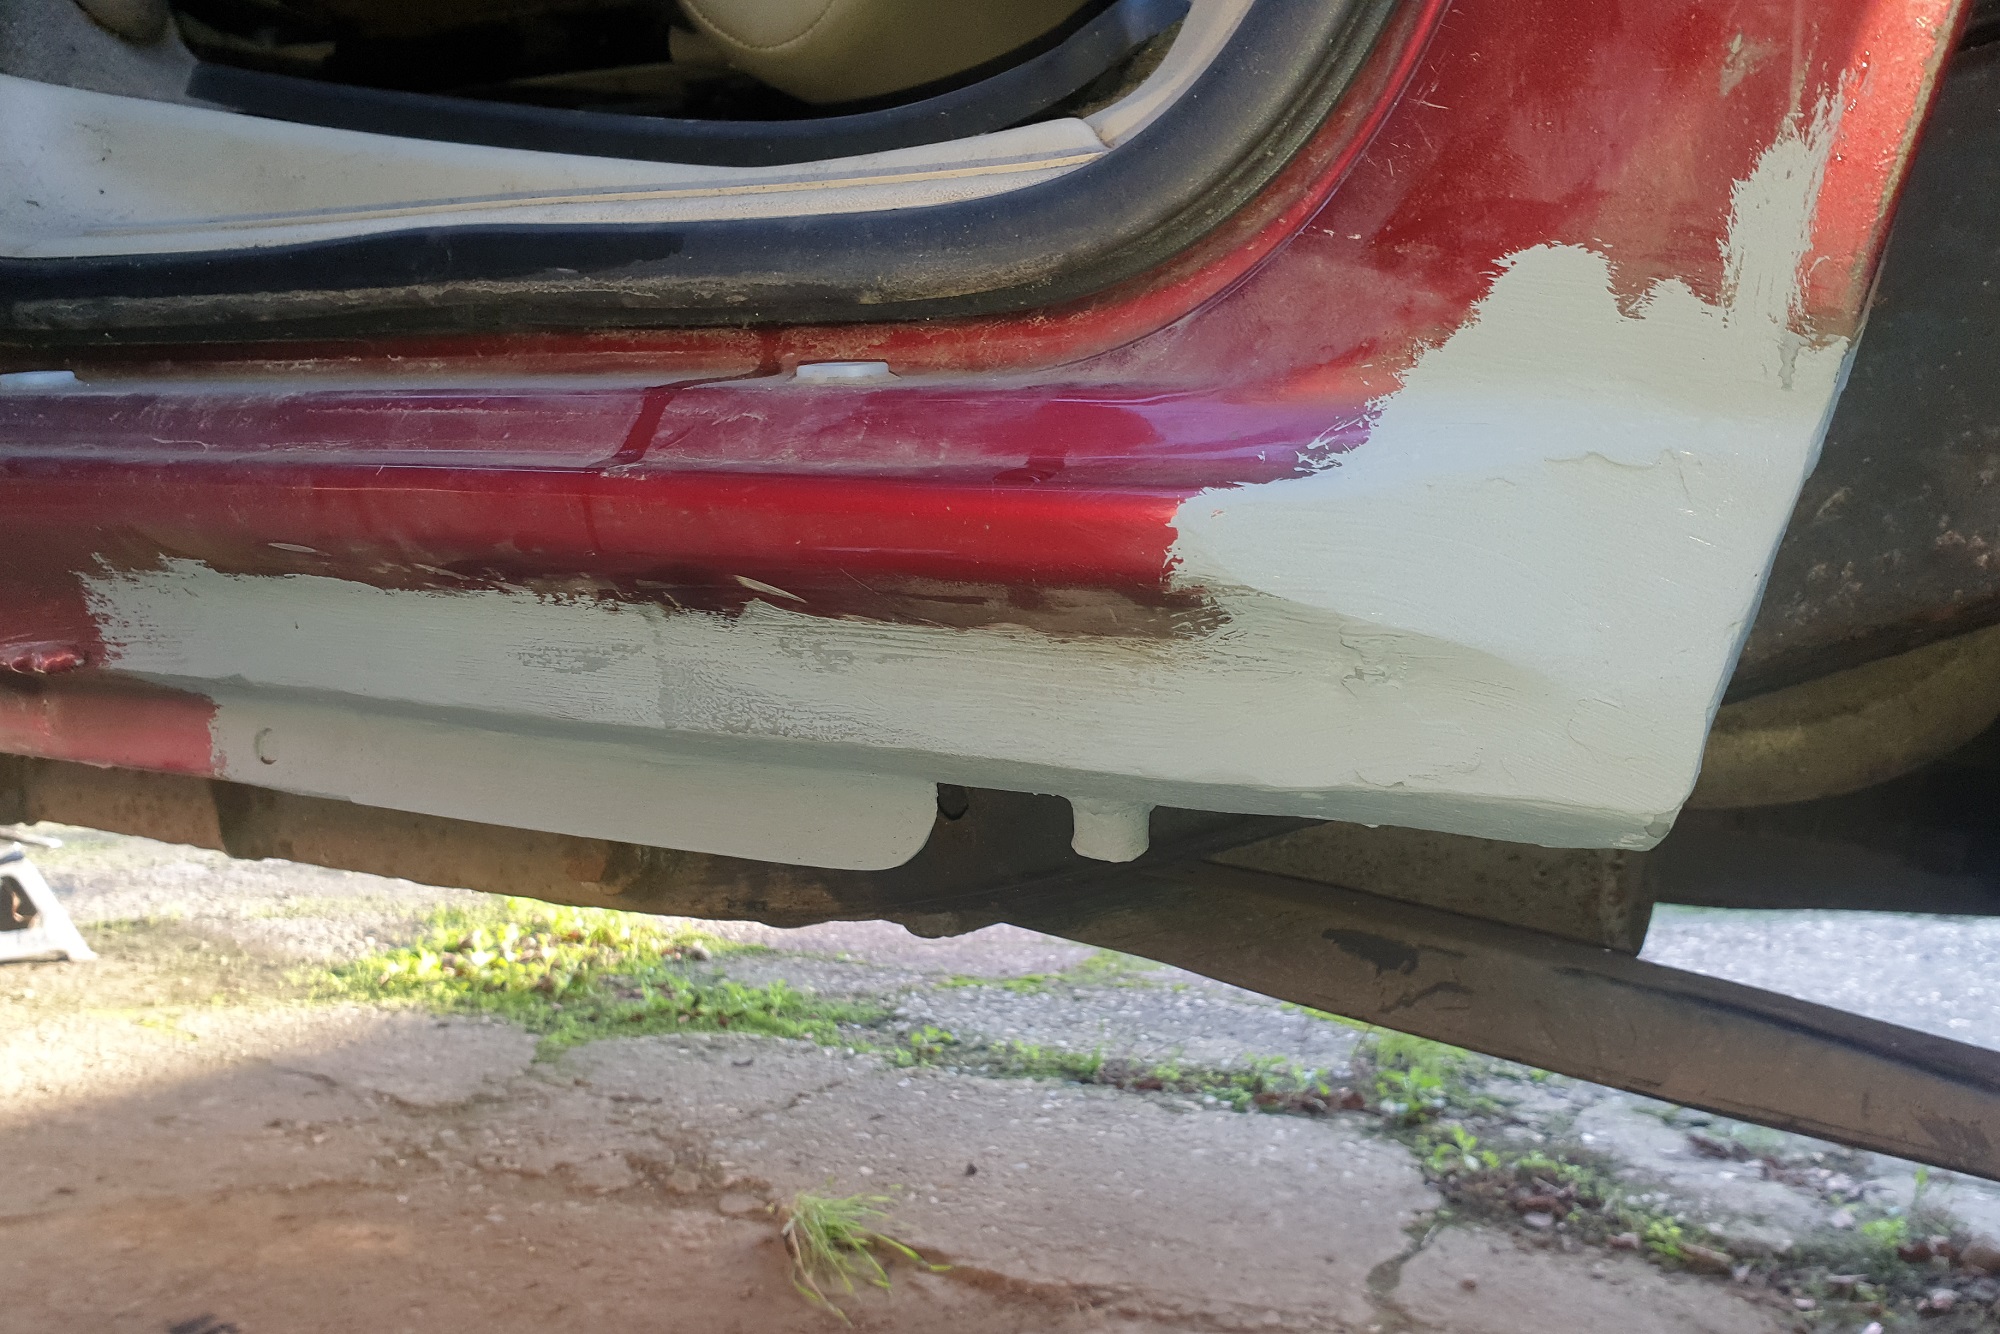
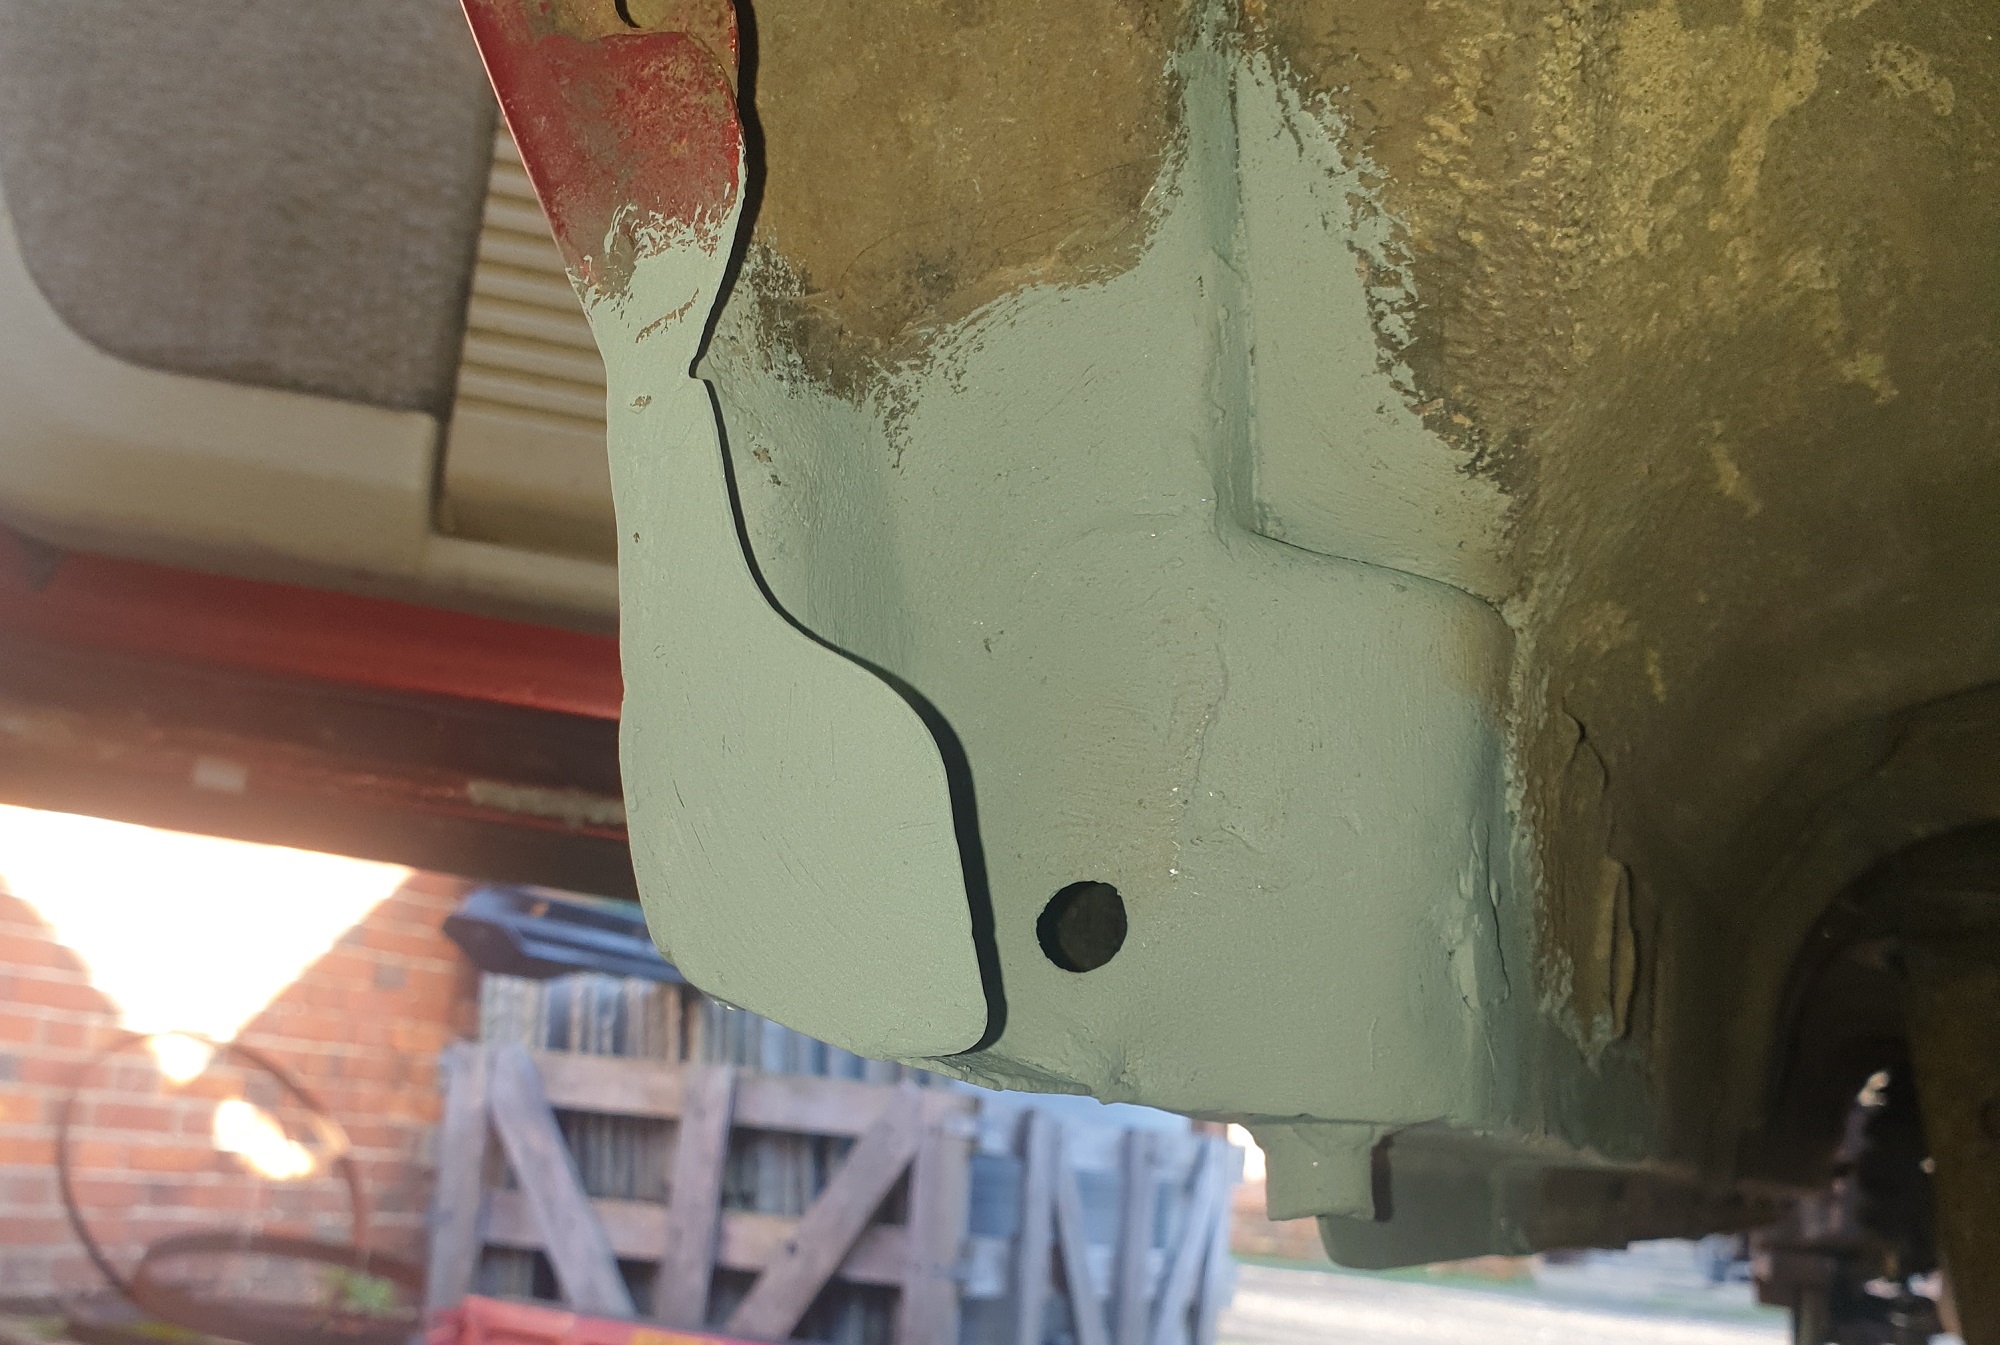
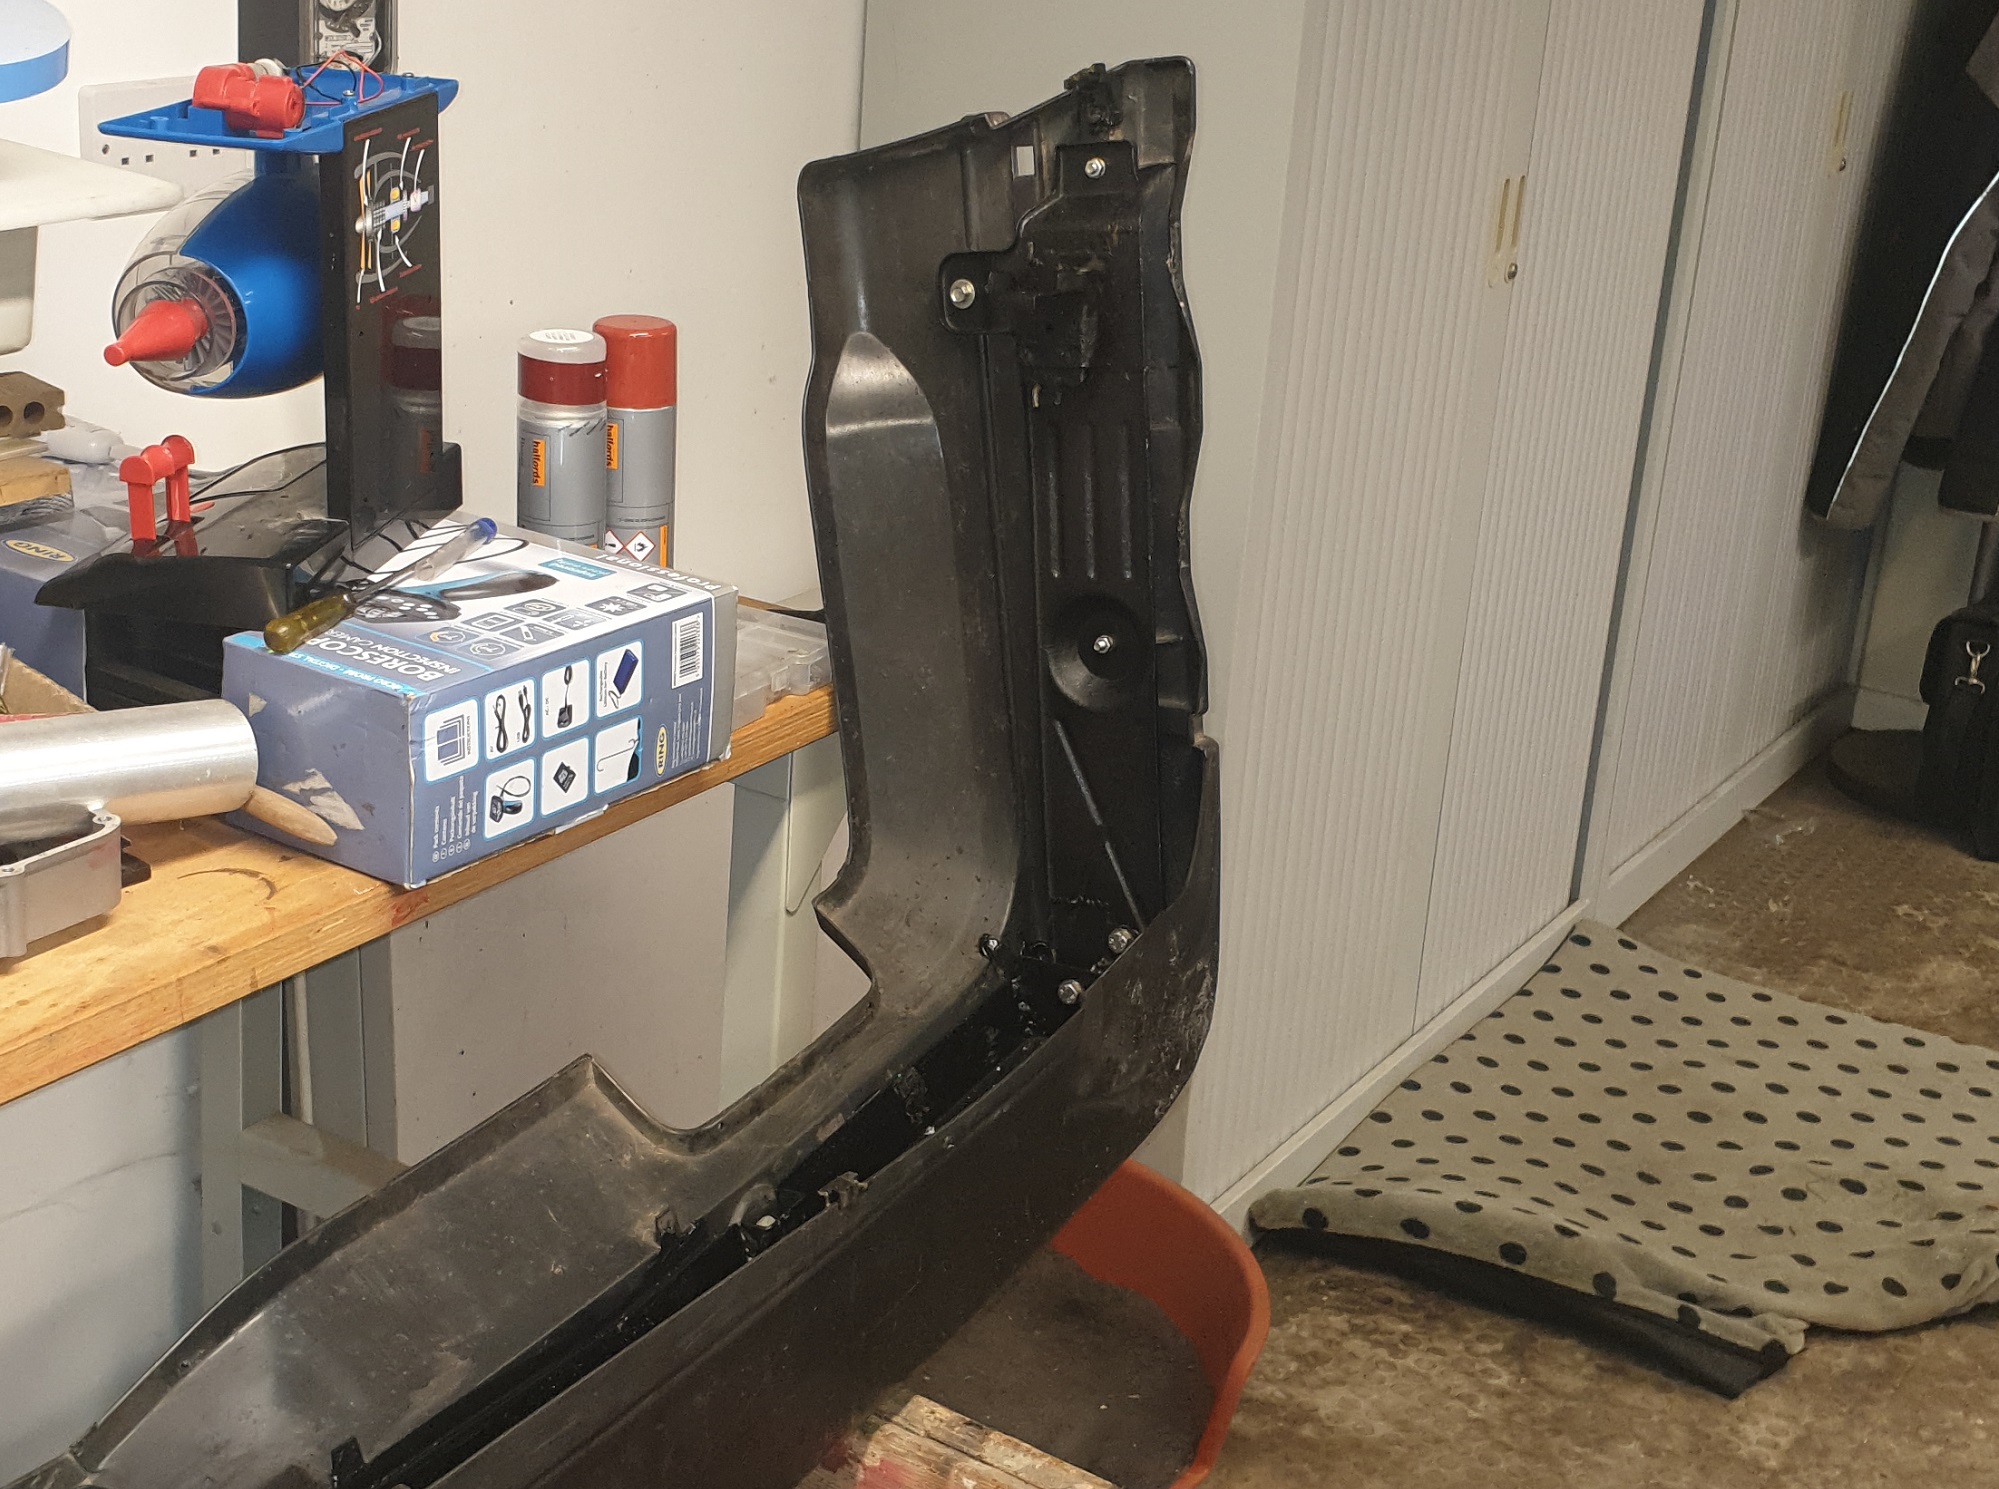
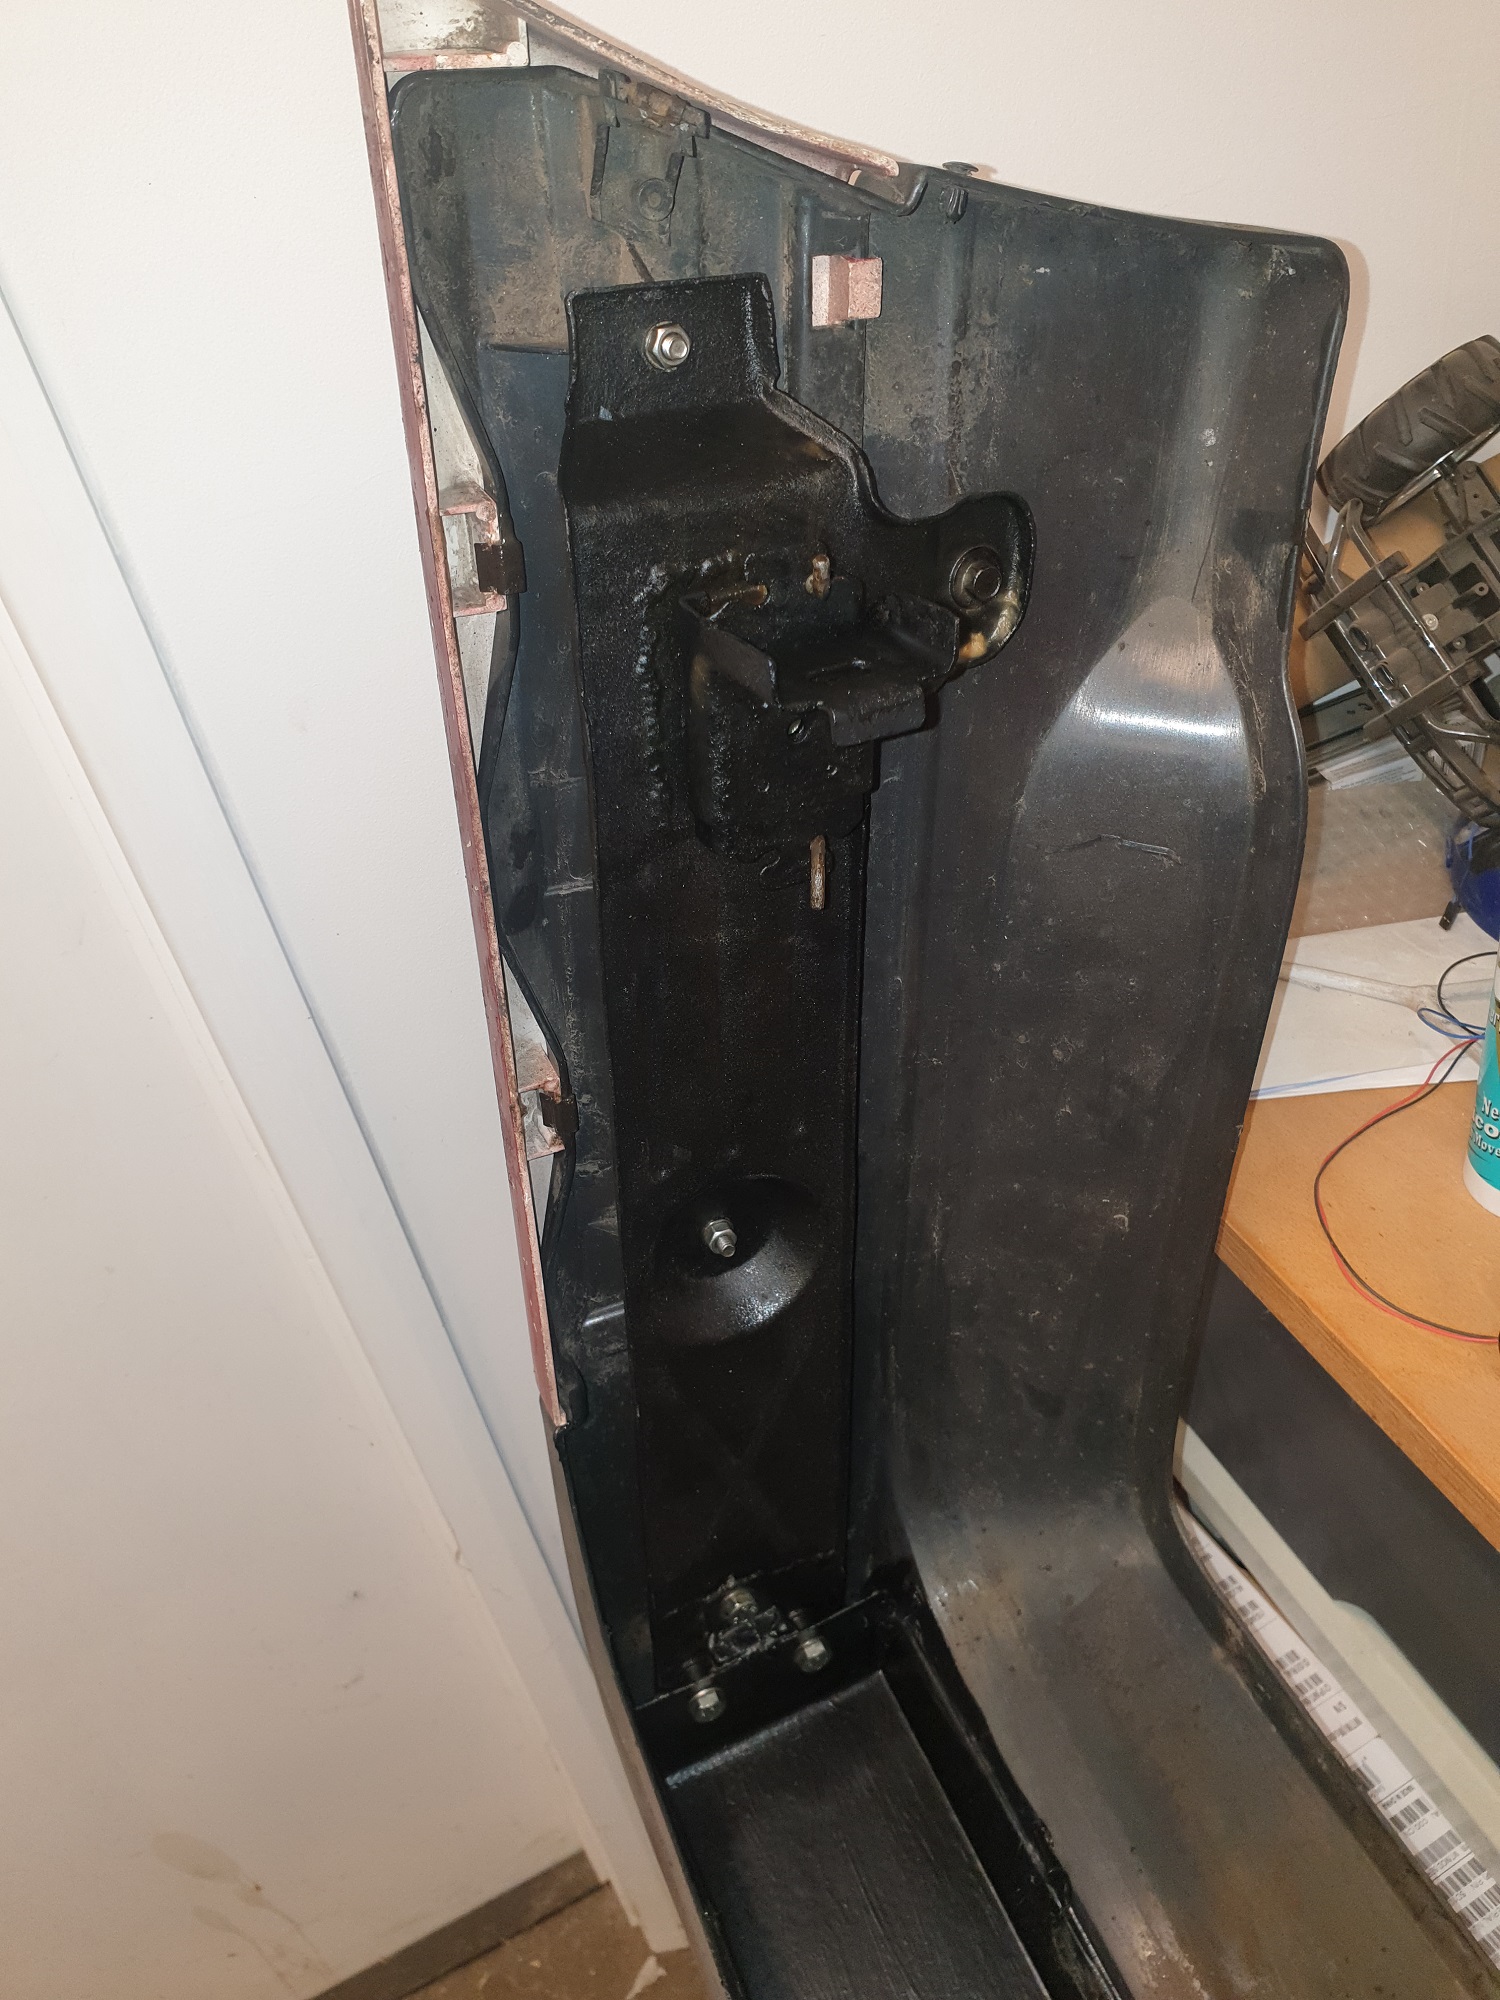
To be fair for 26+ years and 225k miles that the body mount and bumper support was all the rot on it seems pretty good to me, I cut out a larger section than was stricly necessary to make it one welding job, plus I cut it back to the point where I would have minimal upside down welding. I have a bit of previous with metal fabrication; being tought to gas weld (which I prefer to MIG, but until recently was way more expensive than a MIG) when I was 14 by my dad (who at various point in the 60's had been a panel beater and blacksmith) way back in 1987 and I started working on my first project car a '68 Austin Mk2 Mini 1000 which we still have!

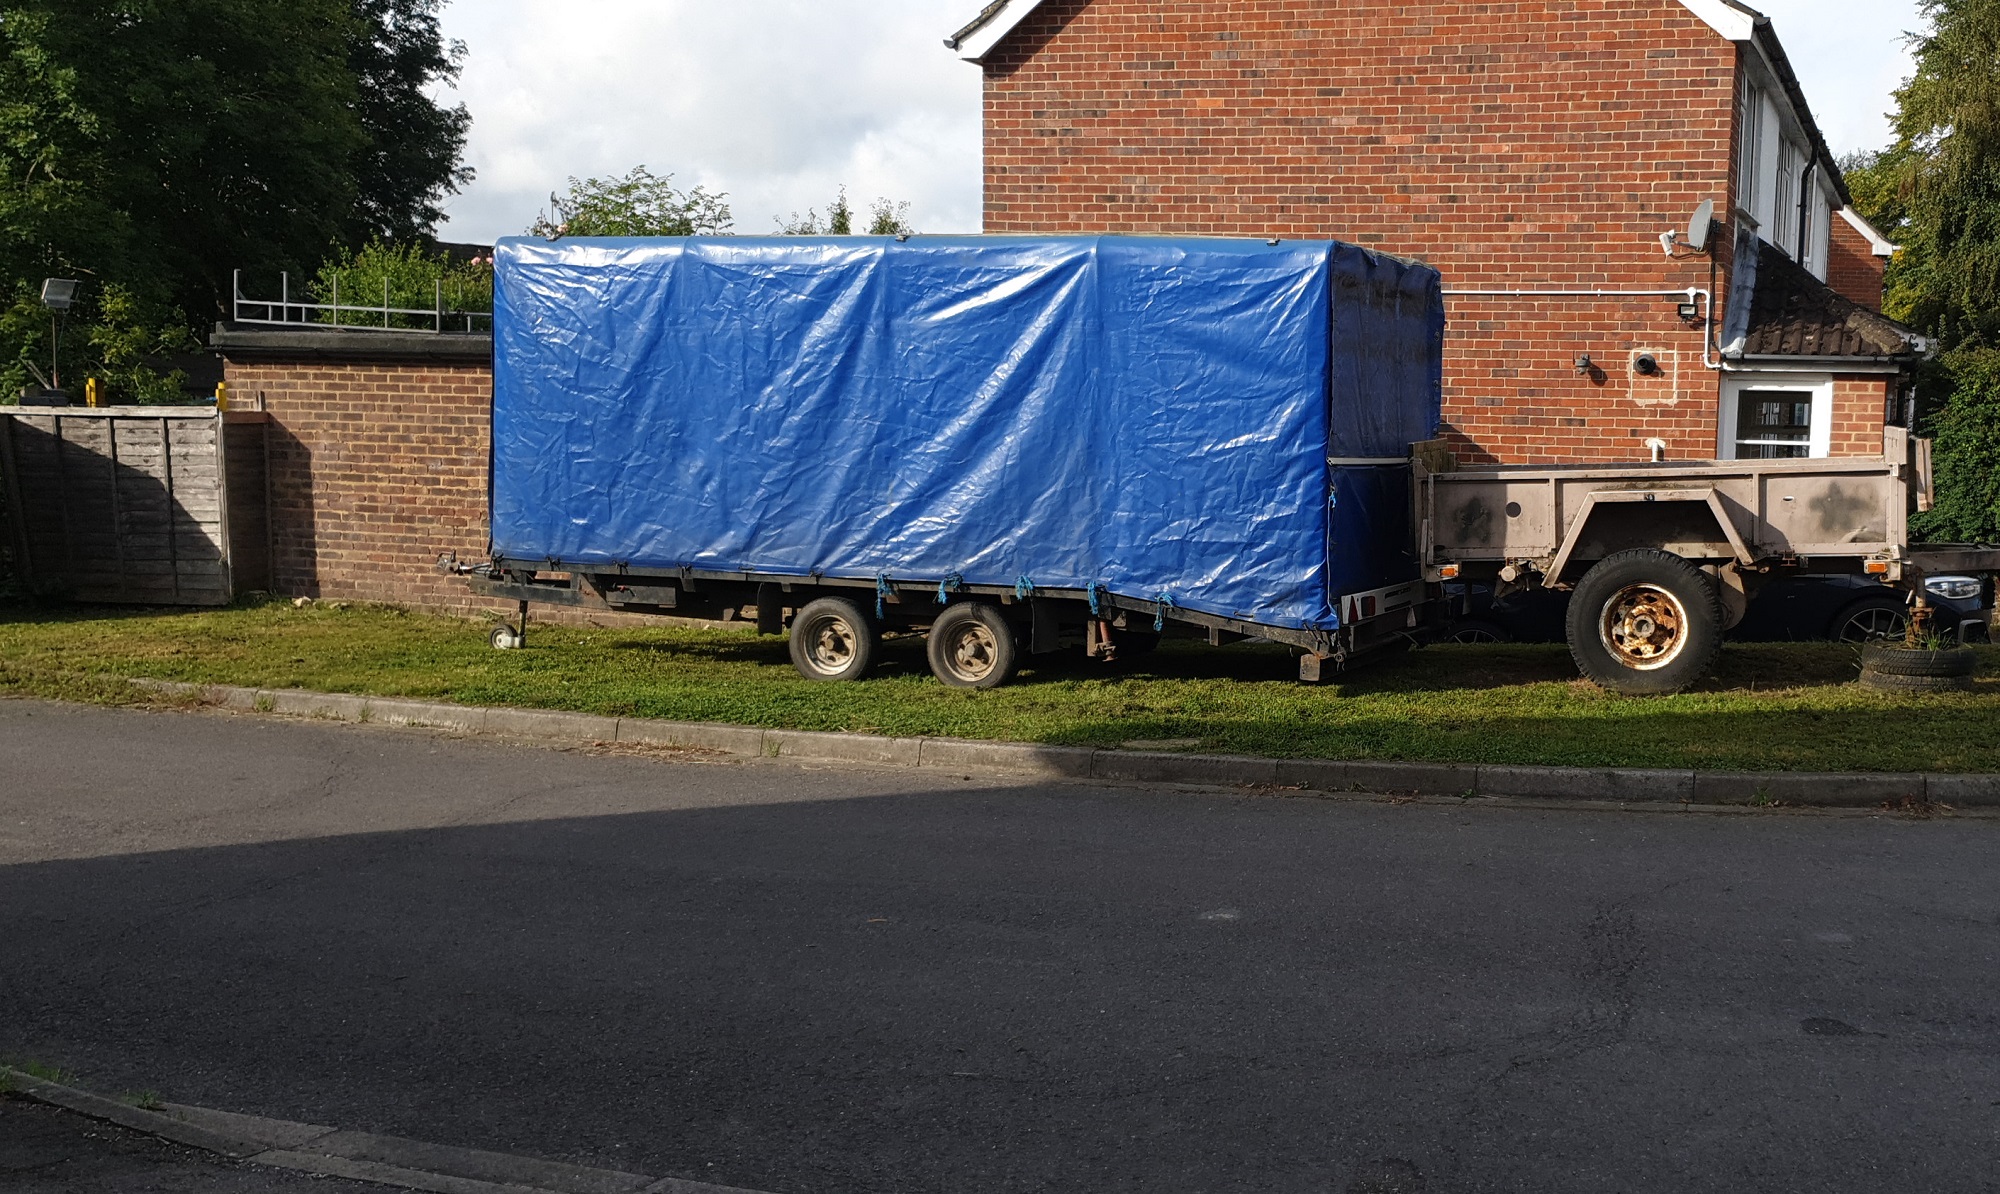
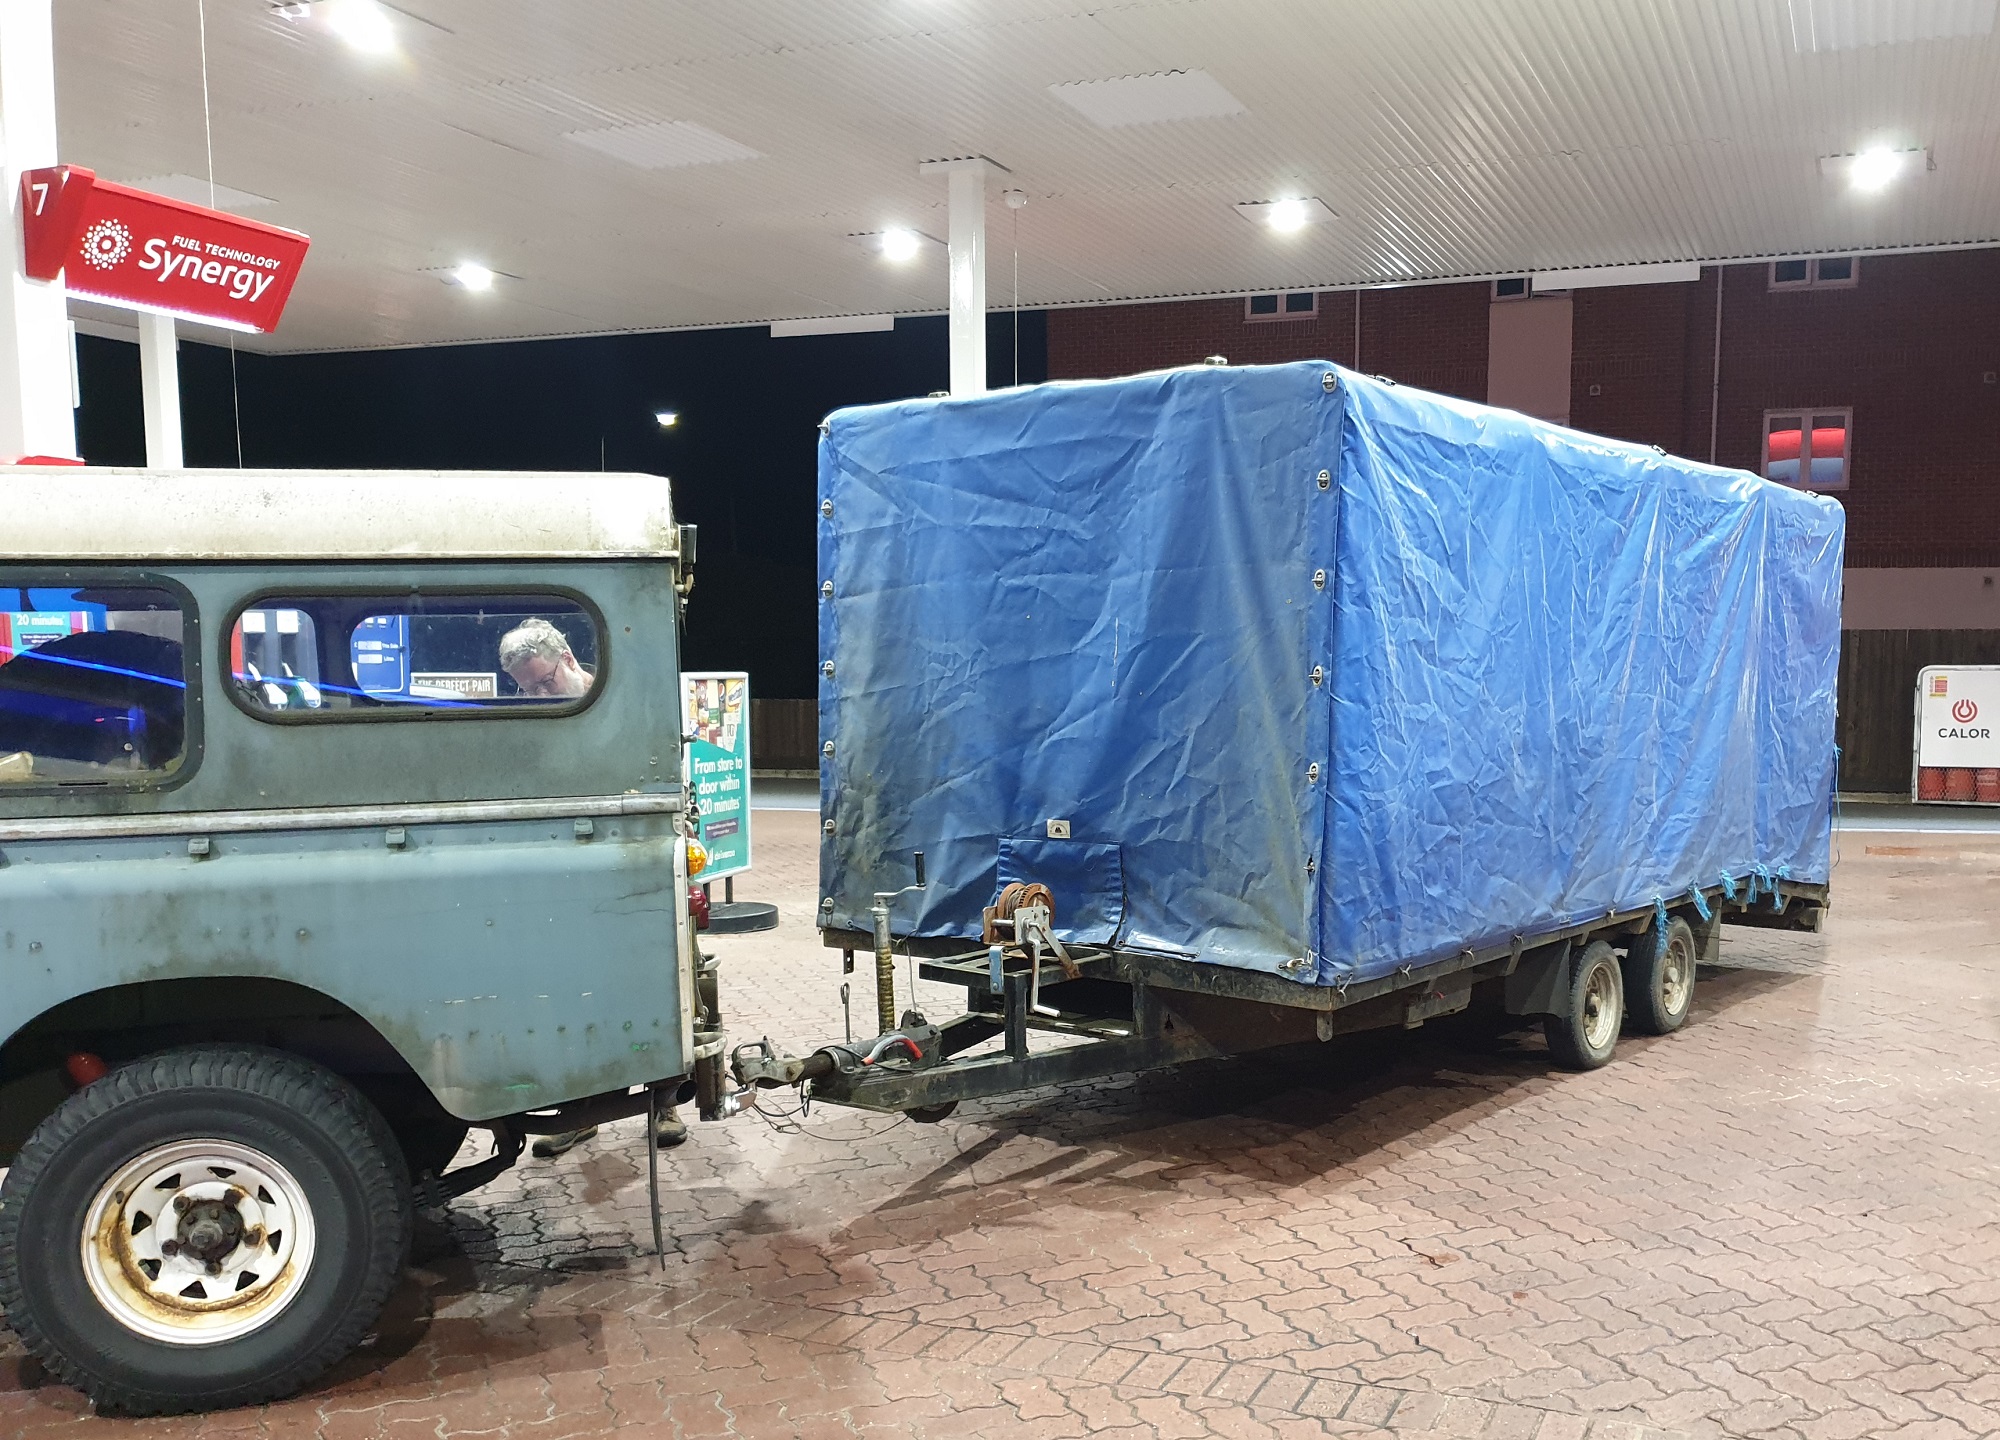
To aid me in the process of relocating my stuff, back in September, I acquired this:

2AU2bB3.jpg


9JyvWKC.jpg


UiNTAd5.jpg


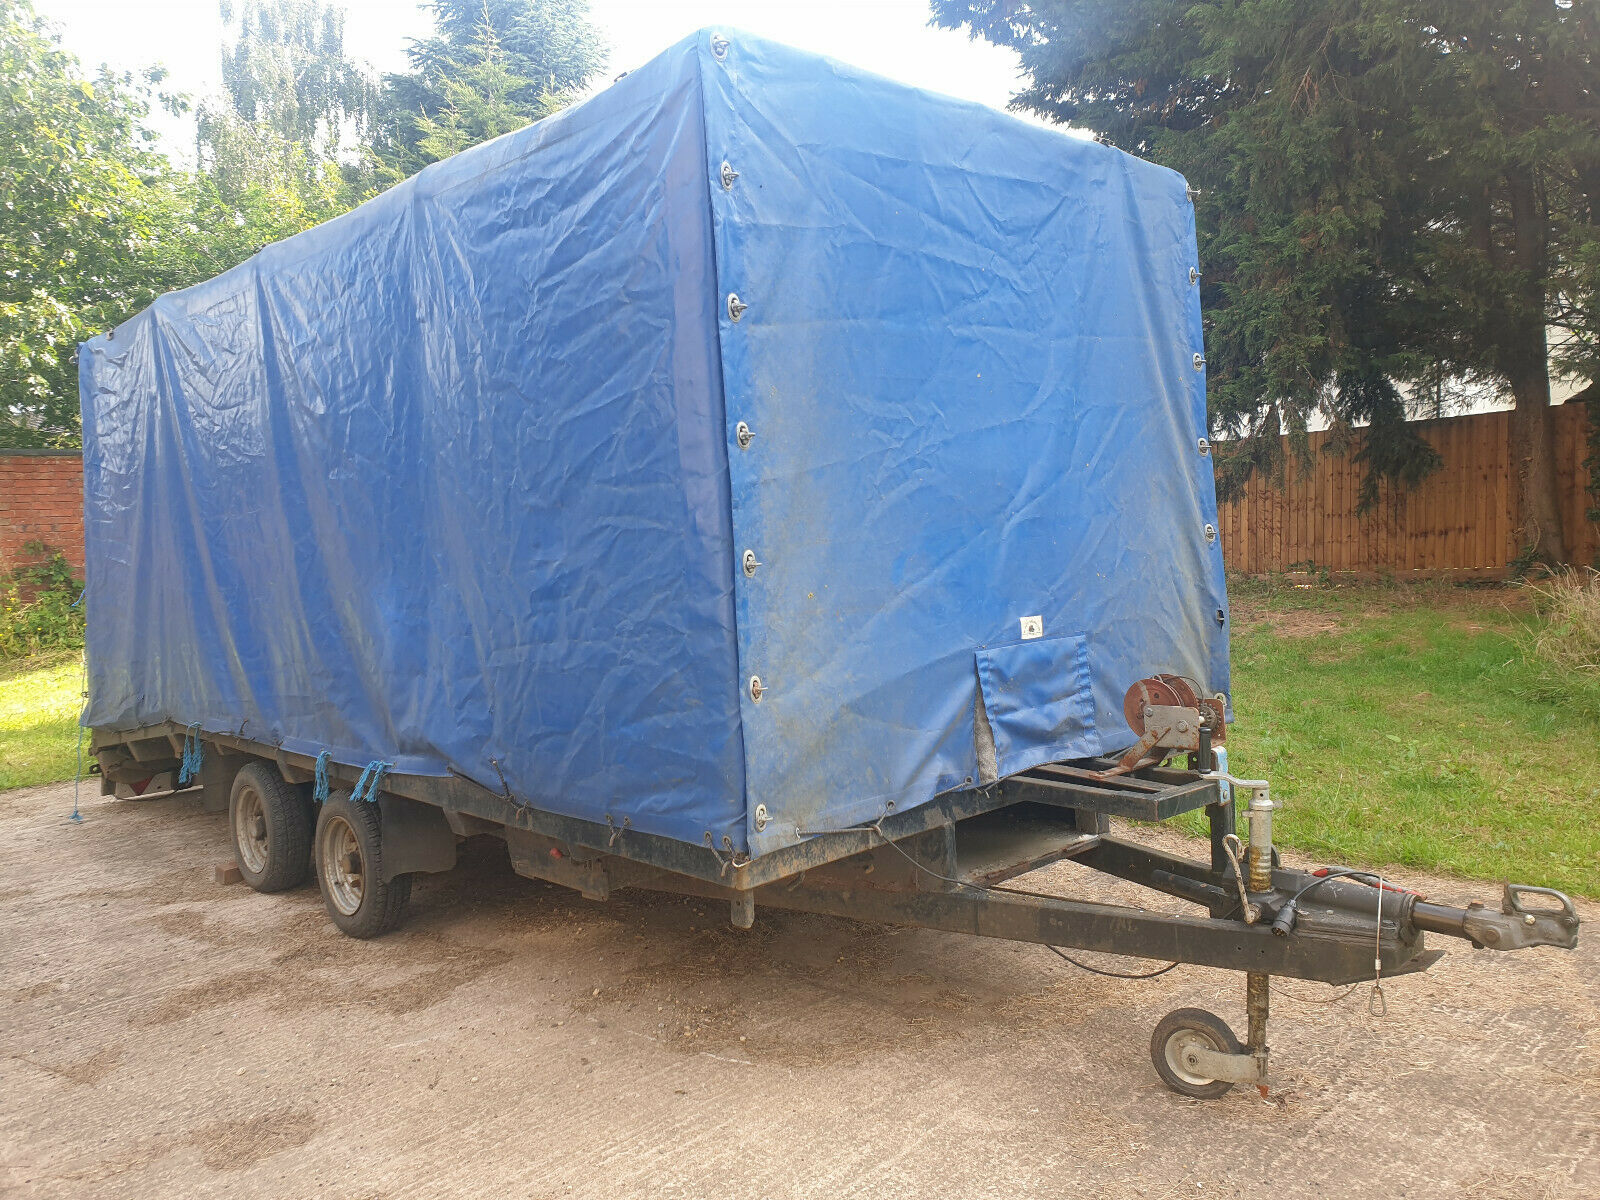
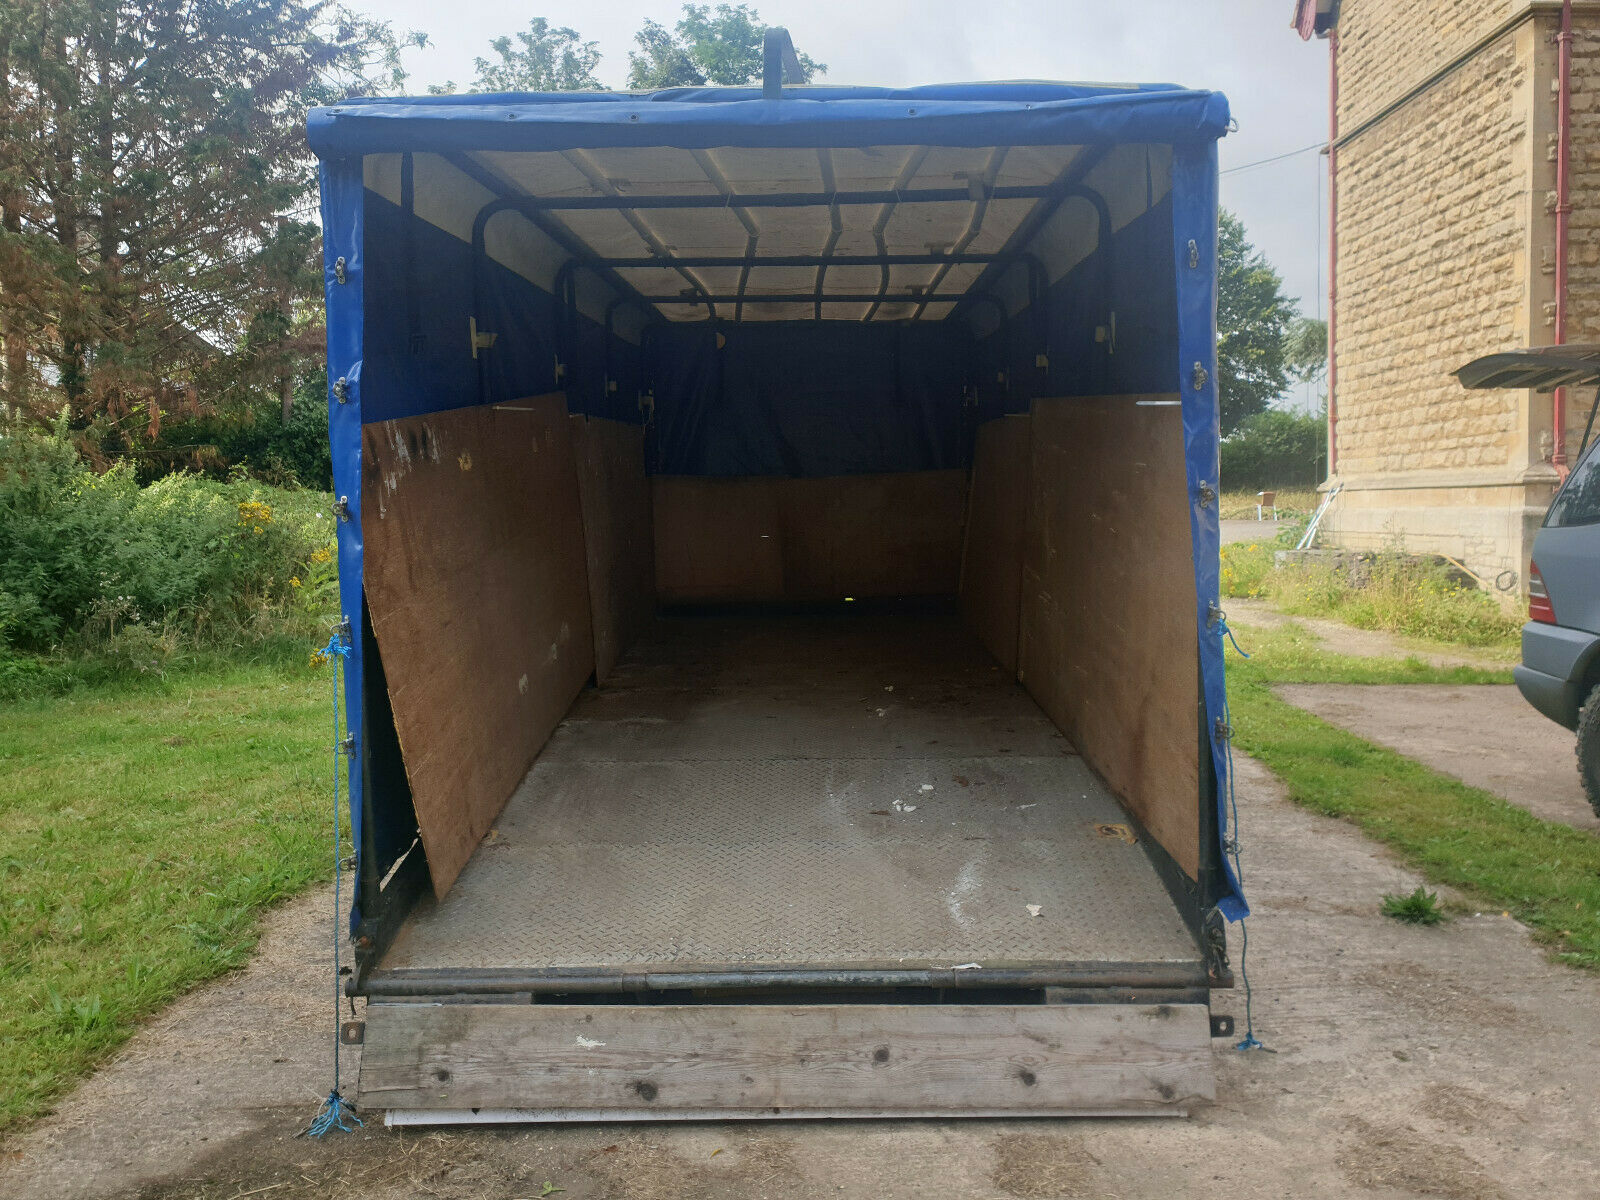
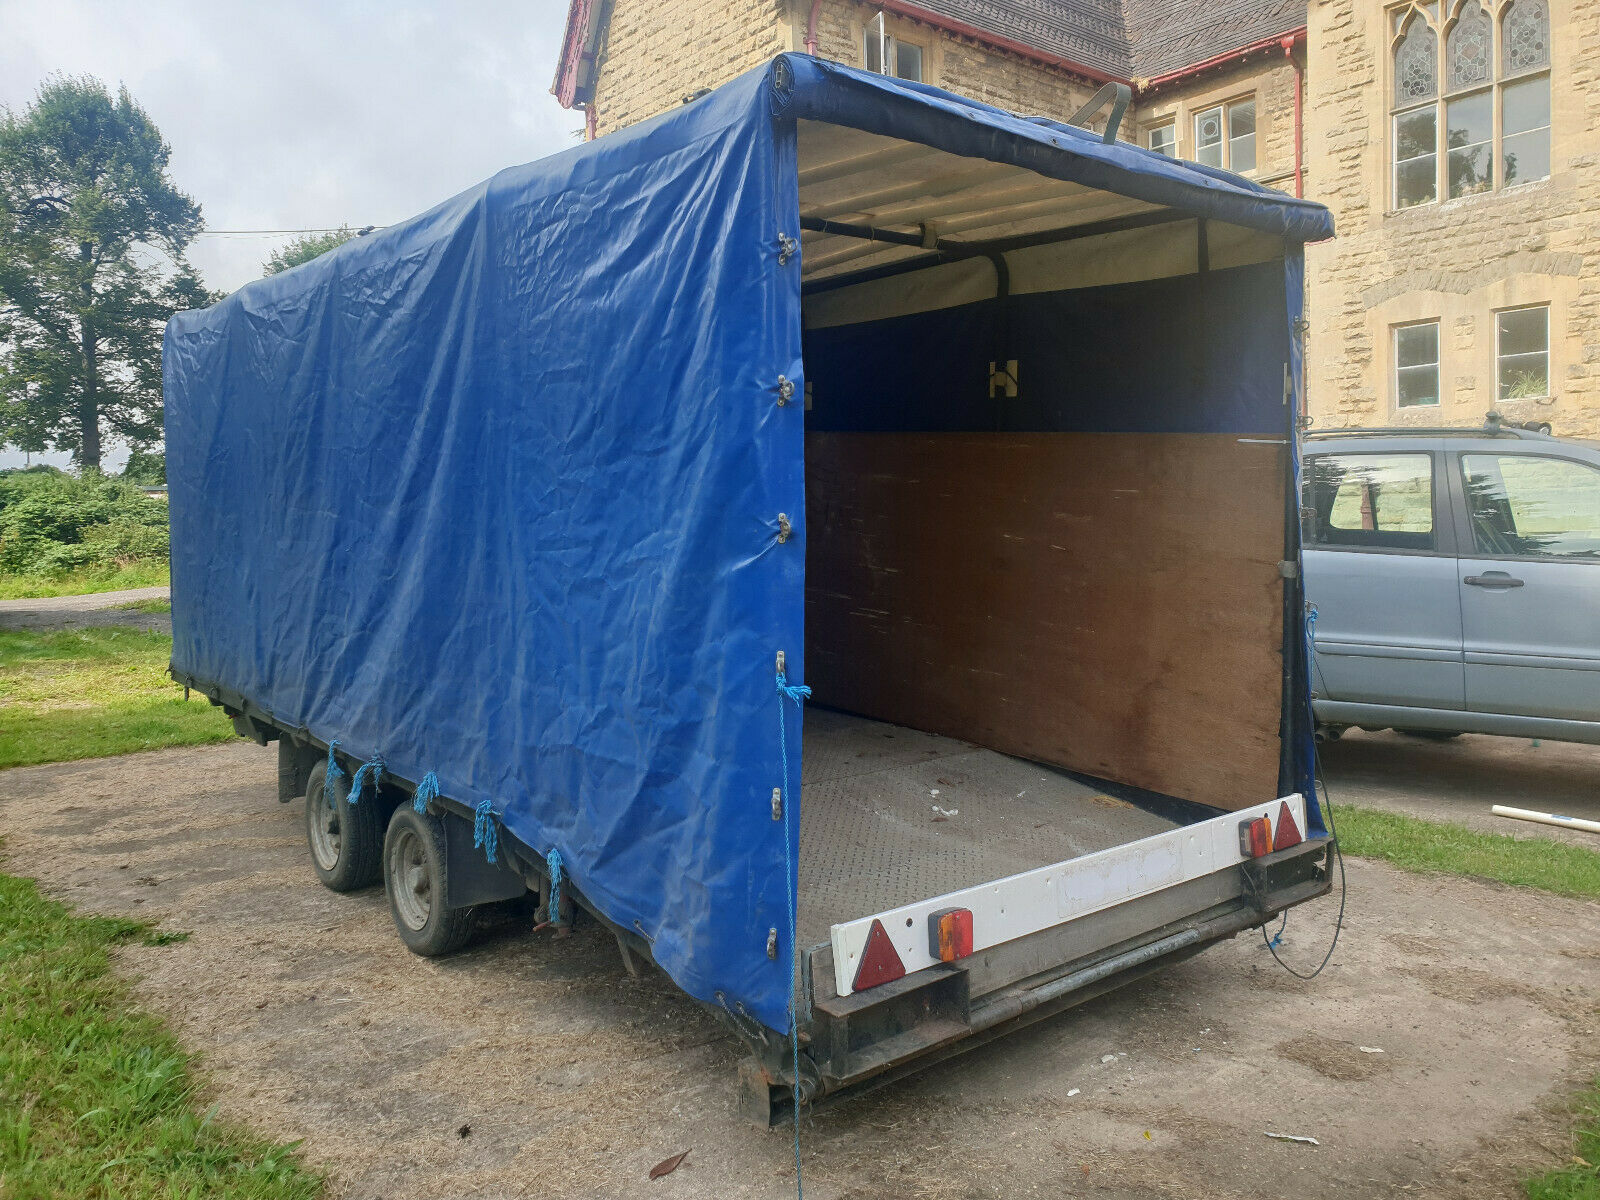
'Big Blue' as it is known, acquired for the princely sum of £600 care of a second chance offer on ebay: 3.5 tonne rated, 16 foot long bed, 7 foot wide and 6 foot high inside the cover which is removable

As I had no means of collecting it from Cirencester a mate with a 110 (that I happened to do all the repairs to the chassis and bulkhead of during its full rstoration) who lives in Swindon collected it for me:

NXHQlIt.jpg


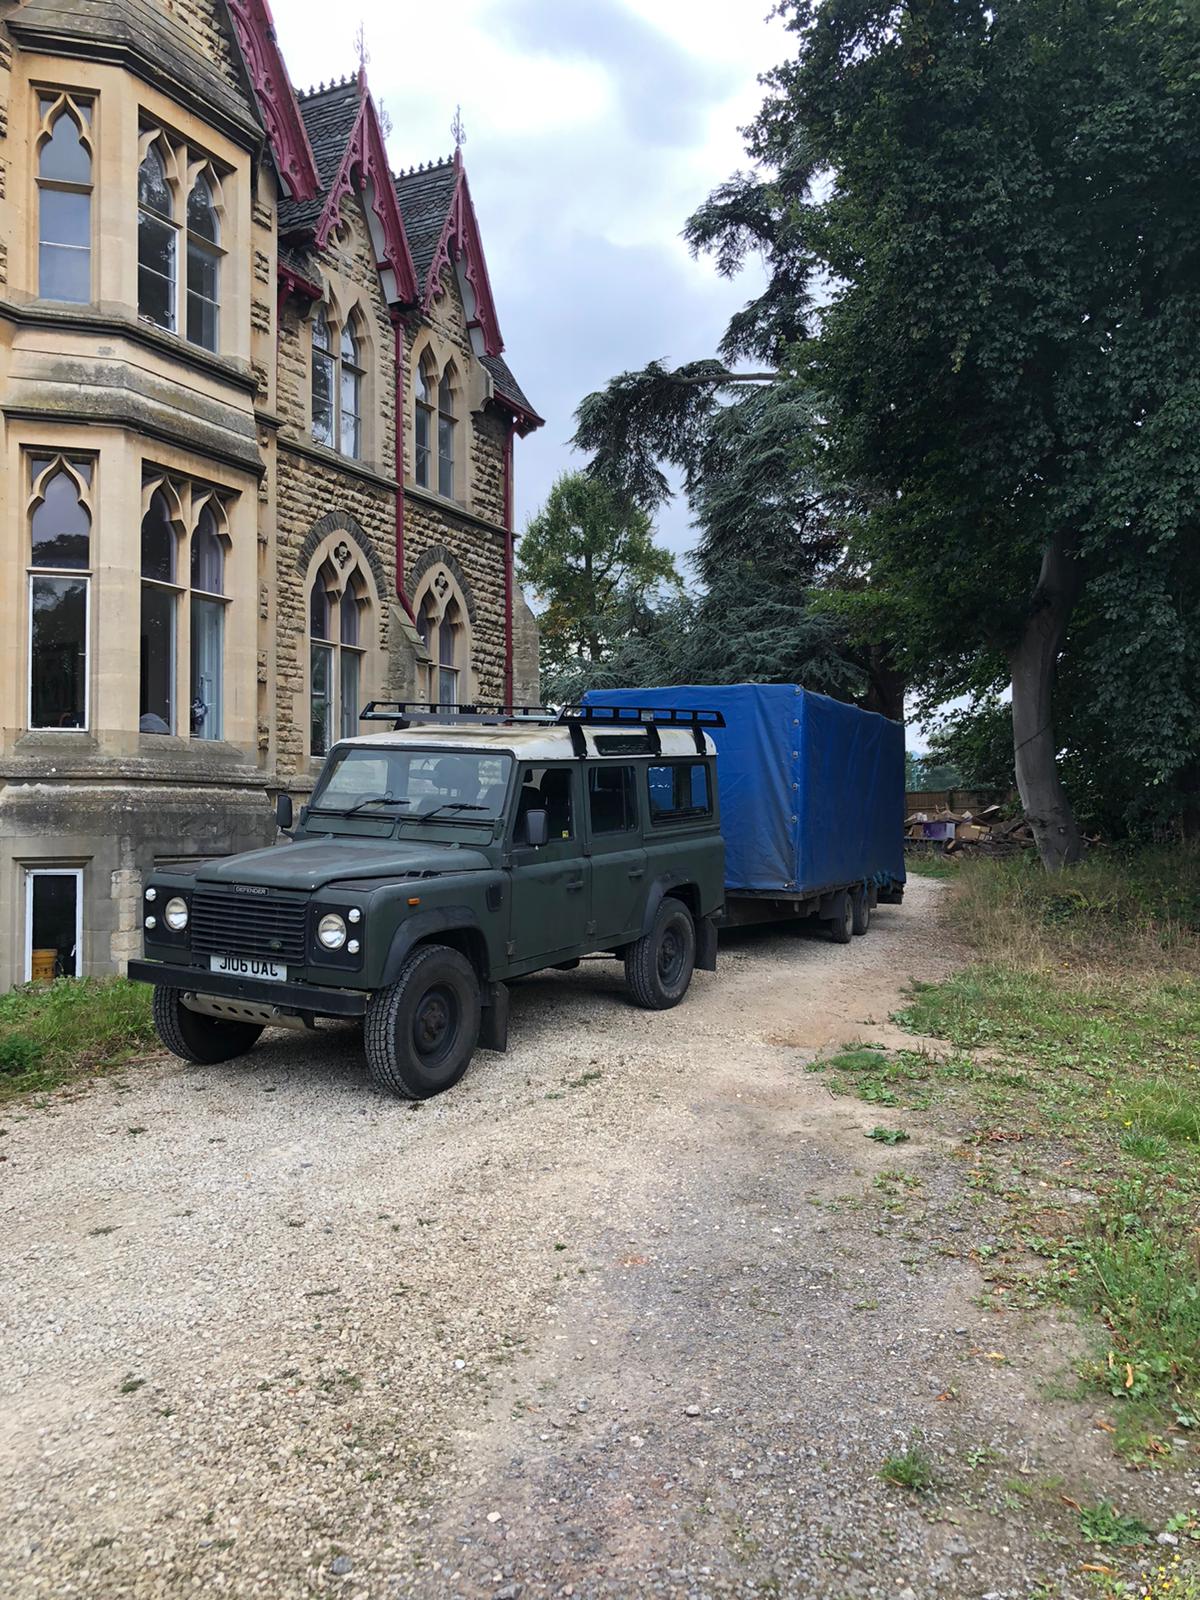
And parked it in the field behind his house for me to then go and collect it with my mate, who caused me to end up with Letti my '65 Coil Sprung V8 Hybrid project, in his 109 with 200tdi power; Bill:

YN3I2m8.jpg


GVTZtyA.jpg


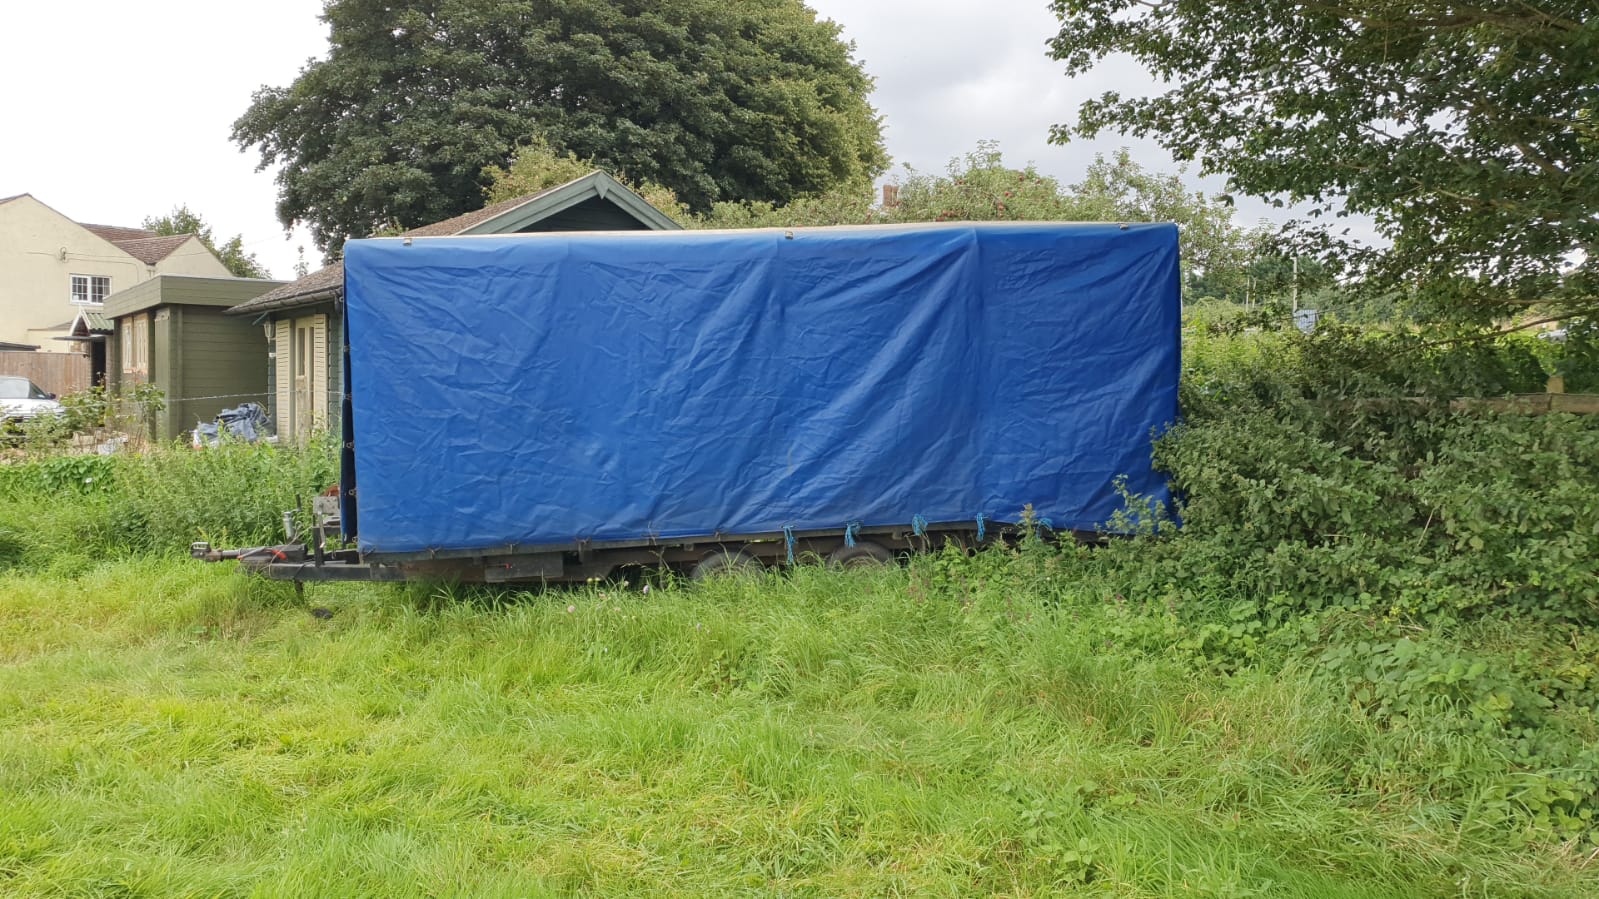
After which it has been sitting outside my house (with one of Bill's owner's Rapier Trailers for company)

N3D60Bt.jpg
 
Am back down in Kent for the weekend and despite the dark I've been out and removed the inlet manifold to access the glow plugs.

The manifold has clearly been off before because just like the rocker cover I found a loose fixing, this time the securing nut on cylinder 5. Who ever did the job clearly didn't fit new gaskets as one was damaged and they were all very brittle.

The glow plugs came out far more easily than I was expecting (if you've ever done battle with the glow plugs on the later M57 BMW diesel you'll know), all of them were NGK. The glow plug lead on number 6 has seen a repair. I've now installed and torqued down the BERU plugs that I bought a while back, fingers crossed they will help cold start, if not I guess I'll be looking at the glow controller module, or a little black box of tricks.

Interestingly all the leakdown hoses on the injectors had been replaced above the inlet, but the return hose below hadn't. I have 3m of the correct hose, which will also replace the MAP sensor hose which has fallen apart.

Tomorrow I shall be cleaning the inlet (surprisingly not dripping oil everywhere) refitting the glow plug connectors, cleaning the inlet manifold mating faces on the head, pulling the towelling of the inlet ports and giving them a wipe out before new gaskets and refitting the inlet.
 
Last edited:
Various activities over the past few weekends, and as I'm on leave till the 10th January I'm determined to get everything finished and the Range Rover at least to an MoT by then!

Pics from the weekend of the inlet manifold removal and before pulling the NGK Glow Plugs:

guoqRmd.jpg


Then with the new Beru plugs fitted along with new gaskets in place before refitting the cleaned out inlet manifold (resting on the rocker cover with the freshly rehosed MAP sensor attached), leakdown return hose replaced too:

5GRjqd4.jpg


With the inlet refitted I plumbed in all the cleaned up intercooler pipes and refitted the turbo inlet pipe, then set about making a new exhaust manifold heatshield from embossed aluminium sheet, double skinned, because the old one was in two pieces (missing the bit above the turbo) and soaked in oil:

9spgbP1.jpg


kmdYv9B.jpg


Of course when it came to fitting it I discovered I had to remove the intercooler to turbo and inlet pipes I had already put back on...

While it was dark and raining I set about cleaning the rust off the EAS reservoir tank using a combination of wirebrushing and pickling in Deox-C:

NnaU9bT.jpg


zSLlrWk.jpg


uTkmziv.jpg


Before giving it a coat of Hammerite Rust converter to stabilise the stubborn bits of rust that remained:

BsikuNE.jpg
 
On my return the following weekend the EAS tank got a good coat of Tractol 927 zinc rich primer and a top coat of Truck Bed liner paint. It's now back on the chassis and plumbed in, and the EAS Pump along with the Distribution Block I started all this work with refurbing are also refitted and plumbed back in. All the EAS air lines got a good blow through from the compressor before being connected back up.

My fabricated replacement bumper support bar got a similar paint treatment to the EAS Tank, although on the inside I coated it in stone chip and satin black paint:

q48KDv3.jpg


At the bottom of that pick you can see the repaired bumper support side pieces and the brackets that bolt into the end of the chassis legs that I decided to fabricate myself from 'scrap bin dived' 3mm plate off cuts rather than buy them at 50 quid a throw.

A bit more detail on those side pieces showing where I had to let new metal in and used Rivnuts rather than cage nuts to form the captives:

VdADvx1.jpg


UJ3dVy8.jpg


KyD3zLR.jpg


MHPmHl8.jpg


As ever they got a good pickling in Deox-C then rust converter followed by a generous coat of the zinc primer and Truck Bed paint.

The Bumper to chassis brackets in more detail, with M8 nuts welded on for the mounting captives:

Uf7CnsX.jpg


Wy3LaNO.jpg


Finally for this bit; the bumper bar has been bonded to the bumper shell using Everbuild Puraflex 40 (the same stuff I used to re-pot the EAS Solenoid Pistons) and is sitting just behind me as I type looking like this at this very moment:

8B5iyQU.jpg
 
A few weeks back a chap I know from another Forum (one I use for discussing our motly collection of agricultural and construction plant) who also owns a '95 P38 DSE mentioned his had just failed its MoT on a rotten rear sill end...foolishly I took a closer look at my nearside rear sill end as it had felt a little crispy and the plastic cover was easy enough to pop off to get a better look...prod prod...bugger:

pldY2EV.jpg


Ah well, back to fabricating repair panels for me then

Rot cut out, rubberised underseal and cavit wax removed, wire brushed and rust converter applied:

ZiFsFDy.jpg


Dremel with slitting discs used to remove good piece of outer skin (so it can be welded back in place when finished) to ensure all the rotten metal has been cut out:

i6DVE5O.jpg


Just need a full day of dry weather to start putting metal back in.

Meanwhile I have been back in the engine bay and have just removed the engine oil cooler (had some practice getting the intercooler out previously, so it was quite painless) so I can do a decent job on my replacement of the failed hose.
That looks very familiar to me,had to do the same a few months back, bloody steps and sill finishers hold all the wet muck.:eek::D
 
I think that part of the problem is that water runs down into the sill and puddles in the seam as in my case it had rotted out from the inside out, the sill finisher barely had any muck in it, while the paint on the seam looked fine but the metal just crumbled away when I started properly taking an interest in it. Where I have cut away the outer skin on the C pillar the inner structure was badly rotted out so I suspect water has been running down the pillar
 
I think that part of the problem is that water runs down into the sill and puddles in the seam as in my case it had rotted out from the inside out, the sill finisher barely had any muck in it, while the paint on the seam looked fine but the metal just crumbled away when I started properly taking an interest in it. Where I have cut away the outer skin on the C pillar the inner structure was badly rotted out so I suspect water has been running down the pillar
A rear sunroof drain disconnected at the lowest point? @DanClarke is on with this at the mo';)
 
Hum, I've not looked inside the boot area since I disconnected the battery as I've not been able to open the boot to lift the false floor. It was quite dry in there when I got the car and I know it had been stored outside for quite a while, so one would have thought a leak would have presented itself back then.

It could of course been condensation and years of accumulation, then of course there was the rotted out rear body mount on the nearside as well, plus the total destruction of the back bumper support structure so there is the possibility that my car did a bit of back end wading launching a boat and loads of water got in that way!
A good question, my son 38' hs a lot or rust only at the back end. Towbar and surrounding areas also..
 
I'm doing away with the folded seam on the repair section and welding in a web to take the trim clips, plus giving everything a good coat of paint then Waxoyl before plugging the access holes with their bungs. Pondering putting in a drain too and leaving that open somehow.
 
I'm doing away with the folded seam on the repair section and welding in a web to take the trim clips, plus giving everything a good coat of paint then Waxoyl before plugging the access holes with their bungs. Pondering putting in a drain too and leaving that open somehow.
Those trim clips are very brittle and snap if you look at them I was kindly sent some by members on here, still a few missing though. You can't buy the bit that breaks only the two pieces, fecking expensive for what it is.:rolleyes:
 
Those trim clips are very brittle and snap if you look at them I was kindly sent some by members on here, still a few missing though. You can't buy the bit that breaks only the two pieces, fecking expensive for what it is.:rolleyes:

Yes, I have discovered that already...two have snapped their 'clips' so I shall investigate ways to fix them if at all possible
 
A busy week and a bit working on it nearly solidly and I've still failed to get it running :( It is fighting me all the way...

The welding of the sill came out pretty well, but I did have to do a bit of hole chasing because I should perhaps have cut back to thicker section completely clean steel, even so:

VpVMyRb.jpg


hVbju7O.jpg


Main repair section fabricated from 1.5mm sheet and then a 'fake' seam from 3mm welded to it. Note I added a drain which was a bit of steel pipe scavenged from the engine oil cooler pipes I was reapiring :lol:

M3Z2ssj.jpg


xgNqx1t.jpg


2txtTns.jpg


As you can see from the pics I applied my usual coating weld through primer, then the Tractol Zinc rich primer, on the inside and outside, it has also had seamsealer applied in all the corners and joins plus on the chassis facing side a coating of stone chip paint. That hole in the end of the sill is in the same place as the stock one and I used it to lay a good covering of Waxoyl inside the sill.
 
Last edited:
With the welding done I put the rear bumper together to allow me to refit it:

v8dcEbY.jpg


iSFOAT1.jpg


cCBstcT.jpg


bHy4Bud.jpg


Rather than faff about trying to fix the captive thread fixings that once sat in the plastic for the side brackets I drilled through and just used button head stainless bolts as the head easily sit behind the coloured trim covers once refitted.

The bumper is back on, unfortunately it sits about 1/2" too far back as my channel section support pushes up against the tow bar upper bracket. IT's all good and strong though and I'll revisit it later to try and get a better fit as it's a cosmetic issue, which considering the state of the rest of it is minor!
 
The weaping oil cooler pipe has been replaced, with the ends of the steel pipe flared to stop the hose from poping off:

vdumwWt.jpg


I also painted the steel parts of the pipe to tidy it up a bit, and fitted new O rings on the couplings.

I then refitted the oil cooler and the intercooler, finished the oil change and replaced the fuel filter. Then I drained a bit more transmission fluid out of the gearbox as it's been stood a few months since I did the first drain. I cleaned up round the gearbox sump, removed it and replaced the filter then fitted the sump before I naturally sheared the gearbox sump plug putting it back in with a new washer and disbelieving that 11ft/lb was enough to torque it in place.

The replacement bolts for the rear brake caliper carrier arrived finally just as I'd bought another with the replacement sump plug from Keith Gott as I needed them and they were only a little detour on my return to Kent with my son last Friday. All the brakes have been given a good clean up, fresh caliper grease on the slider pins, Deox-c de-rusting of the rear discs, new pads on the rear and new discs for the front.

Engine topped up with fresh 10W40 Semi-synthetic, possibly too much transmission fluid in the gearbox post a fluid change (when I had got to 7 litres down the filler tube without having run it I decided to stop filling), I then put the battery back on and turned the ignition on to see what would happen...

Not a lot. Silence from the EAS (door open), lots of bongs about windows, lights, EAS fault and transmission, moved the the gear selector around and that seemed to clear the transmission complaint, cycled the windows and it's still a bit unhappy with the nearside front. Tried to fire the engine, coughed a few times caught briefly then stopped coughing all together (like a fool I didn't prime the fuel filter). EAS doing nothing with door shut. Hum. Can't hear the fuel tank lifter pump doing anything either, more hum. This was late last night and I've rather had my fill of it this weekend tbh so I've had to give up till next weekend, which is immensly tiresome as I am about to exchange on my house and desparately need the RR to be running for the move of all my projects (2 x10⁹'s 1x88, a lathe, engines, 4 post ramp T25 camper van etc etc) because I may only have two weeks to get it all done!

I'm a bit unsure of the battery condition, I need to get my Noco charger onto it rather than the cheap Chinesium one I had to hand, because I know the Noco properly checks the condition.

I have the EAS Unlock suite with the dedicated 232 serial cable to OBD2 connector and matched USB to Serial converter supplied with the cable, but when I try the software I can't seem to configure the correct COM port (none of the 12 options seem to talk to the cable) So I'm a bit stumped.

Thoughts?
 
Back
Top