110 Fuel Tank.

This site contains affiliate links for which LandyZone may be compensated if you make a purchase.

border

Well-Known Member
Posts
3,517
Location
North East. UK
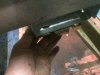
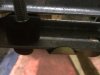
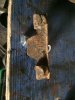
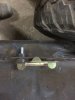
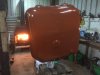
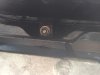
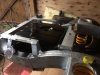
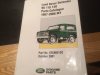
Just ordered new fuel tank for my 110 Rebuild, My old tank was just really resting on the chassis when it came as the bolts had been cut, so only seen a couple of bolt heads, and was just expecting a couple of bolts to the front and rear of tank going into chassis.
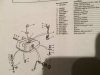
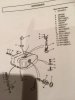
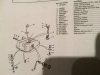
Looking at my parts book there is spacers, mounting rubbers and a kind of bolt attached to a piece of plate number 12 on photo, so have ordered these bits to, But looking at photos of other tanks online they only seem to have 2 bolts either side. So will I need these extra bits that I've ordered or could I have just put the right size bolts in ??
 

Attachments

  • IMG_3405.JPG
    IMG_3405.JPG
    184 KB · Views: 109
When i put my tank back in, I just used nylock nuts with a rubber spacer between tank fixings and chassis for a bit of shock absorbing. Had id know those fixings were available, i would have bought them. What are you using to get diagrams and part nos?
 
When i put my tank back in, I just used nylock nuts with a rubber spacer between tank fixings and chassis for a bit of shock absorbing. Had id know those fixings were available, i would have bought them. What are you using to get diagrams and part nos?
This Bit Pricey but well worth the money
 

Attachments

  • IMG_3406.JPG
    IMG_3406.JPG
    189.8 KB · Views: 114
Got all the bits today Gonna give the tank a couple of coats of red oxide then some black paint same as I used on axles.
Anyway got fixing 4 to 15 on photo, now this book is very good at showing parts but I'm a bit confused as how they go together by the diagrams. for instance does number 5 go up from the bottom of chassis holes then first bolt go in upwards, or does everything go down from the top ?? same for number 12 does it go upwards first or down from the top ?? has anyone got any photos of these bits fitted.
Only bits I'm missing is number 13 as these were a fiver each, Ive got something similar that I can use. also got new sender and fuel feed pipe.
 

Attachments

  • IMG_3405 (2).JPG
    IMG_3405 (2).JPG
    215 KB · Views: 100
dowel goes through the tank holes a rubber bush sits either side then large washer then tank pushed up to mount ,washer and nut bolt goes up through no 5 and up through bushes etc
 
dowel goes through the tank holes a rubber bush sits either side then large washer then tank pushed up to mount ,washer and nut bolt goes up through no 5 and up through bushes etc
Is it this way James ??
 

Attachments

  • IMG_3460.JPG
    IMG_3460.JPG
    285.3 KB · Views: 125
  • IMG_3464.JPG
    IMG_3464.JPG
    260 KB · Views: 125
that rings a bell now, that plus bolts hang down from cross member, tank has the tube and bushes 1 each side then large washer and nut
Thanks I trial fitted on old tank when I was up just to show you, so should it be like this when fitted ?
 

Attachments

  • IMG_3467.JPG
    IMG_3467.JPG
    321.7 KB · Views: 108
yes with crossmember, tank is squished between 2 bushes and the tube stops them been squashed flat
Spot on Mate, Thanks Very Much. Need to find another 2 rubbers tomorrow as only ordered 2 by mistake should of had 4. unless I can find something similar to use.

Couple of coats of primer on tank tonight, will get some chassis paint on tomorrow then hopefully get it fitted Sunday.
 

Attachments

  • IMG_3445.JPG
    IMG_3445.JPG
    230.1 KB · Views: 73
Tank all read y to fit tomorrow, give it 2 coats of correless chassis paint, forgot to take a bloody photo. Had another look at where the rear fits on to rear crossmember and it goes up inside the crossmember, looks a bit fiddley to get hands up inside to get washer nut and spacer on so might put number 12 in photo up in there first coming down through so getting the rest on should be easier. will decide when I get to that stage anyway.
 
Tank all read y to fit tomorrow, give it 2 coats of correless chassis paint, forgot to take a bloody photo. Had another look at where the rear fits on to rear crossmember and it goes up inside the crossmember, looks a bit fiddley to get hands up inside to get washer nut and spacer on so might put number 12 in photo up in there first coming down through so getting the rest on should be easier. will decide when I get to that stage anyway.
Love that stove. Just keep taking pictures of that :cool::D
 
Well got it just about fitted, its in place but I cant get a hold on the number 12 bolt that's up in the rear cross member, cant even get fingers in to hold it to get bottom nut tightened.photo shows bottom nut. Must be a way but cant figure it out yet, gonna have a cup of tea and think about it before I end up breaking something else:)
Any Ideas ??
 

Attachments

  • IMG_3489.JPG
    IMG_3489.JPG
    159 KB · Views: 98
  • IMG_3490.JPG
    IMG_3490.JPG
    284.1 KB · Views: 103
  • IMG_3471.JPG
    IMG_3471.JPG
    200.2 KB · Views: 102
It’s a bit of a pig, I had to support the tank in place so I had both hands free to do the nuts. Also I forget which way round but one end needs to be bolted first so they line up. Getting to pick up pipe in was an absolute pain, including somehow fitting it at the wrong angle and having to call the AA out for more fuel on the motorway, and then the new one needed adjustment so the gauge read correctly.
 
It’s a bit of a pig, I had to support the tank in place so I had both hands free to do the nuts. Also I forget which way round but one end needs to be bolted first so they line up. Getting to pick up pipe in was an absolute pain, including somehow fitting it at the wrong angle and having to call the AA out for more fuel on the motorway, and then the new one needed adjustment so the gauge read correctly.
The tank is fully in place front bolts that have the rubber bushes on are in but not fully tightened. Its the rear I can get to the bolt coming through from crossmember but just can not get anything on the inside bolt head to stop it spinning so I can tighten them up.
 
Back
Top