Ok, it´s not Swedish just because it´s here, but it´s here..
Landys are a new chapter for me - and I already like them - I´m grateful for all and any tips I can get during this process.
This car belonged to a dear friend of mine, who helped me with a couple of my own projects. We used to say we´d be doing his Landy next time. Long story short, I inherited this one and I will do my best to resuscitate it. I really admire (read "am envious of") you girls/guys who can take on a nut and bolt restoration, but since I have visited the Rabbit Hole before, this time I will try my best to work with what I´ve got.
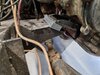
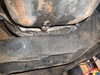
So, my friend bought this S3 21 years ago. I think he knew the engine was shot, so he found another 2.25D and planned the swap, though he never got arround to it. Now, when I pulled it up from where it sat and home to my garage, I could actually see where he gave up. All bolts/nuts/wires were removed in the engine room, but when he came to the transmission plates/floor boards, he just put the tools where I found them 21 years later. I suppose he just planned to take a break, which then was extended 21 years. Reason for this prolonged break could be everything inside was glued together. Floor boards to the body, transmission plates to the floor - everything was joined together, is´nt that nice? I got the biggest pipe wrench and crow bar I could find. Those and a nice canned torch got the job done. Who needs a straight floor anyway?
Anyhow, this is what it looked like when I took a better look at it for the first time. It sat under a "roof" with wheels burried down to the hubs in the dirt. We actually had to lift and pull it to get it out. Amazingly the tyres held air when inflated. Tyres looks to be new btw.


After towing it 100 meters to my home I - naturally - took a few more pics.


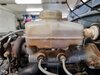
First task was to get the engine out. I thought we could need a little more "push", so will replace that one with a 2.8 TD from a Dxxxtsu, which I learned would be an easy swap. It already sat in another Landy, so does "Bolt-In" apply?


Engine room has been properly cleaned. Paint was brush-bettered (is there such a word?) where needed. Frame horns, battery box and front axle got a layer of black chassie paint, in the US it´s called POR15. I call it "gluey stuff that can´t be removed from anything you put it on". Everything that can be removed, vacuum tank, battery clamp, air filter, blower/heater house, engine mounts etc etc has been blasted, and are right now waiting for the gluey stuff to come on. Radiator support was pretty rotten at the bottom, but structually ok, so it got a bath with rust stopper and then the same brush treatment as the engine room. Last pic shows exterior side after a nice rub and wax. I like it
Before/after.


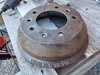
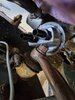
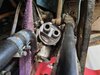
Now, I´ts the matter of seized clutch and brakes that calls upon my attention. Hopefully I can report back about that in a few days, or weeks. Oh btw, my time frame is "done by atumn". This year.
Cheers!
//Car1
Landys are a new chapter for me - and I already like them - I´m grateful for all and any tips I can get during this process.
This car belonged to a dear friend of mine, who helped me with a couple of my own projects. We used to say we´d be doing his Landy next time. Long story short, I inherited this one and I will do my best to resuscitate it. I really admire (read "am envious of") you girls/guys who can take on a nut and bolt restoration, but since I have visited the Rabbit Hole before, this time I will try my best to work with what I´ve got.
So, my friend bought this S3 21 years ago. I think he knew the engine was shot, so he found another 2.25D and planned the swap, though he never got arround to it. Now, when I pulled it up from where it sat and home to my garage, I could actually see where he gave up. All bolts/nuts/wires were removed in the engine room, but when he came to the transmission plates/floor boards, he just put the tools where I found them 21 years later. I suppose he just planned to take a break, which then was extended 21 years. Reason for this prolonged break could be everything inside was glued together. Floor boards to the body, transmission plates to the floor - everything was joined together, is´nt that nice? I got the biggest pipe wrench and crow bar I could find. Those and a nice canned torch got the job done. Who needs a straight floor anyway?
Anyhow, this is what it looked like when I took a better look at it for the first time. It sat under a "roof" with wheels burried down to the hubs in the dirt. We actually had to lift and pull it to get it out. Amazingly the tyres held air when inflated. Tyres looks to be new btw.
After towing it 100 meters to my home I - naturally - took a few more pics.
First task was to get the engine out. I thought we could need a little more "push", so will replace that one with a 2.8 TD from a Dxxxtsu, which I learned would be an easy swap. It already sat in another Landy, so does "Bolt-In" apply?
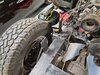
Engine room has been properly cleaned. Paint was brush-bettered (is there such a word?) where needed. Frame horns, battery box and front axle got a layer of black chassie paint, in the US it´s called POR15. I call it "gluey stuff that can´t be removed from anything you put it on". Everything that can be removed, vacuum tank, battery clamp, air filter, blower/heater house, engine mounts etc etc has been blasted, and are right now waiting for the gluey stuff to come on. Radiator support was pretty rotten at the bottom, but structually ok, so it got a bath with rust stopper and then the same brush treatment as the engine room. Last pic shows exterior side after a nice rub and wax. I like it
Before/after.
Now, I´ts the matter of seized clutch and brakes that calls upon my attention. Hopefully I can report back about that in a few days, or weeks. Oh btw, my time frame is "done by atumn". This year.
Cheers!
//Car1
")