A Swedish Series 3 brought back to life

This site contains affiliate links for which LandyZone may be compensated if you make a purchase.
Ok, my first attempt with the welder. Or, I did a few welding jobs with a pin welder back in the last century, but that was on a plough and so long ago it does´nt count now.
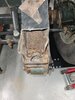
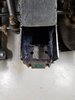
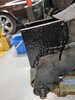
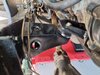
The frame on this 88 got more repairs than original steel, and sometime in the future, lifting the body off would´nt be a bad idea. But I have seen so many projects being abandoned, dying a slow death with all parts in a mess when motivation runs out. That´s not the route this one is going, this will have to do for now. The front frame legs where the bumper attaches, have also been repaired some time in the past. I guess right side still can be considered ok, so I started on the left side where the steel was paper thin, and only fragments left where the lower bracket once was. Thinking if this goes well I will have a go on the right side to. Asides from wanting to do this right, I also would like to have a winch up there, sometime in the future. Obviously these parts can´t be seen later on, which makes them perfect for my first go with the welder, which is just a hobby machine but suitable for me as I wanted a smaller one, easy to tuck away when not used. I cut the rusted parts and made new ones using 3 mm steel sheet. Time consuming and dirty. Before I started welding, I pictured the finished welds as smooth seams. Well, not anywhere near that image but it will have to do, top lid still to do. When I welded I made a mental Post-It, not to weld wearing plastic crocs anymore...
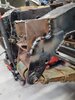
This weekend we plan to do the engine frame mounts. This task is clearly above my pay grade, so I´ve called in a better man for this job.
//Car1
 

Attachments

  • RED_20210417_174015.jpg
    RED_20210417_174015.jpg
    86.6 KB · Views: 146
  • 20210810_203227.jpg
    20210810_203227.jpg
    302.3 KB · Views: 157
  • 20210811_200618.jpg
    20210811_200618.jpg
    240.7 KB · Views: 151
  • 20210817_184449.jpg
    20210817_184449.jpg
    189.5 KB · Views: 173
  • 20210817_184501.jpg
    20210817_184501.jpg
    198.7 KB · Views: 160
As mentioned, I called a friend and asked if he would assist in making frame engine mounts. This guy is a professional, normally working on engines/cars producing + 700 hp, so naturally this project very fast spun out of control. Chances are this is one of very few series 3 vehicles with hand made, reinforced light weight frame mounts. The thought of lifting the body to preform the same procedure on the frame was soon dropped, since executive committee never will go for it. But they are very cool.
Next tasks will be construction of exhaust which includes adjusting driver side fender. The engine will be coming out again, for "final" adjustments. Oil filter will find a new space etc etc. The list is still very long, but another bite at least.
//Car1
 

Attachments

  • RED_62322.jpg
    RED_62322.jpg
    202 KB · Views: 137
  • RED_62326.jpg
    RED_62326.jpg
    196.8 KB · Views: 155
  • RED_62327.jpg
    RED_62327.jpg
    252.2 KB · Views: 161
  • 20210822_170207.jpg
    20210822_170207.jpg
    281 KB · Views: 159
Last edited:
Phase of denial now have to cease and "Done by autumn" is postponed. Last weekend, in connection with fitting engine/gearbox and checking the banged up cross member, a significant amount of rust was discovered on the inside of frame right next to the gearbox cross member. Seat box is removed, gearbox will come out, rust will be attended. I will be back.
//Car1

"Done by Autumn...", don't feel too bad, it's the Land Rover norm'. I started with an engine rebuild and freshen up in August 2019...it ended up being a near total rebuild, finally finishing July 2021. In fact, finishing at 22.15hrs the night before taking to the Alpes...the Eurotunnel left at 06.30hrs the following morning!! :eek:
 
It´s been a while. I decided to pull my head up from the sand and started to check the frame a little closer. Living in denial I had convinced myself, and site manager, that it was good to go - or at least will hold up for a little while more. I think it´s saveable. 1 area right next to the gearbox, app 10", and another near the rear shock. The latter being difficult to determine damage as the frame i paper thin here. Anyway, this weekend i mustered up and decided to pull the gearbox, a "2 hour job". Naturally this turned out to be considerably more time consuming, so sunday was all spent in the garage. Nothin is easy with this one. What is "Whitmore"? A brittish revenge on the rest of the world, or an ingenious invention which conquered the entire industry? Blow torch and disc cutter is now the 2 most used tools in the garage. The gear box is now ready to be pulled, after which we will get the 88 up on a lift to start patching the frame up.
Unfortunately, and despite plenty of Post-Its messaging "do not buy another vehicle" I managed to fumble up again. Another "treasure" is on it´s way, site manager is delighted, and will arrive in a couple of months. This means my 2 car garage, which now contains 3 cars, is beginning to feel small-ish. Consequently I have been nourishing thoughts of passing the 88 over to another poor sod, but I don´t like the idea of leaving a project worse than it was when I started. So, we will try our best to fix the rust, straight the cross member out, putting engine and gearbox back in, and naturally fix everything else needed fixing - before the newcomer arrives. It can be done.
//Car120211121_123633.jpg 20211121_123642.jpg 20211121_123736.jpg 20211121_123746.jpg 20211121_123812.jpg 20211121_123826.jpg
 
Gearbox is out and tonight we´ll get the 88 up on the lift. Plan is to adress the rust, tidy up the frame a bit and also take care of the crooked cross member, Looking forward to two days dedicated to grinder, wire wheels and welding.
//Car1
Inked20211123_185101_LI.jpg
 
I really don´t like rust. It´s like an iceberg, 10% shows, the rest is down under, overwhelming and impossible to eliminate. But, after 20 hrs on the lift, with a grinder, wire wheel, cutting discs and 3 sqm new steel, we saw the light in the tunnel. I would´nt say the frame is anywhere perfect now, but it holds together and will hopefully not break in half driving down the road.
Another, quite large, chunk of the elephant.
//Car1
20211127_141150.jpg 20211127_141213.jpg 20211127_141208.jpg 20211127_141220.jpg 20211127_141132.jpg 20211127_113053.jpg 20211128_131054.jpg 20211128_131141.jpg 20211128_134720.jpg
 
This weekend the plan was to paint what was left on the frame and also clean the gearbox up, before reinstalling it. Painting was quick done away with, which rendered me with the filthy gearbox. The outside temperature -15 made it impossible to use degreaser/pressure heat washer, so I had to do with spray bottle and cloths. A few hours later I could read the serial nr on the housing and also what seems to be a hand made serial nr on the gearbox, right next to the overdrive housing. Maybe someone here can decode them. I also cleaned up the gear levers and painted them together with a few brackets. Time to put the gearbox back in. At first, and because the glued floor boards are still firmly in the way, I was considering putting the gearbox in from the front/engine room. However, after checking the green bible which says "gearbox can only be removed/put in trough the passenger door" I decided to do it the proper way. This payed out, as it was really easy getting it back in. In fact, so easy that I started to look around, looking for things I forgot to put back on. Of course there are a ton of other stuff to attend to - fule lines/sedimentor/filter, fixing the rotten battery box etc, but hopefully it´s not to long before the 2.8 can be put back in. Actually quite pleased right now.
//Car1
20211123_185114.jpg 20211204_142701.jpg 20211204_142647.jpg 20211204_142636.jpg 20211204_171703.jpg 20211205_163559.jpg
 
It´s been a while. I decided to pull my head up from the sand and started to check the frame a little closer. Living in denial I had convinced myself, and site manager, that it was good to go - or at least will hold up for a little while more. I think it´s saveable. 1 area right next to the gearbox, app 10", and another near the rear shock. The latter being difficult to determine damage as the frame i paper thin here. Anyway, this weekend i mustered up and decided to pull the gearbox, a "2 hour job". Naturally this turned out to be considerably more time consuming, so sunday was all spent in the garage. Nothin is easy with this one. What is "Whitmore"? A brittish revenge on the rest of the world, or an ingenious invention which conquered the entire industry? Blow torch and disc cutter is now the 2 most used tools in the garage. The gear box is now ready to be pulled, after which we will get the 88 up on a lift to start patching the frame up.
Unfortunately, and despite plenty of Post-Its messaging "do not buy another vehicle" I managed to fumble up again. Another "treasure" is on it´s way, site manager is delighted, and will arrive in a couple of months. This means my 2 car garage, which now contains 3 cars, is beginning to feel small-ish. Consequently I have been nourishing thoughts of passing the 88 over to another poor sod, but I don´t like the idea of leaving a project worse than it was when I started. So, we will try our best to fix the rust, straight the cross member out, putting engine and gearbox back in, and naturally fix everything else needed fixing - before the newcomer arrives. It can be done.
//Car1View attachment 253142 View attachment 253143 View attachment 253144 View attachment 253145 View attachment 253146 View attachment 253147
Guessing you might mean Whitworth. An old system of Imperial measurements for fastenings. The sizes on a Whitworth spanner refer to the size of the threaded shaft of the bolt, not to the distance across the flats.

I think you can still get Whitworth nuts and bolts, and working with old ones isn't usually a problem, as Metric surface drive spanners and sockets fit on them.
Thanks T-man, got that now. Initially, working with badly corroded bolts and nuts, I thought it to be yet another dimension.
 
Thanks T-man, got that now. Initially, working with badly corroded bolts and nuts, I thought it to be yet another dimension.
No worries! :)

Not quite sure how old your Series is, but on later ones, there aren't many Whitworth fastenings anyway. Mostly AF, which stands for Across Flats, so a 7/8ths of an inch AF spanner is 7/8ths of an inch across the jaws of the spanner.

All makes perfect sense to us. An inch is based on the distance along the top joint of Henry VIII's thumb, so pretty easy to visualise.

Millimetres, on the other hand, are something to do with a very small Corsican called Napoleon, which I can't visualise at all! :)
 
My first Landy was a Series III that had been "restored" (for "restored" read "bodged"); loved it. Would love another one, but nowadays I'd have to remortgage the house to afford one....and I don't believe the Housing Trust would be too pleased.
 
I restored my old series 2a.
Removed all the bodywork and running gear. Cut out and replaced the bad rust on the chassis, cleaned and painted. Done on my drive and rebuilt, in around 6 months.
I must try and find the photos
 
Well not very much Land Rover this weekend, but managed to dismantle the handbreak contraption, painted, greased up and put back in the car. Works like a charm. Hope to find time getting the engine back in, in the days between. Let´s see how that works out.
//Car1
20211219_122840.jpg
 
Cheers, good work there. The one I´m working on I kind of inherited. It´s been sitting för +20 years, and my low set goal is mainly getting it back on the road.
//Car1
 
Engine is finally back in. It did put up quite of a fight, much due to a bad engine hoist, but in the end it caved in. Now time to figure out how to connect things like fuel cut solenoid, glow plug controller etc. I can´t find much information about this engine, DL52 but I guess it will be resolved once i get there. Also need to cut L fender up a little and route the exhaust.
//Car1
20211226_101030.jpg 20211227_072733.jpg 20211227_072640.jpg
 
Good to see you making progress - some nice metalwork done on the chassis too :) .... I agree that it is always best if a vehicle does not fall in half whilst driving... :eek: but no one seemed to have told ni$$an that with our pickup ....ho hum - got me back into LR's, so not all bad ....:confused:

:D
 
Back
Top