britishwardog
Active Member
- Posts
- 394
- Location
- Cranleigh, Surrey
Hi guys, I've taken out the tiny bulb set into the hazards button but can't seem to find a local supplier with a bulb that small, any ideas or should I go to a LR dealer?
I have ordered new white 3mm 12v leds from eBay. When they arrive I will see if those particular ones fit and if so I’ll advise on here of the seller etc, think I’m getting 20 leds for £5 odd.

20 for a fiver.
Wow that's expensive. You can buy LEDs by the hundred for about the same cost.
https://www.ebay.co.uk/itm/352163012233
 . My intention is if the led fits to then offer the remaining ones on here so folks can fix their own if they want to. Also will be willing to share the sellers info once I know the part fits as I don’t wanna get ahead of myself or have you guys buying stuff that won’t work. Will update on this soon. I’ve purchased the led’s and also 4 hazard switches of which the led doesn’t work. So will repair a few to test the led’s.
What year is your FL?
I tried several years ago to get into my hazard button to replace the bulb and couldn't for fear of damaging it.
Armed with your info, I will have another look as it annoys me that it doesn't light up when in use.
I have the switch end off. Thank you for your instructions.
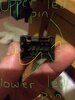
Now, how do I remove the small bulb? I am very heavy-handed and often break things so don't want that to happen on this occasion.
****EDIT*****
It just pulls out. Used a tweezers.
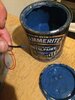
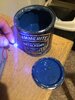
So the solution comes in the form of blue hammerite smoot, it mimicks the boot about perfectly and given it’s now an led and not a bulb should be just fine.
Welcome To LandyZone, the Land Rover Forums!
Here at LandyZone we have plenty of very knowledgable members so if you have any questions about your Land Rover or just want to connect with other Landy owners, you're in the right place.
Registering is free and easy just click here, we hope to see you on the forums soon!