Not a bobtail a 6x6

This site contains affiliate links for which LandyZone may be compensated if you make a purchase.
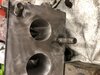
I started to have a go today at changing the middle axles from a A Frame to a panhard arm set up. I think it will work ok. I’ve used 25mm solid bar and 10mm plate and made a bracket up. It’s not finished yet but I think that should be strong enough. I’ll make another bracket and weld it to the axle off the drop arm bracket. Then cut the other one off when I do the axles , I’m going to sleeve the chassis and bolt it on rather than weld it. There isn’t loads of room around it. But it can’t foul on anything and should be tucked up enough If anyone has any ideas otherwise. Jump in Please
C7EF64D9-1BD9-4D07-B6C3-4FB28CC8D2AD.jpeg

031D28F3-A4E6-4AC4-84DD-0F5D6E7E67F4.jpeg

D566C647-1886-409E-AE83-0C46BA2B4F0C.jpeg

22506706-6844-4B30-88CB-21CEF377A37D.jpeg
 
Quick thought. Do you have to change the arms from chassis to axle?
(Fit the same type as the fronts)
The bracket of the front did work out. So I made one. I’ve set it up off the panhard rod from the front. But I’ve ordered an adjustable one to give me a bit wiggle room
 
What axle arms are you using ?
I’m sure you can’t use normal trailing arms
Cheers for pointing that out. Thought about it and realised the axles could rotate a bit under load with the A Frame not there stop to it. Looked at some pictures of a p38 axle as they have panhard bars and their trailing arms are different. So I’m having a play about with making a bracket on the backside of the axle mounts for the trailing arms. Then I’ll make bushed bracket and take it over the existing arm bush and weld it to the trailing arm so it would end up a similar setup as front radius arms
FB73739D-1D2B-4CA5-881E-0FA35392C3D9.jpeg

11FC8FBC-43C2-4398-8CF8-6B6BB60C168E.jpeg
 
After a bit head scratching I think I’ve got the back axles sorted. I bored some bar out and made up a double bush on the middle axle trailing arms. I think this will stop it twisting with removing the A frame from it. Time will tell. Shortened the chassis mount for the panhard arm and and a mount on the axle. I’ve an adjustable one to go on there
21A962E6-9816-41D1-9F4E-A777FF348D15.jpeg

58E0767C-17E5-4131-88DC-5906535E4F7F.jpeg

4353BA7E-FA9B-42F1-89A2-91433927190A.jpeg

4C95040A-F0C4-4396-BE04-AAA7333581FE.jpeg

I didn’t think I’d have much to do with the back but ! I twigged the spring mounts are square to the face of the diff. Ive been putting new mounts on the axles. I rotated it up and 10 degrees as I’m taking the prop over the top. Wonded if the pinion bearing would be ok but looks like the front is about out that anyway. With rotating it I had to move the mount for the A Frame ball Joint too, so I just did that on the axle rather that move it on the chassis also put a new pan on that one
1EBDE616-CBFA-494E-8745-CBFDC5BE9329.jpeg

210CC9C4-2394-445D-931D-5EE0946464A6.jpeg

22293710-9E9A-40B3-80BB-7C27DF440071.jpeg

4F100651-73D9-4600-968B-AF3DD03485A6.jpeg

She always had a 2” lift on. So I’m sticking with that. However I’ve put a 4 degree bend on the trailing arms so the bush sits better.
E7EB9624-E35B-4C1A-8954-5DE704EDDD82.jpeg

CA562CF5-0674-4342-9372-3CB6ECE74957.jpeg

chassis has had its first coat of black. Got to finish that. Axles are painted so my next jobs building them back up ,and the wheels landed today I went for 305.70.16 on steel with a 35mm offsett So I’m hoping she’ll be on her Feet soon
92A8FD28-D9F8-4CBB-9CE2-66283DF13681.jpeg

E52BC5E1-85E8-471E-B3E0-DEB3D6218805.jpeg
 
Just found this thread and read start to finish. Brilliant!! Your work is superb. I'll be following with interest. All the best. Steve.
 
I’m on piping then back brakes. I think the runs look right from the callipers to the bracket on the diff. But the mud shields aren’t on yet. And I’ve done away with the anti roll bars on the back. I’ll put some dislocation cones on
30BEEB03-981D-4A4C-BFF9-5C0DA38FA34A.jpeg

B7C66B7E-3A92-440E-8D43-7EE210813409.jpeg

But I couldnt seem to find extended hoses individually. So I got some SS ones that you make up yourself. But I think the original must have come from a mount on the body ? But I’ve had to come off the chassis. Will this be ok ?
A9A19D94-8BAD-4E56-B9C5-EBEAEE57A06D.jpeg

72FE27D7-8420-4614-8905-B8660CA3EFB5.jpeg

C64E6E24-DF07-47DF-AFB6-1831F46564FB.jpeg

I’m going to change the route of the brake pipe from over the crossmember to under it as the fuel pipe will end up crossing over it. I think I will also make a flexy up under the cab were the brake pipe leaves the chassis and goes onto the body to take up any movement between them. ?
 
On my RRC the brake pipe is indeed clipped to the underside of the body, i think theres a bracket on a boot floor xmember where it joins to the flexi.
Fantastic work so far :cool:
 
I’m on piping then back brakes. I think the runs look right from the callipers to the bracket on the diff. But the mud shields aren’t on yet. And I’ve done away with the anti roll bars on the back. I’ll put some dislocation cones on
View attachment 219888
View attachment 219889
But I couldnt seem to find extended hoses individually. So I got some SS ones that you make up yourself. But I think the original must have come from a mount on the body ? But I’ve had to come off the chassis. Will this be ok ?
View attachment 219891
View attachment 219892
View attachment 219893
I’m going to change the route of the brake pipe from over the crossmember to under it as the fuel pipe will end up crossing over it. I think I will also make a flexy up under the cab were the brake pipe leaves the chassis and goes onto the body to take up any movement between them. ?

The original hard copper lines should run along the chassis rail (drivers side) to a small hole in a body mount. This is where the hard line stops and goes to the flexi. I have a photo of my rebuild, but it’s not great, hopefully you get an idea of where it should go originally. It doesn’t make a great deal of difference where you mount it, so long as you can bleed them ok.

upload_2020-9-24_8-24-12.jpeg


As a side note, personally, I don’t bother with the mud/stone shields on discs. I think they can cause more crap to stay stuck around the brakes. Mine are removed from the front discs (drums on the back).

Edit: found another photo showing the location from the underside.
 
Last edited:
Well I’ve started to pull the engine to bits to rebuild it. It was running fine but when I’m this far in I thought I may as well do it. Got the block cleaned up masked up and painted.
66044BAC-33F6-415E-A22D-61E26DC55C54.jpeg

A6433938-1425-41FF-B464-4EE49D00DE0F.jpeg

I was getting on canny with the head. Looked good so I clean the ports then removed the cast marks from them and gave them a bit of a polish
A0B2A056-D9A4-41C8-A3F7-1FD4164E64F3.jpeg

I cleaned it with brake cleaner and de greaser then gave it a good soak and a wash. I suggested putting it in the dishwasher The the utility sink was as far as it got. No vision some women!
B9D4C108-FC2A-41E6-9323-F48D3C6326E8.jpeg

it came up bloody lovely but !!
Found two cracks between 2 and 3 cylinder valves. Had a look on the net and seems common on 200’s. Thought it’s goosed any way so had a go at welding it
93ABCB4C-629F-47D6-8F58-E8856BBEC7A7.jpeg

B32F0A92-4808-4BC7-A700-C4EF31E364A6.jpeg

BCD7DD8F-B477-490D-B0EF-E58C07200F31.jpeg

it turned out ok alert from marking the seats which I could re cut if I had a cutter. But I’m not going to use it. It I don’t want to take the chance. I’ve managed to get a good second hand one but I haven’t seen it yet like. I thought about swapping it for a 300tdi head. But them changed my mind. Fingers crossed this one coming is ok.
Meanwhile I had ago at nikel plating. Just watched a couple of vids on YouTube, Seems easy enough. Did the lift bracket and the feeder hose for the turbo
Quick clean with a wire wheel. I stuck them in brick acid for 5 mins. Washed them off. Then in the electrolyte I’d man up for about 20 mins. Seems a decent coat. We’ll see
6A442CC4-839B-4AB9-A279-30BE3D47CB9E.jpeg

4284918A-EBF4-40AC-AC6C-3DE065D3DC1D.jpeg

9F29F9CB-8F58-4BE1-A705-1CFAEA156F89.jpeg

43133070-BBDF-4FCE-A0D1-FA86F9C0C0D7.jpeg

58F8FF49-0A2A-4EC7-8624-C4E52C6302B7.jpeg
 

Attachments

  • 94BFB3B0-35D5-4C7E-8708-59507A9DF2E0.jpeg
    94BFB3B0-35D5-4C7E-8708-59507A9DF2E0.jpeg
    52.2 KB · Views: 90
Hi folks. My build is coming along. Slow at times but I’m blaming that on the pub being open again. I rebuild the engine, Box and transfer box. And it’s back in and running now. Came up with a plan to use a newage 1:1 transfer box to get the drive to the back axle. Wasn’t sure at first. But then found a lad who had do the very same. And reckons they are perfect. I’ve change the setup I’d done with a panhard arm on the middle axle and made a centre carrier for the prop using the front transfer box output shaft. The splines are the same on both ends to take the flanges. Welded the inside one one. And turned the dog gear off so a bearing slid over. Going to make some new trailing arms now with Johnny joints. I’m pretty please with proportions. Put a 2” body lift on too to help clear the cradle for the other transfer box. Just got 1 prop to sort as it has a 1480 series joint on it. I shortened a prop for between the two transfer boxes. I’ve run it up without the half shafts in. And it’s all good. Still a bit to do. But there’s light at the end of the tunnel
E36D0813-3196-469A-B35A-1BF2A6E059FF.jpeg

40F0C11B-7E27-4990-A301-73E2CB1A8806.jpeg

6312F199-5167-4E97-B10E-917C6716DFCF.jpeg

9DD101CE-9E57-48C5-8A8B-A3FB730AFB61.jpeg

4F559163-E4A6-4E8E-9076-3791D784F65F.jpeg

3E866A16-227A-4088-9E71-C3769DB23A80.jpeg
FB4521C3-4CAB-43F4-B1DA-49B81D5DD4A2.jpeg

Ah and making a liner for the back of the cab. I put stuck carpet protector the the body panels first. The used expanding foam. I’ve cut it and sanded it roughly to shape, I’ll take it back out now. It’ll be in 4 sections. I’ll finish it off. Then spray glue 0.3 fibreglass mat to both sides. Then use 4 way stretch fabric on the face.
 
Back
Top