OK, update time again. I've realised why I put the panhard rod on the wrong way around - firstly it's the bend in the rod that just looks like it wants to wrap around the diff (and presumably does on the LHD version), but secondly the diagram in the Haynes manual shows it on that way! I don't actually have that any photos clearly showing the panhard rod in place as presumably I thought it was obvious.
Anyway, let's move on. With the chassis now able to support some weight, I could finally put the engine back in and free up some space in the garage. I haven't been able to do anything on the engine with it dangling, and hopefully fixing it to the chassis will make it a bit easier to work on. The block's looking a bit on the rusty side, but I'm not sure it's worth painting it, is it?
View attachment 219306
Look, loads of room
View attachment 219307
I'll just pop in a few pictures of the engine in case anyone spots anything awry. I'm fairly sure I've put it in the right way around anyway!
View attachment 219308
Clutch end
View attachment 219309
Fan end. While we're looking at this, does anyone know why the fan blades aren't evenly spaced? Presumably there's a good reason for it, but I can't think what it is!
View attachment 219310
Turbo and exhaust side
View attachment 219311
I'd noticed a lot of oil around the bottom of the flywheel housing and assumed that the crankshaft oil seal was leaking, so I stripped down the rear of the engine.
Clutch out. I've got a new one to replace it although to my extremely untrained eye it looks like there's plenty of life left in it.
View attachment 219312
Flywheel off
View attachment 219313
The housing has got quite a bit of oil and grease in it but not as much as I was expecting. The seal looked fine - certainly there wasn't anything obvious wrong with it.
View attachment 219314
With the housing off you can see a lot more of the oil that was obvious from the outside. I'm not sure where this has come from. Maybe a leak down the back of the gasket?
View attachment 219315
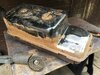
I've taken the sump off as it's looking quite rusty underneath. Inside it's all looking fine though. Any idea how best to get the old sealant off?
View attachment 219316
And this is the grand total of stuff found in the sump. Barely any sludge either. I initially thought the black bit was a chunk of metal but it's some sort of rubber. The washer is made of plastic, so hopefully it's not caused any damage on its way through. Any idea where it came from?
View attachment 219317
Once the sump's been cleaned up a bit, I discovered the imprint of the oil strainer in the bottom. Should I be looking at adjusting something here to stop it rubbing?
View attachment 219318
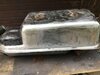
And this is the outside of the sump. It needs a good clean-up and a lick of paint but luckily the rust's not gone too deep.
View attachment 219319
Just one final question - this post seems to have a lot of them. Should I drop the ladder frame as well and re-seal it? This corner here is where most of the oil was obvious. Is it common for oil leaks to occur between the block and the frame?
View attachment 219320
So that's where I'm up to now. I'm hoping to get a full day in soon to get a load of bits cleaned and painted as they're cluttering up the workbench.