1993 Defender 90 Rebuild

This site contains affiliate links for which LandyZone may be compensated if you make a purchase.
Bearmach had one on today, finished at 4pm.
The trouble is that Bearmach only discount their own branded products, which is useless if you're trying to stick with OEM where you can. They have these "quick, buy now, our once in a lifetime offer expires in half an hour" sales, then they'll either extend them by a couple of days or have another one next week. Plus the debacle with the swivel ball has put me off a bit.
 
The trouble is that Bearmach only discount their own branded products, which is useless if you're trying to stick with OEM where you can. They have these "quick, buy now, our once in a lifetime offer expires in half an hour" sales, then they'll either extend them by a couple of days or have another one next week. Plus the debacle with the swivel ball has put me off a bit.
To be honest, I have used Paddocks and never had any issues with them. I have had issues with one or two Britpart items but they are only the distrubuter / retailer. Many other suppliers are good and I use them all as the interweb allows some price comparison. Bearmach website is not too user friendly in my opinion, even after the change.
 
Last edited:
And two years later, we're getting back into things again. Don't ask!

I've rubbed down and resprayed the calipers in proper caliper paint after the Buzzweld High Temperature Silver paint rusted through just sitting in the workshop.
IMG_20230619_091108636.jpg


Painted and rebuilt the radiator frame with stainless bolts and a new radiator. The intercooler looks rough next to the nice shiny radiator but it's got some life left in it yet.
IMG_20230619_221407680.jpg


Also rebuilt the heater box. I used some 5mm self-adhesive neoprene sheeting from eBay to replace the old foam pads on the vent flaps as they'd disintegrated to nothing.
IMG_20230621_112917115.jpg
IMG_20230624_124718216.jpg

All ready for fitting, with extortionately priced rubber seal attached.
IMG_20230624_190511056.jpg


Hopefully more to follow on a more frequent basis!
 
Looking good, glad you're back at it ...

I rebuilt my heater too, the seals are indeed silly money.
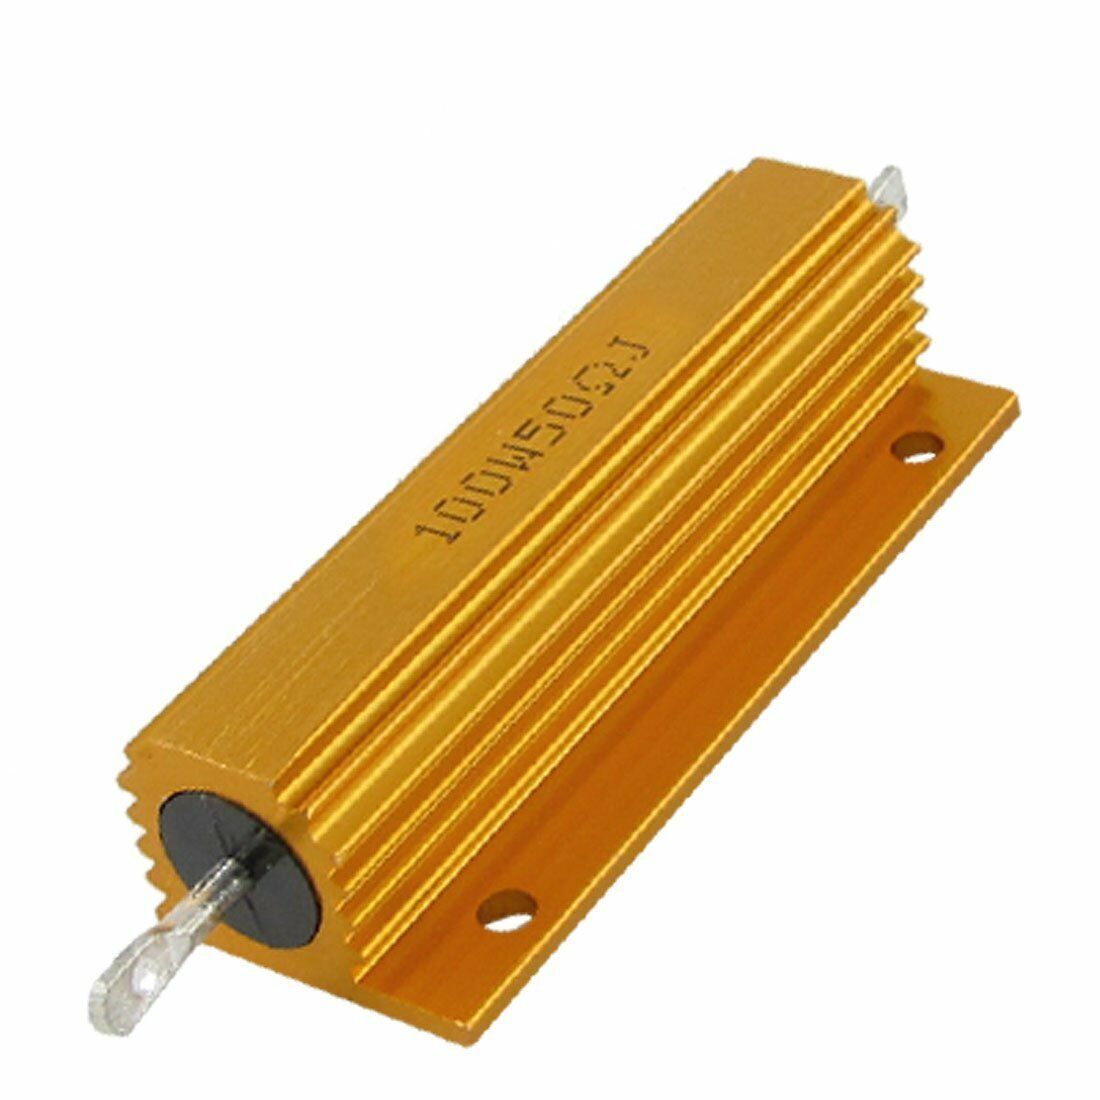
Have you changed out the resistor ?

Since you went, Bearmach (you mentioned them in your last post) have bitten the dust and Britpart now own pretty much everyone else ....
 
Looking good, glad you're back at it ...

I rebuilt my heater too, the seals are indeed silly money.
Have you changed out the resistor ?

Since you went, Bearmach (you mentioned them in your last post) have bitten the dust and Britpart now own pretty much everyone else ....
Thanks, I feel like I've been out of the loop a bit!

I didn't change the resistor, but it looked alright and was working fine when I last used it (in 2009!). Fingers crossed, but it's not a huge job to replace it if it turns out to be knackered.
 
The standard is a 10R
If you fit a lower resistance (say 4R) the 'slow' speed will be slightly quicker.

This resistor will be the same speed, put 2 in parallel and it will be a bit quicker, Just screw them to the plate so they are inside the blower.
 
And two years later, we're getting back into things again. Don't ask!

I've rubbed down and resprayed the calipers in proper caliper paint after the Buzzweld High Temperature Silver paint rusted through just sitting in the workshop.
View attachment 291554

Painted and rebuilt the radiator frame with stainless bolts and a new radiator. The intercooler looks rough next to the nice shiny radiator but it's got some life left in it yet.
View attachment 291552

Also rebuilt the heater box. I used some 5mm self-adhesive neoprene sheeting from eBay to replace the old foam pads on the vent flaps as they'd disintegrated to nothing.
View attachment 291551View attachment 291550
All ready for fitting, with extortionately priced rubber seal attached.
View attachment 291549

Hopefully more to follow on a more frequent basis!
Great to see you are back in the garage. Looking forward to the next post.
 
I've done a few small jobs while I summon up the courage to deal with an oil leak between the gearbox and engine.

First job was to remove the old battery box from the seat box.
1.jpg


The old one was rusted through quite badly so I bought an aluminium job to replace it, although I haven't got as far as assembling it yet.
2.jpg


I cleaned up and repainted the steering column components
3.jpg


4.jpg
5.jpg


And started on the brake tower, which took more time to sort out than these photos would have you believe
6.jpg
7.jpg
8.jpg


It doesn't look too shabby in the end, and is now put in the pile of bits to reattach once the bulkhead is painted and attached.
9.jpg


I finally got around to removing the rusty cappings from the tub. One side had completely rusted through in two places. I've got some galvanised ones to replace them.
10.jpg


I've removed the rusty fuel filler tube and will treat myself to a nice new one. The galv hasn't held up too well. I finally managed to unseize the fuel cap and stripped and rebuilt it, not helped by having to search through every box in the garage for the keys.
11.jpg


I've also got replacement rear quarter panels as the corrosion is pretty bad and there's a bit of collision damage on this side
12.jpg


Unfortunately the part Paddocks sent comes with its own damage. Hopefully it will flatten out without too much trouble, but it's a bit irritating.
13.jpg


And completely jumping the gun, I've started fitting the heated mirror kit from MUD UK, just for a quick and satistfying job that I can actually complete in a reasonable time.
15.jpg


And finally, I have a decent engine crane that I can use to split the gearbox without having to call in favours. Facebook Marketplace to the rescue once more.
16.jpg
 
Great progress Tim,

you may have seen the post about my oil leak, my advice is do it now before the rebuild is complete. A word of warning from experts, make sure the clutch plate is in the correct way😄 when reassembling.
 
Great progress Tim,

you may have seen the post about my oil leak, my advice is do it now before the rebuild is complete. A word of warning from experts, make sure the clutch plate is in the correct way😄 when reassembling.
Thanks. I'm still not 100% sure that the oil is coming from the rear crankshaft seal, but as the engine hasn't been run and flung oil everywhere I'm hoping that it will be relatively easy to trace. And I'll double-check the clutch plate when it all goes back together!

I've also bought the Britannica Restorations Super Duty clutch fork which I probably should have done first time around. I don't want to have to take this all apart again in a hurry.
 
Looking good Tim.

I'd definately recommend examining and probably changing the rear crankcase oil seal now, as you car is somewhat undressed and it's easy to get at.
The trouble is, I've already done it once. Twice if you count the one I knackered trying to drive it in the first time! At £15 a pop it's an expensive habit.
 
Happy Tirran😄

I may have a weeping breather pipe from the cylinder head back to the sump, but nothing to be concerned about, and certainly not £40 worth of oil pipe concerned.
 
Just finished reading this and you haven't finished it yet :oops: 😉
Looking great, so far though 👍
Thanks, I think! A house move and loads of DIY projects threw a spanner in the works but I'm getting back on track. I'll find some time to post another update soon. Paint arriving on Monday so hopefully a painted bulkhead before too long, then things should start looking a bit more convincing.
 
Several thousand spot welds drilled out and the rear quarter panel finally came off
IMG_20230902_135941516.jpg


Then off with the gearbox (again)
IMG_20230907_180958986.jpg


Which firstly proved that there was no problem with the crankshaft oil seal, but also allowed me to fit the Britannica Restorations Super Duty clutch fork which I splashed out on after a couple of drinks one evening.
IMG_20230924_142021065.jpg


I cut up some of the aluminium from the old rear quarter to make a patch to cover that hole in the bellhousing
IMG_20230924_142034785.jpg


And then rubbed off any of the remaining Buzzweld rubbish and resprayed the gearbox (and engine block). In proper black enamel engine paint this time.
IMG_20230924_162313143.jpg


I modified an old angle bracket to create a tool to lock the crankshaft damper while I tightened the crankshaft bolt to some insane torque that equated to me sitting on the end of a long bar. First time my grandad's old arc welder has been used in a good couple of decades.
IMG_20231021_105715732.jpg


And the engine side of things is starting to take shape. A bit of paint works wonders on the gearbox and engine.
IMG_20231021_130821891.jpg


And I spent a good couple of hours filing down all of the spikes left from the galvanising process before giving it a coat of phosphoric acid. Now I've spent some time getting up close and personal with the bulkhead I can see there's quite a bit of warping on a couple of the panels, which is annoying. Hopefully nothing that will be obvious.
IMG_20231021_180919555.jpg


Next on the list: Drill any holes that were on the old bulkhead but aren't on this one, tidy the garage enough to be able to assemble a spray booth, spray and fit bulkhead. Could be interesting.
 
Back
Top