My Defender 90 200tdi rebuild

This site contains affiliate links for which LandyZone may be compensated if you make a purchase.

Tirran

Well-Known Member
Posts
227
Location
South Lanarkshire
Decided to buy and rebuild a defender 90. Why, well why not, daily driver is modern German and meets the daily family needs. Although i’ve Had 4 landrovers , a 1974 series 3 that was ex BT and the yellow paint would sneak out every now and then, two Discovery 2 and a L322 Range Rover honestly the best car I ever owned but too expensive to run latterly.

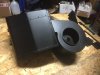
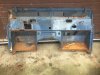
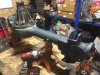
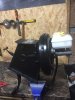
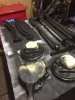
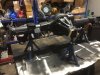
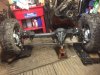
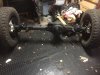
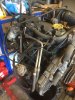
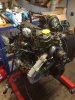
Anyway, my D90 resto bought specifically for this project, with a very rusted chassis, usual bulkhead issues, but otherwise not too bad (so far).

My plan has no specific end date otherwise I fear I will rush to finish and miss the whole point of doing it in the first place. I don’t have unlimited time or indeed funds so the approach will be strip down, start to refurb those parts I can save then buy the replacement chassis and start the rebuild.

I’m not looking to modify much from standard, keeping the 200 tdi and only adding items that will improve the running and drive ability of the 90. This means i’ll Be on this forum looking for advice, information and no doubt encouragement as the tedious scraping and cleaning continues.

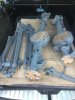
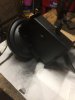
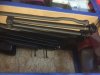
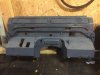
I intend to update this as I go so here are the first of the pics of the strip down.

Cheers

upload_2019-8-11_21-6-20.jpeg
 
Some slow progress but progress all the same. Bulkhead off to have the repair panels fitted by local motor engineer who can weld way better than me.

Rear axle was swollen near the diff housing with rust so a replacement has been purchased and all of the axle cases, Panhard rod, drag links, radius arms have been blasted. Waiting on my delivery of Buzzweld CIO to paint them prior to rebuild.

heater unit, stripped, cleaned, painted, new labels, internal foam and matrix fitted.
Steering box checked, cleaned and painted. Drop link was a b****r to remove even with the special tool.
Disc brake shields cleaned and painted.

a very , very long list of parts created, a worthwhile exercise as some replacement parts come up on eBay and the like, if you know you need it and the price a bargain can be had.

The seat runners on the frames have been stuck so, now freed off, with all upholstery removed.

more to do over the Christmas holidays.View attachment 196369View attachment 196369 View attachment 196369 View attachment 196369 View attachment 196369
 
Some photos, front axle brackets are being replaced this week so they can be painted and rebuilt
 

Attachments

  • 3525F5C2-C927-49B1-997B-B19A0B5BBDCB.jpeg
    3525F5C2-C927-49B1-997B-B19A0B5BBDCB.jpeg
    47.4 KB · Views: 424
  • F58030E6-6246-4DF0-966E-AD96A5EE2755.jpeg
    F58030E6-6246-4DF0-966E-AD96A5EE2755.jpeg
    51.3 KB · Views: 385
Well, had to buy a replacement bulkhead as the original, although repairable was going to cost too much to repair in terms of the garage bill. Unfortunately, I don’t weld so this was where the costs were.

I managed to get one from Emmotts of Colne, an original one that really only needed a passenger footwell repair panel which is being fitted now. I’ll have the bulkhead prepped and painted in primer as the top coat will be done once all the panels are repaired and prepped for top coat.
Off to do some work on the pedal assemblies and order all the parts to rebuild the axles before they are painted with Buzzweld Chassis in One (CIO). More photos to follow.
 

Attachments

  • 23B6392E-BA8C-46BC-A2D7-DD00B92F605B.jpeg
    23B6392E-BA8C-46BC-A2D7-DD00B92F605B.jpeg
    356.6 KB · Views: 425
  • DA71DB7E-DDC7-45C4-A4BE-30061D8B0514.jpeg
    DA71DB7E-DDC7-45C4-A4BE-30061D8B0514.jpeg
    270.3 KB · Views: 400
More progress, clutch pedal and brake pedal assemblies clean and painted with new master cylinders fitted.
Front axle reassembly has started, diff casing needs cleaning before it’s all painted with Buzzweld CIO.

A large quantity of new parts have arrived from Paddocks and Bearmach to rebuild the axles, I decided to replace all bearings, stubs etc as no point in having to strip it down later to do a repair.

a few pics on my slow progress.
 

Attachments

  • 71FE7994-8E16-474B-A626-3F2760D81562.jpeg
    71FE7994-8E16-474B-A626-3F2760D81562.jpeg
    293 KB · Views: 399
  • 68A43E6F-6DC6-4687-BFE6-1137190A8823.jpeg
    68A43E6F-6DC6-4687-BFE6-1137190A8823.jpeg
    329.6 KB · Views: 363
  • E93B733F-E717-4E33-B199-17B6DE681023.jpeg
    E93B733F-E717-4E33-B199-17B6DE681023.jpeg
    402.6 KB · Views: 376
More slooooow progress

hope to complete the rear axle this weekend.
The bulkhead has been painted in the original colour, need to collect it from the paint shop then start the assembly.
 

Attachments

  • 801E2E68-8558-4BCF-9957-46A62C66A340.jpeg
    801E2E68-8558-4BCF-9957-46A62C66A340.jpeg
    367.4 KB · Views: 475
  • F0A785F6-4D83-4ED4-90CF-37C3A37B9504.jpeg
    F0A785F6-4D83-4ED4-90CF-37C3A37B9504.jpeg
    59.5 KB · Views: 445
Looking good. I think we're at roughly the same point in our rebuilds so it's interesting to compare notes. I've just started the 'painting bits' stage in the hope of having a rolling chassis in the next couple of months. Might be a bit optimistic but we'll see!
 
Looking good. I think we're at roughly the same point in our rebuilds so it's interesting to compare notes. I've just started the 'painting bits' stage in the hope of having a rolling chassis in the next couple of months. Might be a bit optimistic but we'll see!
Thanks, I finished the axles today with the exception of one mud shield and the axle breathers which will be done at he same time as the brake pipes.

probably the engine next as it is an indoors job, given the weather here a prudent approach.

The body work, tub, doors etc I need to work on out side due to the dust and that I store another car in the garage. I’ll prep them and have them painted later. Then order a new chassis......
 
After going through the same with my 110 a couple of years ago I’d recommend the following minor mods:

Steve Parker extended mud flap kit front & back to close off those mud traps in the chassis & make cleaning a lot easier!

Modified my wash wipe system to include a heatshot (think that’s the name) heater for front washer jets.

Fitted twin windscreen washer jets utilising blanked off hole for wipers depending on whether left or right hand drive. A. Very simple mod and well worth it.

If all your door panels (interior) are loose and fittings broken search Britannica restorations for simple idea to replace the mushroom headed fittings that the fir tree fittings slot on to. Works a treat. Just file off the old broken mushroom heads & use flat headed countersunk self tappers screwed in to enable you to twist on new fir tree fittings.

Replace original plastic instrument binnacle and support frame with an all metal one from Raptor Engineering.
Thanks For the suggestions, I was intending to extend using the Steve Parker mods the others you suggest will be added to the list. It’s great to get the positive feedback and suggestions as the finished article seems ages away so must remain positive.

Resurgam and I are around the same stage in our rebuilds, similar age and surprisingly with the same colour of Land Rover.
 
Mines a family heirloom. 1992 & was my old companies vehicle before I retired & bought it before rebuild! Be worth getting A & B posts galvanised along with tub capping as well.
 
Some more progress. Bulkhead completed and painted in final colour, I’ll post more pics when it is delivered this week from the paint shop.

Both axles now complete, all trailing arms, linkages etc. have new standard bushes fitted and on the shelf awaiting fitment when the chassis is eventually bought.
C66EC7C8-BAAB-42D5-874A-04D913AF9970.jpeg

Steering column checked and painted. On to the parking brake today to strip, paint, adjust and replace as necessary. With the gearbox next to fit a slick shift to the LT77 and change the oil. I was unable to really test the 90 when I bought it due to the extreme poor condition of the chassis. The intention was to send it to Ashcroft for a refurb before refitting however, I’ve decided to refit it as is and remove it later if there are any issues. Saves some cash too,
But more likely just postpones the expenditure.
 

Attachments

  • FC35DFB8-EEFD-40B8-9D87-E942108E519C.jpeg
    FC35DFB8-EEFD-40B8-9D87-E942108E519C.jpeg
    65 KB · Views: 389
  • 65B45AE2-A5DA-4B8C-AAE9-4F129E1A5760.jpeg
    65B45AE2-A5DA-4B8C-AAE9-4F129E1A5760.jpeg
    44.4 KB · Views: 403
  • 72FF2462-B9F9-40E2-BAEF-A5EE5A84C8D6.jpeg
    72FF2462-B9F9-40E2-BAEF-A5EE5A84C8D6.jpeg
    312.9 KB · Views: 411
Last edited:
Bulkhead back all painted ready for rebuilding. Just waiting on some parts from Paddocks to arrive.

a bit dusty as it’s been sitting at the body shop until I made some space. One thing you need when refurbish a Land Rover is SPACE!!
 

Attachments

  • 588A158D-B98D-41C7-909B-B9AE95F8B419.jpeg
    588A158D-B98D-41C7-909B-B9AE95F8B419.jpeg
    50.6 KB · Views: 413
Bulkhead back all painted ready for rebuilding. Just waiting on some parts from Paddocks to arrive.

a bit dusty as it’s been sitting at the body shop until I made some space. One thing you need when refurbish a Land Rover is SPACE!!
Looking good. I'm about to spray all the underbody bits and am also at the waiting for parts stage, but you've stolen a leap on me by having a bulkhead that's not riddled with holes, let alone painted. Good luck with getting the rolling chassis together.
 
Tried to clean off the engine at the weekend using a degreaser and power washer. Disappointing results but it was very thick with grime and oil.
I had thought about doing a full strip down and rebuild, paint etc of the engine however, it was running well before the restoration started and I have decided to service it, replace the timing belt, water pump, set the valves and reinstall. The gearbox & transfer box will be serviced and installed, I can remove if there is a problem.
 

Attachments

  • 9D04E59F-AFC2-459D-8A11-3041C1B0ED0C.jpeg
    9D04E59F-AFC2-459D-8A11-3041C1B0ED0C.jpeg
    70.8 KB · Views: 462
  • 64E093B0-DF0C-4BBD-9E7E-49BC7D208AC9.jpeg
    64E093B0-DF0C-4BBD-9E7E-49BC7D208AC9.jpeg
    63.4 KB · Views: 429
Back
Top