Riggwelter
Active Member
- Posts
- 186
- Location
- Sweden
Norrie, which proportions do you use for paint/thinner?
I tend to try and put it on with no thinners unless I'm struggling then I just add a small amount probably no more than 10%.Norrie, which proportions do you use for paint/thinner?
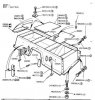
Ok thanks. It did feel a bit tight.Is that a rubber hand brake gaiter as if it is you need to fit it going backwards into the void behind the seat box or it will tear very quickly.
Thanks for the tip, I have just fitted one and found the same as @norried that is was not as flexible as i had hoped.Is that a rubber hand brake gaiter as if it is you need to fit it going backwards into the void behind the seat box or it will tear very quickly.
No that is the way it is designed to be fitted. The quality of the rubbers is poor best option is to make one out of leather.Thanks for the tip, I have just fitted one and found the same as @norried that is was not as flexible as i had hoped.
Does reversing it cause any other problems?
Having turned it around so it is the correct way I now cannot release the handbrake! The rubber pushes it back on at least one click. I think leather would definitly be that way to go!No that is the way it is designed to be fitted. The quality of the rubbers is poor best option is to make one out of leather.


Oh and before anyone says anything I'm going to change the bolts for shorter ones.
")
Welcome To LandyZone, the Land Rover Forums!
Here at LandyZone we have plenty of very knowledgable members so if you have any questions about your Land Rover or just want to connect with other Landy owners, you're in the right place.
Registering is free and easy just click here, we hope to see you on the forums soon!