sp00k
Well-Known Member
- Posts
- 1,530
- Location
- Washington, County Durham, UK
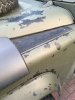
Looks like a good excuse for a heated windscreen to me!
What was the plan??
Cheers

Looks like a good excuse for a heated windscreen to me!
ouch
looks like a rough day in the office /garage / workshop
brave for you fitting therm,, i have removed a few, but never refitted one..
so is it timer for an autoglass call or u going to have another go..?


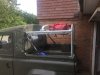
Looks a decent repair to me and I like the ‘patina’ that remains on the wing!
Do you use aerosols or have you got a compressor and spray equipment?
Rich
Blimey! If you want to apply your skills to mine you are welcome! I’ll even provide beer and cakes and maybe even a chippy supper
I have paint peeling off in sheets
It’s the same as the photo but all over!!!
Sounds a good plan and thanks for the tips! Buddy, the 110 looks great!Oh, I also heated my paint before rolling it on. Popped the tin in a bucket of hot water. I didn’t thin mine tho but I was never going to get a perfect finish. What paint did u use Flat? Mine is Satin NATO Green from militaryvehiclepaint.co.uk
Welcome To LandyZone, the Land Rover Forums!
Here at LandyZone we have plenty of very knowledgable members so if you have any questions about your Land Rover or just want to connect with other Landy owners, you're in the right place.
Registering is free and easy just click here, we hope to see you on the forums soon!