How to - 4.4 V8 PCV valve replacement

This site contains affiliate links for which LandyZone may be compensated if you make a purchase.

Deasy

Well-Known Member
Posts
4,070
Location
Warwick-on-the-shire
Right, im going to give it a go a and do a write up of my PCV replacement :D
Although im not great at stuff like this, so prob wont be as good as saintV8's stuff.

If you have a 4.4 v8 i really cant stress this enough to do this if it hasnt been done.

So...
My cam covers started to weep and my MPG started dropping off recently, and when i looked into it and searched around i found out that this is a prety major and common issue on the L322

over_pcv.jpg


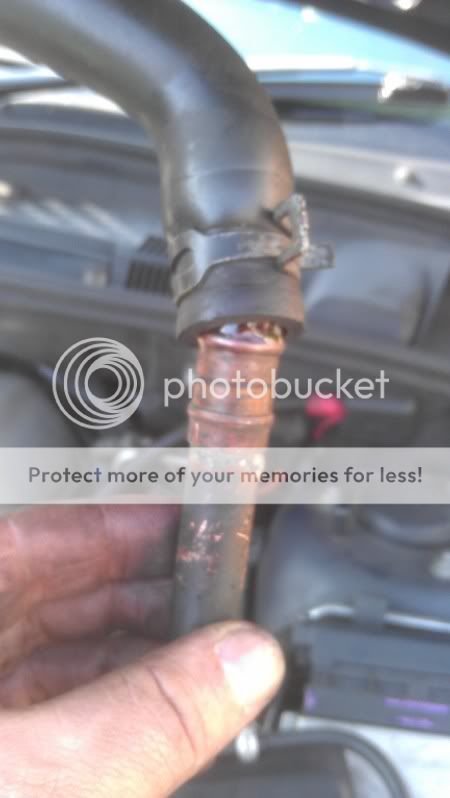
I checked my two top hoses and they were fine, (probably replaced when the LPG kit was fitted)
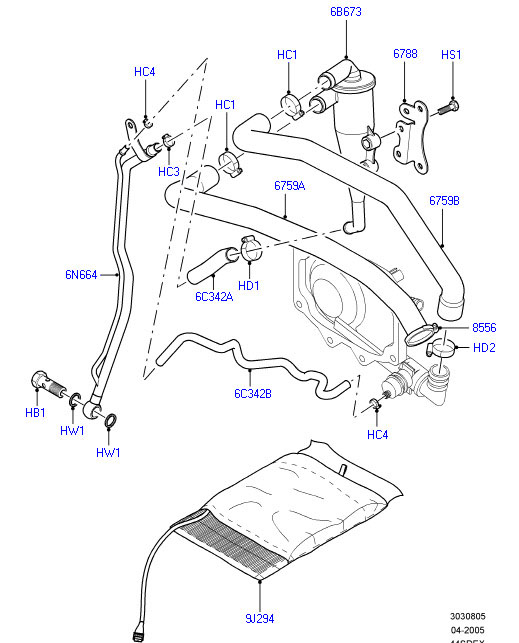
(6759A and 6759B on the diagram)

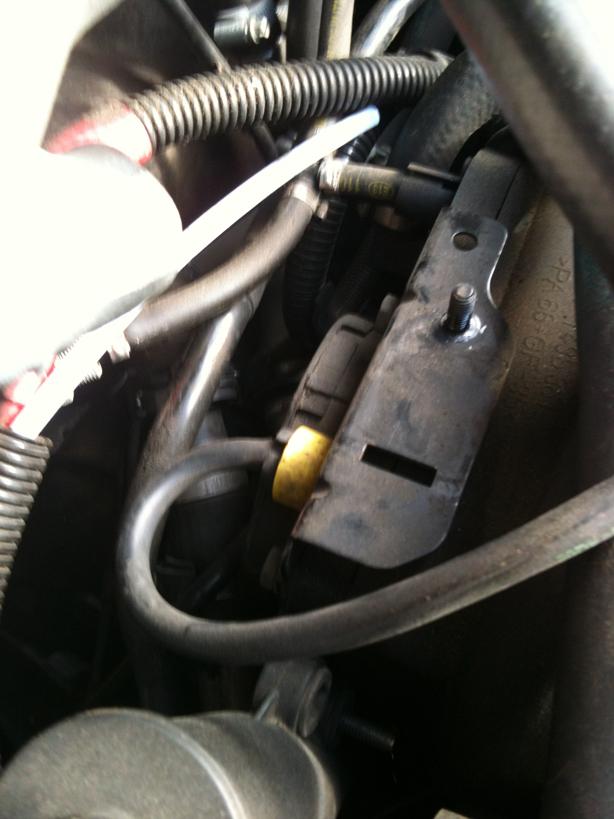
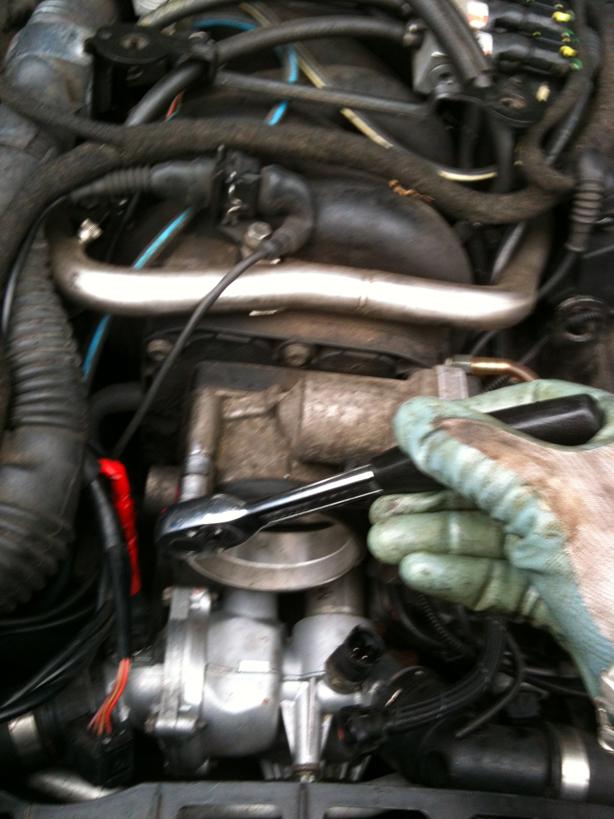
So i removed the cyclone (6B673 on the diagram), which is easy enough, 2 hoses at the top and one at the bottom.
The cyclone is held on by one bolt, and the cyclone itself is threaded so no need to worry about a nut. Just the bolt.

One removed it was clear just how blocked it was with gunk, so i soaked it on degreaser and flushed it out with a hose and left to dry
Sorry i dont have any pics of this, but its fairly self explanatory.

Next i tackled the PCV valve which i bought direct from guy salmon along with the gasket
PCV valve - LKR000040
PCV gasket - LKJ000060

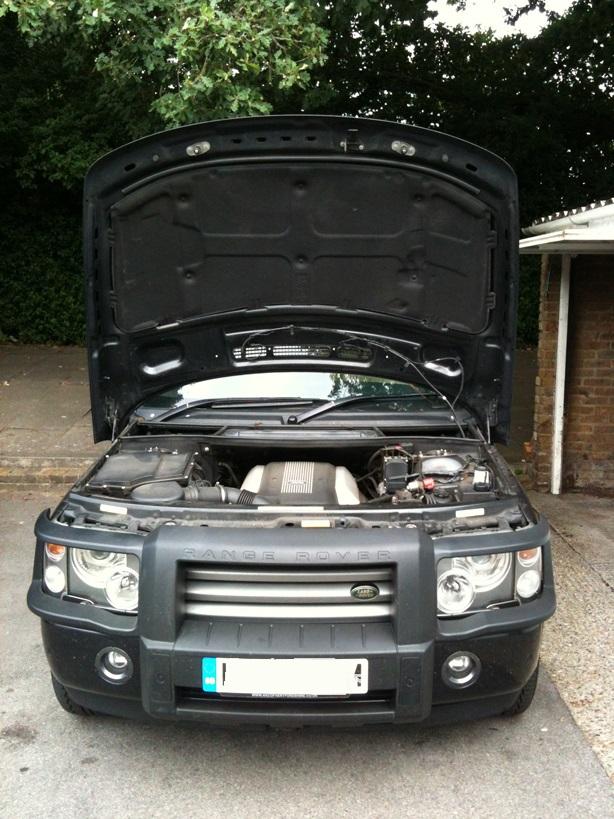
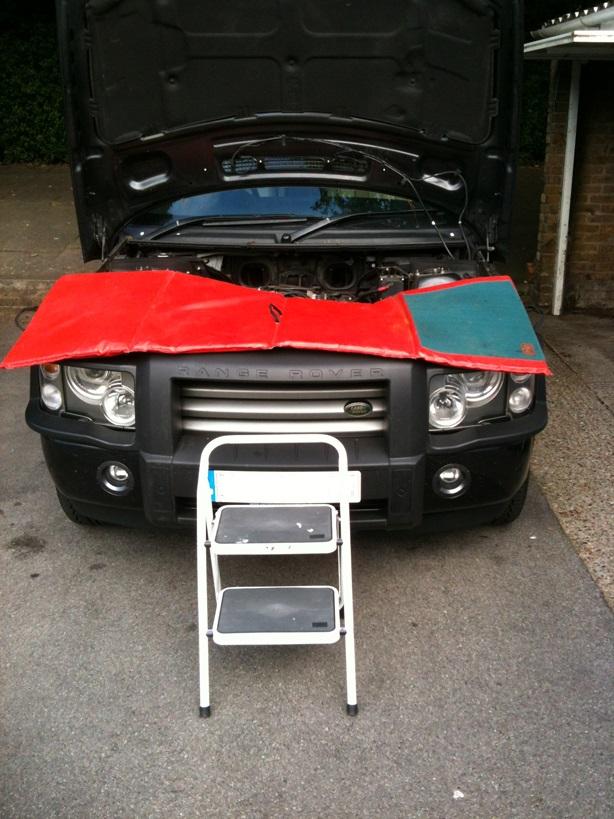
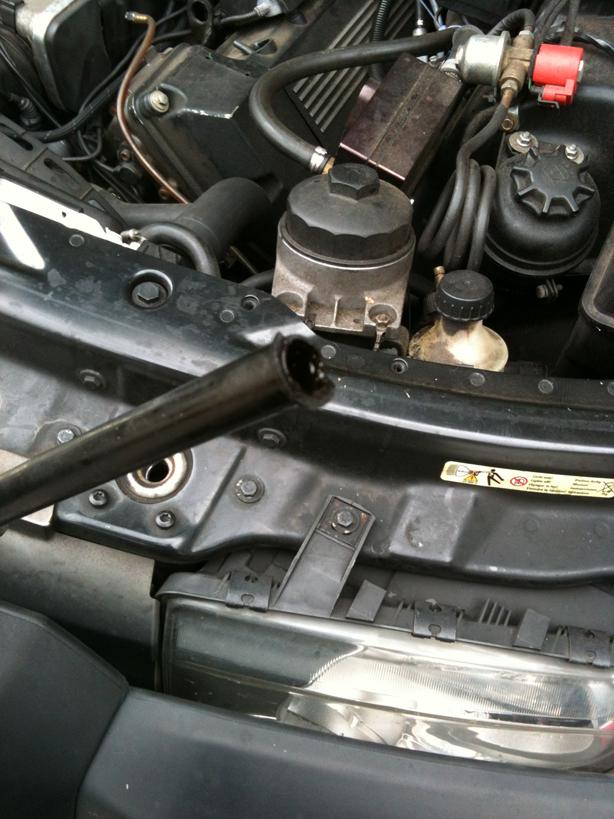
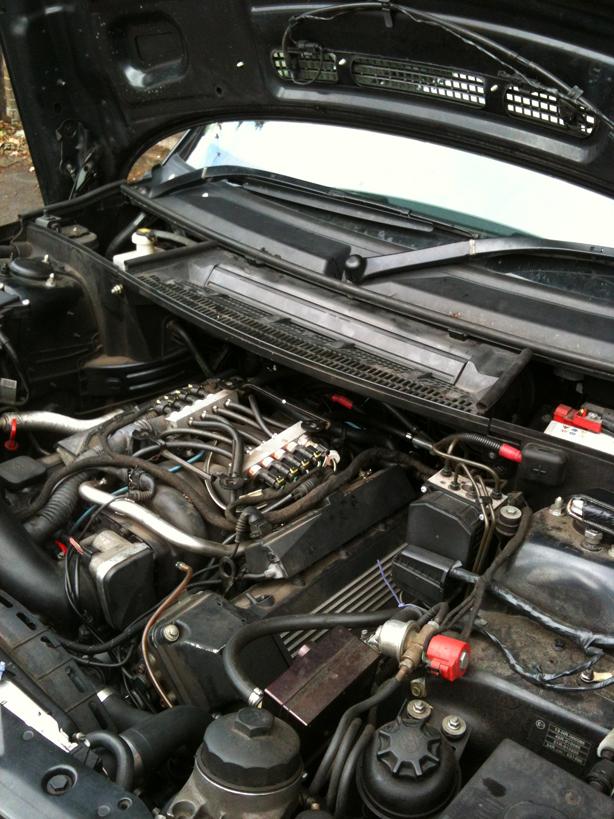
Put the bonnet into service mode by releasing the gas struts and locking it in place
487369D9-5A16-44C1-9C19-D5DD964A3F32-11955-00000D0AEAE54115_zpsc6427863.jpg

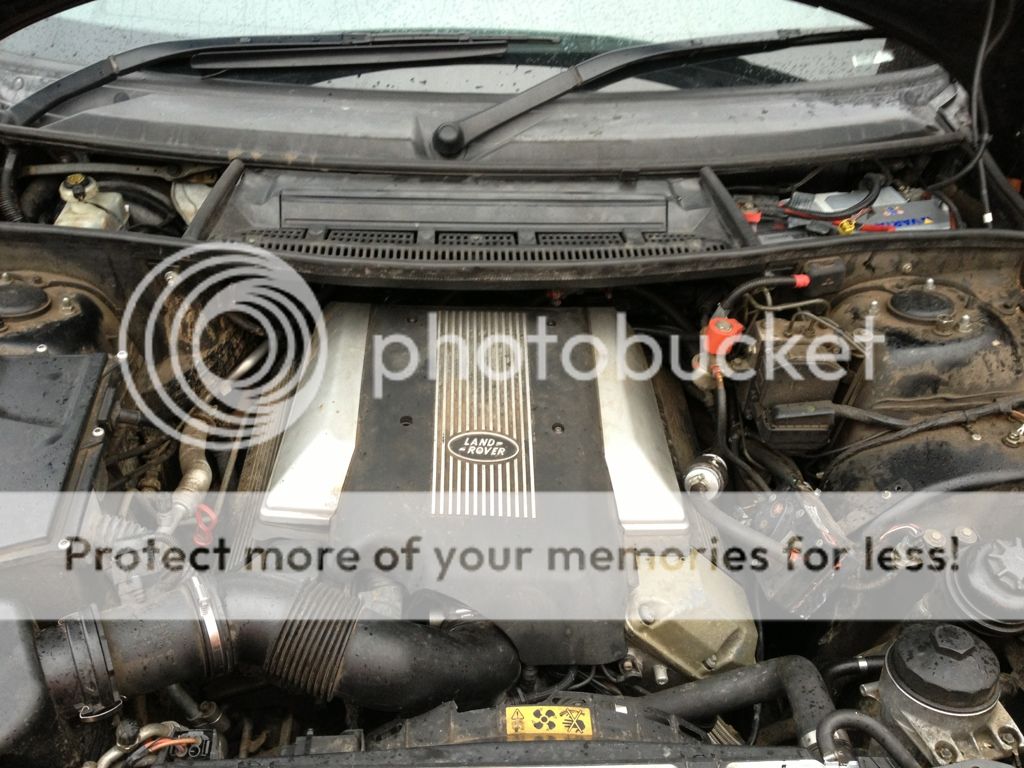
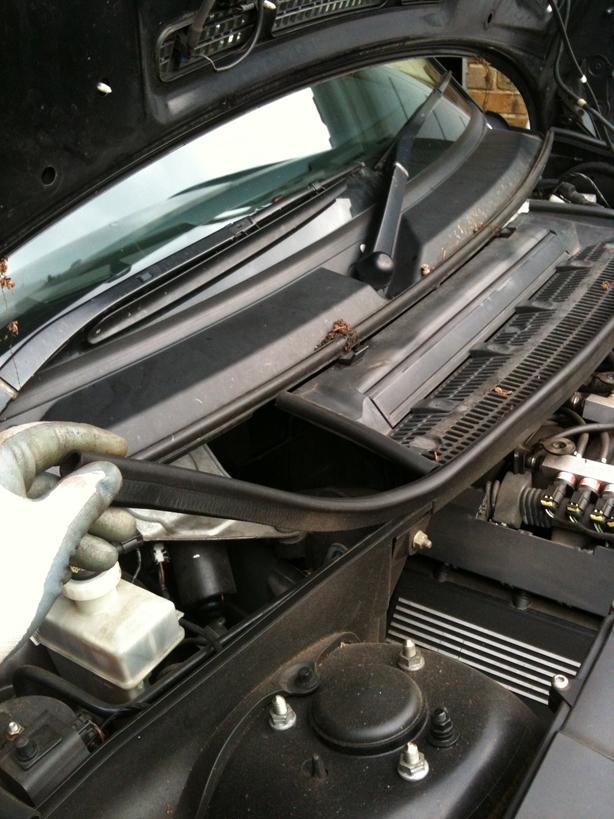
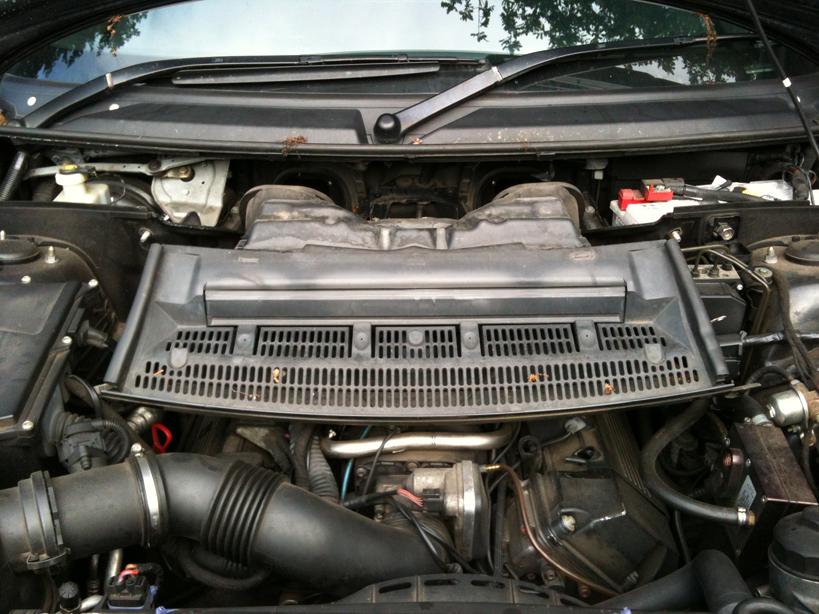
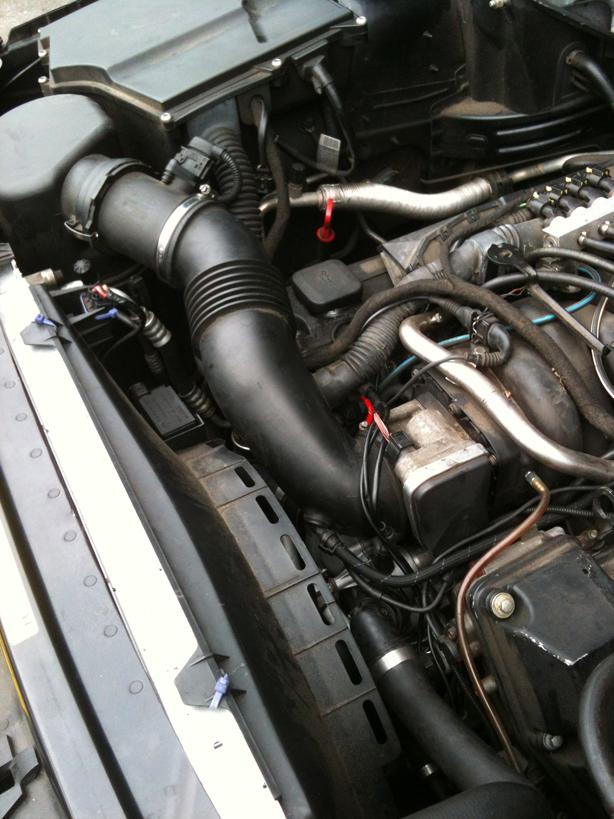
You will need to disconnect the battery and the +lead in the engine bay in order to get the vent block out, the vent block is helt in with 2 13mm nuts, one either side and are obvious, with these 2 removed and the + bat leas disconnected it just slides out with very little effort

9565A456-A94F-4A71-9694-D8A047787DF1-11955-00000D0AF13D052F_zpsea859fdf.jpg

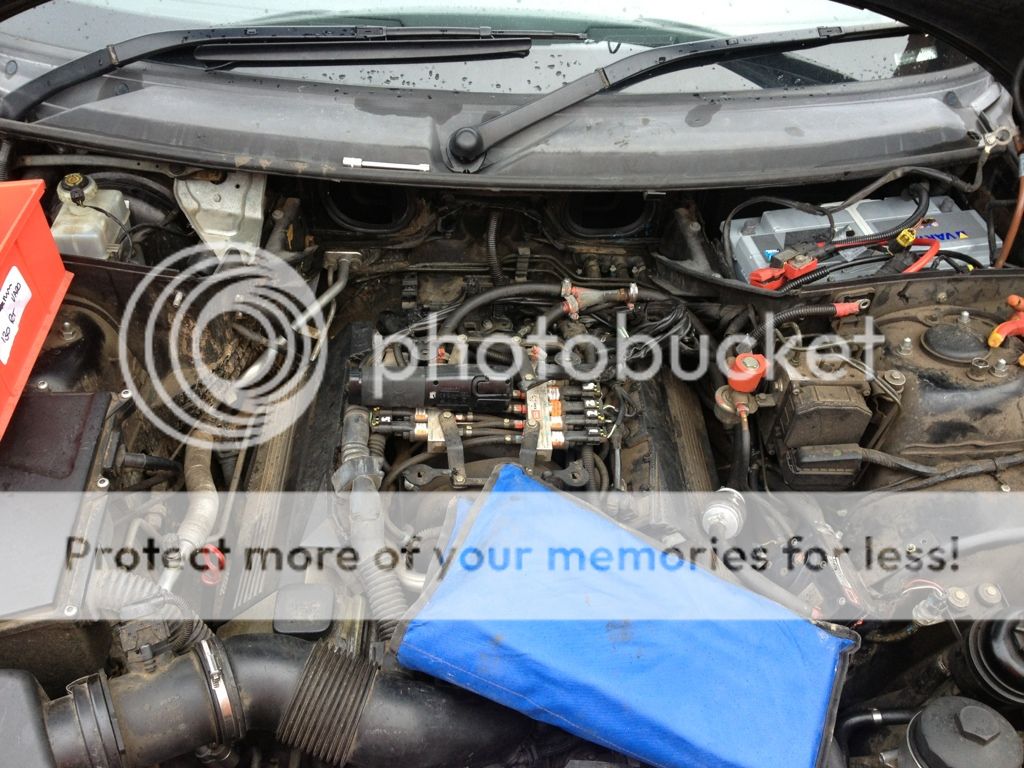
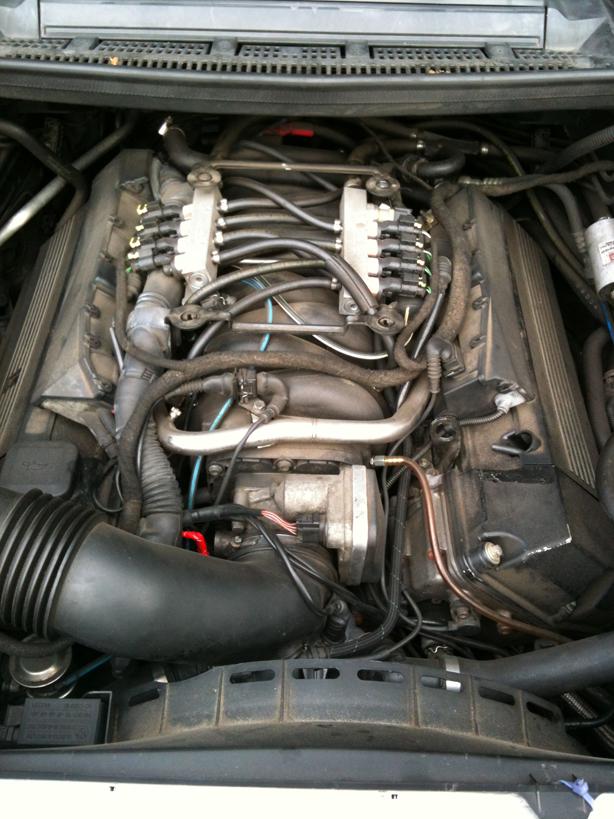
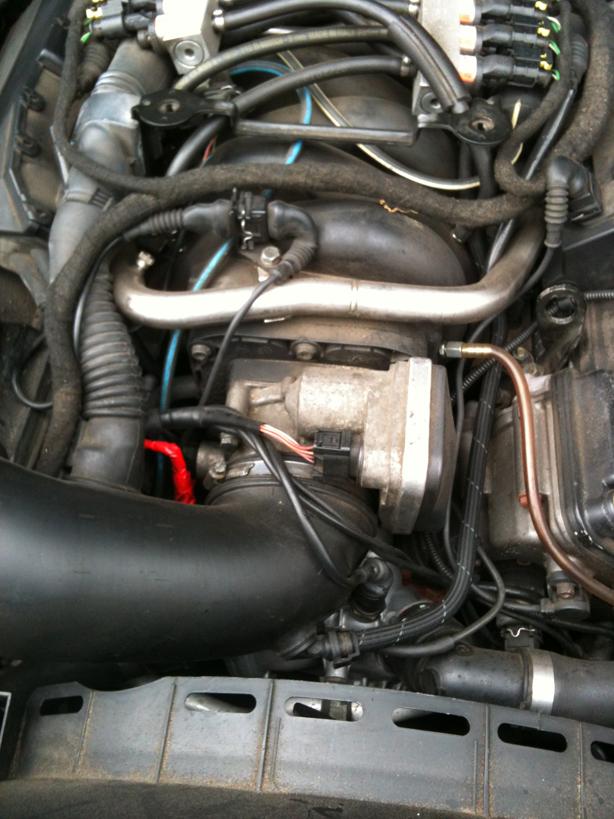
With the vent block removed it makes access to the rear of the engine much easier, the cam covers of the engine is safe and sturdy enough to kneel on, you will need to do this to get youself into position to reach the back of the bay.
I also had a hop up (available from any hardware shop) and the front of the rangie so i could climb in.

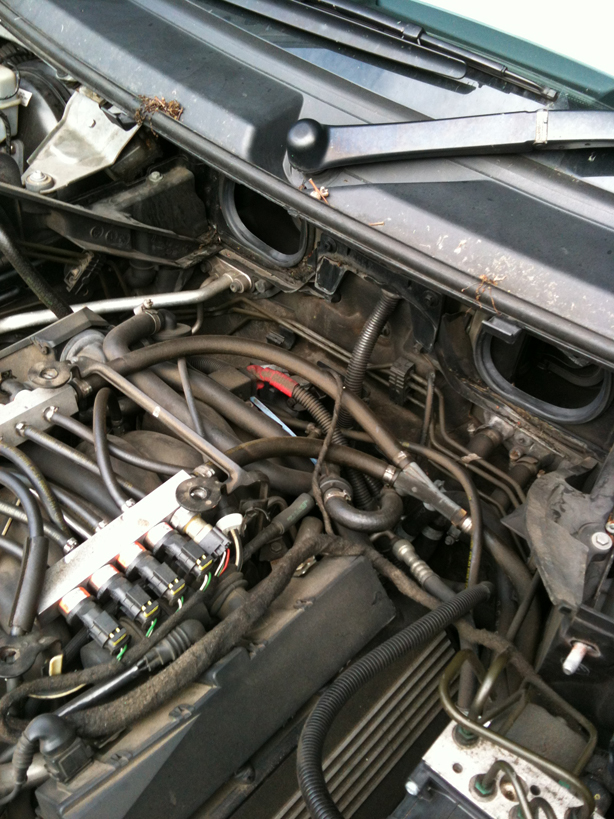
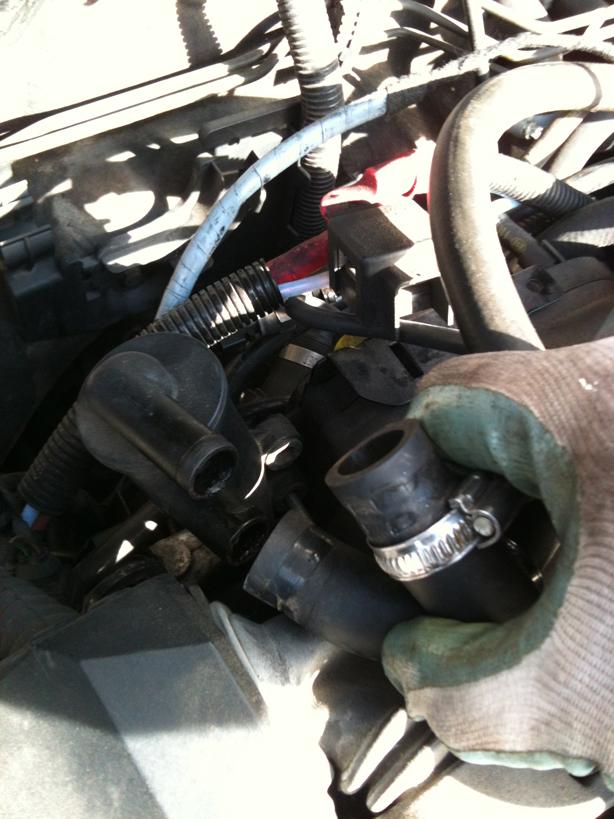
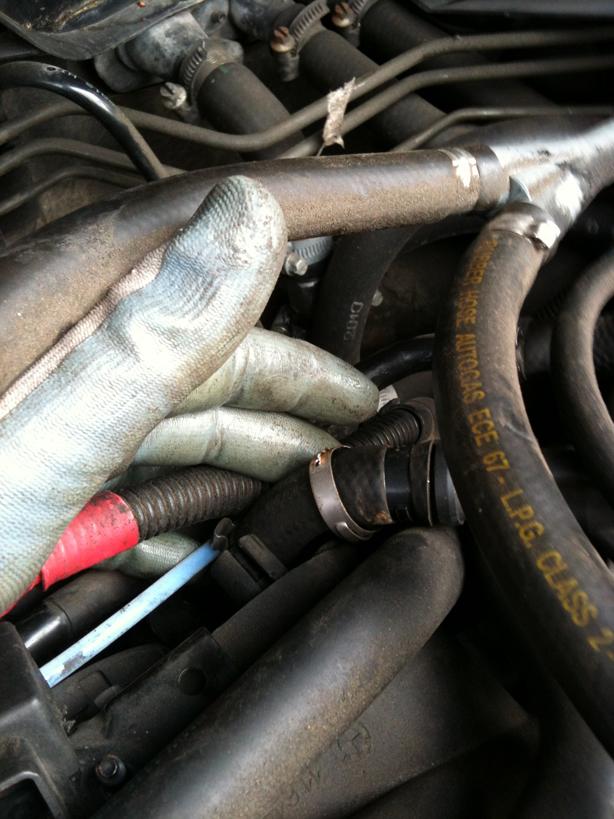
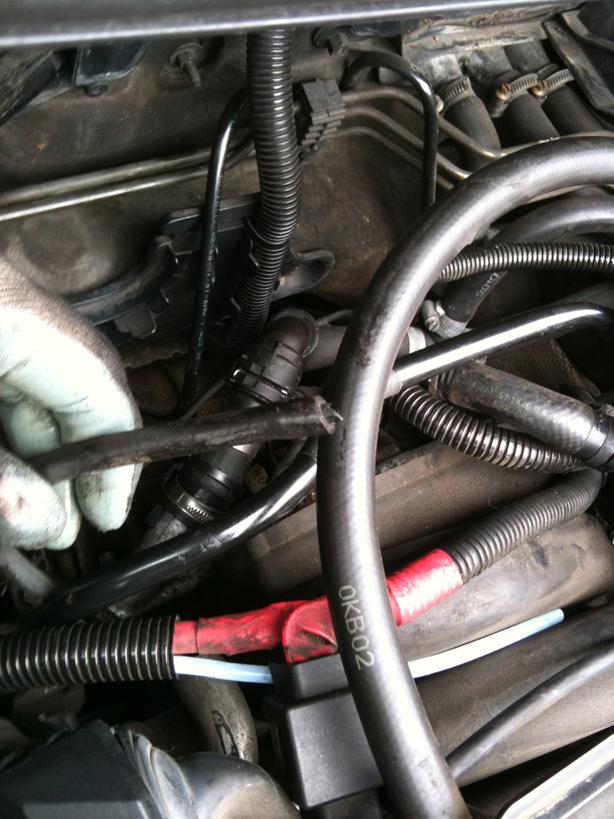
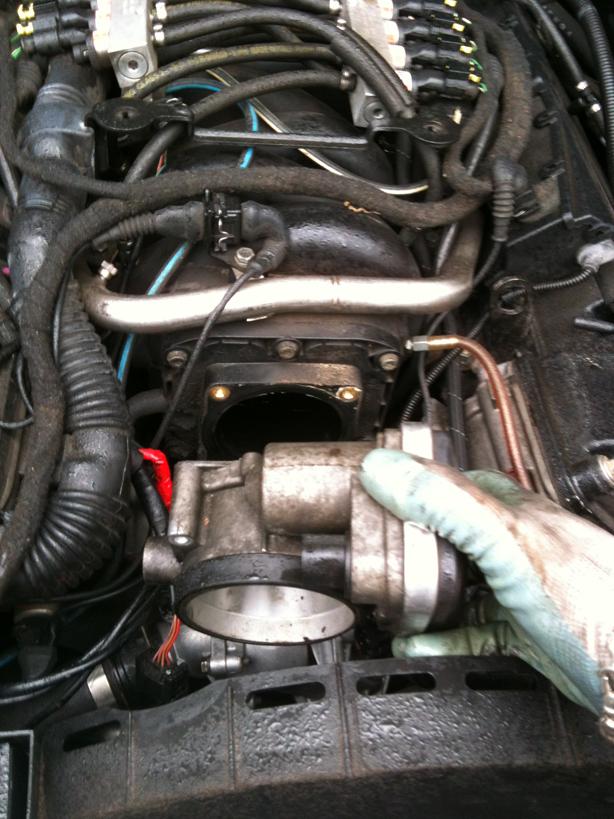
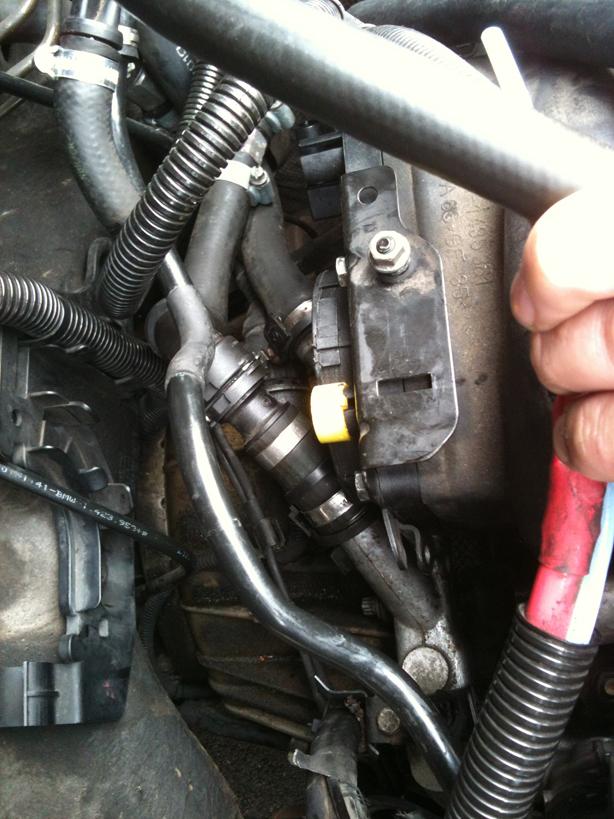
Disconnect the 2 big hoses at the back of the PCV (quite tough to break the seal) and dont forget about the smaller vacuum hose at the bottom of the valve
(6C34B on the diagram)
If you are struggling, the valve can be removed and the hoses pulled off when its in a more suitable position.
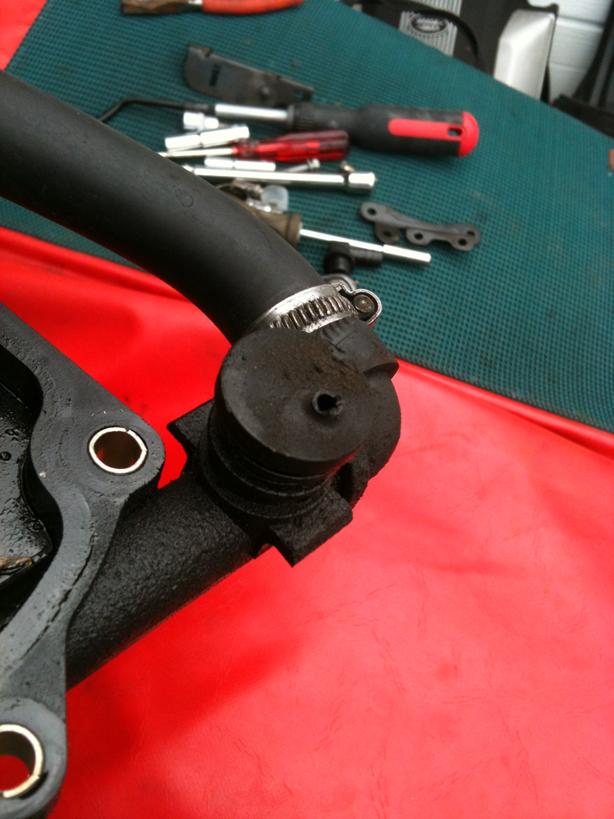
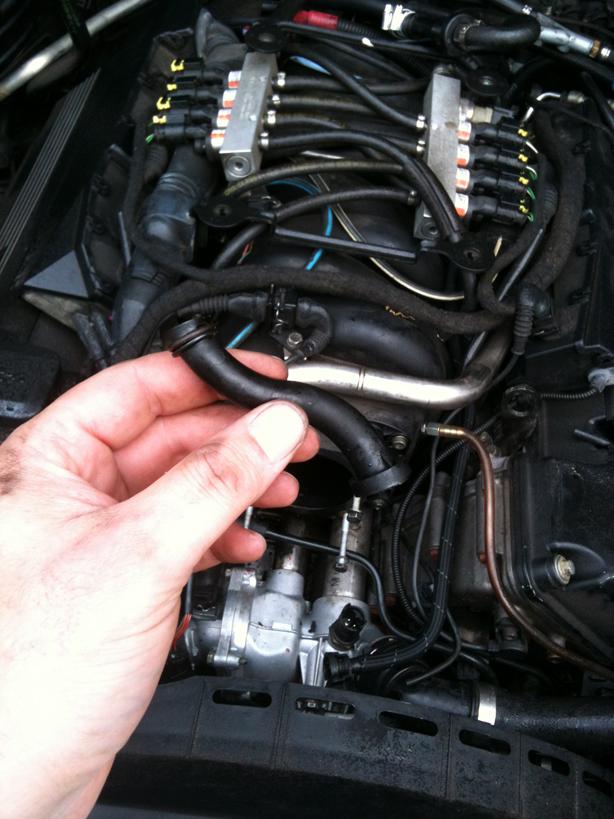
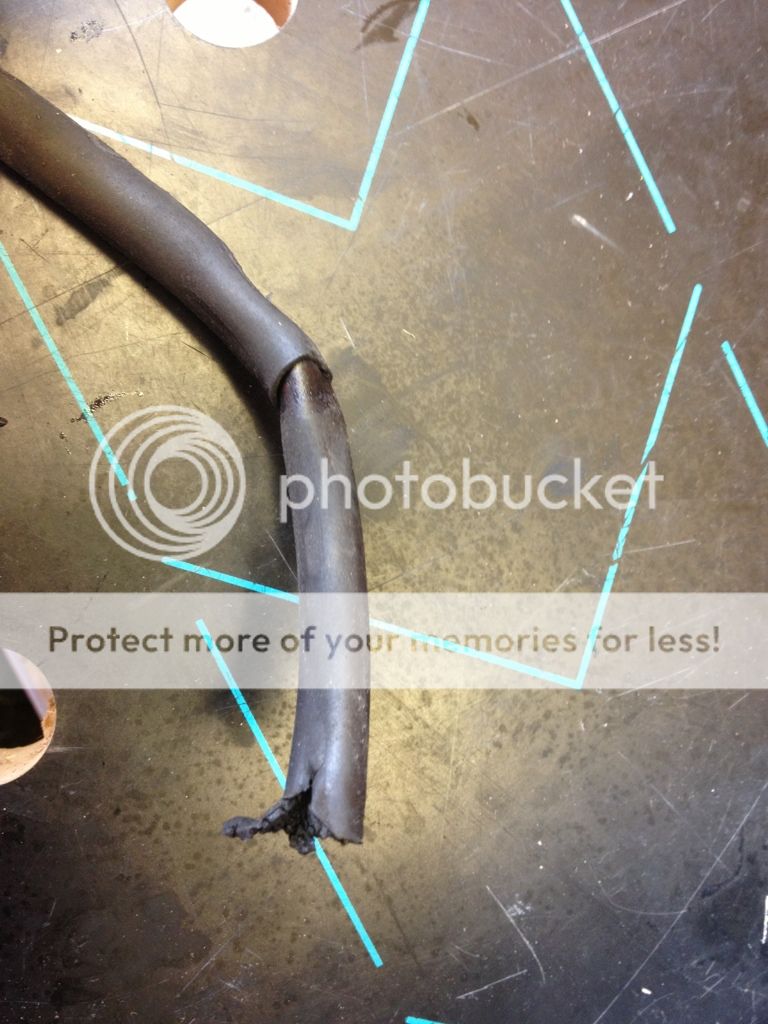
On mine the smaller of the 3 hoses which people generally dont replace as its a cnut to get to was completely perished and wasn't even connected to my valve
7E9B2E48-4D01-4A95-87EE-80CFC44317A4-11955-00000D0B002424B7_zps768af085.jpg


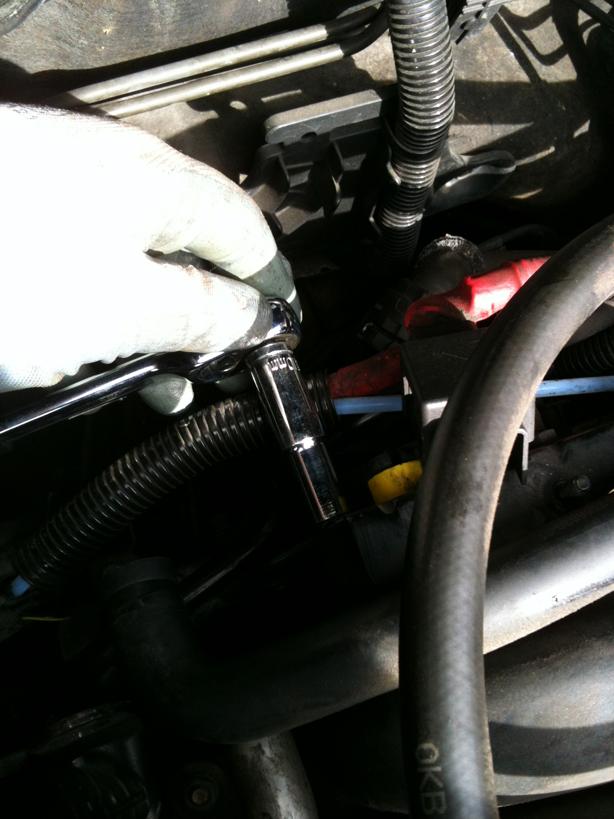
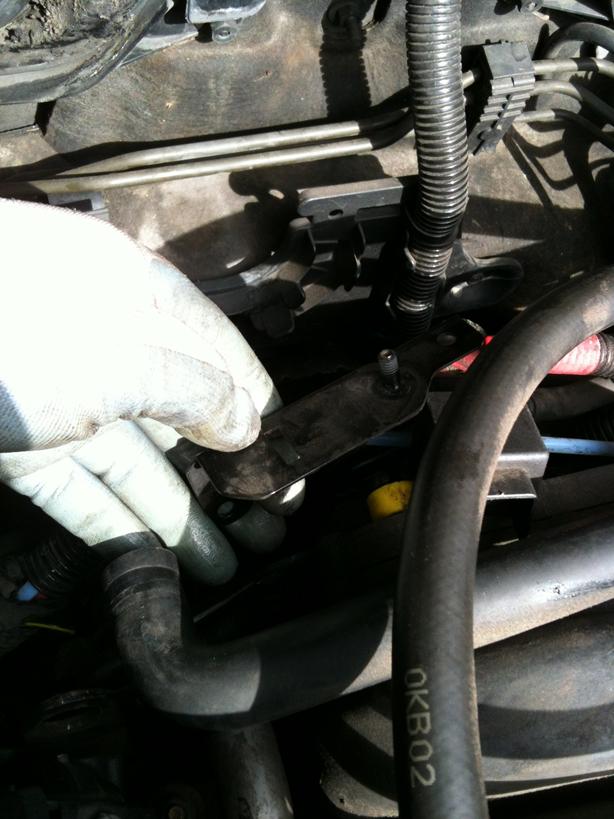
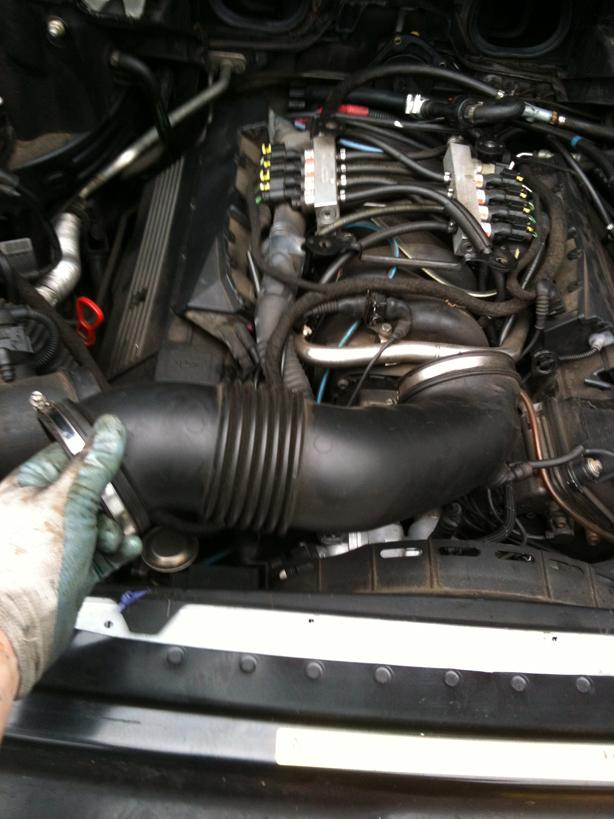
undo the two 10mm bolts at the top of the PCV valve, they hold a bracket for an electrical connector
And the 5 t30 torx bolts all the bolts have washers on, so be carefull not to drop anything.

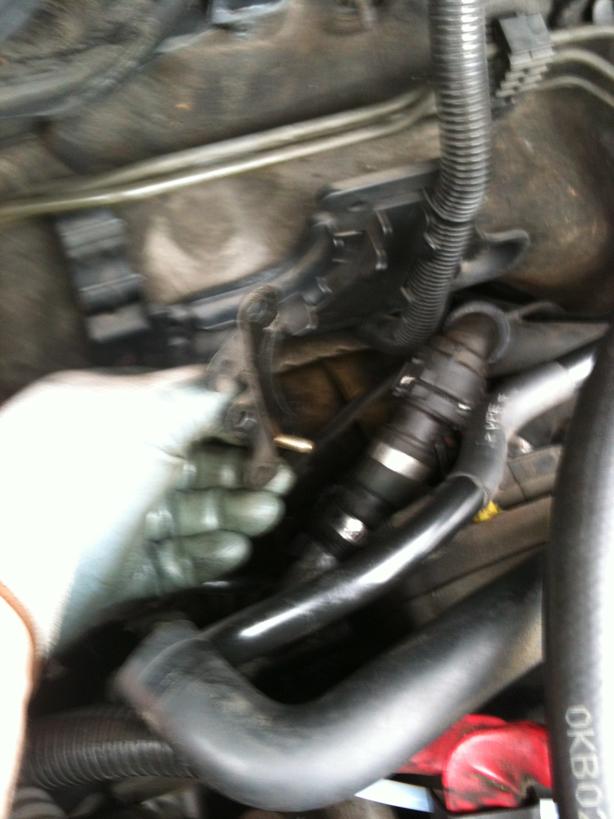
Once all the blots are out and the hoses disconnected then the valve is easily removed. Mine was a little tighter, as i have an LPG kit fitted and the extra pipes and wire do get in the way.

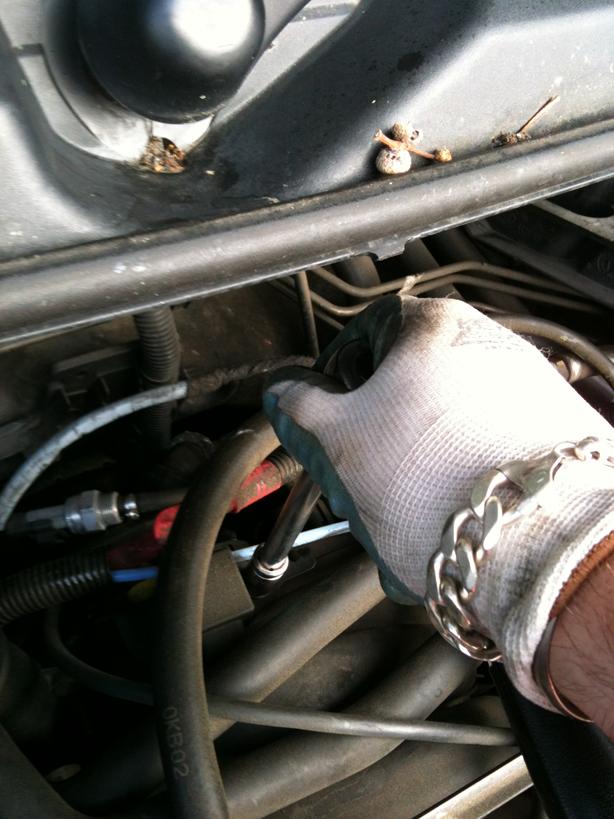
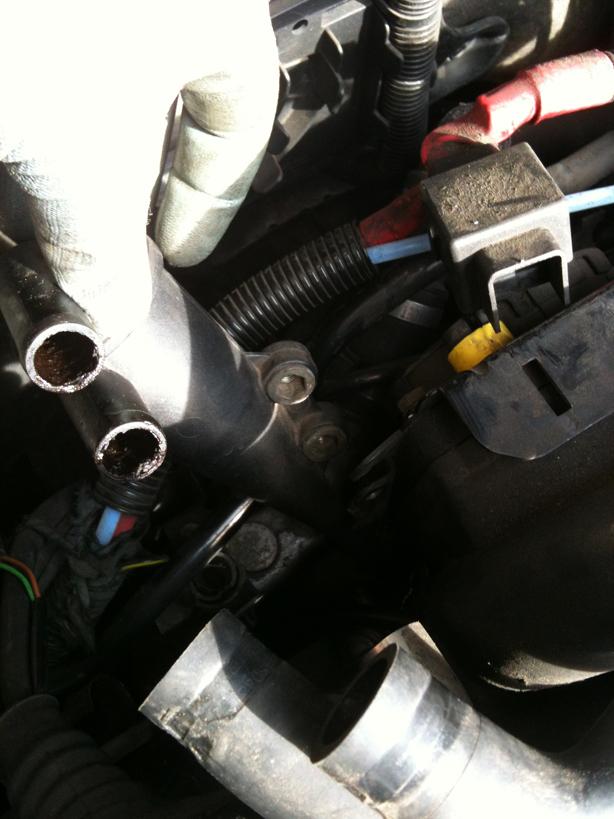
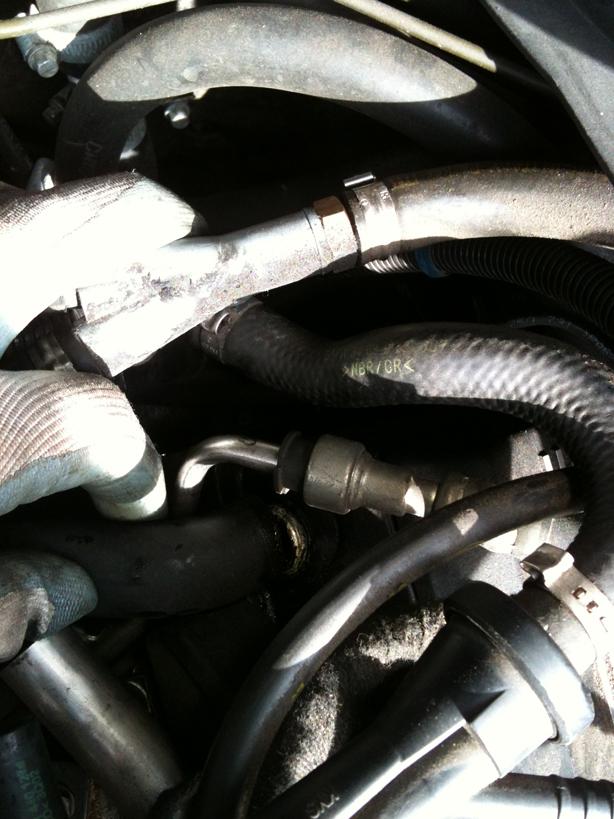
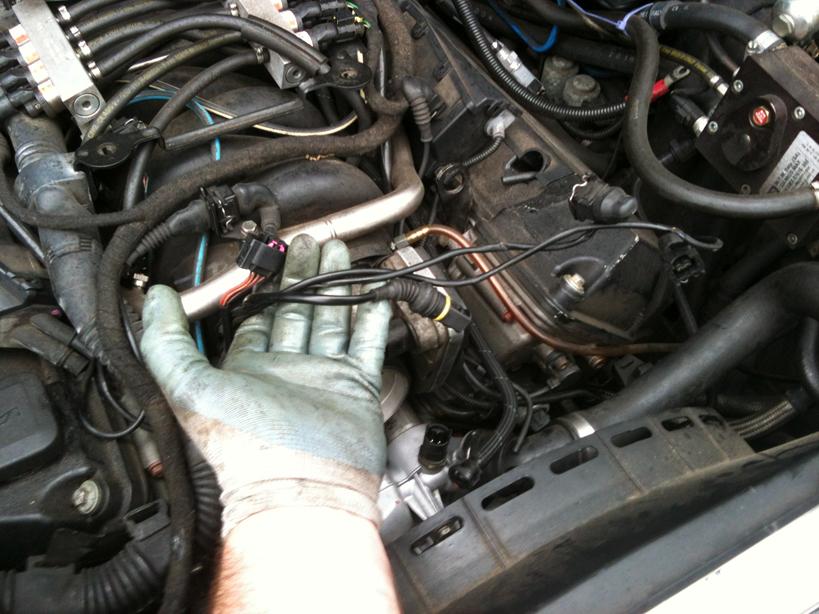
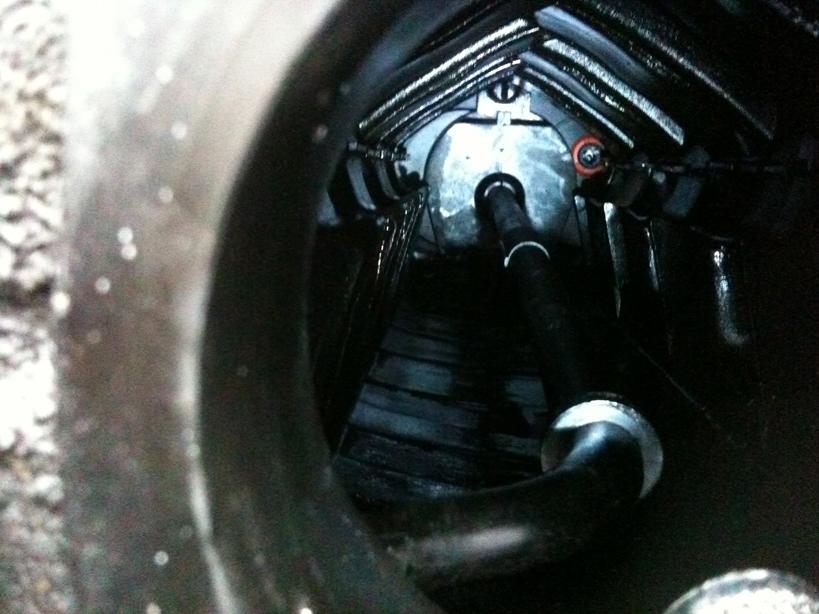
When removing the valve, make sure you don't dislocate the vacuum manifold vent pipe (no.7), as it goes through the centre of the manifold and has to locate into a hole on the throttle body. trust me, IT IS A PITA to relocate. luckily i have a borescope camera
B0020242.png

CD0850B7-1CC7-487B-837F-6A1344B6EE4C-11955-00000D0ADDCBC9D9_zps0564e656.jpg

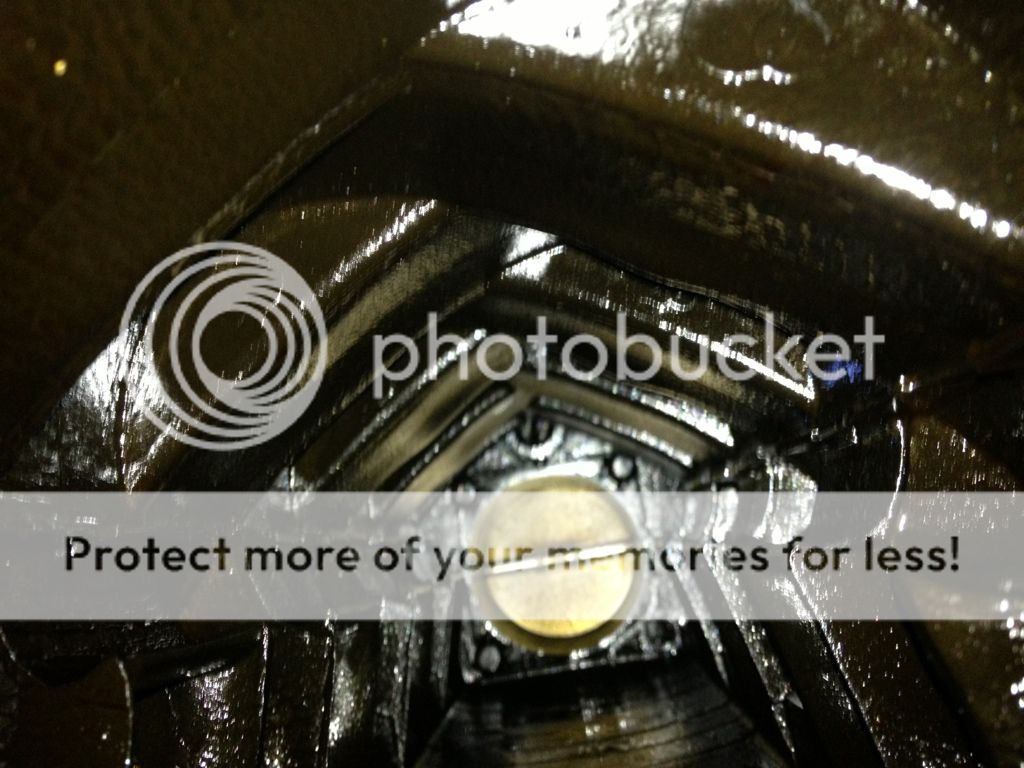
inside the manifold, the hole it has to locate to is the bottom RHS of the throttle body


4A103070-69AF-4BC8-B4FC-042A1902123A-11955-00000D0AE5658E87_zps5cca9d97.jpg

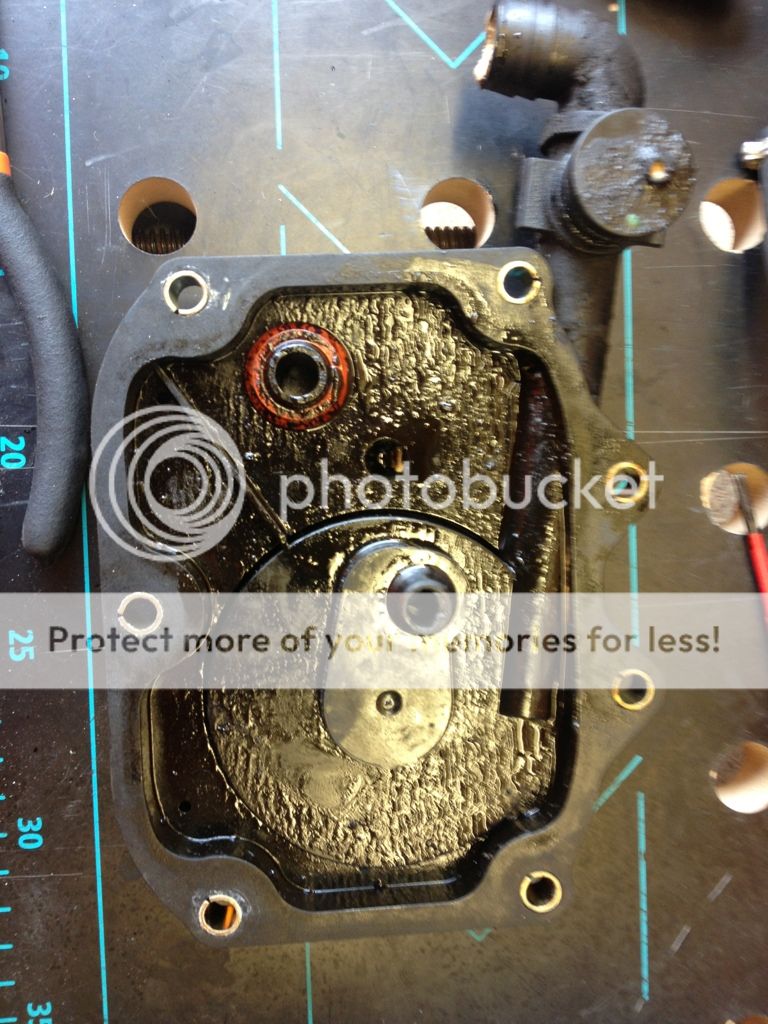
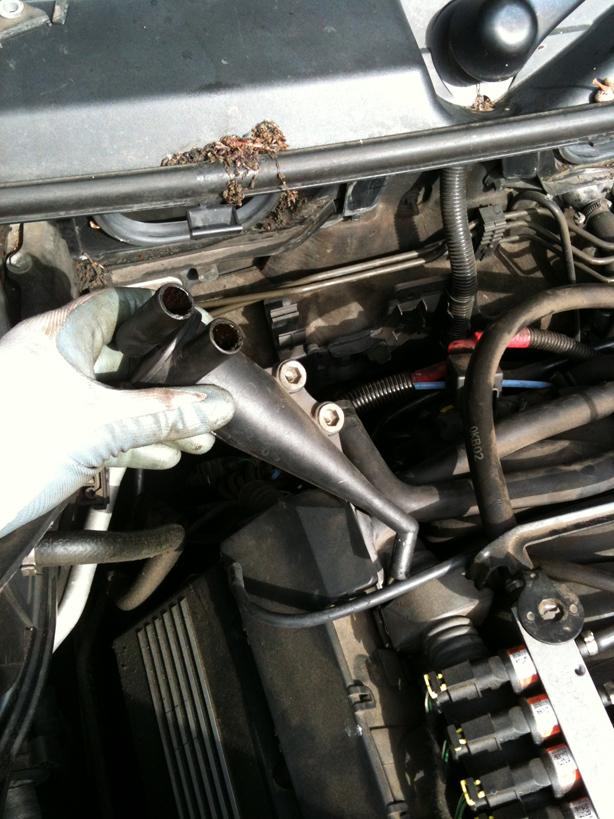
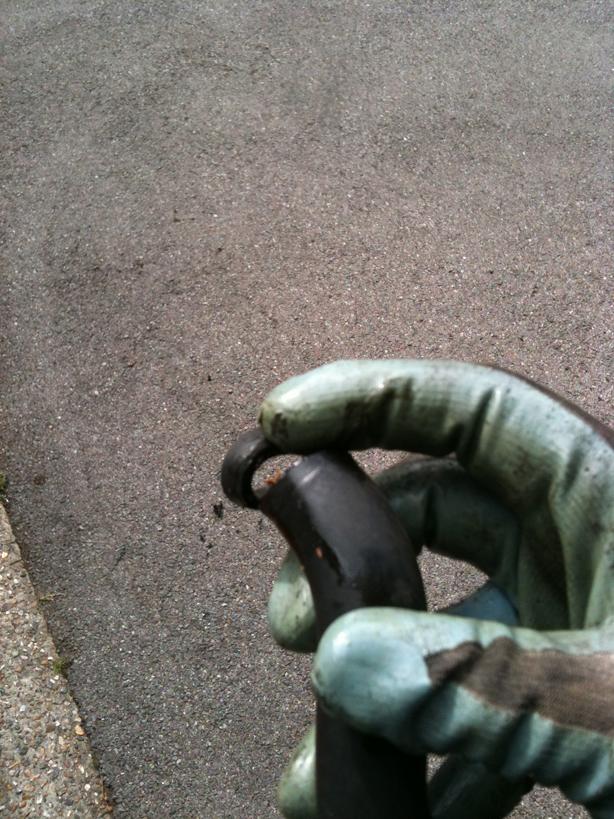
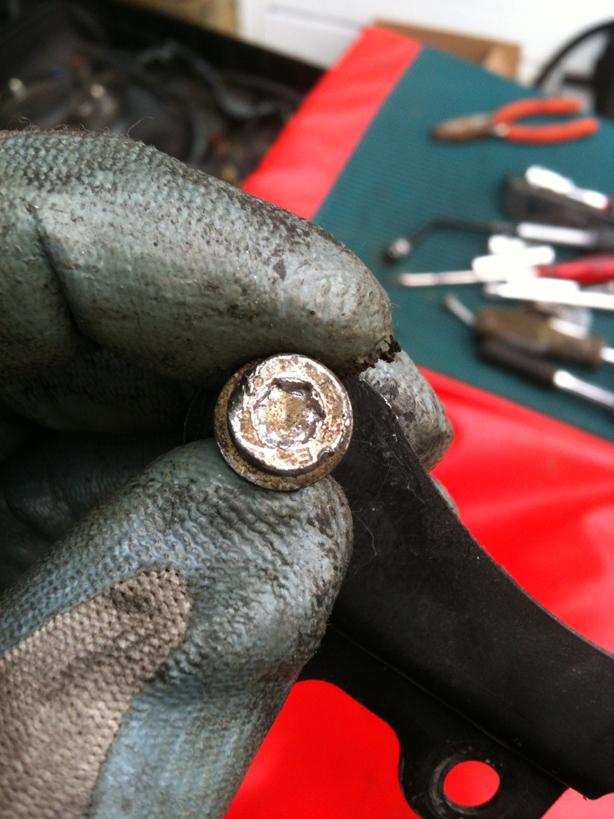
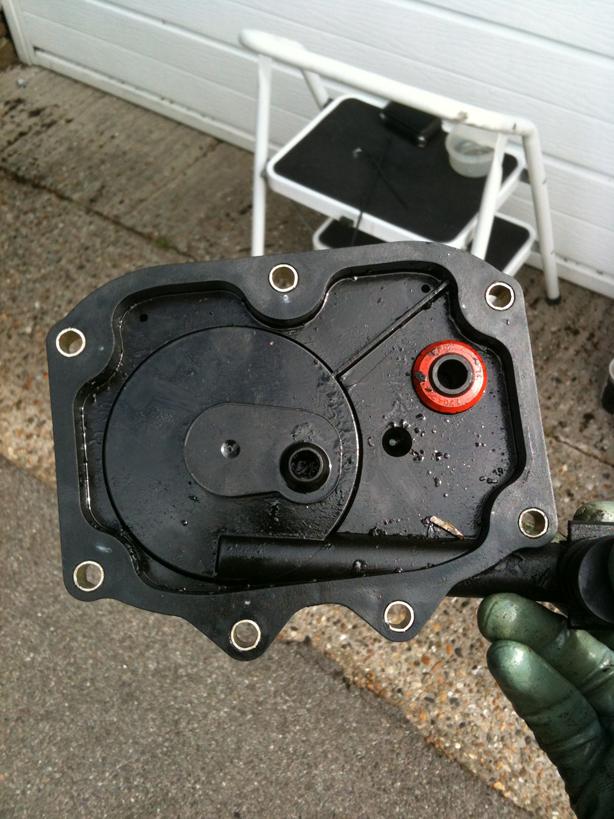
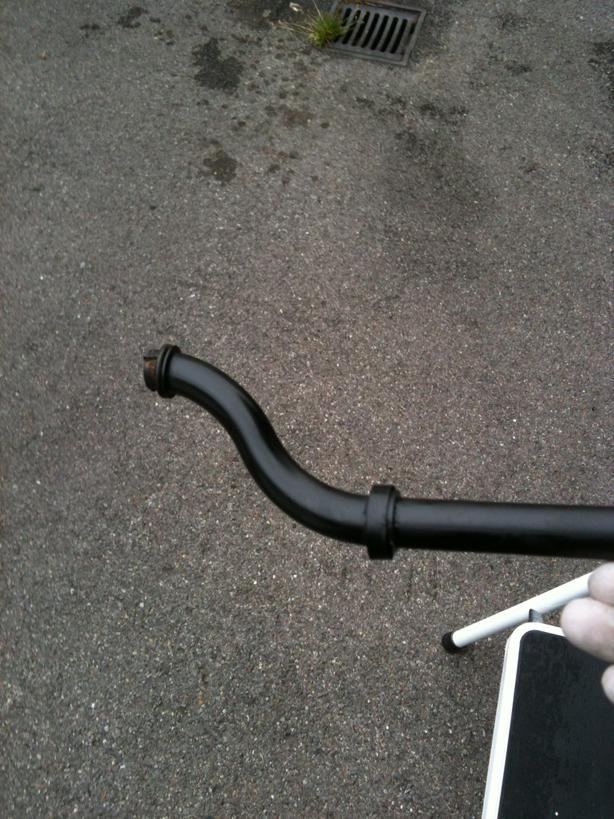
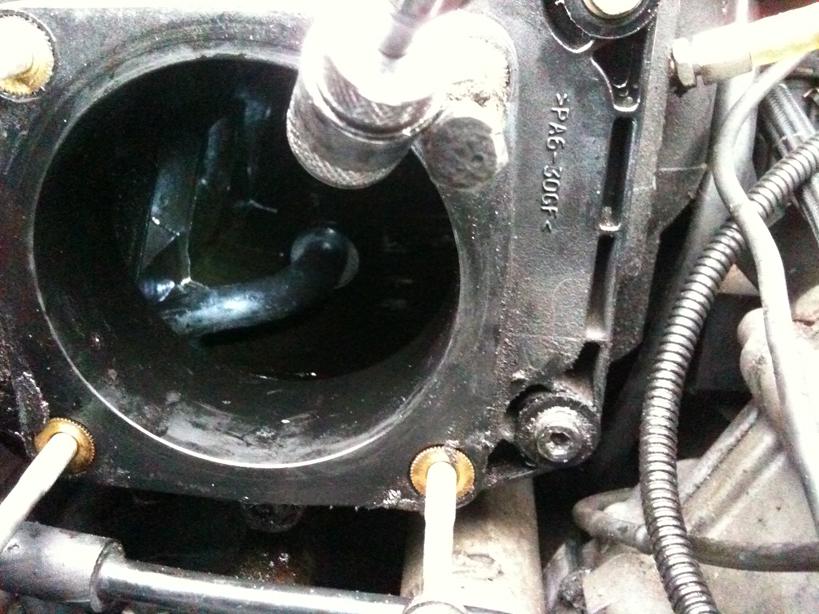
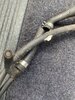
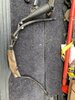
With the valve removed its prety clear to see it fcuked
7B0A1750-93A5-4958-8583-6541ACB15AC8-11955-00000D0B080CB872_zps28089401.jpg

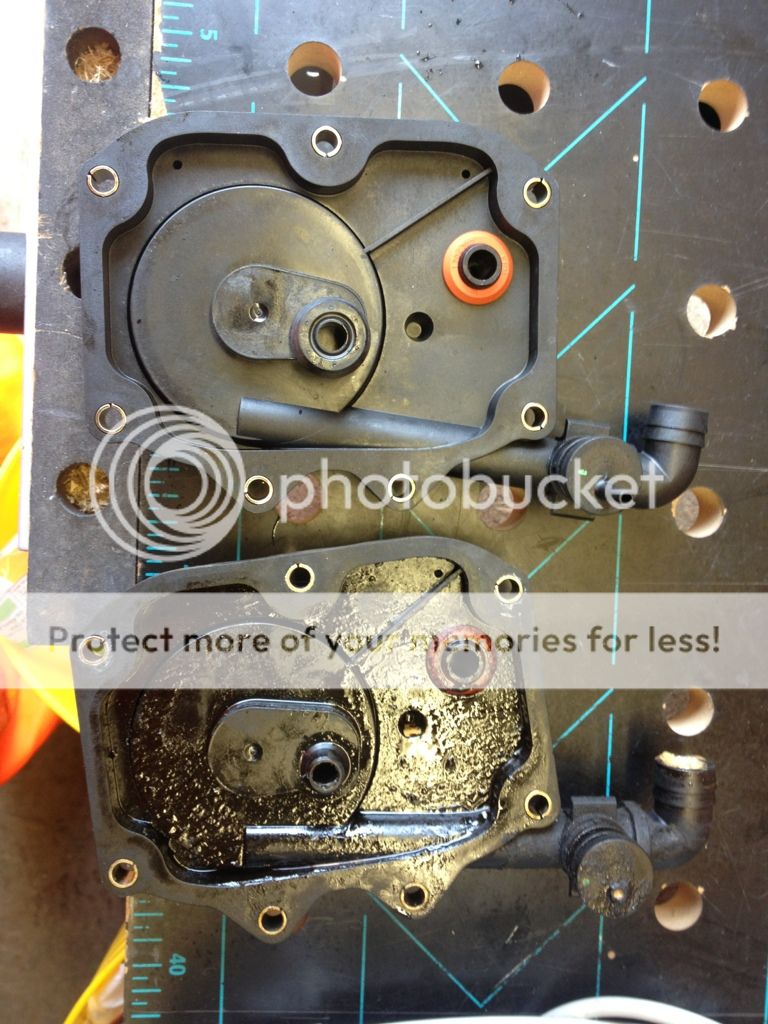
in this pics you can see the very small pipe connector had snapped off and looks blocked

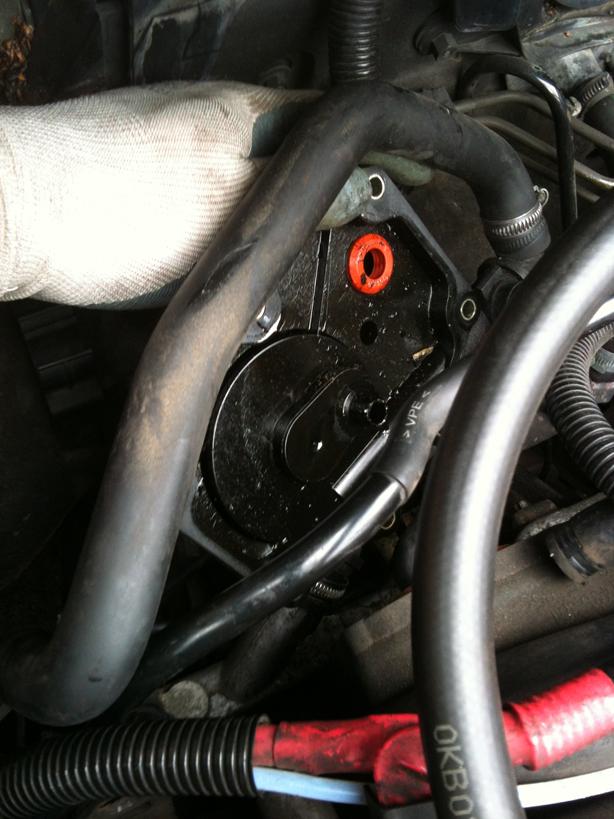
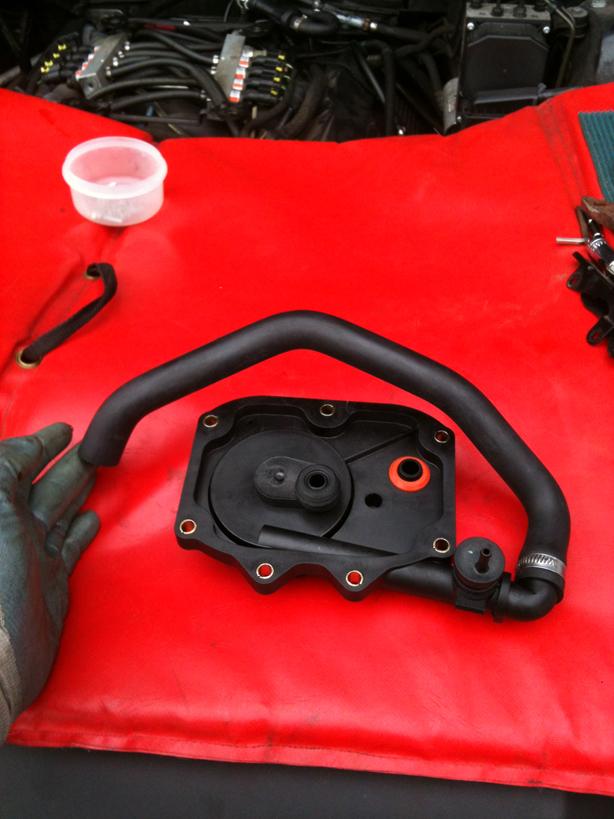
Right, bolt it all back together, once you have taken it off, it very obvious how it goes back together, replace the perished hose as we talked about earlier with new. whilst the valve is off its quite easy to do, i left my new one a little longer as you will want to connect it the the PCV before you bolt it back in, much easier than trying to do it after.
7E9B2E48-4D01-4A95-87EE-80CFC44317A4-11955-00000D0B002424B7_zps768af085.jpg

1364C077-7A85-485A-BC7F-E84655987896-11955-00000D0AF866F4B4_zps198a9fb6.jpg


And thats it. sorry it its abit rubbish. as i said im not great at write ups, or remembering to take pics!

But i definitely recommend you do it!
My FFRR is at 115000 miles and had been left too long.
Valve was £65+vat
Gasket was £4.21+vat
smaller bottom vacuum hose (internal dia. 8mm i think, but check that) and some jubilee clips was £5
 
Last edited:
Awesome write up D....

I love the use of the MicroCAT parts images to explain the component locations etc...Never thought that...brilliant.

Will be looking to do mine at some point this year, no doubt in the summer, and I can assure you , you're 'How To' will be read and re-read....

Copy this post and put it into the How To section, it will need to be approved by an Admin/Mod so I usually drop a PM to Sirus or Ratty to see if it suitable.

Grand job...!
Didn't think it was possible to PM Sirus?
 
Good write up, and just goes to show how gumped up it gets. How long did it take to do?
 
Top write up could of done with that when I did mine, would have helped me realise that this little darling was not OEM
IMAG0139.jpg

This was joining two pieces of soggy pipe that went onto the CCV valve. I am at a loss to why someone would do this rather than replace the pipe? My monies on the LPG fitters looking at the rest of the install...
 
Addendum:


So building on Deasy's thread, lets start at the beginning....


Lower the vehicle to Access Height to make working towards the back of the engine a lot easier and set the bonnet into 'service' mode...


10.jpg


Remove the Acoustic Engine over....


20.jpg


Remove the weather seal strip from along the front of the Pollen Filter housing and Battery and Brake areas....


30.jpg


Disconnect the battery negative lead (waiting for the Sat Nav system to go off first obviously)


Then disconnect the Battery Jump Post Positive Lead....


40.jpg


Undo the two 13mm nuts that holds the Pollen FIlter Housing in place then pull towards the front of the car.....


50.jpg


You can now get much better access to the rear of the engine...


60.jpg


Time to setup your working space, I use my old shooting mat (I have a new one :D) to work on, so I draped it over the front slam panel, intake and E-Box. I then used a small set of steps to get up and into the engine bay.


It is quite surprising how comfortable it is up there and I mostly sat on the Slam Panel and E-Box, also kneeling on the front of the rocker covers is comfortable....I weigh in at over 20 stone and 6'3" tall and it took my size and weight with no issues...just be mindful of the components below, but I found it a comfortable place to work....


70.jpg


Undo the 10mm nut holding the Electrical Splice in place...note I snapped the bracket, it doesn't just lift up and off, but wiggles off!!


80.jpg


You can now get to and see the PCV Valve in place...


90.jpg


Undo the breather tubes to the Cyclonic Oil Seperator...


100.jpg


Undo the 10mm bolt holding the Oil Seperator in place, then I used a long flat screwdriver to hold the small pipe at the bottom of the seperator in place while I pulled the unit from the pipe...Note: this pipe at the bottom can be a real PITA to get back on at the other end, so be mindfull to carefully remove the seperator from it and not remove the pipe from the other end....


110.jpg


120.jpg


Now remove the various pipe clips from the pipes leading to the PCV valve unit...


130.jpg


On removing one of the Breather hose from the top of the rocker cover, I noticed it had split....I wonder if this is where my very minor Oil leak has been coming from??


140.jpg


145.jpg


The two top bolts holding the PCV valve in place are 10mm and also hold the bracket that holds the Electrical Splice in place...


150.jpg


160.jpg


Using a T27 Torx bit, undo the PCV clamping bolts.....this is where the fun begins...!!


3 of the remaing 5 Torx bolts are simple to get to, 2 of them are a SOD...a real bugger...one the 3 easy to get to had been done up so fecking tight and had been really badly chewed up that I snapped a T27 bit, wrecked my spring drive and almost had me totaly give up on it....90 minutes to get one bolt out....in the end using a set of mole grips I managed to get it undone....


170.jpg


180.jpg


With them undone, now it is time to remove the PCV valve....the fun continues....


Mounted on the bottom of the valve is a small pipe - it is mentioned by Storey Wilson in his video tutorial, and various other posts I have read about the process to replace the PCV....so I was VERY aware to be careful of it, the same goes for the Vent pipe between the PCV and the Front of the intake manifold....


So being very cautious I pulled the PCV valve from the rear of the manifold, no sooner had I moved it back 3mm so I could get a screwdriver in the gap to hold the Vent Pipe in place, the small pipe snapped...oh ****e....


I would have assumed there was play in the small pipe to allow you to get it on and off, but there was none, not a single mm of play...how they put it on there in the first place I have no idea....


I reached around under the manifold feeling for the other end of the pipe and gave it a small tug. Nope not a single mm of play at all, so I then looked down the back and the other end of this small pipe goes down below the Oil Seperator, so I carefully pulled the pipe back out from under the manifold to see the damage. The plastic had become so brittle on the PCV valve that as soon as I tried to pull the remains of the spigot out of it, it crumbed, so I ended up cutting an inch off the pipe...it is now even shorter than it was.


I rerouted the pipe to allow for more play if I need to replace the PCV again the future and also because i had made it an inch shorter it was never going to fit back where it was originally.


190.jpg


195.jpg


200.jpg


210.jpg


Had to have a coffee after that...


OK, Time to fit the new PCV Valve....


In order to make life a bit easier, on remvoing the old Valve I left one of the breathers attached as it was difficult to get to the Jubilee Clip in place, so I fitted the new Breather Pipe tothe PCV before fitment...


220.jpg


Got back on top of the engine to replace the valve, lined it up and pushed it into place....now thats when it all went Pete Tong...it seemed to not 'fit' well it kinda did but didn't, so I pushed it on a little futher and all I heard was the sound of something falling into a hollow metal dish....oh feck...


I removed the PCV and moved it to one side, and the vent pipe fell out the back of the manifold.


On retrieval, I had snapped the end off...OH FECK....


On closer look what I had done was when I remvoed the old PCV, the little rubber seal on the centre spigot of the diaphram was still attached to the Vent Pipe - I hadn't noticed, so when I pushed the new PCV into placeit was trying to fit the new rubber seal into the Vent Pipe which already had a rubber seal in it...and with me pushing I had snapped the pipe....


230.jpg


240.jpg


It was time for another coffee....


I had to find the other end that had snapped off inside the intake manifold...


This meant taking the Fly-by-wire throttle butterfly off the front...


250.jpg


Remvoe the Intake Ducting...


260.jpg


Disconnect the Throttle wiring, the Water Temp Sender, SAI Connection and another which I have no idea what it does :D:D


270.jpg


Undo the 4 10mm bolts holding the butterfly valve body in place and remove....


280.jpg


290.jpg


Fishing around inside the manifold (luckily it was at the front as I have large hands - otherside, the girlfriend would have to reach in and see what she could find) I found the end I had snapped off....


300.jpg


That was the end of day one (Saturday) as I would have to bond these two pieces back together as no one would be able to supply this off the shelf on a Sunday, and I couldn't wait for 3-4 days delivery from an internet supplier or wait for a LR/BMW dealer to order into stock for me.....


Saturday evening I used Unibond 2-part Epoxy resin deisnged for Plastic....reportedly a permenant repair, High Temperature resistant and super strong up to 30kg/cm2 after fully curing for 24hours....


Held together for the required 15 minutes, left it overnight to cure and now we crack on to Sunday morning....


310.jpg


Feeding the pipe in through the rear of the manifold, patience is needed to locate the front of the pipe into the hole in the front of the manifold and also line it up at the rear....


320.jpg


330.jpg


On replacing the new PCV I decided to use new M6x25 (10mm hex) bolts as they are easier to get to with a socket/spanner than the T27's


340.jpg


And ensured the pipe was located correctly before I replaced the Throttle Butterfly...


350.jpg


Replaced the breathers and Oil Seperator into place and all the pipe connections to the PCV Valve....


360.jpg


Replaced the Throttle Butterfly and reconected the wiring connections....


370.jpg


Replaced Intake Ducting...


380.jpg


Replace Pollen Filter Housing, Weather Seal and the Engine Acousitic Voer - remember to reattach the Battery Positive Jump Lead....


390.jpg


400.jpg


On starting the car....she spluttered into life, then died...restarted and she ran fine....need to take her out for a spin later, so we are off to see the inlaws this evening so should be a good test.


So what have I learned:


The PO or his/her mechanic was a numpty and rounded off one of the PCV Bolts....

The Little Pipe on the bottom of the PCV is a PITA

The Plastic the PCV is made from is brttle when it gets old

The Plastic Vent Pipe is easily broken

The slam panel and E-Box/Intake Filter is quite comfortable to sit on when using a mat :D:D


I usually don't like repairs/maintenance spreading over two days of the weekend (unless planned that way) as it leaves little wiggle room if things go a bit wrong, but hopefully the repair will hold.


Just to note the Vent Pipe is ony £25-26 so not expensive, but is not a usually stocked item so if you can't repair, you'll have to wait for delivery....


Now where's my coffee!
 
Brilliant!
I have done two or three of these and everything you have said has happened at some point despite how careful you are.
One thing I think you didn’t mention that I encountered that should be checked, is the Cyclonic oil separator & its drain pipes. On two occasions I have found when I check the separator it was blocked solid. A couple of days soaking in Gunk tub softens it up enough to poke a bit of piano wire though it and with a bit more soaking it started to clear. You would not believe the amount of crap came out of it!
The pipe that drains the oil back to the sump was also blocked solid also. Again the Piano wire did the job and got it flowing again. The rubber lower connection hoses were completely perished and disintegrated when I touched them. So in a nutshell if I had just changed the PCV on its own it still would not have worked and the oil seals would still have failed in very quick time.
So sorry folks no easy way it has to be done and it is a real pig of a job.
 

Attachments

  • 2B257398-7C77-4991-A14B-FFAF024C6BB6.jpeg
    2B257398-7C77-4991-A14B-FFAF024C6BB6.jpeg
    591 KB · Views: 291
  • 19907C9B-DE9E-4613-A5DD-A13BA4BE776F.jpeg
    19907C9B-DE9E-4613-A5DD-A13BA4BE776F.jpeg
    69 KB · Views: 339
  • 1B0C3DD1-6621-4546-9DF5-85AB85B9E342.jpeg
    1B0C3DD1-6621-4546-9DF5-85AB85B9E342.jpeg
    594.5 KB · Views: 323
I know this is a fairly old thread , but just changed my pcv valve, found that none of the breather pipes where attached on the one I was replacing is there any pictures of where the pipes are attached, thanks Tony👍🏼
 
Back
Top