Freelander KV6 cambelt

This site contains affiliate links for which LandyZone may be compensated if you make a purchase.

Kizza

New Member
Posts
3
Hi all,
Just started to change the cambelts on my Freelander and come across a problem that we cannot work out!
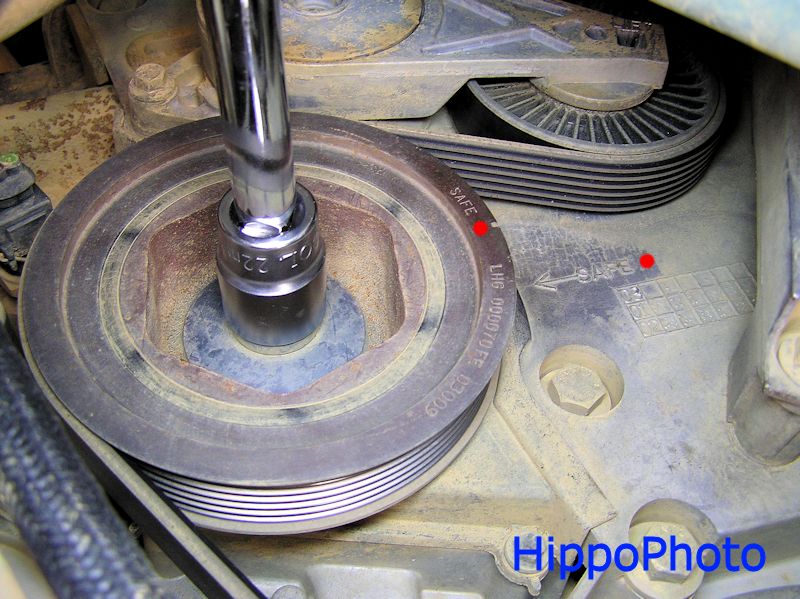
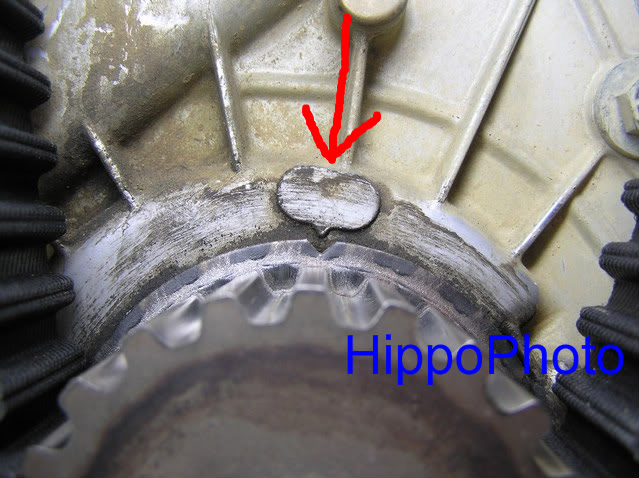
The story so far is that we moved the engine round to the safe mark and put the locking pin into the fly wheel. All good so far. We checked the other side of the cam shafts on the front bank as the rave disc said and it was all lined up just as it should be.
We then locked the camshafts with the laser locking tools ready to change the main belt.
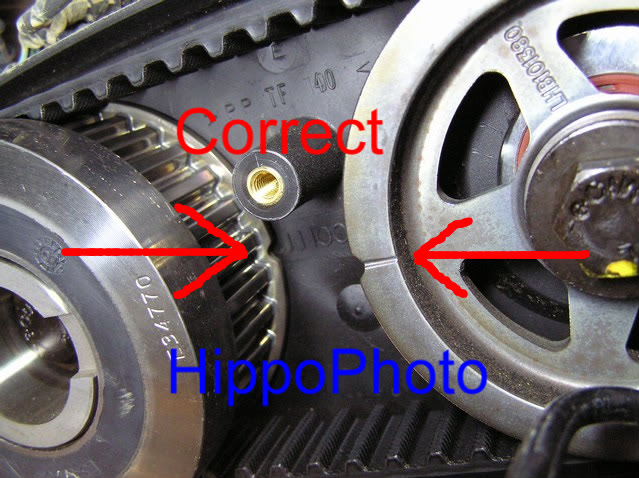
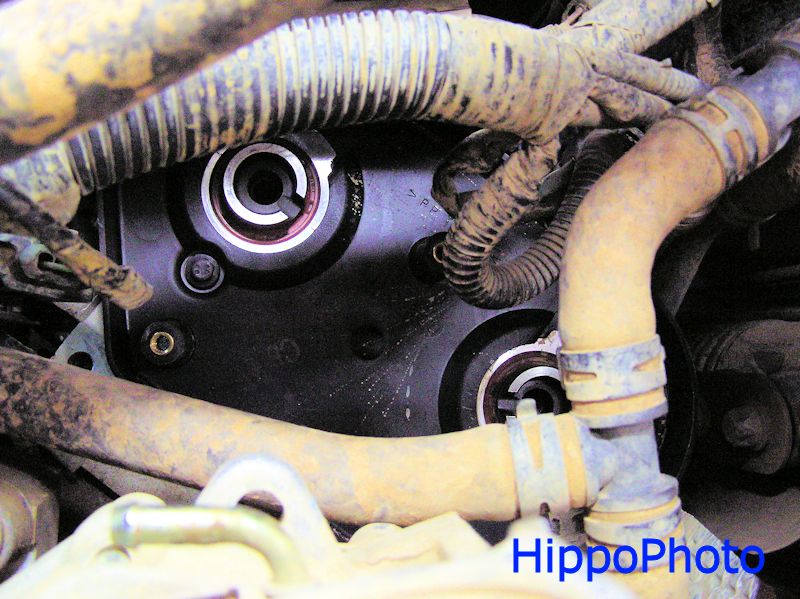
We then noticed that the tool located perfectly into the camshaft and the exhaust port on the front bank but was out on the rear.
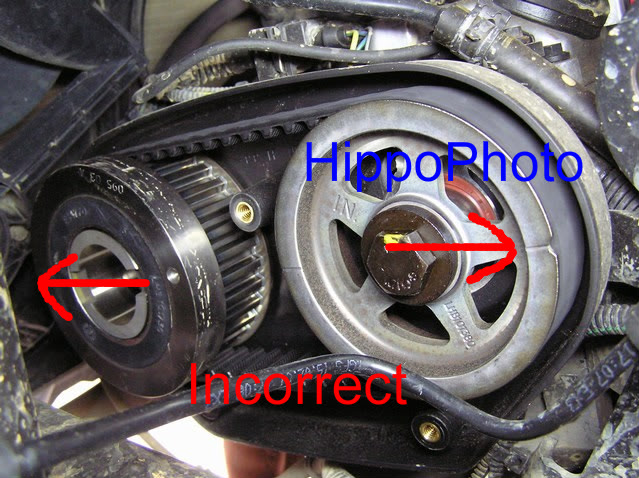
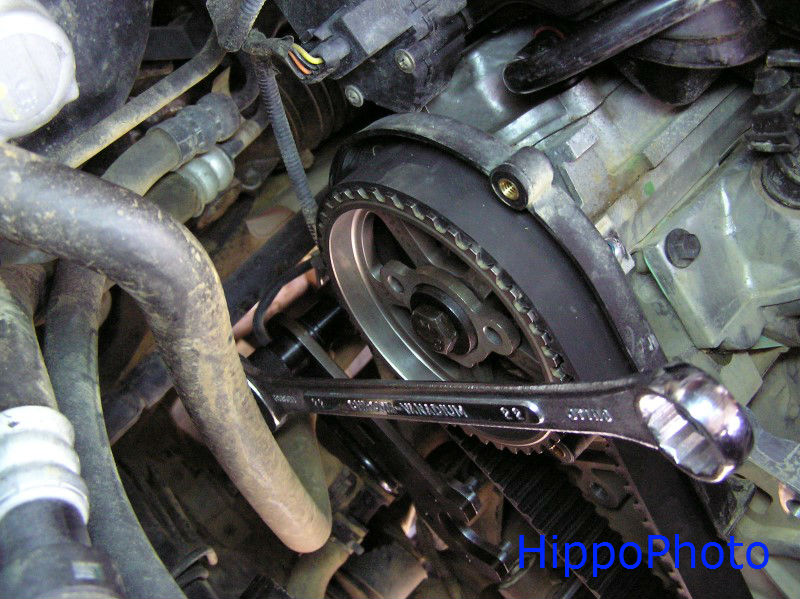
On removing the back banks cover (where the short belt is) we noted that it was not lined up. We removed the cambelt and moved the cam shafts round and realised that there is no way it would ever rest on the notches on the camshaft pulleys, the marks seem to be put the camshafts in a position where the vales are half way through a cycle.
The engine ran fine before starting this and we are at a loss as to what has gone wrong and how we change the belts!
Any information would be fantastic! :)
 
KV6 = 1 main large timing belt and 2 smaller ones at the rear.

Yer need to turn the crankshaft until the SAFE marker on the crankshaft pulley is lined up wiv the SAFE marker behind it:

J4I3WnL.jpg

P8151272 J4I3WnL

The check yer rear inlet and exhaust gears are correctly lined up. Markers should be central and inbound like this:

MXqjJKS.jpg

P8151279 MXqjJKS

If the rear inlet and exhaust gears are incorrectly lined up like this, then rotate the crankshaft one complete turn clockwise to set them correctly as above:

tIMYmTT.jpg

P8171531 tIMYmTT

Fit the fly wheel locking pin through the block into the fly wheel. Trun the crankshaft pulley nut to make sure the fly wheel is locked, and won't turn in either direction. This is important as the fly wheel has location holes and you can also feel metal studs will allow you to undo the pulley bolt but not tighten it up.

Now undo the crankshaft pulley 22mm nut. Remove crankshaft pulley. Remove the fly wheel locking pin. Now look at the crankshaft gear. It has a v grove in it. It should be aligned wiv the arrow above. If not, then you need to turn the crankshaft gear so it is aligned like below:

ltItEyA.jpg

P8221634 ltItEyA

Mine wasn't aligned correctly so I had to adjust a little. The old tensioner bolts will screw in and you can use them with a lever. Don't forget you'll need to undo this little adjustment to be able to refit the fly wheel locking too later on.

You should see you rear inlet and exhaust gears are perfectly aligned. The alignment tool should fit, but take it out for the next bit.

Change the front timing belt. Don't remove the inner Allen key nut in the timing belt tensioner wheel. This is preset. Remove the 2 hex bolts if your changing the tensioner. Refit new tensioner with only 1 bolt, ready to swing towards belt. You'll need to squeeze it in a vice to put the pin in to hold back the plunger.

wT4Amir.jpg

P8161507 wT4Amir

If you've already removed the 2 smaller belts, then set up the main front belt first, then use the alignment tool to set the inlet and exhaust gears to the correct position afterwards.

Fit front inlet camshaft gear-locking tools on to the gears and locate in the exhaust camshaft holes

It's always a good idea to change the water pump while your in here. Also the main timing belt front pulley has a 50% chance of failure. Mine failed after putting it all back. Bugger.

Fit the main timing belt: Start at the crankshaft gear. Insert a soft wedge to hold the timing belt on the crankshaft gear. Now move round in an anti-clockwise direction, fitting the belt to the front idler pulley, then the left inlet camshaft gear, then the water pump gear, then the right inlet camshaft gear, then the tensioner pulley. Ensure belt is kept taut between gears as you work round in an anticlockwise direction.

NOTE: As you look at the gears, turn the inlet camshaft gears fully clockwise first, then anticlockwise just enough to set the belt teeth in the gear teeth, as viewed from the front of engine before fitting the timing belt round them, whilst the inlet locking tools are fitted. When the belts fitted. Turn the timing belt tensioner wheel towards the timing belt. Fit the second bolt and tighten both bolts. Now remove the pin.

Qv4sWYz.jpg

P8161433 Qv4sWYz

Good idea to replace all bolts with new. Be warned the inlet camshaft and rear exhaust/inlet bolts NEED to be replaced. When you tighten them to 27Nm + 90 degree turn, the bolt thread will stretch to the correct torque. Reusing these bolts is not an option.

To do the 2 smaller belts you set the engine as above, with the crankshaft gear v grove lined up wiv the arrow. Flywheel locking pin and inlet camshaft locking tools should be removed. Rear inlet and exhaust gears should be inwards and aligned correct. Fit the alignment tool and remove one belt at a time. Replace bolts with new as above. I found it easier to use a tie wrap to install the new belt + tool + spreader tool keeping the gears apart. Fit the alignment pins. Fit the belt/gears/alignment tool as one piece. If needed use the camshaft locking tool to help you turn the exhaust camshaft as this can turn due to pressure in the engine. But only to turn. Remove alignment pins. Fit new bolts and tighten 27Nm + 90 degree turn. To check, turn the crankshaft clockwise 2 full rotations with all tools removed. Now do the 2nd small belt.

NX5mzeD.jpg

P8171547 NX5mzeD
 
Last edited:
Thank you for your reply Hippo.
The engine is in the safe position with the locking pin in the fly wheel.
The front bank of cylinders line up as your correct photo shows. The rear bank has one camshaft mark at 9 o'clock and one at 4 o'clock!
If you rotate the bank of shafts so they line up correctly it will not stay there as all of the valve springs are fighting against it and it just rolls back over to the same place!
 
Are the 9 and 4 o'clock positions with all 3 the belts fitted, or just 1 removed?

Video's includes knowledge on the operation of the Rover KV6 engine and how to replace the timing and cams belts.

rover kv6 - YouTube


rover kv6 - YouTube


kv6 belt change - YouTube


Also a Rover K series engine timing belt change.

Cam Belt change K Series - YouTube


Even with the engine in the safe position, you still need to check and adjust the crankshaft gear v grove is aligned with the arrow. This is the true correct position for cam belt setup.

Have you correctly fitted the large timing belt whilst the original 2 smaller belts were left in place? If so, then everything should be ok if you followed the correct procedure for the main timing belt.

When removing the smaller belts the eggsource camshaft will rotate due to value spring tension as you say. Pic's below show mine with 1 small belt removed only each time, with the main timing belt set correctly:

jetHdyq.jpg

P8171550 jetHdyq

SjXNgzV.jpg

P8171578 SjXNgzV

When I did mine it was my first belt change. I was eggpecting a bit of movement, but didn't eggspect the gears to slam into their new position when removing the small belt. To correct this, with all tools removed and the main cam belt fitted correctly, use the camshaft locking tools to turn the eggsource camshaft. Only fit the tool in the eggsource camshaft hole and turn it wiv a spanner. You may need the help of an octopus here. Fit the small belt and setting tool when the camshaft slots align:

P8171562a.jpg


Do the same procedure to the 2nd small belt, but this time put the locking tool in the eggsource oil camshaft hole on the other side. All should be ok. You can turn the crankshaft gear to check. You feel 3 rise then fall pressures on each turn of the crankshaft gear. The camshaft gear turns 2 whole rotations for 1 cycle of all 6 cylinders firing.

Your engine looks like this inside:

cbelt.jpg


fixx
 
Last edited:
Hey quick question, after completing the front belt,
I aware that if im changing the front timing sprokets or removing the strech bolts i well have to usse this tool ,18G 1747/2

with that in mind, im not changing the strech bolts or sprokets, so my question is; well i need this tool (18G 1747/2) on both top sprokets to hold them in place, via preventing gear moving (springs) when changing the 2 rear belts?

thanks very much

What are you trying to do? If you are just doing belts and you are using the tools then follow Hippo's guide above. If not using the tools then follow my guide in my sig ;)
 
yes im only doing the rear belts, i'm just wondering if i need the tool to hold the front sprokets as i change the reer belts.... will the canshaft move automatically when belts removed ? (first time with this timing) lol

thanks again!:)
 
yes im only doing the rear belts, i'm just wondering if i need the tool to hold the front sprokets as i change the reer belts.... will the canshaft move automatically when belts removed ? (first time with this timing) lol

thanks again!:)

Are you using the tools? If not I would and do change the rear (link) belts first. The reason for doing them first is simple. There is a risk damaging the new front belt!! To carry out the link belt change you need to hold the link inlet cam pully with a home made tool so the pulley bolt can be undone without the torque transferring through the cam to the front belt. Once the bolt is free the pulley can be slipped off the cam nose, the exhaust cam will rotate approximately 3 teeth. The exhaust cam will need to be held in the correct place so the new link belt can be slipped on and the inlet pulley refitted to the cam nose making sure the key lines up. When tightening up the bolt the link belt pulley will need to be held still for the reason i'v explained above!! Follow the guide in my Sig it's all there!! Anything is possible but be careful ;)
 
Last edited:
Thanks for your help, im still stubbed.. :(

Well, the thing is im using the tools, I was just wondering if theres a way i cud avoid the gears from slamming into place, say for example the main belt is changed, and im replacing the rear belts.

what i'm thinking; :rolleyes:
I could use the tools (18G 1747/2) to hold both sprokets on the main belts, which would allow the cams not to slam into place when removing the 2 small belts...? they should just slide back on correct? :) :confused:

From memory the exhaust cam turns about 3 teeth. The front belt locking tool holds the inlet cam still. It's an easy job but only when you've done a few.
 
Thanks for your help, im still stubbed.. :(

Well, the thing is im using the tools, I was just wondering if theres a way i cud avoid the gears from slamming into place, say for example the main belt is changed, and im replacing the rear belts.

what i'm thinking; :rolleyes:
I could use the tools (18G 1747/2) to hold both sprokets on the main belts, which would allow the cams not to slam into place when removing the 2 small belts...? NO. THIS WILL PUT STRESS ON THE MAIN BELT they should just slide back on correct? :) :confused:
When removing the belt the shafts only turn by this amount in the pic below due to the valve tension spring action. It's a sharp jump as it turns. It's not a problem and is expected to happen when removing the rear belt.

P8171550.jpg


jetHdyq.jpg

P8171550 jetHdyq

When doing the rear belts with the corect tools you only need to fit the camshaft locking tool in the exhaust camsaft at one end, and not use the tool to lock it like you do with the main timing belt (front big one). Fit the tool at one end only to allow you to fit a spanner in it to turn the camshaft against the spring action to line it up to fit/set the rear gears correctly.

If you fit the crankshaft locking tool or camshaft locking tool to lock anything stationary whilst doing the rear belts you risk damage to the main belt. Follow ma posts above or look at the video in them which takes you through the whole process. Remove then fit 1 rear belt at a time.

Fit one end only like this. If you don't want it to turn get someone to do this and hold it for you, but this is not needed. If it makes you feel happier then do it.

P8171562a.jpg
 
Last edited:
Pic of the rear belt nearest the bulkhead. Tool fitted one end only with a spanner to turn the shaft.

EBnSlMW.jpg

P8171582 EBnSlMW
 
Last edited:
Hi

When I needed to change the belts on my V6 'Clutchdust' sent this reply

'To do the main timing belt, strip it all down to access the belt then get someone on the front bulley with a ratchet. Turn the engine while cutting the belt along its length with a sharp stanley kinife, once you've gone all the way round, pull off the outer part of the belt, fit the new belt as far on as you can get it then cut the remaining part of the old belt off then push the new belt fully on. easy!!! And no **** arsing about timing it up which is a 3 man job and alot of swearing when trying to get the belt on.'
You might be able to use the same method.
After cutting the belt in half long ways I put the engine in T.D.C. for number 1 cylinder so all the timing marks lined up before I pushed the new one on. (Just in case it went wrong )

Also check this thread
www.landyzone.co.uk/lz/f9/v6-cam-belts-change-59563.html

Bleddy hell, would this work on 1.8??!!
 
Hi

When I needed to change the belts on my V6 'Clutchdust' sent this reply

'To do the main timing belt, strip it all down to access the belt then get someone on the front bulley with a ratchet. Turn the engine while cutting the belt along its length with a sharp stanley kinife, once you've gone all the way round, pull off the outer part of the belt, fit the new belt as far on as you can get it then cut the remaining part of the old belt off then push the new belt fully on. easy!!! And no **** arsing about timing it up which is a 3 man job and alot of swearing when trying to get the belt on.'
You might be able to use the same method.
After cutting the belt in half long ways I put the engine in T.D.C. for number 1 cylinder so all the timing marks lined up before I pushed the new one on. (Just in case it went wrong )

Also check this thread
www.landyzone.co.uk/lz/f9/v6-cam-belts-change-59563.html

What a faf!! It's a cam belt on an engine not a space ship ;)
 
you try it on yours, then drive it around for a while and let us know how you get on ;)

Never done a timing belt - always left this for for the garage. I guess that doing it this way you cant replace water pump and tensioner??!!
 
Never done a timing belt - always left this for for the garage. I guess that doing it this way you cant replace water pump and tensioner??!!
true and I did both of these at the same time, it's advisable even if they seem ok ;)
 
If you had a spaceship would this work? tbh i,ve never messed with cambelts!

As long as you have a good manual a cam belt is'nt that hard. The 1.8 is a dodle. It's always worth changing the water pump and tensioner at the same time.
The V6 must have a new pump and tensioner pulleys as it's such a labour intensive job to do the belts!!
 
Last edited:
Back
Top