Datatek
Well-Known Member
- Posts
- 43,924
- Location
- Near Poitiers SW France
FIRST OFF Anyone following this guide does so at their own risk. This is just how I did the job, I don't say it's the best way but it worked well for me.
Thanks to Andy for the initial advice on how to do one corner at a time.
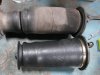
You can see the bad state of the old air bags compared to a new Arnott Gen 2
OK, so car on the level with the wheels chocked. Open the rear tailgate to freeze the suspension. On mine it was only necessary to open the upper part for this.
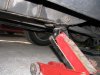
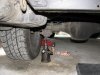
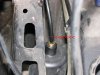
Jack up one rear corner per the photo until the suspension is fully extended, no need for the wheel to be off the ground. Secure with an axle stand under the chassis.
In the next photo you can see the air pipe and the point of entry to the air bag, no need to remove the wheel arch liner.
Wear Goggles for the next move and gloves if you are sensitive!! With a long flat bladed screwdriver push on the brass collar adjacent to the air pipe and when the collar is fully depressed at the same time pull on the pipe. It will come out with a blast of air.
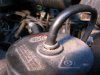
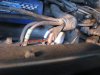
If yours is like mine, DO NOT BE TEMPTED TO CUT THE PIPE AS SOME RECOMMEND, on mine the pipes have a very small raised collar about 25mm from the end of the pipe. If you cut the pipe off, it is possible the pipe will not go back into the air bag fitting or, if you cut off the collar too the pipe may be too short. See photo's of the collars. There are some who say these collars do not exist, my photo's show otherwise. Maybe they are not present on all cars but I know they exist on a 98 model and my 2000 DHSE. They are not caused by a phenomenon called necking as the are too far away from the entry collar.
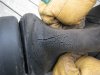
Use the piece of welding rod to hook out the R clips top and bottom. If you are lucky, and your air bags have plastic end caps they will come out easily, if the end caps are alloy, by all accounts they could be a right barsteward. I can't advise on this as mine were plastic and easy!
You can now remove the air bag if it is not corroded to the chassis. Clean up the rust in the housings and put the new air bag into place, with a second jack under the axle lift the axle until the new air bag is held in held place.
Fit the new R clips top and bottom to secure. Make sure the end of the air pipe is clean and refit into the air bag. This may take quite a push, I lubricated mine with a solution of washing up liquid and water. The little collars aided me in getting a good grip with some modified forceps.
Remove the axle stand and lower the car a little, UNTIL THE AIRBAG JUST STARTS TO COMPRESS, remove the jack under the axle, start the engine, close the rear tailgate and wait for the bag to inflate, I had to push the button for max height to make this happen, once the bag is inflated, remove the jack, lower the car via the button to normal height.
If all is well on to the other rear air bag.
I found the fronts a little more difficult, the top clips are a fiddle but on a diesel can be removed without touching the wheel arch liners. Access is a bit restricted on the battery side but do-able with the aid of my bit of welding rod.
The bolts for the lower clips were well rusted in and were a job to remove.
Otherwise the method is the same as for the rears.
The ride heights needed, no adjustment after this as with the tailgate open the ECU is unaware of what you have been up to, however there is the possibility the one of the height sensors may play up after it has moved beyond it's normal range, if so, disconnect the linkage and move it through it's range of travel a few times (tailgate open of course) put an ohm meter on it and see that as you move it the reading changes smoothly with no breaks and then try again. If you still have a corner miss behaving you may have to change a sensor.
Good luck if you try this.
I am new to the P38 so not an expert but I do have experience of air systems and vehicles. Still got lots to learn on the P38 tho.
Sorry tried to insert photo's into text but with no sucess
Thanks to Andy for the initial advice on how to do one corner at a time.
You can see the bad state of the old air bags compared to a new Arnott Gen 2
OK, so car on the level with the wheels chocked. Open the rear tailgate to freeze the suspension. On mine it was only necessary to open the upper part for this.
Jack up one rear corner per the photo until the suspension is fully extended, no need for the wheel to be off the ground. Secure with an axle stand under the chassis.
In the next photo you can see the air pipe and the point of entry to the air bag, no need to remove the wheel arch liner.
Wear Goggles for the next move and gloves if you are sensitive!! With a long flat bladed screwdriver push on the brass collar adjacent to the air pipe and when the collar is fully depressed at the same time pull on the pipe. It will come out with a blast of air.
If yours is like mine, DO NOT BE TEMPTED TO CUT THE PIPE AS SOME RECOMMEND, on mine the pipes have a very small raised collar about 25mm from the end of the pipe. If you cut the pipe off, it is possible the pipe will not go back into the air bag fitting or, if you cut off the collar too the pipe may be too short. See photo's of the collars. There are some who say these collars do not exist, my photo's show otherwise. Maybe they are not present on all cars but I know they exist on a 98 model and my 2000 DHSE. They are not caused by a phenomenon called necking as the are too far away from the entry collar.
Use the piece of welding rod to hook out the R clips top and bottom. If you are lucky, and your air bags have plastic end caps they will come out easily, if the end caps are alloy, by all accounts they could be a right barsteward. I can't advise on this as mine were plastic and easy!
You can now remove the air bag if it is not corroded to the chassis. Clean up the rust in the housings and put the new air bag into place, with a second jack under the axle lift the axle until the new air bag is held in held place.
Fit the new R clips top and bottom to secure. Make sure the end of the air pipe is clean and refit into the air bag. This may take quite a push, I lubricated mine with a solution of washing up liquid and water. The little collars aided me in getting a good grip with some modified forceps.
Remove the axle stand and lower the car a little, UNTIL THE AIRBAG JUST STARTS TO COMPRESS, remove the jack under the axle, start the engine, close the rear tailgate and wait for the bag to inflate, I had to push the button for max height to make this happen, once the bag is inflated, remove the jack, lower the car via the button to normal height.
If all is well on to the other rear air bag.
I found the fronts a little more difficult, the top clips are a fiddle but on a diesel can be removed without touching the wheel arch liners. Access is a bit restricted on the battery side but do-able with the aid of my bit of welding rod.
The bolts for the lower clips were well rusted in and were a job to remove.
Otherwise the method is the same as for the rears.
The ride heights needed, no adjustment after this as with the tailgate open the ECU is unaware of what you have been up to, however there is the possibility the one of the height sensors may play up after it has moved beyond it's normal range, if so, disconnect the linkage and move it through it's range of travel a few times (tailgate open of course) put an ohm meter on it and see that as you move it the reading changes smoothly with no breaks and then try again. If you still have a corner miss behaving you may have to change a sensor.
Good luck if you try this.
I am new to the P38 so not an expert but I do have experience of air systems and vehicles. Still got lots to learn on the P38 tho.
Sorry tried to insert photo's into text but with no sucess
Attachments
-
 Compare Old & New Rear_1.JPG92.8 KB · Views: 1,450
 -
 Split in old Air Bag_1.JPG86.8 KB · Views: 1,277
 -
 Jacking Info 1_1.JPG78.7 KB · Views: 1,267
 -
 Jacking Info 2_1.JPG82.3 KB · Views: 1,390
 -
 Collar on Air Line 1_1.jpg82.1 KB · Views: 1,265
 -
 Collar on Air Line 2_1.jpg68.3 KB · Views: 1,090
 -
 Collars on Air Lines Solenoid Block_1.jpg82.4 KB · Views: 1,268
 -
 Air Line Access Rear_1.JPG69.8 KB · Views: 1,243
 -
 IMG_0339A.jpg62.4 KB · Views: 940
 -
 IMG_0340A.jpg43.4 KB · Views: 858