coppergrease
New Member
- Posts
- 131
- Location
- Scotland
Hi Guys,
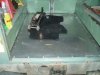
I have been overhauling my old Series III SWB and replacing the rear floor. I have had a section of 2mm Alu cut and bent such as the edges are bent up to rivet onto the side walls of the loadbay, into solid metal. The flanges had corroded away. I have replacement ribs and they are all Hammerited and ready to go in. I have just been placing the bits together and noticed the top of the ribs are not entirely flat. They are higher in the middle. This might be to absorb the depth of the flanges at the sides of the original floor, but does raise the question as to whether the supports ever made contact in the outer 1/4 of the floor width as the difference in height is more than a depth of Alu.
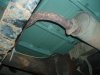
I'm also looking to find some Alu extrusion box section to replace the ribbing that was originally present in the floor (fore and aft). However, I have just noticed the heights of the recesses in the ribs are not even. The middle recess is 15mm deep. The outer two are nearer 20mm deep. I don't remember seeing this reflected in the old floor channels that were spot welded to the underside of the floor plate.
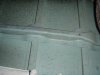
The possible explanation for all of this is that the floor is very slightly arched, but I seem to remember puddles all over the floor, so this doesn't seem to make sense. Does anyone have experience of rebuilding a floor the long way round, instead of the traditional lump of marine ply and run away.
Cheers,
Rob
I have been overhauling my old Series III SWB and replacing the rear floor. I have had a section of 2mm Alu cut and bent such as the edges are bent up to rivet onto the side walls of the loadbay, into solid metal. The flanges had corroded away. I have replacement ribs and they are all Hammerited and ready to go in. I have just been placing the bits together and noticed the top of the ribs are not entirely flat. They are higher in the middle. This might be to absorb the depth of the flanges at the sides of the original floor, but does raise the question as to whether the supports ever made contact in the outer 1/4 of the floor width as the difference in height is more than a depth of Alu.
I'm also looking to find some Alu extrusion box section to replace the ribbing that was originally present in the floor (fore and aft). However, I have just noticed the heights of the recesses in the ribs are not even. The middle recess is 15mm deep. The outer two are nearer 20mm deep. I don't remember seeing this reflected in the old floor channels that were spot welded to the underside of the floor plate.
The possible explanation for all of this is that the floor is very slightly arched, but I seem to remember puddles all over the floor, so this doesn't seem to make sense.
Does anyone have experience of rebuilding a floor the long way round, instead of the traditional lump of marine ply and run away.Cheers,
Rob