What have you done to your Freelander today

This site contains affiliate links for which LandyZone may be compensated if you make a purchase.
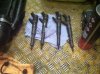
Mine seems okay...the drums and rear brake parts are in 'good order' so someone has looked after that part. From the 'stone guards inwards however, there is a lots of work to be done. All the brake lines will need replacing, from what I can see at least. In the spring I will remove as much plastic trim pieces as I can and plan to fully dig out the system. The tank cradle with be getting a 'refurb or if necessary, replaced. Kind of like the thought of a refurb though. Whilst the tank is Out I will be doing as much preservation work as possible. I like this car very much and want my daughter to get some use out of it which has been sadly lacking since purchase. If I lived/ worked in the UK it would be much further down the road. She is pregnant and has two kids so it would make a massive difference to her if she could 'rely' on it to perform and behave itself. Lets see how the injectors look....but I am back to Spain 5th Jan so if i can get it to run better/safer then it will have to do..I have sourced(but not bought) fully refurbed injectors for not too much money, that come with a years guarantee...so lets see. :)
 
I enjoyed the comments! Last year I got my first garage after years-decades! of working outside and it sure is a treat. I even sprung for an epoxy floor so I can slide under the cars and
not come out looking like a chimney sweep.
The next time I change the diff oil it won`t be nearly as bad. I`ve figured out the best way to tighten/loosen the cover bolts. It turned out that my 1/4inch torque wrench can get into some very tight spaces, and with the right combination of sockets and extensions I can get at all of them except the two right next to the mount brackets. They call for a ratcheting wrench. If I change the diff oil again I may drill a 25mm hole in the cargo area floor and plug it with a rubber bung so I can fill the diff without risking my sanity. It`s either that or buy a pump. I got it buttoned up last night and this morning there wasn`t a drop of oil under the diff-Success!
As for the tyre rotation, the ATs only have about 3000km on them. I hated leaving a brand new spare on the back. I measured the tread and found the wear was less than 2mm so the rears went to the front and the R/F went back to the spare which went to the R/R. I even made notes of what I did for next time! :D
 
Cool. I have a very cheap fluid pump that works very well indeed...Having struggled more than a few times it was well worth the investment..less than 10 Euros in Spain and about £7 in the UK(yes, I have TWO) bought from a very well known and expanding German chain.....

Regards the tyres etc the first time I became aware of this being an issue on 4WD cars involved a clients AMG ML (a real one, not a badge engineered example) Part worn tyres, a puncture(No not my fault) and 'Urs, our friendly German manager came out to explain 'rolling radius' etc' which meant that there wasn't just one tyre needed but two. These 'old' tyres were not that old at all...maybe 3 months. That 'little' bill was over 1000 euros (it had 19 inch AMG alloys) and there was much laughing and rubbing of hands at that one, I can tell you. my client just said..'Yep, change them and if you think it's necessary, do all 4'.....

Now he had 13 cars.....and I drove them all, some more than he or his wife.....tyre costs on his 'fleet' was a major expense...along with several broken alloys(broken, not damaged).....but i always remembered Urs and his advice.

(Urs' family are major shareholders in Porsche and own a major gearbox manufacturing company..............but he ran that workshop and his mum ALWAYS made me coffee....great people)
 
IMG_5867.JPG
Okay, so today, after collecting my daughter I started the injector removal on the TD4. Started by running the car for a good 25 minutes to get it up to a decent temperature, maybe a bit longer than usual but its quite cold here.

Everything progressed well and after removing all the necessary's to get proper access the HP fuel lines and return lines were removed. The securing 'claws' were next, one thing I noted on ALL injectors was that the R/H nut as you look at the injectors from the front of the car were loose. Not overly so but in no way helping to keep the injectors 'in'. Once removed the injectors all came out without problem, using a small 'pry bar' just used to lever underneath the fuel inlet port. No force was necessary and all the injectors left their positions with a satisfying 'pop' of sorts, the 'O' rings probably making that so!! On removal, the second from left injector had a slightly brownish 'tinge' to it. All the injectors were slightly sooting, some with harder deposits in the injector 'point (whatever thats called) and of course the usual crap where in the injector is secured at the top. All the washers came out attached and after plugging all the holes I spent some time cleaning each injector port. I used a long 'head bolt' that was just too big to fit into the hole at the bottom of the injectors port and then used an airline to blow out all the detritus and carbon each that was in the injector 'housing/port'. This part took me longer than everything else i think. Organised the injectors(still in order) gave them a quick clean to get rid of the surface 'grunge' and placed some rubber tubing on the 'nozzles'(thats was the word I was looking for earlier) and each wrapped in a rubber glove no await a trip to the local diesel specialist(Wednesday I think?) to be tested and assessed. I can't afford to replace all of the, but the worst will get done first. My idea to buy from another vendor has been put on hold, needs must and all that. Took the time to replace a couple of vacuum hoses too...minor stuff and also the connector at the fuel rail(pressure sensor??) got a inspection and a good dose of contact cleaner for good measure.

Now really looking forward to getting things back together again...I'm go back to Spain Friday so I have little or no time to get things sorted, what with bank holidays etc.....
 

Attachments

  • IMG_5861.jpg
    IMG_5861.jpg
    395.7 KB · Views: 136
View attachment 138143 Okay, so today, after collecting my daughter I started the injector removal on the TD4. Started by running the car for a good 25 minutes to get it up to a decent temperature, maybe a bit longer than usual but its quite cold here.

Everything progressed well and after removing all the necessary's to get proper access the HP fuel lines and return lines were removed. The securing 'claws' were next, one thing I noted on ALL injectors was that the R/H nut as you look at the injectors from the front of the car were loose. Not overly so but in no way helping to keep the injectors 'in'. Once removed the injectors all came out without problem, using a small 'pry bar' just used to lever underneath the fuel inlet port. No force was necessary and all the injectors left their positions with a satisfying 'pop' of sorts, the 'O' rings probably making that so!! On removal, the second from left injector had a slightly brownish 'tinge' to it. All the injectors were slightly sooting, some with harder deposits in the injector 'point (whatever thats called) and of course the usual crap where in the injector is secured at the top. All the washers came out attached and after plugging all the holes I spent some time cleaning each injector port. I used a long 'head bolt' that was just too big to fit into the hole at the bottom of the injectors port and then used an airline to blow out all the detritus and carbon each that was in the injector 'housing/port'. This part took me longer than everything else i think. Organised the injectors(still in order) gave them a quick clean to get rid of the surface 'grunge' and placed some rubber tubing on the 'nozzles'(thats was the word I was looking for earlier) and each wrapped in a rubber glove no await a trip to the local diesel specialist(Wednesday I think?) to be tested and assessed. I can't afford to replace all of the, but the worst will get done first. My idea to buy from another vendor has been put on hold, needs must and all that. Took the time to replace a couple of vacuum hoses too...minor stuff and also the connector at the fuel rail(pressure sensor??) got a inspection and a good dose of contact cleaner for good measure.

Now really looking forward to getting things back together again...I'm go back to Spain Friday so I have little or no time to get things sorted, what with bank holidays etc.....
Nice one mate
I used a bit of hose taped to SWMBO's vac to clean out the crap that was down the injector holes, then shoved some paper towels down the holes. One of them had a fair bit of what looked like sand in it. Very glad not to let that into the engine.
 
Nice one mate
I used a bit of hose taped to SWMBO's vac to clean out the crap that was down the injector holes, then shoved some paper towels down the holes. One of them had a fair bit of what looked like sand in it. Very glad not to let that into the engine.

Ali, Think any method that doesn't include gratuitous ingress of crap into the cylinder is a WIN. Big Sis would't let me use there vacuum except this morning to hoover up the living room before a 'hallowed guest' arrived...

Think that many would just try their best with what they have. I 'found' two 'head bolts' on the shelf of my 'resto van' and my thoughts went to what they could be used for....After 'measuring them up' against the injector nozzle one was deemed 'fit for purpose' so was employed....It has a tapered head which is threaded...so I made a note that no matter what the temptation, no 'screwing action' would be used, indeed, this was resisted fully....Sometimes things just seem to work out...i struggled for two afternoons with the most basic of handbrake issues, today it was my turn to make some progress..... for a change!! :)
You need to sneak it out when she ain't looking. ;)
The dirt/sand in my case was right down the hole where the copper washers go. I was careful to clean as best I could around the engine before pulling out the injectors so the dirt must have been there all along.
 
You need to sneak it out when she ain't looking. ;)
The dirt/sand in my case was right down the hole where the copper washers go. I was careful to clean as best I could around the engine before pulling out the injectors so the dirt must have been there all along.

Yep, mine also had 'crud' down in the area of concern. Was the 'sandy stuff' slightly reddish in colour? One of my ports had such a colour near the top...maybe there is a chemical reason for this?

'ANYHOO' I got rid of in same fashion as mentioned before....Time will tell if things start working properly when the new(ish) injectors are installed.....Tomorrow I have to collect my son from Newcastle/ 8 hour round trip) and then brothers house for sibling 'hook up'...first Christmas and New Year without our mum, so think thats why its be organised...and its also a bank Holiday so think diesel specialist will be closed anyway...if they are open I will drop off the injectors on the way back from Newcastle (the diesel specialist is Pattersons of Cowdenbeath/think thats correct spelling?)Okay, I'm off to bed as leaving at 0600hrs.

Be safe.. :)
 
Got back to sorting out my rear brakes. I don't know why I keep trying to spend my money with Kiwi parts suppliers for my Freelander. I need to renew the rear brakes, and I'm going to do a 'proper' job and replace all the parts... shoes, drums, cylinders, springs, clips & hoses - 9 different parts in total. Took my time to write out all the parts with their part numbers and headed down to BNT. The first reaction from the guy there was "Whats the part numbers?", so I told him they are the LR part numbers. Oh he says, we don't have those matched to our parts - so HTF are you going to know you are providing me with the right parts then! So he goes down the list... don't do those, don't do those (repeat repeat) - turns out they can just to the shoes and cylinders - and they have different options - and they can't tell me which ones are the right ones because they don't match back to the LR part numbers. What a waste of my time trying to help out a Kiwi company. Shall be going online tonight to order from the UK.
 
I'm being told by respected members that I should replace my brake drums on my rear brake overhaul. It will almost double the cost of the job. Does anyone know if having them skimmed is an option? My brother, who is a LR engineer and likes his classic cars, suggested it, but didn't know what thickness the drums need to be for a safe job.
 
I'm being told by respected members that I should replace my brake drums on my rear brake overhaul. It will almost double the cost of the job. Does anyone know if having them skimmed is an option? My brother, who is a LR engineer and likes his classic cars, suggested it, but didn't know what thickness the drums need to be for a safe job.
Is that not in Rave? Pretty sure it will have minimum safe thicknesses.
 
Is that not in Rave? Pretty sure it will have minimum safe thicknesses.
Spot on!

Rear drum brakes
Drum inside diameter 254 mm ........................
Drum wear limit 255.50 mm, discard drum .............................
Lining minimum thickness 2.00 mm .....................
Drum ovality limit 0.012 mm ............................

Looks like there's a 1.5mm allowable diameter wear - so that's 0.75mm of wear to the drum - not much!
 
I'm being told by respected members that I should replace my brake drums on my rear brake overhaul. It will almost double the cost of the job. Does anyone know if having them skimmed is an option? My brother, who is a LR engineer and likes his classic cars, suggested it, but didn't know what thickness the drums need to be for a safe job.
The problem as drums wear, they get larger in internal diameter. As the friction surface moves away from the shoe. So less of the shoe contacts the drum and brake power is reduced. This is fine for an old shoe that has worn with the drum, as the contact area remains constant. However when you fit new shoes that are sized for a new drum, only the centre of each shoe will contact the friction surface of the drum. The rest of the shoe will simply be "floating" above the drum friction surface. This will continue for some time, until the new shoes wear enough for the full length to be in contact with the drum.
If your old shoes are still serviceable (they are for a while yet;) ), then use them with the old drums until you can justify the shipping cost of replacement drums.

When I looked at your earlier pictures, I could see the centre of the shoes were worn more in the centre than the ends. This is a sure sign that the drums have worn to a larger diameter.
While fitting new shoes into worn drums is possible. There effectiveness is massively reduced, as the contact area is small, and the working life is compromised as a result.

Do you want me to make you some link pipes?
20170909_143414.jpg
20171220_203018.jpg
 
Last edited:
Back in the day turning the drums was a standard practice. As long as you don't exceed the max dimension they will work just fine.
Suppliers have conditioned us to replace rather than refinish. It's better for their bottom line. (Granted it is a bit of a nuisance to take them to be
turned but it is safe and inexpensive)
 
The problem as drums wear, they get larger in internal diameter. As the friction surface moves away from the shoe. So less of the shoe contacts the drum and brake power is reduced. This is fine for an old shoe that has worn with the drum, as the contact area remains constant. However when you fit new shoes that are sized for a new drum, only the centre of each shoe will contact the friction surface of the drum. The rest of the shoe will simply be "floating" above the drum friction surface. This will continue for some time, until the new shoes wear enough for the full length to be in contact with the drum.
If your old shoes are still serviceable (they are for a while yet;) ), then use them with the old drums until you can justify the shipping cost of replacement drums.

When I looked at your earlier pictures, I could see the centre of the shoes were worn more in the centre than the ends. This is a sure sign that the drums have worn to a larger diameter.
While fitting new shoes into worn drums is possible. There effectiveness is massively reduced, as the contact area is small, and the working life is compromised as a result.

Do you want me to make you some link pipes?
View attachment 138232 View attachment 138233
What you say makes sense, its a shame you can't get 'wear collars' that fit inside or something, but there you go.

I've bitten the bullet and ordered my parts. I opened 2 sessions up in my browser, 1 for Rimmers and the other for LRDirect - put all the parts into the respective carts and Rimmers came out a reasonable amount cheaper and all parts in stock. So I decided to go with them and hit the checkout... to be greeted with a MASSIVE delivery cost that was lots more than the parts being ordered and a delivery time of up to 12 days. So went back to the LRDirect order and proceeded with that! The delivery charges were much better and delivery is quoted at 3 to 4 days - so even if it takes them a couple of days to get the bits they didn't have in stock it will probably still be quicker. As the delivery is hiked up by the weight of the drums, I added in some service filters, a plenum gasket (which broke when I cleaned it out) and an intercooler to plenum hose as mine has a small split caused by the jublilee clip - so hopefully the car won't be so smokey after they're fitted. Total for parts $229.87, total for shipping $146.76 (Rimmers wanted $260 for shipping).

Should say, I ordered the brake drums and all the bits inside - shoes, cylinders springs and clips.
 
Well today, I went from this...

20180104_114650.jpg


to this...

20180104_170758.jpg


Waxoyl and the VCU on. Seems okay on the test run so far. The weather here is so ****e tonight that I've not got it up to motorway speeds to see if the bearings are straight. However, all seemed well at 60mph. Can't quite tell if it's my tyres humming or possible bearing noise though.

It's interesting what you notice when you spend four hours lying underneath a car. What are the little studs above the exhaust you can see in the first pic? And is there some sort of plastic drain on the off side rear, below the fuel filler pipes, on a plastic cover? What's that for? Sorry, I should have taken a pic.
 
Sourced new injector washers and 'O' rings and replaced the injectors that I pulled only to find out the diesel specialist had a 3 day turn around(my bad). Got the bits from Mike Aitken in Ladybank(now called something else but still flying that name) Cleaned what I could externally of injectors with carb cleaner. Reasembled and car went very well until handover this morning. Now smoking again as before and konked out on hill. Big puff of smoke.

Frustrating but expected. I return next month from Spain so will do it all again AND get injectors sorted.....

Now sat in Glasgow airport....about to board...
 
Back
Top