Had a visit from
@Tony Reeves yesterday to help swap the seat cushion over from the passenger seat on my parts car to the daily drive's drives seat. I hadn't really thought about how a car seat is constructed before - turns out they're quite interesting
")
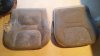
When Tony left we'd removed the cushion & cover from the parts car seat. I was going to give it a wash/clean and then at some point, strip the daily drive's seat. However, I couldn't wait, and stripped that as well - so daily drive is immobile now till I can get some time to put it all back together again
So, the "backup Starlet" will see some use for a couple of days.
View attachment 108034
The cushion with its covering basically sits on the seat base frame (which I suppose ain't rocket science!). Along the sides and front/back of the cover are plastic strips that clip over lips on the frame to hold the cushion and cover in place. The side ones pull off quite easily, but the front and back are right buggers, they're like this...
View attachment 108037
The little hookey bit at the top is the bugger because the frame has bits that poke out, so you can't just pull the plastic clips off - they have to be opened up so the hookey bits don't catch - and they are about 400mm long. I was wondering what I had that was the right size to open them up and long enough to poke right through. In the end I found the perfect tool - a fishing rod
I found an old spinning rod and tried the top end first - but it wasn't wide enough to open the clip sufficiently - so tried the bottom end and it was the perfect size
I had to remove the ring from it, but it was an old kids rod that will never be used for fishing again, so now has a new use.