Uneconomical to repair!

This site contains affiliate links for which LandyZone may be compensated if you make a purchase.
Anyone who has ever taken on an old Range Rover Classic or a Discovery will be sure to know all about the tales of woe, and how some folk actually believe black silicone is an effective repair over a welded repair, I think I have born witness to many bodges over the years and never in my life have I encountered so many that involve that most inconspicuous of products that most of us welders use for seam sealing, black silicone.

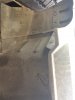
I will get back to the black silicone in a minute, here is the last plate welded into the back of the drivers side sill.

DSCN1110.JPG


DSCN1111.JPG


And here are some pics of the patched up front inner wing on the drivers side.

DSCN1106.JPG


DSCN1108.JPG


All done and tidy :D

The last piece of the puzzle now, oh boy!!!

This is the bit where you will now understand the rant over black silicone :evil:

DSCN1097.JPG


Yes that was a bit of tin stuck in the hole and no I was not happy to find it!!! Bit of tin pulled out and oh my.....

DSCN1114.JPG


So time to get busy with the flap wheel and see what becomes of the rest of it, by the way, this is not good from my point of view as this is now far exceeding my time allowance for this project and yes the black silicone has reared it's ugly head again.

DSCN1113.JPG


Not 100% on how I am going to tackle this bit and need to sort out my game plan and see what is going to be the best, quickest and above all, the safest option to get this repaired.

Thanks for looking in as we draw ever closer to completion.
 

Attachments

  • DSCN1096.JPG
    DSCN1096.JPG
    57.7 KB · Views: 127
Last edited:


Not 100% on how I am going to tackle this bit and need to sort out my game plan and see what is going to be the best, quickest and above all, the safest option to get this repaired.

Thanks for looking in as we draw ever closer to completion.

Those last areas photographed there are probably some of the most awkward bits to fix on a Discovery. When I did mine I did use the wheel arch repair section on one side, the other side had a good arch but the bit your showing there was rotten so I think I cut it all back, then welded in a big plate with a hole in it for draining. The underseal is a pain as it stinks as you grind/weld it.
 
Bringing this up to speed and to a close.

We saw the rot in the wheel arch, and the C pillar, well time to cut it all out and get some new metal welded in there :D

DSCN1115.JPG


Chop chop and all that.

DSCN1117.JPG


Bzzzz, Bzzzz as I weld in a new section of steel to rid the rot.

DSCN1118.JPG


Looks better but has to be fnished off nicely ;) cue flap disc and P40.

DSCN1123.JPG


Now time to re-create the post bottom and inner arch.

No pics of how bad it was but think the repair will give an idea!

DSCN1120.JPG


DSCN1127.JPG


DSCN1125.JPG


DSCN1124.JPG


DSCN1141.JPG


Don't poke it, it looks solid enough, well, actually this was a previous repair that was nothing more than a patch stuck over the top of the rusted out section of the outer sill, it got worse too!!!

This picture is an important one for me as it shows how bad an idea some folk have about what constitutes acceptable workmanship, I am no expert and can be taught new things daily, but look close at the build up of sand and silt inside the sill, had this been cut open fully and cleaned out and fully repaired properly, waxoyled and treated against further rust then this repair would never have been necessary, anyhoo....

DSCN1122.JPG


I mentioned it got worse didn't I?

DSCN1128.JPG
DSCN1129.JPG


DSCN1130.JPG


I had to cut a rather large lump right out of the middle of the sill between the B pillar and the body mount, see my bottle jack propping up the door post, well, that is a must have to keep it going back square, the pillar and cut open sill can drop by as much as 5cms!!!

DSCN1134.JPG


DSCN1136.JPG


You know how it goes, get busy with the 2mm plate and get building it back up.

DSCN1137.JPG


DSCN1139.JPG


DSCN1145.JPG


DSCN1144.JPG


Sorry no pics of it seam sealed and painted black but think you can guess wow it looked.

Final part of this helping hand was to source a brand new exhaust for this truck, old one was bodged to get by but it was BAD!!!

DSCN1150.JPG


This is what it looked like when I had removed it from the car and dragged it out for closer inspection.

Pictures no longer available at this time.

Shocks and surprises over, lets see the new one in place shall we?

DSCN1146.JPG


DSCN0478.JPG


DSCN0479.JPG


So, that concludes this helping hand session, I have put a massive ammount of time and hard work, not to mention a heck of a lot of welding fabrication and skill into making this car awesome again.

Thanks for taking the time to read and please comment, your comments make this all worthwhile.
 
Last edited:
Great thread. Thx for sharing. It makes my little patch look quite innocent
 

Attachments

  • image.jpeg
    image.jpeg
    159.5 KB · Views: 159
@ DieselDog - I salute you.... the work you've done there would be monumental if it were your own vehicle, its even more epic given its a customers vehicle, but given the "customer" isn't paying you for your services - your doing this "pro-bono" - words fail me other than to say you should get a medal for doing that.
 
Back
Top