You are using an out of date browser. It may not display this or other websites correctly.
You should upgrade or use an alternative browser.
You should upgrade or use an alternative browser.
Try again….
- Thread starter resto_d1
- Start date
This site contains affiliate links for which LandyZone may be compensated if you make a purchase.
") .
. .
.LincolnSteve
Well-Known Member
- Posts
- 1,224
- Location
- Lincoln
Dry, undercover workspace is worth it's weight in gold. Good on yer.
RAW111111
Well-Known Member
- Posts
- 256
- Location
- Nottingham
I can try to look it up on the Online Tech Pubs if it's the same as a RRC?I will be fitting a new box on her. This will come with the torque converter. I’ve no idea how this is set up!! Have any of you above gents done it? @Hicap phill you must know how to do this? Won’t be for a while as engine still in bits and no rush when I’m doing body first but I’m curious if I’ll be able to do it with a mate at home
Glad to see you're still plodding along. I recon weather and shooting are good excuses for lack of progress over the winter - been making a new downpipe for the Range Rover since December and still not finished.
Rich
I can try to look it up on the Online Tech Pubs if it's the same as a RRC?
Glad to see you're still plodding along. I recon weather and shooting are good excuses for lack of progress over the winter - been making a new downpipe for the Range Rover since December and still not finished.
Rich
Please mate! Think it’ll be the same. I couldn’t find anything in rave.
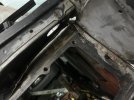
Finally got the blower etc out and the relays and ecu out the way. Bulkhead panel is off too. Need to detach rear light loom then I can pull the lot through and get welding. So much effort for such a little section!
I’m going to order a whole front wing for the o/s but sticking it out with this side. It’s been very fiddly and I imagine a lot of d1 repairs don’t dig deep into the problem spots - I.e. seams and corners.
The rot gets under the seam sealer and grows hidden. “I’ve got a rot free d1”. No you haven’t
I’ve ordered a new front and rear headlight panel, new front mount box and mount and also a footwell panel.
All looks horrendous at the moment but I’m happy with progress on the awkward thing


The rot gets under the seam sealer and grows hidden. “I’ve got a rot free d1”. No you haven’t
I’ve ordered a new front and rear headlight panel, new front mount box and mount and also a footwell panel.
All looks horrendous at the moment but I’m happy with progress on the awkward thing
Attachments
The truck smelt a little funky….
Found a piece of rat hide and **** everywhere so been busy cleaning up and stacking everything away. I’ve shot, caught and poisoned so many of these fcukers and they still keep coming. Need to get it sealed up sharpish


Found a piece of rat hide and **** everywhere so been busy cleaning up and stacking everything away. I’ve shot, caught and poisoned so many of these fcukers and they still keep coming. Need to get it sealed up sharpish
- Posts
- 6,928
- Location
- South Bucks
Dirdy RatThe truck smelt a little funky….
Found a piece of rat hide and **** everywhere so been busy cleaning up and stacking everything away. I’ve shot, caught and poisoned so many of these fcukers and they still keep coming. Need to get it sealed up sharpish
View attachment 310771View attachment 310772
The inner pillar wasn’t great. I removed a fair amount but don’t want to chase all the way to the top. You can’t bang a screwdriver through it and it cleaned up quite well. I drilled two holes in the top of the outer pillar so I can fill it with dynax.
Surprisingly, the sill end and rigger plate bit was all pretty good - was just the pillar foot and surrounding sill that took the brunt of the sunroof drain I think.


Surprisingly, the sill end and rigger plate bit was all pretty good - was just the pillar foot and surrounding sill that took the brunt of the sunroof drain I think.
Can someone remind me if the little curve tack welds in to the outer (as shown) or inner please? I’ve done the pillar repair - the repair panel was crap. Yrm or nothing from now on. It’s short by 2mm so going to have to weld a little piece on back to make flush

Similar threads
- Replies
- 5
- Views
- 679
- Replies
- 18
- Views
- 3K
- Replies
- 195
- Views
- 19K