Yes lots of the good black stuff Molybdenum Disulphide, ordinary grease will do if you're stuck.
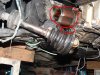
You would be best to assemble the whole shaft to CV before fitting.
You cut the clip on the rubber boot..................correct?
You will need to get a new one, or get some fine wire, wrap around several times under tension, twist the ends, cut back the trailing ends and tuck neatly away out of sight.

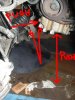
Driveshaft will tap in with a mallet, dont forget to stake the flange/collar on the driveshaft nut. It needs torqued to 205Nm (really really tight). wedge a bar in through the wheel to stop the shaft/drivetrain rotating when you torque up.
You're nearly on the road again.