Transfer Box ??

This site contains affiliate links for which LandyZone may be compensated if you make a purchase.
Ahh yeah that makes sense ! My rear diff mounts were requiring replacement. Damn ! If only I had taken it into landrover last week like I was going to, none of this may have eventuated. Perhaps my rear diff gave way ? Hopefully not - Causing movement in the drive shaft and the upsurgence of noise ? In any case / the transfer case is safe for the time being / till I get the rear diff mount and the VCU corrected.

I am not happy that I am currently not running a 4wd that much is certain. But I am allot happier that I analysed the issue / instead of rushing to a transmission or diff guy who were quoting $3000 fixes.

So far the cost is 5hrs of my time. If it ends up a large sum, I'm gonna run this as a 2wd until the day it dies.

Thanks for your input Blippie. Do you think the VCU can be re-conditioned rather than replaced ?


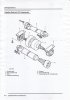
Nope, because the IRD ("transfer box") transfers the drive to the propshaft.

Not necessarily. These can be problems with VCU mounts, centre rear diff mount or the rear diff itself.

The rubber is the damper that stablises the VCU - if you remove it or replace it you may remove the vibration, etc.

Glad you are happier with your vehicle.

Cheers

Blippie
 
Hey man. .

I've read about you before ! Are you the fella with the Camel Trophy freelander ? Your like a celebrity dude.

:)
 
Now the VCU is off, replacing the VCU mounts is easy and they cost <£20. You'll need a press to get them on probably.

The rear diff mounts are fairly easy, <1hr for a DIY-er. Again under <£20 fir the part.

THe rubber around the VCU is a damper that I saw recently on eBAy. Fairly pricey but an easy swap. If the vibration is down to an unbalanced VCU due to the damper wear, than that shoud help.

The crunch coming of the curb could well be the prop and rear diff flexing upwards and striking the floorpan/fuel tank.

I don't like the way the Freelander handles in "Mondo Mode" - we removed the prop shaft for a week whilst we waited for parts. Drove it a few times and thought it wasn;t the normal assured handling you get from the 4wd Freelander. Besides, isnt 4x4 kinda the point?

Cheers

Blippie
 
Thank you Blippie ! I think youve just about summed it up ! Yep Mondo Mode felt like driving a front wheel transit van with a block of lead in the back. Will take it easier around corners till fixed.

Thanks again mate !
 
Hey Yanick
that is a vibration damper not the actual viscious coupling, I have seen them repaired/bodged with glue or 'e' metal even with cable ties.
 

Attachments

  • pic10001.JPG
    pic10001.JPG
    79.4 KB · Views: 461
In relation to this entire thread / and despite an interesting journey, the final resting problem is in the IRD (Transfer Case). By removing the prop-shaft and having it inspected by Landrover / there is nothing wrong with the prop/drive-shaft or the VCU. I've also had the rear diff checked, and although it could do with a replacement it has not failed completely.

The problem is that the drive shaft adds extra load to the transfer case, (which in its maggot state) it is not coping with. Alone, operating as front diff, it is still pulling the car along well enough.

What this has uncovered though, is that with a maggot transfer case you might get away with driving 2wd (removing rear drive shaft) and you might get a few more miles out of your frontlander.

The IRD on the freelander is not only designed to distribute power to the rear, it also comprises the front diff.

All the best fellas.
 
interesting fred
Its like going back in time 2 to 3 years. I wonder why Mondo/Minge et al havent picked up on this one.

First thing to check is ALWAYS VCU - Mondo mode is a common mod and loadsa peeps do it during summer months for increased performance/fuel economy gains. The rear diff mounts are also easy to change (particularly the front one. The VCU damper is easily obtained thro fleabay.

Have yu done a search, as these probs have been covered gazillions of times and there are a couple of complete threads in the general Q's and A's bit?
 
Hiya Mad Hat. .

Yeah I find the search function on this forum to be quite sticky. . .Its not very simple.


Have yu done a search, as these probs have been covered gazillions of times and there are a couple of complete threads in the general Q's and A's bit?[/quote]
 
Yes it did ! Very much /

One thing though, mine is a petrol 1.8 so I think removing the transfer case is slightly different.

Do I need to remove the exhaust manifold away from the base of the transfer box, before removing ?

Is there a diagram for the best way to remove it ? I imagine the first step would be to remove the coolant hose first ?

Any directions to this information will be grand / and I'll be sure to post my results. Basically, I am going to attempt a re-furb of the IRD.


hopefully that link helped?
 
I plan to do an IRD rebuild, just need to get a few days to tackle it.
Baldbryn is someone on another forum who has split the IRD. Took him 17hrs. The water cooler has a discrete access point at the 3 oclock position for prising off.
Remove the rear coupling on the IRD in situ (5 bolts, mark its relative position) before you remove the IRD or exhaust. The crown and pinion teeth will give a tell tale sign to the damage. After that you can decide if it needs an overhaul.
 
I didn't mark the relative position when I removed the rear coupling (shaft) from the IRD. .Is this going to be a problem ?

Yep, I'll be good to go quite soon. I've sourced a crown wheel and pinion + bearings from a British dealer. Who knows ? If my CWP teeth are in relatively good nick, I may only need the bearings ?

I wish there was a detailed diagram showing all points of fixture from the IRD casement. I'm still quite unsure as to what I'm up for regarding removal and replacement of the case.

So the coolant hose needs to be ripped off / not unbolted or any such thing?


I plan to do an IRD rebuild, just need to get a few days to tackle it.
Baldbryn is someone on another forum who has split the IRD. Took him 17hrs. The water cooler has a discrete access point at the 3 oclock position for prising off.
Remove the rear coupling on the IRD in situ (5 bolts, mark its relative position) before you remove the IRD or exhaust. The crown and pinion teeth will give a tell tale sign to the damage. After that you can decide if it needs an overhaul.
 
its good practice to mark relative positions. When you say
shaft, do you mean the 6 bolts on the front of the prop? Im referring to the 5 bolts on the IRD itself, once removed you can inspect the CWP. There is a get out clause if you didnt mark them, the 5 bolts are off-set, so it only goes one way. The oil drain lug on the inside, sits at the 8-9 oclock position as it is turned away from you (offered up to the 5 bolts again)
 
I was speaking to an engineer in work about bearing loads, he says he has never done them. I think the IRD can be done with a little patience. Awkward yes! but there are only 7 bearing sets in the IRD, I reckon I only need 4 replaced due to seasonal Mondo mode. Only on private roads for insurance reasons ;)
 
So as an inventory of components for the IRD interior, there are.

1. The Crown Wheel
2. The Pinion
3. is it 7 bearings ?

I am processing an order on these items, which are coming from a gears and bearings manufacturer in India for little more than AU$100 plus shipping. Will keep you posted on the outcome. Myself being in Australia, these seperate IRD components are not commercially available > only commercial availability being completed re-furbed (not even new) IRD's from the UK @ $3000 shipped to Australia.


I was speaking to an engineer in work about bearing loads, he says he has never done them. I think the IRD can be done with a little patience. Awkward yes! but there are only 7 bearing sets in the IRD, I reckon I only need 4 replaced due to seasonal Mondo mode. Only on private roads for insurance reasons ;)
 
I'll be sure to mark relative positions from now on. At this point, I am having difficulty figuring out the best way to remove the IRD :rolleyes: :) It's quite a convoluted little rhizome with things plugin into it allover the joint... This is the first step I am yet to overcome / I agree the rest will come with patience and per-severance. I am enjoying learning about this little fella though. It is essential too that I know this stuff - given the Australian terrain that intend to undertake over the next year. Some locations will be leaving me quite remote.


its good practice to mark relative positions. When you say
shaft, do you mean the 6 bolts on the front of the prop? Im referring to the 5 bolts on the IRD itself, once removed you can inspect the CWP. There is a get out clause if you didnt mark them, the 5 bolts are off-set, so it only goes one way. The oil drain lug on the inside, sits at the 8-9 oclock position as it is turned away from you (offered up to the 5 bolts again)
 
Taking the exhaust manifold is hard / I had to use a blow torch on the 3 nuts to release them from the rear joint. Still cant get to the top one and have ripped a 15mm socket appart trying so. But that socket was made in Taiwan / the West German socket i've aquired from dad came off without even a scratch on it ! :)

Now thats done!! Wow what a Job on the exhaust ! Still enjoying myself though, will have a crack at the IRD in the mornin. Any tips for taking the IRD off before the morn would be great. From what I can see there are only 5 boltheads ? 3 on the right and two on the left. Seems as thought the whole unit moves towards the right.
 
Blippie.

Maybe ? The nuts are fixed to bolt plates on the muffler joint / grinding or chisling might deform the bolt leaving it very hard to re-fit. The blow torch did nothing in the way of destroying the thread on the bolt / infact the thread was 'cleaned' up by the release of the nut and the softness of the metal. Replacing will be simple.

I used one of those desert making torches / no welder's etc.


Crickey. Before resorting to a torch, I would try a cold chisel through the nut or a grinder.

Cheers

Blippie
 
Have to agree, blow torch is the weapon of choice. Anyone who has tried to remove them will know what they're like. If you think the FL1 is bad, you want to try removing them in an MG F. There are SS cat saver nuts available in the UK. They cover the entire thread. An alternative is to cut the thread just behind the nut when fitting new M10, 17mm SS nuts.
 
Back
Top