Tis the season to...upgrade the heater/blower

This site contains affiliate links for which LandyZone may be compensated if you make a purchase.

zeaphod

Well-Known Member
Posts
3,103
Location
Belfast, Norn Iron
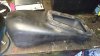
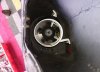
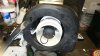
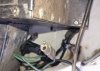
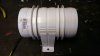
Lots of recent posts about improving the heater. After seeing a similar thread on another (lesser) forum, I decided to fit a bilge blower in line with the original heater. This was a 3" model, costs £19 including delivery. It fits easily into the heater intake box. The 4" model is more powerful, but will be more of a squeeze. The 3" has plenty of blow anyway, although I found it better to leave the original fan in place (it blocks the flow of the new fan a bit if you don't) , and just wire it in parallel with the original. I upgraded the fuse from 10 to 15 amp. (actually a PO had fitted a 35amp fuse!) . Took me a few hours as I worked through the best way to set it up, but I could fit one in less than an hour now. I reckon there's at least double the volume of air coming through the vents, and it can now demist the windscreen in a few minutes, even with the low heat from my cool running 2.5 N/A.

To start, you need to add about 40CM of wiring to the motor. I soldered and covered with heatshrink, then added a couple of bullet connecters to the end. I stripped some of the insulation of the pair of wires that go to the motor (without cutting them) and soldered on another couple of short leads, with bullet connectors.
 

Attachments

  • fanpic2.jpg
    fanpic2.jpg
    27.3 KB · Views: 161
  • fan pic1.jpg
    fan pic1.jpg
    37.9 KB · Views: 121
Now you're ready to remove the heater intake box. Remove the washer bottle (10mm nuts), I was able to leave the hose connected and set it on top of the bonnet as I worked. Remove the strut that the bottle was bolted onto (10mm bolts). Remove the grille on top of the wing - these screws hold the intake in place. Now you can wrestle the intake box out of the vehicle. Now you're ready to wiggle the fan into the box, with the motor facing backwards. Position the fan so that the outlet is level with the rear of the box, drill a 6.5mm hole through the box and on of the fan support legs and bolt it through with a 6mm bolt and nut. Repeat for the other side. drill a hole for the wiring - not in the face of the box as I originally did. I sleeved the wires to protect them.
 

Attachments

  • heaterintake1.jpg
    heaterintake1.jpg
    64.5 KB · Views: 129
  • faninbox1.jpg
    faninbox1.jpg
    54.9 KB · Views: 132
  • faninbox2.jpg
    faninbox2.jpg
    81.3 KB · Views: 132
The standard heater, heatwise, is great on mine.
More wind sounds good though but a bit worried that it might cool the matrix down too much?
After all, Landrover boffins designed the standard heater to be the best and cutting edge technology too at the time.
Lol!
 
You're now ready to wrestle the intake box back into place - don't forget the seal between the intake box and the original heater, a bit of foam will do if it's missing. I tried a few different wiring options, but found it best to remove some insulation from the two wires that go to the original motor, solder on a couple of short leads and wire this motor in parallel with the original. This give both fans blowing, with two speeds. If you disconnect the original fan but don't remove it, it blocks the air flow considerably. lastly, change the original 10amp fuse for a 15amp, to cope with extra load. (Some PO had fitted a 35amp one for me - nice)
 

Attachments

  • heater plug.jpg
    heater plug.jpg
    37.2 KB · Views: 139
As you say Flossie, if you remove extra heat from the system, if the thermostat doesn't work well, the engine will get colder. The air doesn't have to be very warm to demist the screen, so this is a major improvement for that function.
 
Back
Top