timc1967's 110 slow project

This site contains affiliate links for which LandyZone may be compensated if you make a purchase.

timc1967

Active Member
Posts
444
Location
Essex
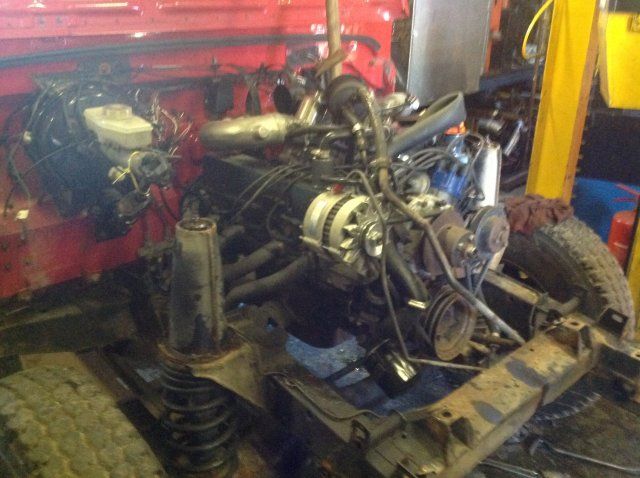
Since I tried and failed to do a chassis swap on my dear old Series IIa way back in the 90s, I commissioned a tame ex-mil mechanic to do the chassis swap on the 110 wot I purchased last November.

I was happy to see some progress today.

attachment.php


I hope the pic is of interest. Its a V8 conversion done by Keith Gott back in 2002 ish. Engine is 4 litre V8 ex TVR factory land rover. At risk of sounding like a chump, I have no idea even if its a low or high compression unit.
 

Attachments

  • photo 3 - Copy.JPG
    photo 3 - Copy.JPG
    57.8 KB · Views: 596
billy no mates here with an update on my 110

I checked out the engine number and it is a high compression engine. Hopefully it will move well.

Here's the latest pic

attachment.php


In the background, bulkhead removal in progress.
 

Attachments

  • 20140405_101936a.jpg
    20140405_101936a.jpg
    84.2 KB · Views: 496
Bored with waiting for my hard top chassis swap to complete I have bought a 110 CSW off a forum member. I needed it quick so the timing was right. Will be using it to shift some parafinalia over the weekend. Project-wise it will be keep it on the road maintenance, whereas for the red one featured here it will be a labour of love.
 
Been driving it today and yesterday. Its running great. Amazing since it hasnt been on the road for 2 years

I have been working on trimming the rear interior sticking in closed cell foam and automotive trimming carpet on top. This has been hard work so many angles and surfaces, due to the rear seat conversion. I made up a dropin piece of carpet stuck to foam for the 2nd row footwell but unfortunately left it on the roof when i went for a test drive. Been round again and fear it is lost for ever.

The rear seats have all the space you could want, which is better than my CSW, and putting standard front seats in the back was the best decision possible.

Next Sunday we leave for our caravan holiday (not too far) so I need to keep driving it in case any issues crop up, and also need to finish the trimming out otherwise the kids won't want to ride in the back. Landyglass is coming Wednesday to fit the panel side windows.
 
Finally, at least on the outside this pup is mostly looking how I want it and need it.

attachment.php


The charming Dave of Landyglass was over today and fitting his panel windows and new leccy windscreen.

The project will continue with the interior trimming but these windows are great inside and outside, with nice trims all the way around the opening, it looks like a proper job.
 

Attachments

  • 20140806_163504 - Copy.jpg
    20140806_163504 - Copy.jpg
    202.8 KB · Views: 245
Bit of a late update, I got some wider wheels and tyres
20150530_132251-jpg.120145

It needs wider arches but I have struggled to find ones I like that use the original fixings. Coming soon though!
 

Attachments

  • 20150530_132251.jpg
    20150530_132251.jpg
    50.7 KB · Views: 430
Last summer I constructed a bed in the rear of the truck
20160717_164056-jpg.120147


Its not attached at all, just wedges in - takes about 5 minutes to install or remove.

Doesn't need much support underneath
20160717_164106-jpg.120148


Futon mattress perfect size:
20160719_151424-jpg.120149


And room for the beer keg and cooler:

20160808_090350-jpg.120152
 

Attachments

  • 20160717_164056.jpg
    20160717_164056.jpg
    42.1 KB · Views: 389
  • 20160717_164106.jpg
    20160717_164106.jpg
    48.7 KB · Views: 389
  • 20160719_151424.jpg
    20160719_151424.jpg
    35.2 KB · Views: 370
  • 20160808_090350.jpg
    20160808_090350.jpg
    55.4 KB · Views: 368
This story is pretty much up to date with my 110, but I have a plan to add wider arches as the weather warms up.

The new wheels and tyres in the picture above does not sure how much they protrude from the arches. I bought a set of wide arches from SP but realised to my horror that I would have to drill the bodywork, so my heart simply wasn't in it.

My search continued and I eventually found some universal arches on ebay which I believe will work. You can keep the existing arches to preserve the look, better than shown in the ebay ad, where you can see a Defender with them fitted - I plan to cut them to a more tapered profile than shown. These arches use the original plastic rivet fittings, I have plenty of new ones at the ready. My hope is that these new arches will appear simply as a lip emerging from the standard arches.

There is a video for fitment to a Disco and I will get started at some point this summer when the weather is warm enough to make the arches pliable.
 
This story is pretty much up to date with my 110, but I have a plan to add wider arches as the weather warms up.

The new wheels and tyres in the picture above does not sure how much they protrude from the arches. I bought a set of wide arches from SP but realised to my horror that I would have to drill the bodywork, so my heart simply wasn't in it.

My search continued and I eventually found some universal arches on ebay which I believe will work. You can keep the existing arches to preserve the look, better than shown in the ebay ad, where you can see a Defender with them fitted - I plan to cut them to a more tapered profile than shown
This story is pretty much up to date with my 110, but I have a plan to add wider arches as the weather warms up.

The new wheels and tyres in the picture above does not sure how much they protrude from the arches. I bought a set of wide arches from SP but realised to my horror that I would have to drill the bodywork, so my heart simply wasn't in it.

My search continued and I eventually found some universal arches on ebay which I believe will work. You can keep the existing arches to preserve the look, better than shown in the ebay ad, where you can see a Defender with them fitted - I plan to cut them to a more tapered profile than shown. These arches use the original plastic rivet fittings, I have plenty of new ones at the ready. My hope is that these new arches will appear simply as a lip emerging from the standard arches.

There is a video for fitment to a Disco and I will get started at some point this summer when the weather is warm enough to make the arches pliable.

. These arches use the original plastic rivet fittings, I have plenty of new ones at the ready. My hope is that these new arches will appear simply as a lip emerging from the standard arches.

There is a video for fitment to a Disco and I will get started at some point this summer when the weather is warm enough to make the arches pliable.


'Looked at the wheel arch extensions in the video link, but have to say, and it's only my view, that they don't appear to complement the high standard of work and finish which you have achieved so far. Then again, you do great work and might get a superior look to the guy in the video. It also looked like a lot of work for a small gain, although he obviously could have extended his much more, had he chosen.

The big consolation is that if you don't like them when you have done them, you can always bite the bullet and fit the screw on alternative. Don't like to be negative and it's none of my feckin business o_O ! But,whatever you choose will be good for you. Enjoy your holiday and try not to spill too much from the keg when your going up hills :D
 
That's a good way to treat it, yeh they're not pretty in that picture. I will prob need about 2cm top and rear of the wheel arch. Sounding confident, but who knows when I get started it might not work out. I certainly enjoyed working on the bed frame but I find wood more intuitive to work with.
 
Back
Top