Rear Compartment and storage
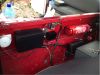
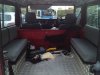
Getting the back of your vehicle sorted out will help no end in keeping you sane on the road. Even on short trips, incessantly unpacking and repacking it just to find your stove will drive you bonkers. But first things first, we had to (reluctantly) lose the bench seats. We were lucky enough to have a checkerplate coated back of the vehicle which makes it pretty rugged for throwing things about in. We went for a simple concept, keeping the heaviest stuff as low as possible, and having things as accessible as their frequency of use
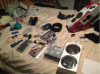
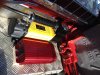
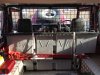
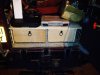
i.e. The stuff thats most likely to be used needs to be easiest to get at. A 70L FrontRunner specialist designed water storage tank sits up against the back of the front bulkhead, which will hopefully keep us out of a sticky situation in the desert! Strapped up against the tank is our hi-lift jack, essential kit for getting out of a mess. Weve used two old airliner aluminium tins that the air hostesses used to keep the dinners in on the plane, for our spares and fluids. Pushed up against the water tank, they fit snuggly between the two wheel-arches and dont really need fixing down especially when theyre loaded up.
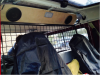
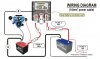
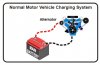
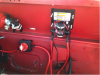
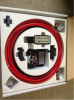
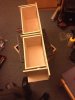
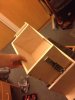
In front of the two aluminium tins, weve got the more accessible tool box a 100L heavy duty stanley toolbox with pretty much every tool we could think of bringing. Essential kit for a land rover The Persuader (Big hammer) and the torque wrench, anything in the engine and the axles is likely to require the torque wrench somewhere in the job and without it you run the risk of sheering some essential bolts. We learnt this one the hard way. In front of the toolbox sits two shallow drawers. In a 110d youd have the space to create deep drawers which can hold tonnes of stuff, but in a 90 youve got more limited space, which is actually not a bad thing. The purpose for the drawers is to be accessible in all situations, whether thats to tow you out of a swamp, or cook up a brew with a back-drop of the himalayas at a moments notice. But only for the immediate bits, the rest of it can be stashed in the rest of the rear compartment. To make the drawers you just need a bit of plywood, some hyperextending drawer runners to get the drawer as open as possible, and a variety of short screws. The basic design is pretty easy, but make sure to put a midline support in between the two drawers for strength and check that it wont foul on the door bracket. Then its pretty straightforward. Weve then got 4 Flatdog Wolf boxes easily stacked, quickly strapped down and secure to shut. Theyre really useful for quick access stuff, and mounted up above the aluminium aircraft tins. A simple dog guard from a discovery is above the aluminium tins mainly to protect us from stuff flying forwards in the event of sharp braking, but also partly as security. Using a combination of ratchet straps helps to keep everything strapped down and secure. And a roof section storage area has been a useful addition for immediate access clothing. In the back, the semi-essential kit of an air compressor is bolted down on the side wheel-arch, accessible to use the extension pipe reaching to each wheel. A power invertor with 1000W constant and 2000W surge rating sits alongside.
")