Tank Fuel Pump Replacement

This site contains affiliate links for which LandyZone may be compensated if you make a purchase.

TAKdriver

Active Member
Posts
621
Location
Beside a field in Midlothian
Thanks to some advice on here I didn't follow the Rave procedure and went through the floor. Highly recommended.
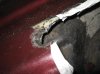
First thing I had to work out was precise location to cut. You'll find that the cradle carrying the tank has an indent on the underside which appears to be for the moulding for the base of the tank where the pump sits.
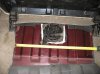
You'll find that the location of the pump is virtually dead centre under the rear seats : I had to cut an opening which went right to the edge of the drop for the change of level from the boot floor .
Watch out because if you don't get your first cut right the surface of the tank is hard against the underside of the floor in the boot.
I'll post some pics later if anybody is interested.
( Should just add that I would have taken ten times longer if CharlesY hadn't come past and kept me right.)
We extracted the pump and find that although the motor runs and fuel is delivered there must be a crack or something which allows some fuel to spew up from the middle of the base of the pump. It failed on me under load.
I'll post some more on this if there's any interest after my new pump arrives and is installed ( hopefully in the next couple of days)I'm going to put a square of mild steel over the hole with self tappers. Much much quicker and easier than dropping the tank and I now have a permanent top access.:D
 
Last edited:
Yea useful write up with picks would be great, i changed mine 2 times now, but yours seems the best
 
Hi.
There are some photos of the same procedure here.

Fuel Pump Access, Replacement and Rebuild ing

I have had the bloody tank off twice now and it is a very unpleasent job....
And it will have to come off again.

Thanks for that M8. There is a difference between my pump and the one in the pic to the extent that the internatl black hose and the white plastic tube that it goes into are not there. I do not know if that is because they have parted company and are still inside the tank or if it is simply a change in design. My old pump is temporarily back in place and I will supply pics when the new one arrives.

I did MUCH less cutting than shown in that website. ( I also did it much uglier !)
The critical point, for me at least, was the first cut with the tank in place. I had downloaded an explodod diagram of the tank and first drilled a 6mm experimental hole (very carefully )after working out where the dip in the moulding should be which holds the pump.
Having done that and being able to feel the shape inside ( with a cable tie !) I then cut a 1" hole with an ordinary hole cutter ( again v carefully making sure the drill running down the centre of the hole cutter was set just proud of the hole cutter.).
That hole enabled me to see exactly where I was and I opened it up with a big pair of tin snips ( specified to be able to cut 1.5mm sheet : (B & Q £15.00) : the rest was just continued hacking as I enlarged the hole now that I could see what I was doing.
I had spent the previous day underneath eyeing up what had to be done to drop the tank. I came to the view that the risks in going in through the floor were worth taking. That turned out to be right and all of the above work, while it sounds like a bit of a pain in the butt is at least being done in the comfort of the back of the truck.
I have everything covered up temporarily right now but will do a full thread with pics when the new pump arrives.


TAK ...........Yer a BRAVE MAN .........I take my hat off to you sir!!!!

I'd have spent 2 Seconds cutting & 3 Hours in the bog Crappin meself!!! & when I'd done it I'd be drivin round "Sniffin" all the bloody time thinkin I drilled a hole in summott ...

WELL DONE THAT MAN!!!:cool::cool::cool::cool::cool::cool:
 
Thanks, I don't know whether to call you Mr. Hoodie or Mr. Claw.
Let's just say if I had screwed up you'd never have heard about it ! The line between insanity and bravery can be a fine one !
Quite seriously, though I spent several hours measuring from underneath and comparing it with the exploded diagram. Now that I've done it I'll see if I can supply an exact location for the first hole. There is a safety margin of about 2" in one direction and sweet FA in the other.
I also figured that if I screwed up and holed the tank the worst that was going to happen was that I would have to buy a new tank and do the job by the book. If it worked it would be a real bonus.
Can't wait for the new pump when I'll post pics and measurements.
 
Yea useful write up with picks would be great, i changed mine 2 times now, but yours seems the best

Hi
Not very good at managing the pics but one shows the danger namely the gap between the underside of the floor and the top of the tank.
The other shows the location and size of the cut with measuring tape. I have others if you need them
 

Attachments

  • IMG_2050.jpg
    IMG_2050.jpg
    230.9 KB · Views: 415
  • IMG_2049.jpg
    IMG_2049.jpg
    239.7 KB · Views: 2,341
Hi
Not very good at managing the pics but one shows the danger namely the gap between the underside of the floor and the top of the tank.
The other shows the location and size of the cut with measuring tape. I have others if you need them


I am thinking about doing this job myself this way. I wanted to ask how much space did you have in between the fuel overflow pipe and the floor?
the overall section looks like 7 inches square. Do you have more pictures?
and where did you get your pump from?

I am thinking about using a nibbler or a dremel.

Is there a neater way to cut the carpet or remove a whole section?
 
I cut an access hatch to replace the fuel pump, but I am wondering how to remove the big six inch nut.... Any ideas?
Also noted that the two nuts for the fuel lines are coroded.. Anything to lookout for?
I will post pictures later.
 
Pump ordered... feeling nervous about the corrosion on the fuel pipes, any one else done this procedure?

I cut the carpet in line with the seat brackets and just folded the whole thing back. Has turned out quite neat.
I also had serious corrosion on the old fuel lines. USE TWO SPANNERS : ONE TO HOLD THE FUEL LINE END RIGID AND DO THE TURNING AT THE TANK SIDE NUT : if you don't you will knk the fuel line.

I wire brushed the nuts, cleaned up and gave a good soaking in WD40.
To undo the large plastic securing ring by tapping with a hammer on a short length of timber until I got a small amount of movement. The pump itself is spring loaded against it and you will find it easier to press gently downwards on the centre of the tank ( I used a crowbar !) whilst unscrewing by hand : I retightened hand tight plus a couple of taps !
Good luck. You've done the hard bit.

when you say pressing down gently, you mean on the pump or the tank? Also the nuts and corrosion the new pump comes with nuts and olives, but how much play is there in the actual lines and where do you position them when removing the big retaining ring and pump?
 
when you say pressing down gently, you mean on the pump or the tank? Also the nuts and corrosion the new pump comes with nuts and olives, but how much play is there in the actual lines and where do you position them when removing the big retaining ring and pump?

I think the lines are clipped onto the front end of the tank : I plugged the ends with a bit oif toilet tissue and wrapped masking tape round to prevent any crud going into the line. The fuel lines can be moved to each side ( Make sure you distinguish between them for flow and return....there's an arrow on the tank end of the connection.)
Re the pressing down I mean on the pump itself. You are basically just holding against the spring in the pump which is pressing up against the retaining ring. You'll find that the pump wants to turn with the ring as you are undoing it. Pressing it down prevents that. I also just laid the large breather to the side.
Put a new jubilee clip on it. The old one on mine was corroded but opened with a little persuasion.
I'll see if any of my other pics have any more help for you.
 
Pics attached (1) showing where I cut my carpet and folded back and (2) showing close up view of top of pump. You can see the flow and return arrows. I actually had more difficulty getting the leccy multiplug off......the Hooded Claw will no doubt say that that's because it's not persuadable with a crowbar.....and he'd be right.
( SORRY CAN'T GET THE PICS ATTACHED.......where's my crowbar ?


I saw them pics you posted a while back TAK.. IIRC I said I'd spend 30 secs with the cutter & 3 hours on the ****house!!!.....

You gotta post em mate (we should make a "Sticky" outta them ....)
 
Back
Top