Sunroof lining done

This site contains affiliate links for which LandyZone may be compensated if you make a purchase.

JamesBB

Active Member
Posts
779
Location
Sandwich. Kent.
For what seems like weeks now I have been preparing for a roof lining fix as per the "how to" by Dopey.

I have had the fibreglass card out for a week or two and propped against the wall in the dining room, and now I think it has started getting in the family's way for day to day living.....

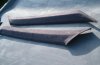
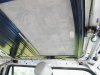
Today I had a bright and early start with my mate banging on the door at 8am, the intention being remove the sunroof on a dry sunny day so I can get the material replaced and do some general maintenance on the drains and mechanism.
Roof was out by 8:30, tea :tea: by 8:40 and then he was on his way to real work.
I spent the day as planned, mate back at 8pm to re-install.

End result was well worth the effort. Followed the "How to" and the next step is the rest of the lining tomorrow unless I get side tracked again.

Material chosen is a light grey suedette type of stuff, looks like the real thing and pillars to be in charcoal. Once done may post pics but certainly need a big thanks to Dopey for the info. :D

Cheers
 
I did mine a few weeks back in a cream suede. It looks good but don't expect it to look like a factory finish. Doing it made me realise why trimmers charge a lot of money, it's not that easy!

Edited to add - I tried some of the megafix suggested on the how to guide however it wasn't very sttong so I went for some brush on Evostick stuff from Homebase instead.
 
Last edited:
I did mine a few weeks back in a cream suede. It looks good but don't expect it to look like a factory finish. Doing it made me realise why trimmers charge a lot of money, it's not that easy!

Edited to add - I tried some of the megafix suggested on the how to guide however it wasn't very sttong so I went for some brush on Evostick stuff from Homebase instead.

No it is not easy, jut the sunroof section alone was tricky, a lot of cutting and trimming to get it right. I found spraying the adhesive into a cup helped to then brush it on around the edges.

I did not use the Megafix either, found some other stuff locally that claims to be for professional use only (saw that after buying it) and it is very sticky.

Did you just brush it onto the lining card and not the material?
I am tempted to do that too to avoid it getting too thick and soaking through.

Thanks
 
Just to add, I had a brand new company Jag 4 or 5 years ago, that was not exactly what I call factory finish in terms of the trim quality. But if I can get 80% as good as that I will be happy.
 
No it is not easy, jut the sunroof section alone was tricky, a lot of cutting and trimming to get it right. I found spraying the adhesive into a cup helped to then brush it on around the edges.

I did not use the Megafix either, found some other stuff locally that claims to be for professional use only (saw that after buying it) and it is very sticky.

Did you just brush it onto the lining card and not the material?
I am tempted to do that too to avoid it getting too thick and soaking through.

Thanks

I brushed it onto the lining card, did a section at a time. Fiberglass is a bit of a nightmare, make sure you wear gloves or you can splinters.
 

Attachments

  • DSC_0017.jpg
    DSC_0017.jpg
    140.2 KB · Views: 259
Yeah that looks great to me.

Did you do the pillars also?

The tight curves on the pillars are an utter nightmare, one attempt totally shot. Try again later.
 
Yeah that looks great to me.

Did you do the pillars also?

The tight curves on the pillars are an utter nightmare, one attempt totally shot. Try again later.

Yes, I did the pillars too and the curves are a bit of a nightmare. Had to redo the first one a couple of times and then got the hang of it. Still need to redo a couple of the rear ones.
 
Looks nice
Im playing with the idea myself. My pillers have been striped to the plastic ready but then the engine realised i was planing something that it wasent involved in, and started demanding the contents of my wallet!
At the moment the roof is sag free but do want to do it in the same material as the pillers when i get round to it
 
Last edited:
What is the trick with the curves? That is not totally clear from the "How to".

Cheers

Start glueing in the middle and then work your way out to the edges. Doing it that way means it's possible to stretch the material slightly into the curves.
 
Some pics of the progress.

Used 1 litre of the Timebond adhesive on the lining. That alone took 8 hours or so.
Two tine grey faux suede.

Dopey did not say how difficult the pillars are, and he missed out the nightmare job about putting it back in.

Mine is only 50% in, left it supported but need to finish fastening it.

Cheers
 

Attachments

  • RR-Roof2.jpg
    RR-Roof2.jpg
    50.6 KB · Views: 188
  • RR-Roof3.jpg
    RR-Roof3.jpg
    42.7 KB · Views: 191
  • RR-Roof5.jpg
    RR-Roof5.jpg
    46.3 KB · Views: 180
  • RR-Roof6.jpg
    RR-Roof6.jpg
    45.7 KB · Views: 173
  • RR-Roof7.jpg
    RR-Roof7.jpg
    33.7 KB · Views: 171
  • RR-Sunroof.jpg
    RR-Sunroof.jpg
    53.6 KB · Views: 177
Had to give up on the pillars that have the tight curves at the top. I just cannot seem to get the fabric around the curve while leaving enough to then go over to the other side at the top. Totally ruined 2 sections of material and had to order another metre. :-(
 
why not get the pillars flocked ?

my head lining was sagging a bit- but i got some push twist pin things, (pin is like a coiled piggy tail) and clear tops, from ebay , a year later its still as good as the day i put them in, and saved a job !
 
why not get the pillars flocked ?

my head lining was sagging a bit- but i got some push twist pin things, (pin is like a coiled piggy tail) and clear tops, from ebay , a year later its still as good as the day i put them in, and saved a job !


Could do, if the latest attempt at covering fails then flock'em I say! :drum:
 
Back
Top