Steve's unexpected Series 3 rebuild.

This site contains affiliate links for which LandyZone may be compensated if you make a purchase.
The only issue I can think of is that expanding foam is quite brittle when cured. In other words it won’t bounce back if clonked with anything. Not that one goes out of one’s way to clonk a new dash of course.
I watch a few model makers on utube and they have all manner of special jollop for building dioramas and the like. Soft stuff, ard stuff, bouncy stuff. Often wondered if they, along with the costume builders had something that might fit the bill.
You're right about it sinking in where it gets knocked. For an experiment i've been pressing on where those two big holes were and it has sunk right in. It's as if all the tiny bubbles and air pockets in it collapse and don't bounce back. I've stretched a piece of the old vinyl over those big holes as they are and you can see the indentation under it. I think i'm happy enough with the foam for all the areas of small, thin repairs like the cracks and little holes but i've got a new plan for the big holes. I'm a proper hoarder of stuff that will 'come in handy' and for once I think something might. I found some dense foam matting in a big sheet in the garage the other day. I've genuinely got no clue where and when I got it but it was probably just happily sitting in a skip somewhere looking forward to it's new life at the bottom of a landfill when along I came and repurposed it. I'm going to see if it can be shaped reasonably well and if so i'm going to cut out the foam in those bad areas and layer it in, shaping as we go. Bonded with puraflex 40 to glue and seal it all round it might be a goer. It feels like the original foam and it springs back when you press it. It's peeing down with rain here so that might be a small job that could be done in my very limited garage space after all todays other chores are done. My back is killing me at the moment though so there's a very big temptation to say bugger it and just sit indoors drinking tea and finishing off easter eggs. We'll see.
 
Last edited:
The cosplay costume makers use a filler between EVA foam joints. I presume it’s extremely flexible and can also be rubbed down but I can’t remember what they call it.
 
Warning! The following post contains scenes of bodgery that some viewers might find upsetting.
View attachment 286305
Nearly there with the repairs on the main section of the dash. (We'll overlook the bit that goes over the wiper motor for now). I had visions of making a lovely curved piece to fit in here but it's a bit more difficult than that.
View attachment 286306
I've decided to make it in two pieces. I haven't got an intact curve to copy so it's art more than science. A lot of cardboard templates and offering up went on before deciding on this and even then it changed slightly in the end.
View attachment 286307
View attachment 286308
I changed my mind a bit as you can see with it not lining up on the right. Next we'll get rid of the rest of the rust.
View attachment 286309
I decided to remove as little as possible but it did leave a very odd shape. Maybe I should have cut more out and made a simpler shape but then i've got less to help me line up the new bit. Too late to worry now.
View attachment 286310
So here it is. I did warn you there was bodgery afoot. The only way I could get the curves to be somewhere near was to cut those slots. It's not quite as bad as it looks as most of the slotted bit will be cut off in the end.
View attachment 286311
View attachment 286312
So not what you would call elegant but it is an approximation of the right shape. I think if I start from the plug weld holes and work my way round clamping in place and welding as I go it should be ok.
Fantastic work there - no bodgery that I can see!😀
 
Last night I did a test and stuck some of my new foam together with the puraflex to see how it would behave. Just had a look and all seems good. Stuck solidly together and hasn't eaten into the foam or anything. Onwards.
 
Time to finalise that corner of the dash.
1683062211540.jpeg

I left plenty of metal spare thinking it would make it easier but still had difficulty getting it to meet up with the curved piece already in place. Not good really but i'd got to the point of keep going and make it work or chop it all out and start again.
1683063185323.jpeg

1683063217530.jpeg

Considerable hammering took place and in the end it became acceptable. It's still the Frankenstein's monster of repairs though.
1683063397156.jpeg

1683063438107.jpeg

I got there in the end but there was more distortion than I expected so I ended up with the top screw hole out of place. More hacking it about and it's back where it should be.
1683064706211.jpeg

1683064749745.jpeg

1683064778970.jpeg
 
Great work! It’s a shame to cover it in vinyl 😀
Thanks. The vinyl and foam are going to be a bit of an adventure. The foam padding is absolutely knackered. Don't know whether to try and save it or just find something completely new. I'm going to have a think.
 
Last bit of dash welding! Don't know if series 3's are supposed to have clocks but a hole had been hacked / chewed into the dash for one. This is the hole after some squaring up.
1683231892012.jpeg

1683231942183.jpeg

And with it all done it's time for another offer up. All the screw holes line up and it looks ok.
1683232031091.jpeg

Might go with @GSF 109 and leave it like that. Rat look dash. :D
Usual Bilt Hamber treatment to keep it right for now.
1683232283800.jpeg

Outside cleaned up but haven't got a picture of it after it was rustproofed.
1683232439797.jpeg

1683232460599.jpeg
 
Last edited:
Next it was time to do the good side of this part of the dash.
1683232639026.jpeg

It doesn't look bad in the photo but I think someone in the past had painted over the rust with some horrible paint and the resulting finish was a pig to get off. I started with one of those vicious twist wire brushes on the grinder but wasn't going through. They would normally have a North Sea oil rig cleaned up but not this time. I took a deep breath and fitted my angriest cup brush. It's just one of those ones with the thin brass coloured bristles but they all spread out when you fire it up and it seems to act like the rotor blades on a helicopter. It's like it's trying to pull the grinder out of your hands. Also it grabs really badly if you happen to catch an edge a bit wrong. My neighbour came over to see what I was up to and made me jump which made me catch the edge and shoot the whole thing up into the air. Very spectacular. Despite the terror it actually works really well and got it super clean with a slightly rough surface perfect for painting.
1683233269032.jpeg

1683233300034.jpeg

A good application of etch primer.
1683233372717.jpeg

I also did the metal bit of the crash pad.
1683233414697.jpeg
 
Talking about the crash pad i've been doing more experimenting. The expanding foam is very good overall and if the damage is not too bad I think it would do. Big areas will definitely sink back a bit though, enough to have a visible dent when the vinyl is on.
1683233604259.jpeg

Hard to see in the photo but the one on the right is worst. So it had to all come out.
1683233701643.jpeg

I found some foam that actually came as part of the packing for a curtain pole from years ago. My 'That will come in handy' theory is vindicated again. It's a bit squashy but won't dent and springs back. It's quite like the foam on the crash pad which is actually pretty hard. I made the holes a bit bigger and squarer. Couldn't do too much with the right one or I wouldn't have had enough foam to fill it. This meant that I had to clean and treat more rust inside. Good news though, I did find the edge of the rust so it can't cover the whole of the dash under the foam.
1683234097830.jpeg

1683234130102.jpeg

The little holes were fairly easy. I squirted the hole half full with Puraflex 40, plugged it with an oversize bit and then sliced it flush the next day.
1683234430351.jpeg

1683234449510.jpeg

The bigger holes were done the same way but because of the weird shapes and different depths I did them in layers.
1683234539320.jpeg

1683234561880.jpeg

1683234590288.jpeg

1683234627103.jpeg

1683234657071.jpeg

1683234678332.jpeg

1683234695621.jpeg

I love that Puraflex stuff so thought I would try using it by itself to fill a couple of last cracks. Works a treat. Squeeze a bead along the crack then smooth with a wet putty knife or just lick your finger and smooth it over. Bonds completely and is about the right feel when it's dry.
1683234945764.jpeg

1683234970243.jpeg

The expanding foam does have a lot of large bubbles in it. I don't think these will cause any problems when the vinyl is finally stretched over but the puraflex will solve that as well.
1683235099411.jpeg

1683235116248.jpeg

I went over the joins between the foam inserts with more puraflex and then because I just don't know when to stop I did a last coat of expanding foam to smooth over everything. I underestimated the expansion this time so went a bit overboard with it.
1683235312813.jpeg

1683235338475.jpeg


1683235360930.jpeg

After a lot of slicing, carving and sculpting here's the finished product. Even I am happy now to say that's enough.
1683235465906.jpeg

1683235484244.jpeg

1683235515891.jpeg

1683235534480.jpeg
 
So that's what it's called. That has got me intrigued. Just been looking into it and I see it can be moulded by heating it. Could be the salvation of the ruined dash covering.
 
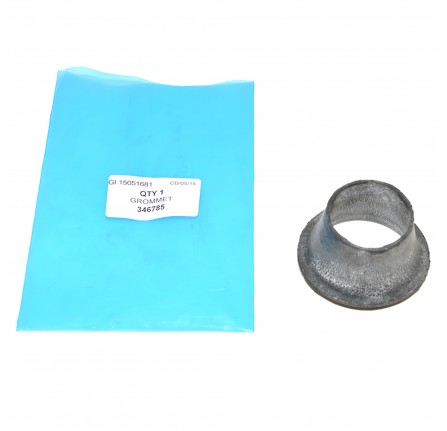
Just found something interesting. Need two of these. One missing altogether and the other is perished beyond redemption.

Seal for Demister Tube SER.3.Part No. 346785​

  • Seal for Demister Tube SER.3.
NOW £8.18 exc. VAT
£9.82 inc. VAT

As you can see £9.82 including the VAT from Craddocks. Paddocks as always are a little bit cheaper at £9.06 Including VAT. Both of those would then have P&P on top unless you make up a big order over 60 quid or similar. Went on to Ebay and saw this

1683798592138.png


Have a look at the sellers name. John Craddock Ltd. Cheaper and free postage for the same thing from the same people. I appreciate I won't be able to retire early on the savings but i'll take anything I can get. Also much handier than having to wait until you need a load of stuff for a big order. How many other items do they do this for?
 
Just found something interesting. Need two of these. One missing altogether and the other is perished beyond redemption.

Seal for Demister Tube SER.3.Part No. 346785​

  • Seal for Demister Tube SER.3.
NOW £8.18 exc. VAT
£9.82 inc. VAT

As you can see £9.82 including the VAT from Craddocks. Paddocks as always are a little bit cheaper at £9.06 Including VAT. Both of those would then have P&P on top unless you make up a big order over 60 quid or similar. Went on to Ebay and saw this

View attachment 288022

Have a look at the sellers name. John Craddock Ltd. Cheaper and free postage for the same thing from the same people. I appreciate I won't be able to retire early on the savings but i'll take anything I can get. Also much handier than having to wait until you need a load of stuff for a big order. How many other items do they do this for?
Make sure you blather them in petroleum jelly or pink grease or they’ll dry out and fall to bits 👍

EVA is a great material. The only issue is it wouldn’t joint well for such a job. You’d have to cover it in one piece.
 
Back
Top