Steve's unexpected Series 3 rebuild.

This site contains affiliate links for which LandyZone may be compensated if you make a purchase.
During a previous trial fit of the seat box I noticed that the fuel tank was sitting too high and that the connections would hit the cover. I should have made my measurements then and made it fit but got side tracked. It meant refitting the sill bar things and seat box again. I used more foam to separate these from the aluminium.
1702990946076.jpeg

1702990967901.jpeg

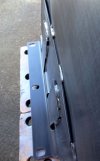
These are an absolute cow to fit at the front bulkhead end. I'm sure that between me getting things slightly out of line with the bulkhead feet and them being made by Britpart in the first place that's where the problem lies. So after lots of swearing and despondency they're back on. Only loosely fitted but i'm hoping they don't have to come back off. Seat box went back on and this showed where I needed to adjust.
1702991258701.jpeg

1702991287464.jpeg

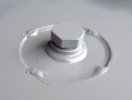
This get's everything out of the way but needs the front tank mounts spacing like this.
1702991351415.jpeg

There's another one to the right of course. And the back mount needs to go like this.
1702991402635.jpeg

I'm sure it's just because the rear mount is a previous owner home brew job. I should have chopped it off in the beginning really. Anyway spacers can now be either bought (if you're not a tight arse) or made (because I am tight arse).
 
No landy progress again but after bragging recently about my fancy new overalls I thought I’d give you a look. Helping my son clear the garden and patio of the remains of this years plants. Far too hot in this mild weather.
B804C5E9-5859-449D-B0DA-00068D6538DE.jpeg
 
Happy new year and welcome back to more of my old nonsense. Here is my source material for these petrol tank spacers. It's the axle for an old trolley jack and it's a bit of tough stuff.
1704748474055.jpeg

I've had a go at an action shot here. Hasn't worked.
1704748604241.jpeg

After much time and some drill bit sharpening we get to here.
1704748724685.jpeg

Anyone with a keen eye will see that it's not 100% true but by it'll do for me.
1704749069198.jpeg

Then I need three of the same thickness for the front and one a bit thinner for the back. This is the bit that I usually have difficulty with. Keeping the cut square taxes my skills. Break out the masking tape.
1704749460465.jpeg

I surprised myself though.
1704749639207.jpeg

1704749676272.jpeg

They seem to work well. I thought this was just a bodge to start with but I can't help thinking that it actually solves a bit of a water and rust trap at the front of the tank. The muck will still get in there but i'll have a much better chance of clearing it out.
1704749918526.jpeg

1704749961162.jpeg
 
Time to prepare the tank next. It's a new one but it's made by Britpart so it's going to need help if it's going to last more than ten minutes. It's full of water traps so i've gone round with the puraflex to try to bung a few up. The paint it has arrived in seems surprisingly good. It's thick and seems willing to stay attached to the metal. I'm going to scuff it up with a bit of scotchbrite and
call it prepared.
1704751277467.jpeg

Scuffed and un-scuffed. The cradle that the actual tank sits in is only partially welded and the welding itself has caused enough warping to allow a good flow water and filth to run in and make itself at home.
1704751461219.jpeg

1704751488086.jpeg

1704751523841.jpeg

1704751558398.jpeg

So after a good going over with the puraflex it looks like this.
1704751686599.jpeg

1704751791232.jpeg

So after the problems on the seat box with puraflex reacting with paint i'm sticking to a primer that I know it gets along with.
1704751984303.jpeg

1704752019911.jpeg

1704752058512.jpeg

1704752111840.jpeg

1704752573833.jpeg

I've got some black stonechip resistant paint that I thought might be good for it's top coat so we'll wee what that looks like soon.
 

Attachments

  • 1704752140955.jpeg
    1704752140955.jpeg
    127.5 KB · Views: 26
  • 1704751636161.jpeg
    1704751636161.jpeg
    159.8 KB · Views: 35
I've also been sorting out the windscreen. Started with these things.
1704753043013.jpeg

1704753089558.jpeg

A bit of a state but they came up well on the wire wheel on the bench grinder.
1704753222487.jpeg

This was the point when I realised that there was a little brass seal round the base. Seems like these are a prime place for water leaking into the cab. I don't know what came over me next but I went looking for a subtle shade of silver to paint them and ended up with a sort of metallic gun metal colour. I flippin love it but it's all a bit blingy for my old banger.
1704753508231.jpeg

Then with the new fittings they end up like this.
1704753587705.jpeg

The gunmetal needed a clear lacquer over it so I came to my senses and used matt finish. These sorts of things really ought to be plated rather than painted because how can you avoid damaging that paint. Maybe one day.
 
Next stage of the petrol tank. We got a halfords voucher as a special offer when we bought something or other so I went to have a shufty at what I could get. I ended up with a can of that stone chip resistant paint to coat the tank in. I really like it.
1706040505744.jpeg

Just how chip resistant it really is remains to be seen. Nothing like that raptor stuff but definitely better than nothing. Has a pleasant texture to it as well.
1706040648409.jpeg

They say it can be left like that or coated over so i'm going for some satin black. At the moment i've just done a small test area as i'm fed up with things reacting and making me more work.
 
Next the saga of the windscreen.
1706041193930.jpeg

Not bad, a bit of patina (rust). I'm not keen on painting the galv bits. It's probably the most sensible solution but it's not for me. Knowing what a fuss arse I am you would probably assume that I would get them re-galved but I don't think there's anyone very local to me that does it. Plus those kind of places don't open at times when I could get to them so I would have to get time off work to drop off and pick up. So my solution is clean it really well, scotchbrite, wire brush, soap and water and then clear lacquer. Will it work? Will it peel off? I don't know. All I can say is that I've done it on the back corner cappings of the tub years ago and they still seem fine and I like the look of them. Admittedly they have been stashed away indoors and not out facing the elements. It's another one of those times where i'll have a go and see what happens. It might help someone in the future to not make the same mistake. This big fat rubber seal was stuck on with a gallon of silicone so you can bet it's been leaky in the past and someone got fed up enough to clear Wickes out of bathroom sealer one Saturday.
1706042063060.jpeg
1706042239007.jpeg

Came off nice and clean in the end.
1706042285008.jpeg

I'm converting it to have push on door seals by removing the lip that holds the original type seals. I don't really like making non reversible alterations like that but it's already such a mongrel it's not too sacrilegious. Plus some previous owner has already done one side. And my word didn't they do a lovely job? Well no actually, they did a bloody awful job that looks like they chewed the edges off. The cack handed buggers.
1706042540788.jpeg

1706042567595.jpeg

1706042604486.jpeg

The other side still had the individual section of seal on it.
1706042698769.jpeg

Here's proof it can be done neatly.
1706042768913.jpeg

Next any exposed metal where the galv had been chopped through got a coat of Bilt Hamber and etch primer. Same for the few rusty spots I found on the bottom rail.
1706042954883.jpeg

1706042997287.jpeg

1706043024402.jpeg

1706043053880.jpeg

1706043076779.jpeg

I know I said I didn't like paint but these bits needed the rust treating somehow and they will all be hidden by seals or the top of the bulkhead later. A bit of silver next so I really hope they are hidden in the end.
1706043250739.jpeg

1706043276143.jpeg

I have to admit that when you see the silver like that it does look quite good. My new found liking for shiny stuff is really turning into a problem. Matt lacquer next. Tones the silver down, coats over it and keeps the old galv protected a bit, maybe.
1706043470614.jpeg

1706043493803.jpeg


Well that was a long one. The post I mean. On to a bit of glazing next.
 
I'm trying to reuse as many old parts as possible. Maybe pushing my luck with the windscreens but there you go. Looks like someone in the past left it a bit too long between wiper blade changes.
1706044564295.jpeg

Some deep scratches but mostly lighter ones as if it's been sanded. I got one of those kits from Ebay with the cerium oxide powder. It was never going to make it look like new again but I was surprised how well it went.
1706044774018.jpeg

Makes a shocking mess though. With the pad attached to the drill and making sure not to heat the glass up too much it's done a good job. I did try going a step further on a very small area and actually sanding deeper with wet and dry but without a proper polisher there was a strong chance I was going to make things worse.
1706045007026.jpeg

Knowing when to stop is key to this job I think. It's miles better than it was, it saves the old glass because that's important to me and it'll do. It's also hard to get a photo showing the scratches that aren't there in a piece of glass. I thought the black background might help but it really doesn't.
1706045164262.jpeg

And as you can see there are still some left.
 
The old sealer was still nice and soft. It's good stuff.
1706045410625.jpeg

But so is this butyl tape. Nice and easy to use and grips the glass like nobody's business.
1706045501852.jpeg

I managed to find just the right size so it hardly needed any trimming.
1706045591260.jpeg

1706045612673.jpeg

1706045654742.jpeg

1706045677833.jpeg

1706045701712.jpeg

I didn't have much faith in those little self tappers to be able to grip enough but actually the really get hold and squish the sealer. I know this is a rash statement but I reckon it might keep the rain out.
 
Let's get it fitted then. A large part actually being refitted? Making progress? Steady sailer!
A nice new seal. Will it do any good?
1706046023766.jpeg

1706046065182.jpeg

Posh brackets.
1706046104944.jpeg

1706046143720.jpeg

And there you go. Aren't they tall? Ages since I saw it like that. Also looks very different under the dust sheets in the garage.
1706046241135.jpeg

1706046268502.jpeg

Looking like that will only make the neighbours ask me even more about how i'm getting on with the 'jeep'. :eek:
 
Let's get it fitted then. A large part actually being refitted? Making progress? Steady sailer!
A nice new seal. Will it do any good? View attachment 308642
View attachment 308643
Posh brackets.
View attachment 308644
View attachment 308645
And there you go. Aren't they tall? Ages since I saw it like that. Also looks very different under the dust sheets in the garage.
View attachment 308646
View attachment 308647
Looking like that will only make the neighbours ask me even more about how i'm getting on with the 'jeep'. :eek:

Lovely job pal, it looks superb well done. :cool: :cool:
 
Back
Top