Steve's unexpected Series 3 rebuild.

This site contains affiliate links for which LandyZone may be compensated if you make a purchase.
Doors. Had a final fit and then prep and prime.
DSC00042.jpg
DSC00041.jpg

I made a gadget to hold them while I primed them. A couple of big bolts though a bit of wood that go into the holes where the door tops fix on. Let me get round them and move them until they dried.
DSC00470.jpg
DSC00480.jpg
DSC00482.jpg
 
Last edited:
Steering. Could have been more thorough with this and replaced more parts. Had to go sensible in the end. It's all serviceable if not perfect.
DSC08555.jpg

That's Steamwally on the laptop. Really helps.
DSC08556.jpg
DSC08559.jpg
DSC08561.jpg
 
Next with the help of my roof removal technical consultant, off comes the roof again. Here's something new, a short time lapse video. It's on my son's youtube channel so don't forget to like/comment/subscribe. Also I can't be responsible for any of the other content of the channel (even though as his dad I probably should be).
 
Just to illustrate how long i've been at this project compare if you will the picture above of my son last week with this one of him the day after I got the land rover.
DSC06772 (2).JPG

I have been working on it for half his life! I've got to get this finished.
 
Petrol tank. Had a right to and fro over this as to whether to try to save it. At the beginning I was very cocky about it and just decided i'd get a new one when the time came so didn't take too much care over storing it. Fast forward years and the reassembly is starting to cost the earth so I had a think about saving it.
View attachment 274470
Didn't look terrible. Had a bit of a scratch and scrape at it and could see some shiny metal showing through in a couple of places. What about inside though?
View attachment 274471
View attachment 274473
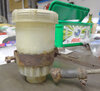
Maybe not the end of the world? The cost of the new ones and hearing the stories of how they never fit anyway made me decide to throw a drop of Bilt Hamber deox c in. I thought if that would get rid of the rust on the inside I could face tackling the outside. And it worked a treat. I only used a couple of pints and tilted the tank to have an experiment in one corner but it was good. So I mixed up enough deox to fill the tank about an inch deep thinking I would let it sit for 24 hrs then tip it to one side and repeat going round the whole thing doing each internal surface. Brilliant plan until I came back next morning to adjust and found there must be a leak somewhere between the botton of the tank and that cradle thing that it's partly welded to. So the tank is a goner and I now have a very, very clean stripe of garage floor and drive just outside where it tried to drain away. Managed to salvage most of the deox though and the new tank is here. And it doesn't fit.

had a leak on mine and got it sorted with some epoxy putty and fibre glass after separating the cradle it’s kind of soldered on , I coated the inside with some POR tank sealer after hand cleaning
AD0F4EB1-4858-42A1-B30F-AA47C4C56660.jpeg
342F8DDC-D2B6-4430-9540-9DEA69F78471.jpeg
 

Attachments

  • 66F76FC7-0368-46BA-B1B4-D1CE0C3A6113.jpeg
    66F76FC7-0368-46BA-B1B4-D1CE0C3A6113.jpeg
    514.9 KB · Views: 62
Last edited:
That looks good. Also keeping the original means it should fit. The cradle is a sure fire water and rust trap. I'm thinking of sealing all round it on my new one but then there's a chance of still getting water in and leaving nowhere for it to get out.
 
Started reading all your progress and then had to join in when I read the Manfred ex prisoner of war. Our village had Heinz, also a u-boat engineer who never went back to his motherland. Sadly passed away now but he was a genius mechanic and could make anything!
 
The drivers side quarter panel has been loosely in place for ages. Time to make it permanent. This is the side that had some crash damage so things weren't that easy.
DSC00512.jpg
I did manage to get a good fit though. The repair panel is a britpart one but despite that it was a good fit. A bit of hammering was needed for that tight corner but that's all. There's very little you can do about where it fits really as it slots into the tub and that's that. All you can do is keep the gap constant top to bottom. At the bottom where there is no adjustment the gap is 92cm so that's what I made it at the top.
DSC00521.jpg
 
I cleaned up the bits that I wasn't going to be able to get to later.
DSC00537.jpg

I looked at loads of pictures to decide where all the rivets and things should go. None of them seemed the same so in the end I put things where they came off the old one or where I liked them best.
DSC00636.jpg

Have a look at the galvanised cappings. I had already made up my mind that I was just going to scotchbrite them and spray them with clear lacquer. I like the look of the rusty bits but want to slow down the deterioration. That was the plan until I started making such an effort to get the paint looking good. Now I don't know if they will look naff on decent paint. I'm thinking of getting them galvanised again but the nearest place I know is in Hull.
 
The other side was original. All as it was when it left the factory and a lot straighter.
DSC00545.jpg

You can see where it has had a coat of red/bergundy paint. That is where there was a number plate light fitted but the number plate itself was fitted the other side with another light so again I don't know what is actually correct. I didn't want to drill out the spot welds and leave loads of holes on this side so sliced the panel off to leave the welded strip in place.
DSC00561.jpg
DSC00567.jpg

This meant I could peel it back bit at a time, see where all the spot welds were and deal with them one at a time.
DSC00569.jpg

DSC00588.jpg

Got the panel fitting well again and got putting some rivets in.
DSC00640.jpg
 
I had been watching CSM retro restorations on youtube and he bonds and seals these panels with Puraflex 40 so I thought i'd have a go with it. He puts it on the edges that will meet and then slides the panel in. Trouble is that scrapes a load of it off so I put it on the panel rather than the lip of the bulkhead. That way you can hold it off until the last second then squash the sealer keeping it in place. Then you rivet it in place and it really grips. The secret down the outside edge is chopsticks. I bought them years ago thinking I would be cool and only eat my takeaways with them. That got to be far too time consuming and left my sweet and sour going cold so they got relegated to the garage. Their tapered ends are perfect for spacing the panel apart while you squidge the sealer in.
DSC00735.jpg

DSC00736.jpg

Then starting from the top to get the best fit on the tricky corner bit you just take out the chopsticks and rivet.
DSC00740.jpg
 
The bolts that go through the tabs on the rear crossmember should go into a plate with captive nuts on but of course these were long gone on mine. I had decided that regular nylocs would do but as I got fitting these quarter panels it was obvious that the captive nuts would be better. If you can get them at all they seem to be about £6 each and you need five of them. I'm far too mean to pay that so I made some.
DSC00684.jpg

DSC00687.jpg
DSC00709.jpg

They are welded both sides but on the outside I ground them down a bit to neaten them up.
 
At least stripping the paint isn't too difficult. This is how the top layer of green peels off.
DSC00697.jpg

Finally for now here's my new helper. This is Freddy. He lives next door but every time i'm working on the landy he seems to be out there with me.
DSC00580.jpg
 
More small and random bits of progress.
DSC08323.jpg

The bottle was already sorted but I didn't really think I could save the ring/clamp thing. I put it in the old Bilt Hamber stuff just in case.
DSC00727.jpg
Still pitted but got rid of all the rust. Could have used filler to make it smooth but even i'm not that bad.
DSC00874.jpg
Better than how it started.
 

Attachments

  • DSC08323.jpg
    DSC08323.jpg
    273.7 KB · Views: 46
More puraflex 40 used as sealer round those quarter panels. In the tub and under the wheel arch.
DSC00836.jpg

DSC00838.jpg
DSC00841.jpg

All hidden places so more bothered about getting plenty in to seal rather than looking too pretty.
 
Back
Top