Squiddy's Series 2A

This site contains affiliate links for which LandyZone may be compensated if you make a purchase.
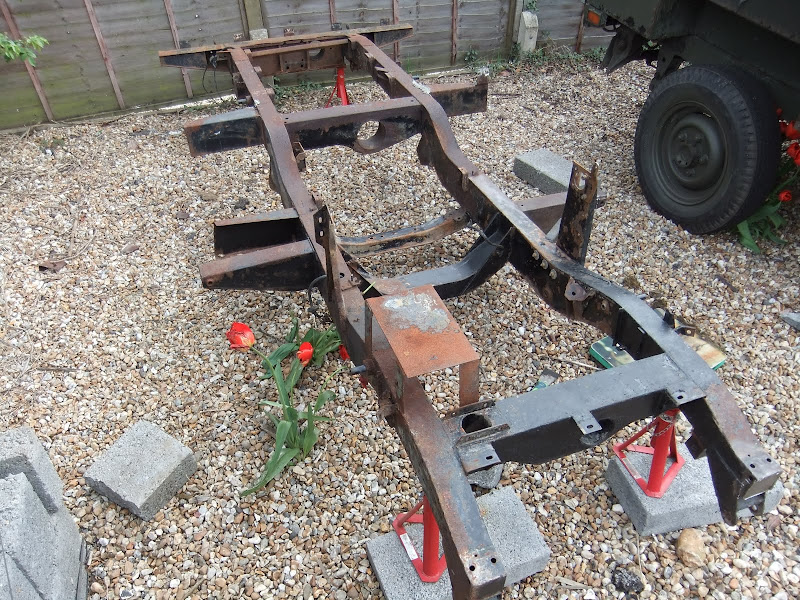
Definitely not racing anyone with this - I think this is going to take a while!

With regard to the paints - the primer is called Corroless S Primer - have a look here: Corroless It's very clever stuff - basically it stabilises existing rust, and then cures to create an impermeable barrier to stop further rust. It's not cheap, but you get what you pay for I reckon. The black paint is just chassis black from Frosts - Classic car restoration, Kit Cars & motorcycle restoration tools and equipment

I also have a box of goodness from Dinitrol - Rust prevention | Rust treatment | Rust proofing from Dinitrol UK supplier - I'm using their rust converter and chassis wax inside the chassis. But I'm waiting for some better weather before I start on that.
 
come on neil get with the times lol... thanks for all that squiddy,,,,, it is a bit pricey but maybe worth investing in... i am currently using simmonz paints which are quiet good on body parts but not sure about working parts or engine etc.... will have to sweet talk our lass into getting some for her birthday along with the welder she wanted lolololol
 
Can't believe it's April and I've done sweet FA on the Series 2A so far this year. Bad man! :eek:

So yesterday I finished stripping the chassis - I'd left a few bits attached as they had proved stubborn b*****ds to remove last time I tried.... and guess what? A few more months sat outside in all weathers hadn't improved the situation! So with the help of Mr Angle-Grinder, I got the engine and gearbox mounts off, the brake lines, the handbrake, axle bump-stops, and the tow bar.

So with everything now removed I gave the chassis it's first proper clean with the pressure washer, just to get rid of loose dirt, flakey paint and so on. It's not in bad condition for a 41 year old motor - I've identified three places that will need a bit of patching, but nothing to get worried about. It's already had a new rear crossmember fitted in the past so that's all good.

Hopefully today I'll be able to degrease it (engine and gearbox crossmembers were well "protected" with thick oil and grease!) and then clean up the rotten areas ready for welding.

Apologies for the lack of photos - I'll take some when I start repairing the thing :)
 
Went laning in the morning, so only got as far as degreasing everything. Still, it's made a big difference to the appearance of the chassis.

As an aside, I've been pondering the "Trigger's Broom" nature of a Land Rover chassis. Mine has already had a new rear crossmember and four new outriggers. Given that the front of the chassis can also be replaced - it's possible that without actually buying a new chassis, you could end up replacing the whole thing anyway!
 
!!!Dodgy welding alert!!!

Don't shoot me - welding isn't my strong point. :eek: I managed to get some time to work on the chassis today. There were three holes that needed fixing (there may be more, that's all I've found so far).

Front nearside dum-iron
DSCF0020.JPG


Nearside bulkhead outrigger
DSCF0022.JPG


Nearside rear axle bump-stop
(Dammit - forgot to take a "before" photo)

And in reverse order....
The bump-stop section took a couple of attempts - I thought I'd cut enough out but it was still way too thin so I extended my repair. I still need to make a pad for the bump-stop to sit on.
DSCF0026.JPG


The outrigger wasn't too bad - I learnt from my earlier experience and made sure to cut out all the metal that wasn't just rotten, but dangerously thin too. So I ended up with a larger hole.
DSCF0029.JPG


The front dumb-iron looked like it was just the very front that needed a repair. But when I cut that out, the sides and bottom were also rusted through from the inside. And the tubes which the bumper bolts go through were also on the way out. I know replacement dumb-irons are available, but I decided this was still repairable, so I wire-brushed all the rust out from the inside, treated everything with Jenolite, and then cut some little bits and pieces to repair it.
DSCF0027.JPG


The chassis is pretty close to being ready for painting now. I need to wire brush it all, but as far as I can see now there's no more repair work to be done. Having said that, I've decided to replace the suspension bushes so that's gonna be fun. Not!
DSCF0031.JPG
 
is it an optical illusion or is the fuel tank outrigger running uphill?
and how has that plant not been trodden on and flattened !?!
lol - yeah, must be an optical illusion from using a wide-angle lens. The outriggers on that side have all been replaced at some point in the past, but everything fitted when I took the Landy apart so I'm not gonna start worrying that things don't line up!
As for those tulips - they grow up through the gravel every year, no matter how much abuse they get. This year they've been stomped on, had the chassis resting on them, and also been covered in degreaser - I bet they still come back next year!
 
Keep going squiddy! Slowly slowly catchy monkey and all that :)

That's some decent welding you've done there too mate, very neat stuff. You'll soon be reaching that half way stage where you stop taking things and off and start bolting things back together. What's next after the chassis gets painted?

Tom
 
Once the chassis is all painted up, the next "goal" is to build up a rolling chassis again. So that means stripping and rebuilding both axles. I've always said there's no target date for getting this back on the road - it'll happen when it happens. :)
 
yeah its looking real good at the moment, much further on than i am, i have thrown all timescales outta the window and it will be done when its done. keep the pics coming it might inspire me a bit more....
 
I started stripping down the rear axle as I had hoped it would be a relatively straight forward job - disassemble / clean / paint / reassemble.

Firstly, I couldn't find my hub nut spanner and all the shops are shut so couldn't do much more than get the brakes off and half-shafts out. Took the diff out - it looks to be in decent shape.

Before...
DSCF0033.JPG


Coming apart...
DSCF0038.JPG


Diff - looks to be in fine fettle...
DSCF0042.JPG


Now for the bad news - the strengthening "gusset" on the nearside of the axle has some serious rot.
DSCF0043.JPG


Apparently, if it's this bad on the outside, the inside will be a lot worse. So I attacked it with the angle grinder today to see what was underneath...
DSCF0044.JPG


I was concerned that the rust might have also penetrated the axle casing itself - but I carried on with the grinder and wire brush to get back to decent metal. It looks like I've been lucky...
DSCF0047.JPG


Once the hubs are off, I'll finish wire brushing the casing and then get it painted up. I've just ordered a box of bits for the axle rebuild - it'll be good to put something back together for a change!
 
look at pinion teeth they show wear first ,teeth will have scratch looking marks if worn ,and outer brg next to diff flange
All teeth look in good condition - no scratching or scoring. The oil that came out looked good too. Although 40 years old, I don't get the impression this vehicle has done a huge mileage. It's just been allowed to rot more than I would have liked! Still, I've seen a lot worse - and hopefully I've found most of it now... (famous last words!)
 
nothing worse than not having the right tools or not been able to find the tool you just had in your hand mins ago, i am working with very limited tools but have decided that i will be getting a air compressor with lots of tools to go with it. (buying it for the step daughters 21st and the other halfs xmas present)
 
Back
Top